下一篇:kotlin+anko自定义view进阶篇(二)
开篇
我最近在学习Kotlin+Anko组合开发Android App。如何用Kotlin+Anko自定义控件,网上的资料不但少,而且还很凌乱。经过一段时间的摸索我大概掌握了这娘们的脾气了。今天就教童鞋们如何用Kotlin+Anko自定义控件。
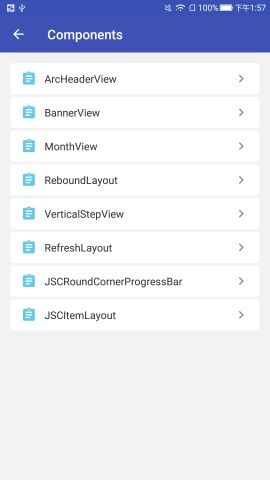
效果图
实现
- 1、kotlin自定义view(横向排列三个控件:ImageView、TextView、ImageView):JSCItemLayout.kt
class JSCItemLayout : FrameLayout, IBaseView {
    //私有成员
    private lateinit var iconView: ImageView
    private lateinit var labelView: TextView
    private lateinit var arrowView: ImageView

    constructor(context: Context) : this(context, null)
    constructor(context: Context, attrs: AttributeSet?) : this(context, attrs, 0)
    constructor(context: Context, attrs: AttributeSet?, defStyleAttr: Int) : super(context, attrs, defStyleAttr) {
       //init(context)要在retrieveAttributes(attrs)前调用
       //因为属性赋值,会直接赋值到控件上去。如:
       //调用label = ""时,相当于调用了label的set方法。
        init(context)
        //retrieveAttributes(attrs: AttributeSet)方法只接受非空参数
        attrs?.let { retrieveAttributes(attrs) }
    }

    override fun init(context: Context) {

    }

    override fun retrieveAttributes(attrs: AttributeSet) {

    }
}
我抽象出来一个接口:IBaseView.kt
interface IBaseView {
    //用来初始化view视图
    fun init(context: Context)
    //用来接收xml文件中的自定义属性
    fun retrieveAttributes(attrs: AttributeSet)
}
- 2、实现
init(context: Context)方法:
override fun init(context: Context) {
        val layout = LinearLayout(context)
        layout.orientation = LinearLayout.HORIZONTAL
        layout.gravity = Gravity.CENTER_VERTICAL
        addView(layout, LayoutParams(LayoutParams.MATCH_PARENT, LayoutParams.WRAP_CONTENT))

        iconView = ImageView(context)
        layout.addView(iconView, LinearLayout.LayoutParams(LinearLayout.LayoutParams.WRAP_CONTENT, LinearLayout.LayoutParams.WRAP_CONTENT))

        labelView = TextView(context)
        labelView.leftPadding = dip(12)
        labelView.rightPadding = dip(12)
        labelView.maxLines = 1
        layout.addView(labelView, LinearLayout.LayoutParams(0, LinearLayout.LayoutParams.WRAP_CONTENT, 1f))

        arrowView = ImageView(context)
        layout.addView(arrowView, LinearLayout.LayoutParams(LinearLayout.LayoutParams.WRAP_CONTENT, LinearLayout.LayoutParams.WRAP_CONTENT))
    }
此时视图已经创建完了,只是现在所有的视图控件都是系统默认属性。
- 3、添加自定义属性
attr.xml
在JSCItemLayout.kt中声明属性字段,并在各个属性的set()方法中添加属性到相应的控件上去。
@DrawableRes
    var icon: Int = 0
        set(value) {
            field = value
            iconView.imageResource = value
        }

    var label: CharSequence? = null
        set(value) {
            field = value
            labelView.text = value
        }

    var labelTextSize: Float = 0f
        set(value) {
            if (value > 0) {
                field = value
                labelView.textSize = value
            }
        }

    @ColorInt
    var labelTextColor: Int = 0
        set(value) {
            field = value
            labelView.textColor = value
        }

    @DrawableRes
    var arrowIcon: Int = 0
        set(value) {
            field = value
            arrowView.imageResource = value
        }
到了这里,完全可以以kotlin语法调用constructor(context: Context)创建控件并使用。For example:
    var itemLayout = JSCItemLayout(context)
    itemLayout.label = "label"
    itemLayout.labelTextColor = 0xff333333.toInt()
    ...
如果想在xml中使用并有预览效果,这还不够,我们需要实现retrieveAttributes(attrs: AttributeSet)方法。
override fun retrieveAttributes(attrs: AttributeSet) {
        val typedArray = context.obtainStyledAttributes(attrs, R.styleable.JSCItemLayout)
        val v1 = typedArray.getResourceId(R.styleable.JSCItemLayout_icon, 0)
        if (v1 != 0)
            icon = v1
        label = typedArray.getText(R.styleable.JSCItemLayout_label)
        labelTextSize = typedArray.getFloat(R.styleable.JSCItemLayout_label_text_size, 14f)
        labelTextColor = typedArray.getColor(R.styleable.JSCItemLayout_label_text_color, 0xff333333.toInt())
        val v2 = typedArray.getResourceId(R.styleable.JSCItemLayout_arrow_icon, 0)
        if (v2 != 0)
            arrowIcon = v2
        typedArray.recycle()
    }
ok,到此,自定义控件已经完成了。接下来我们要如何在Anko和xml中使用。
使用
- 1、在Anko中使用:
声明控件(我们可以专门建一个kt文件来管理我们自定的view):RegisteredComponents.kt
inline fun ViewManager.jscItemLayout() = jscItemLayout {}
inline fun ViewManager.jscItemLayout(theme: Int = 0, init: JSCItemLayout.() -> Unit): JSCItemLayout {
    return ankoView({ JSCItemLayout(it) }, theme, init)
}
Anko调用:
jscItemLayout {
    icon = R.drawable.xxx
    label = "JSCItemLayout"
    labelTextColor = Color.Blue
    labelTextSize = 16f
    arrowIcon = R.drawable.xxx

    //其他属性
    ...
 }
- 2、在xml布局文件中使用:
源码
这里是我自学Kotlin和Anko的示例,也是一个简单的App框架,后期我们会慢慢完善这个示例框架。感谢童鞋们的多多关注!
示例传送门————https://github.com/JustinRoom/MyKotlinAnko
篇尾
一个人摸索不容易,你的爱心和关注是我坚持的动力!QQ1006368252。
巴菲特说,“人生就像滚雪球。重要的是发现很湿的雪和很长的坡。”
