MYS-6ULX-IOT 开发板测评——支持 RTL8188 WiFi 模块
WiFi 模块
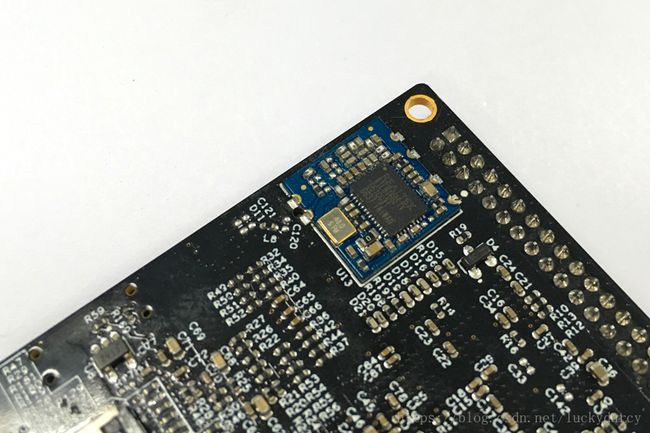
MYS-6ULX-IOT 开发板与 MYS-6ULX-IND 的区别,除了一个是商业级微处理器,一个是工业级微处理器之外,另一个显著的区别就是 MYS-6ULX-IOT 上还搭载了 USB WiFi 模块。

WiFi 内置芯片型号为 Realtek 公司的 RTL8188ETV,天线座子型号为泰科 1566230-1,默认配备一根天线,开发者也可以根据自己需要选择合适的天线来使用 WiFi 功能。由于 i.MX6ull 的资源限制,USB WiFi 模块连接到的是 Hub 芯片扩展的 USB 端口,具体电路连接情况如下:

构建系统
前面我们通过 bitbake core-image-minimal 构建了一个 MYS-6ULX-IOT 最小版本的 Linux 发行版。但是这个版本并不包含 RTL8188 WiFi 模块的驱动,因此我们还需要做一些工作,以便能够驱动该模块,实现无线网络通讯。
进入 Yocto 根目录,如果还没有构建 minimal 的系统,那么执行:
$ DISTRO=myir-imx-fb MACHINE=mys6ull14x14 source fsl-setup-release.sh -b build-myir如果已经构建过,则执行:
$ source setup-environment build-myir执行完成后自动切换到 build-myir 目录,接下来我们看一下除了 minimal 镜像,MYiR 还为我们提供了什么:
$ tree -L 3 ../sources/meta-myir-imx6ulx/可以看到,在 recipes-core/images 目录下有 core-image-base.bbappend 和 core-image-minimal.bbappend 两个配方。其中 core-image-base.bbappend 的内容如下:
IMAGE_INSTALL += "imx-kobs \
    tslib-calibrate \
    tslib-conf \
    tslib-tests \
    bzip2 \
    gzip \
    canutils \
    dosfstools \
    mtd-utils \
    mtd-utils-ubifs \
    ntpdate \
    vlan \
    tar \
    net-tools \
    ethtool \
    evtest \
    i2c-tools \
    iperf3 \
    iproute2 \
    iputils \
    udev-extraconf \
    rpm \
    iperf \
    openssh \
    openssl \
    v4l-utils \
    ${@base_contains("MACHINE", "mys6ull14x14", "rtl8188eu-driver", "", d)} \
    alsa-utils \
    myir-rc-local"
我们发现其中包含了 rtl8188eu-driver 驱动,那么我们就开始构建 base 系统吧:
$ bitbake core-image-base在构建过程中遇到了错误,这里摘取一部分错误提示:
ERROR: rtl8188eu-driver-0.1-r0 do_install: oe_runmake failed
ERROR: rtl8188eu-driver-0.1-r0 do_install: Function failed: do_install (log file is located at /home/rudy/workspace_hd/IoT/MYS-6ULX-IOT/04-Source/fsl-release-yocto/build-myir/tmp/work/mys6ull14x14-poky-linux-gnueabi/rtl8188eu-driver/0.1-r0/temp/log.do_install.29532)

Log data follows:
|  DEBUG: Executing shell function do_install
|  NOTE: make -j 4
   KERNEL_SRC=/home/rudy/workspace_hd/IoT/04-Source/fsl-release-yocto/build-myir/tmp/work-shared/mys6ull14x14/kernel-source
   DEPMOD=echo
   INSTALL_MOD_PATH=/home/rudy/workspace_hd/IoT/04-Source/fsl-release-yocto/build-myir/tmp/work/mys6ull14x14-poky-linux-gnueabi/rtl8188eu-driver/0.1-r0/image
   CC=arm-poky-linux-gnueabi-gcc -mno-thumb-interwork -marm -fuse-ld=bfd
   LD=arm-poky-linux-gnueabi-ld.bfd
   O=/home/rudy/workspace_hd/IoT/04-Source/fsl-release-yocto/build-myir/tmp/work-shared/mys6ull14x14/kernel-build-artifacts
   modules_install
|  #install -p -m 644 8188eu.ko /lib/modules//kernel/drivers/net/wireless
|  make -C /home/rudy/workspace_hd/IoT/04-Source/fsl-release-yocto/build-myir/tmp/work-shared/mys6ull14x14/kernel-source M= modules_install
|  make[1]: Entering directory '/home/rudy/workspace_hd/IoT/04-Source/fsl-release-yocto/build-myir/tmp/work-shared/mys6ull14x14/kernel-source'
|  make[2]: Entering directory '/home/rudy/workspace_hd/IoT/04-Source/fsl-release-yocto/build-myir/tmp/work-shared/mys6ull14x14/kernel-build-artifacts'
|  cp: cannot stat './modules.order': No such file or directory
|  /home/rudy/workspace_hd/IoT/04-Source/fsl-release-yocto/build-myir/tmp/work-shared/mys6ull14x14/kernel-source/Makefile:1123: recipe for target '_modinst_' failed
|
经检查、分析,错误出现在构建 rtl8188eu-driver 驱动过程中 modules_install 失败了,其中 M 的值居然是空。于是找到该驱动源码的 Makefile,路径为:tmp/work/mys6ull14x14-poky-linux-gnueabi/rtl8188eu-driver/0.1-r0/git/Makefile。定位到 module_install,内容如下:
modules_install:
    #install -p -m 644 8188eu.ko $(MODDESTDIR)
    $(MAKE) -C $(KERNEL_SRC) M=$(SRC) modules_install
虽然 M=$(SRC),但 SRC 却没有定义(可能是从环境变量或上层 Makefile 传过来吧)。不管怎么样,在构建过程中确实出错了。
我们看一下 rtl8188eu-driver 软件包的源路径:
$ bitbake -e rtl8188eu-driver | grep ^SRC_URI
SRC_URI="git://github.com/MYiR-Dev/RTL8188eu-driver;protocol=https;branch=master"
然后找到 GitHub 上,OMG!发现是这样的:
modules_install:
    #install -p -m 644 8188eu.ko $(MODDESTDIR)
    $(MAKE) -C $(KERNEL_SRC) M=$(PWD) modules_install
明明是 PWD 而不是 SRC 啊!
检查配方文件:sources/meta-myir-imx6ulx/recipes-kernel/rtl8188eu-driver/rtl8188eu-driver_0.1.bb,看看 SRCREV 的值对不对,或者直接把本地 Makefile 改过来。
OK,重新 bitbake core-image-base 一下,这次构建成功了!
WiFi 测试
更新系统后,上电启动 MYS-6ULX-IOT,登录 Linux Shell。检查驱动:
root@mys6ull14x14:~# lsmod
Module                  Size  Used by
8188eu                758430  0
执行 ifconfig -a,看到增加了 wlan0 网卡:
wlan0     Link encap:Ethernet  HWaddr a0:2c:36:e7:22:52
          BROADCAST MULTICAST  MTU:1500  Metric:1
          RX packets:0 errors:0 dropped:0 overruns:0 frame:0
          TX packets:0 errors:0 dropped:0 overruns:0 carrier:0
          collisions:0 txqueuelen:1000
          RX bytes:0 (0.0 B)  TX bytes:0 (0.0 B)
看起来 WiFi 模块已经准备就绪了,接下来可以测试了。实际上 RTL8188 WiFi 模块支持 Client 和 AP 模式,本文只进行 Client 测试。
首先,使用 wpa_passphrase 生成对应 WiFi 热点 SSID 的密码配置文件,执行以下命令:
# wpa_passphrase "LittleFlowerPig" >> wifi.conf然后输入对应的密码。生成的 wifi.conf 文件内容如下:
# reading passphrase from stdin
network={
        ssid="LittleFlowerPig"
        #psk="100%100%100%"
        psk=5d19fc4a6dc4beebe01c9be29cd613227d84609c871aff37c0c82460410c94c4
}
接着使用 wpa_supplicant 命令,使 MYS-6ULX-IOT 的 WiFi 模块连接到 WiFi 热点:
# wpa_supplicant -D wext -B -i wlan0 -c wifi.conf然后,使用 udhcpc 获取 ip 地址,这样就可以使用了
# udhcpc -b -i wlan0 -R连接成功,ping 一下我的网站吧:
# ping www.luckydarcy.top
PING www.luckydarcy.top (120.78.197.79) 56(84) bytes of data.
64 bytes from 120.78.197.79: icmp_seq=1 ttl=51 time=7.94 ms
64 bytes from 120.78.197.79: icmp_seq=2 ttl=51 time=15.0 ms
64 bytes from 120.78.197.79: icmp_seq=3 ttl=51 time=10.1 ms
64 bytes from 120.78.197.79: icmp_seq=4 ttl=51 time=10.5 ms

--- www.luckydarcy.top ping statistics ---
4 packets transmitted, 4 received, 0% packet loss, time 16323ms
rtt min/avg/max/mdev = 7.942/10.936/15.082/2.592 ms
为了实现开机自动连接,可以在 /etc/rc.local 中增加以下命令:
wpa_supplicant -D wext -B -i wlan0 -c /home/root/wifi.conf
udhcpc -b -i wlan0 -R
这样,我们在 MYS-6ULX-IOT 开发板上成功地驱动了 RTL8188 WiFi 模块,后面我们会在此基础上增加应用层协议实现物联网应用。