GraphQL学习与实践5(连接数据库mongodb与mysql)
GraphQL学习与实践5(连接数据库mongodb与mysql)
- mongodb
- mysql
- 更多
接口最终还是得持久化物理容器中做增删改查的操作。
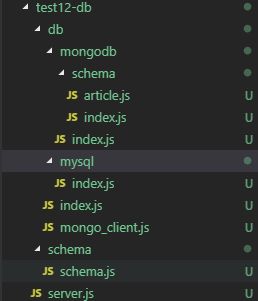
新建一下图片的目录,test12-db:

mongodb
通常链接mongodb,我们使用mongoose模块来处理:
npm install --save mongoose
然后在db目录中封装了一个获取数据库链接对象的类MongoClient:
const mongoose = require('mongoose');

module.exports = class MongoClient {
    constructor({ uri, options, schemas } = {}) {
        this.schemas = schemas;
        this.uri = uri;
        this.options = options;
        this.models = {};
        this.connection = null;
    }

    async connect() {
        let { uri, options } = this;
        mongoose.set('useCreateIndex', true);
        mongoose.set('bufferCommands', false);
        mongoose.set('bufferMaxEntries', 0);
        mongoose.set('autoIndex', false);
        mongoose.connection.on('error', function () {
            console.error('connection error: uri is %s,options is %s', uri, JSON.stringify(options));
        });
        mongoose.connection.once('open', function () {
            console.info('connection success', uri);
        });
        let connection = await mongoose.createConnection(uri, options);
        this.connection = connection;
        console.info('Init mongoose success');
        return connection;
    }

    getCollection(key) {
        if (this.schemas[key]) {
            if (this.models[key]) {
                return this.models[key];
            }
            let model = this.connection.model(key, this.schemas[key]);
            this.models[key] = model;
            return model;
        }
        throw new Error("illegal key");
    }
}
在MongoClient中提供一个connect的方法返回链接对象,以面对多重链接的情况,同时提供getCollection提供给没有model首次链接的时候再获取链接对象,这种情况一般用于serverless的lambda函数,这里就直接拿着之前的封装直接来用了。
然后在mongodb目录下再提供了一个对象的index.js:
const MongoClient = require("../mongo_client");
const schemas = require("./schema");
const [uri, options] = [
    "mongodb://127.0.0.1:27017/onsen",
    {
        useNewUrlParser: true,
        useCreateIndex: true,
    },
]

const client = new MongoClient({ uri: uri, options: options, schemas: schemas });
module.exports = client;
注:这里的数据库,就需要自己去创建模拟数据了。
在根目录的server.js文件中,创建graphql的服务:
const express = require('express');
const cors = require('cors')
const graphqlHTTP = require('express-graphql');
const graphql = require('graphql');
const { queryType } = require("./schema/schema");

require("./db").mongodb.connect();

const schema = new graphql.GraphQLSchema({ query: queryType });
const app = express();
app.use(cors());
app.use('/graphql', graphqlHTTP({
  schema: schema,
  graphiql: true,
}));
app.listen(4000);
console.log('Running a GraphQL API server at localhost:4000/graphql');
相比之前的代码,可以看到增加了:
require("./db").mongodb.connect();
mysql
安装mysql的模块:
npm install --save mysql
同样的类似于mongodb的封装一样,这里也封装了一个mysql的客户对象:
var mysql = require('mysql');

class MysqlClient {
    constructor(options = {}) {
        this.pool = mysql.createPool(options);
    }

    doQuery(query) {
        return new Promise((resolve, reject) => {
            this.pool.getConnection((err, conn) => {
                if (err) {
                    return reject(err);
                }
                console.info('getConnection ok')
                conn.query(query, (err, results, fields) => {
                    conn.release();
                    if (err) {
                        return reject(err);
                    }
                    return resolve(results || null);
                })
            })
        });
    }
}

const options = {
    connectionLimit: 1000,
    host: '127.0.0.1',
    password: 'password',
    database: 'yiibaidb',
    user: 'root',
}

module.exports = new MysqlClient(options);
具体有关mysql模块的,见:
https://www.npmjs.com/package/mysql
做好了数据库的引用,然后就可以像前面一样,直接使用schema中写业务逻辑了,见schema.js:
const graphql = require('graphql');
const mongodb = require("../db").mongodb;
const mysql = require("../db").mysql;

const ArticleType = new graphql.GraphQLObjectType({
   name: 'Article',
   fields: {
      _id: {
         type: graphql.GraphQLString
      },
      title: {
         type: graphql.GraphQLString
      },
      source: {
         type: graphql.GraphQLString
      },
   }
});

const OrderType = new graphql.GraphQLObjectType({
   name: 'Order',
   fields: {
      orderNumber: {
         type: graphql.GraphQLInt
      },
      status: {
         type: graphql.GraphQLString
      },
      comments: {
         type: graphql.GraphQLString
      },
   }
});

const queryType = new graphql.GraphQLObjectType({
   name: 'Query',
   fields: {
      articles: {
         type: graphql.GraphQLList(ArticleType),
         resolve: async () => await mongodb.getCollection('Article').find({}),
      },
      orders: {
         type: graphql.GraphQLList(OrderType),
         args: {
            page: {
               type: graphql.GraphQLInt
            },
            pageSize: {
               type: graphql.GraphQLInt
            },
         },
         resolve: async (_, { page = 0, pageSize = 10 }) => await mysql.doQuery(`
             SELECT  * FROM orders limit ${((page - 1) < 0 ? 0 : (page - 1)) * pageSize},${pageSize};
         `),
      }
   }
});

module.exports = { queryType };
这里的业务提供了articles和orders的两个查询,分别用的是mongodb和mysql的数据库操作。
在工具上进行验证,输入:
{
  articles{
    _id,
    title,
    source,
  },
  orders(page:1,pageSize:5){
   orderNumber,
    status,
    comments,
  }
}
更多
[GraphQL学习与实践1(入门介绍)](http
s://blog.csdn.net/onsenOnly/artic
le/details/102639327)
GraphQL学习与实践2(类型、传参与构造函数类型)
GraphQL学习与实践3(Mutations And Input Types)
GraphQL学习与实践4(模拟客户端请求)
GraphQL学习与实践5(连接数据库mongodb与mysql)
代码:
onsenOnly:https://github.com/onsenOnly/graphql-test
有缘请点颗星,谢谢!
