idea+spring boot+mybatis+restful风格的demo
==> 学习汇总(持续更新)
==> 从零搭建后端基础设施系列(一)-- 背景介绍
注:我是在mac下搭建的demo,在windows下同理,这个不存在什么太大差异。后面会有源码,直接导入idea即可,只是环境的配置稍有不同。
一、准备工作
下载最新版idea.。
下载mysql。
下载postman,这是一款用于前后端接口请求测试的神器。
以上自行百度安装。
二、创建项目
1.new project->选择 spring initalizr


3.这里只需要选web就可以了

4.最后只需要填写项目路径以及名字就行了

5.目录结构

6.打开pom文件,添加几个依赖
			org.springframework
			spring-jdbc
			RELEASE


			org.mybatis
			mybatis
			RELEASE


			mysql
			mysql-connector-java
			5.1.25
三、配置mybatis
1.配置mybatis xml文件,该文件放在resource下
文件名:spring-mybatis.xml
代码如下:
2.创建userMapper.xml文件

代码如下:
insert into user(name) values(#{name})
update user set name=#{name} where id = #{id}
delete from user
delete from user where id = #{id}
3.创建User类和UserMapper接口类
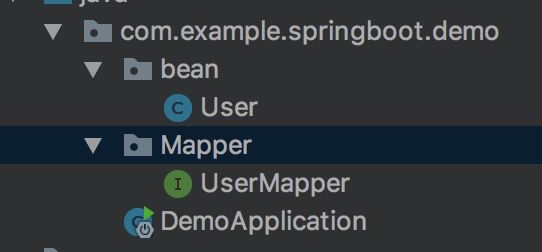
User类代码:
package com.example.springboot.demo.bean;


public class User {
    private String name;
    private int id;

    public User(){

    }
    public User(int id,String name){
        this.id = id;
        this.name = name;
    }
    public String getName() {
        return name;
    }

    public int getId() {
        return id;
    }

    public void setName(String name) {
        this.name = name;
    }

    public void setId(int id) {
        this.id = id;
    }

}
UserMapper类代码:
package com.example.springboot.demo.Mapper;

import com.example.springboot.demo.bean.User;

import java.util.List;

public interface UserMapper {
    public User getById(int id);
    public boolean insert(String name);
    public List getUsers();
    public boolean updateUser(User user);
    public boolean deleteUser(int id);
    public boolean deleteAllUsers();
}
4.为mybatis创建单例模式类

代码如下:
package com.example.springboot.demo.singleton;

import java.io.IOException;
import java.io.Reader;
import org.apache.ibatis.io.Resources;
import org.apache.ibatis.session.SqlSessionFactory;
import org.apache.ibatis.session.SqlSessionFactoryBuilder;

public class SingletonMybatis {
    private static SqlSessionFactory sqlSessionFactory;
    static {
        String resource = "spring-mybatis.xml";
        Reader reader = null;
        try {
            reader = Resources.getResourceAsReader(resource);
        } catch (IOException e) {
            System.out.println(e.getMessage());

        }
        //这里相当于生成一个数据库管理者,它可以返回一个连接给使用者。
        sqlSessionFactory = new SqlSessionFactoryBuilder().build(reader);
    }

    public static SqlSessionFactory getSqlSessionFactory(){
        return sqlSessionFactory;
    }
}
四、实现Controller并设计 restful api
restful是什么?
如何设计restful api
Controller类代码如下:
package com.example.springboot.demo.controller;
import com.example.springboot.demo.Mapper.UserMapper;
import com.example.springboot.demo.bean.User;
import com.example.springboot.demo.singleton.SingletonMybatis;
import org.apache.ibatis.session.SqlSession;
import org.apache.ibatis.session.SqlSessionFactory;
import org.springframework.web.bind.annotation.*;
import java.util.List;
@RestController
@RequestMapping("/index") //在类上使用RequestMapping,里面设置的value就是方法的父路径
public class Controller {
private static SqlSessionFactory sqlSessionFactory;
static {
sqlSessionFactory = SingletonMybatis.getSqlSessionFactory();
}
@RequestMapping //如果方法上的RequestMapping没有value,则此方法默认被父路径调用
public String index(){
return "hello spring boot";
}
//这里体现了restful风格的请求,按照请求的类型,来进行增删查改。
//设计restful api(其实也就是URL),不要有冗余,例如不要写成getUsers,URL中
//最好不要有动词。
@RequestMapping(method = RequestMethod.GET,value = "/users")
public List getUsers(){
List listUsers;
//获取一个连接
SqlSession sqlSession = sqlSessionFactory.openSession();
try {
//得到映射器
UserMapper userMapper = sqlSession.getMapper(UserMapper.class);
//调用接口中的方法去执行xml文件中的SQL语句
listUsers = userMapper.getUsers();
//要提交后才会生效
sqlSession.commit();
}finally {
//最后记得关闭连接
sqlSession.close();
}
return listUsers;
}
//这里用的是路径变量,就是{}括起来的,会当做变量读进来
@RequestMapping(method = RequestMethod.GET,value = "/users/{userId}")
public User getUser(@PathVariable int userId){
User user;
SqlSession sqlSession = sqlSessionFactory.openSession();
try {
UserMapper userMapper = sqlSession.getMapper(UserMapper.class);
user = userMapper.getById(userId);
sqlSession.commit();
}finally {
sqlSession.close();
}
return user;
}
//RequestBody这个注解可以接收json数据
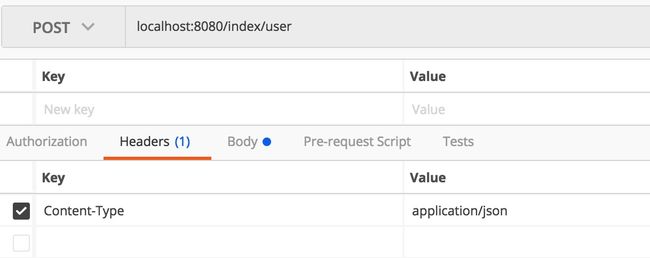
@RequestMapping(method = RequestMethod.POST,value = "/user")
public boolean setUser(@RequestBody String name){
SqlSession sqlSession = sqlSessionFactory.openSession();
try {
UserMapper userMapper = sqlSession.getMapper(UserMapper.class);
userMapper.insert(name);
sqlSession.commit();
}finally {
sqlSession.close();
}
return true;
}
@RequestMapping(method = RequestMethod.PUT,value = "/user/{userid}/{name}")
public boolean updateUser(@PathVariable int userid,@PathVariable String name){
SqlSession sqlSession = sqlSessionFactory.openSession();
try {
UserMapper userMapper = sqlSession.getMapper(UserMapper.class);
User user = new User(userid,name);
userMapper.updateUser(user);
sqlSession.commit();
}finally {
sqlSession.close();
}
return true;
}
@RequestMapping(method = RequestMethod.DELETE,value = "/users")
public boolean deleteUsers(){
SqlSession sqlSession = sqlSessionFactory.openSession();
try {
UserMapper userMapper = sqlSession.getMapper(UserMapper.class);
userMapper.deleteAllUsers();
sqlSession.commit();
}finally {
sqlSession.close();
}
return true;
}
@RequestMapping(method = RequestMethod.DELETE,value = "/users/{userId}")
public boolean deleteUser(@PathVariable int userId){
SqlSession sqlSession = sqlSessionFactory.openSession();
try {
UserMapper userMapper = sqlSession.getMapper(UserMapper.class);
userMapper.deleteUser(userId);
sqlSession.commit();
}finally {
sqlSession.close();
}
return true;
}
}
五.在mysql中创建mybatis_test数据库以及User表
这里就省略了,要注意的是User表的字段和类型都要和User类中的字段一致。
六.用postman测试接口是否正常


六.源码下载
github
csdn