C5:Unity3D制作智能家居设计软件——新手引导系统
为什么叫新手引导系统而不叫新手引导页呢?
新手引导系统适用于各个引导环节,引导环节需要特定状态给出特定引导流程。
其出现和消失的引导页应该是可量化可控的。
话不多说,我们直接看代码:
首先,新手引导页基础类:GuidanceData
/*
作者:
功能:数据脚本
修改日期:2019.2.13-17:50
*/
using System.Collections;
using System.Collections.Generic;
using UnityEngine;
using UnityEngine.UI;
///
/// 方向
///
public enum GuidanceDirection
{
LeftUp,
LeftDown,
RightUp,
RightDown,
Null
}
public class GuidanceData : MonoBehaviour
{
public GuidanceData()
{
}
///
/// 数学公式
///
public MathfManager mathf=new MathfManager();
///
/// 当前方向
///
public GuidanceDirection ArrowDirection;
///
/// 当前新手提示内容
///
public string WainingValue;
///
/// 提示框父级
///
public GameObject DialogsParent;
///
/// 提示框
///
public List
///
/// 当前提示框显示
///
///
///
///
///
public void ShowWainingObject(Vector2 position, string value, GuidanceDirection gdd = GuidanceDirection.Null, bool isShow = true)
{
for (int i = 0; i < Dialogs_List.Count; i++)
{
Dialogs_List[i].SetActive(false);
Dialogs_List[i].transform.GetChild(0).GetComponent
if (isShow == true)
{
Dialogs_List[i].transform.GetChild(1).gameObject.SetActive(true);
}
else
{
Dialogs_List[i].transform.GetChild(1).gameObject.SetActive(false);
}
}
if (gdd != GuidanceDirection.Null)
{
ArrowDirection = gdd;
}
else
{
ArrowDirection = GetScreenArea(position);
}
switch (ArrowDirection)
{
case GuidanceDirection.LeftUp:
DialogsParent.GetComponent
Dialogs_List[0].SetActive(true);
break;
case GuidanceDirection.RightUp:
DialogsParent.GetComponent
Dialogs_List[1].SetActive(true);
break;
case GuidanceDirection.LeftDown:
DialogsParent.GetComponent
Dialogs_List[2].SetActive(true);
break;
case GuidanceDirection.RightDown:
DialogsParent.GetComponent
Dialogs_List[3].SetActive(true);
break;
default:
break;
}
Debug.LogError("(Screen.width,Screen.height)=" + "(" + Screen.width + "," + Screen.height + ")");
Debug.LogError("(position.x,position.y)=" + "(" + position.x + "," + position.y + ")");
float x = position.x - Screen.width / 2;
float y = position.y - Screen.height / 2;
DialogsParent.GetComponent
}
///
/// 返回方向
///
///
///
public GuidanceDirection GetScreenArea(Vector2 position)
{
float x = position.x - Screen.width / 2;
float y = position.y - Screen.height / 2;
//左上
if ((x >= -Screen.width / 2 && x <= 0) && (y <= Screen.height / 2 && y >= 0))
{
return GuidanceDirection.LeftUp;
}
//右上
else if ((x <= Screen.width / 2 && x >= 0) && (y <= Screen.height / 2 && y >= 0))
{
return GuidanceDirection.RightUp;
}
//左下
else if ((x >= -Screen.width / 2 && x <= 0) && (y >= -Screen.height / 2 && y <= 0))
{
return GuidanceDirection.LeftDown;
}
//右下
else if ((x <= Screen.width / 2 && x > 0) && (y >= -Screen.height / 2 && y <= 0))
{
return GuidanceDirection.RightDown;
}
return GuidanceDirection.LeftDown;
}
}
新手引导系统逻辑控制脚本:GuidanceManager
/*
作者:
功能:新手教程控制脚本
修改日期:2019.2.13-17:50
*/
using System.Collections;
using System.Collections.Generic;
using UnityEngine;
public class GuidanceManager : MonoBehaviour
{
public GuidanceData gd;
///
/// 根据坐标自动赋箭头方向
///
///
///
///
public GuidanceManager(GameObject parents, Vector2 position, string value, bool isShow = true)
{
GameObject ga = Instantiate((GameObject)Resources.Load("Prefabs/Guidance/Canvas") as GameObject);
//设置父级
ga.transform.SetParent(parents.transform, true);
//设置当前 Object 的层级最后,即显示在最前
ga.transform.SetAsLastSibling();
gd = ga.GetComponent
gd.WainingValue = value;
gd.ShowWainingObject(position, value, GuidanceDirection.Null, isShow);
}
///
/// 手动赋箭头方向
///
///
///
///
public GuidanceManager(GameObject parents, Vector2 position, string value, GuidanceDirection gdd, bool isShow = true)
{
GameObject ga = Instantiate((GameObject)Resources.Load("Prefabs/Guidance/Canvas") as GameObject);
//设置父级
ga.transform.SetParent(parents.transform, true);
//设置当前 Object 的层级最后,即显示在最前
ga.transform.SetAsLastSibling();
gd = ga.GetComponent
gd.WainingValue = value;
gd.ShowWainingObject(position, value, gdd, isShow);
}
///
/// 删除克隆物体
///
public void DestoryThis()
{
Destroy(this.gameObject);
}
}
在场景里使用的时候,只需要调用控制脚本中的GuidanceManager方法,把父级物体赋值进去即可。
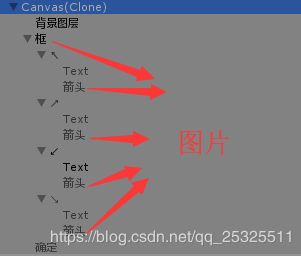
当然,缺少不了预制体,需要提前将预制体Prefabs创建,我们的预制体是一个Canvas,将其放置在Resources文件夹中便于创建,
两个脚本挂载在预制体上,结构如下:
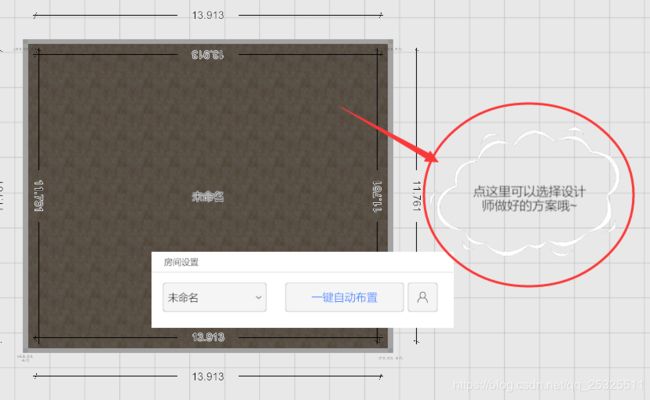
Canvas里结构和效果如下:
具体实现,大家可以拷贝代码到自己工程里实现一下,就不多赘述了。


