Openwrt:LuCI入门(一)
一、 LuCI基本概念
-
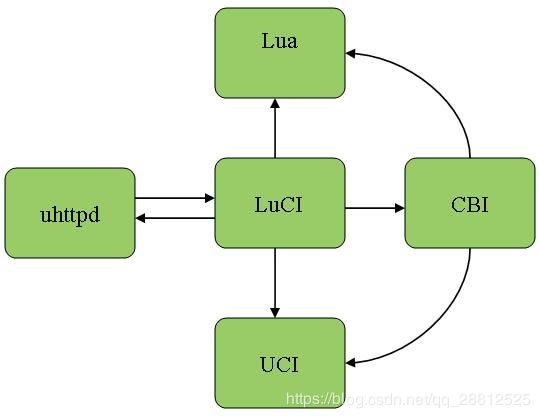
UCI 是 Openwrt 中为实现所有系统配置的一个统一接口,英文名
Unified Configuration Interface,即统一配置接口。轻量级 LUA 语言的官方版本只包括一个精简的核心和最基本的库。这使得 LUA 体积小、启动速度快,从而适合嵌入在别的程序里。 LuCI 即是这两个项目的合体,可以实现路由的网页配置界面。建议在学习LuCI界面开发之前,先了解下LUA 的相关语法知识。
参考教程https://www.runoob.com/lua/lua-basic-syntax.html -
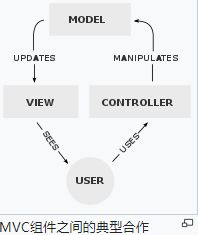
LuCI采用了MVC (模型/视图/控制)三层架构,在系统的
/usr/lib/lua/luci/下有三个目录 model、 view、 controller, 它们分别对应 M、V、 C。也可以在openwrt源码/feeds/luci/applications/luci-app-xx/luasrc/或 openwrt源码/feeds/luci/modules/luci-mod-admin-full/luasrc/目录下阅读官方的源码例程,学习参考, 我们要做的主要工作就是基于 LuCI 框架编写LUA 脚本、在 html 页面中嵌入 LUA 脚本。

二、LuCI 界面开发
2.1 Openwrt配置支持luci
- 在编译完后的Openwrt源码顶层目录 执行
make menuconfig,勾选以下相关选项,保存退出。
LuCI --->
	Collections --->
			<*> luci
			<*> luci-ssl
	Translations--->
			<*> luci-i18n-chinese   //支持中文
			<*> luci-i18n-english
2.2 Openwrt添加界面
- 添加界面有两种方式,大同小异:
- ① 在开发板系统中添加界面方式。
- ② 在源码中添加界面方式。
- 第①种在系统板上修改界面配置文件后,可以马上在网页端看到修改效果,不用重新编译Openwrt源码和烧写固件,优点:开发便捷,缺点:重刷系统后相关文件修改信息丢失。两者开发方式就类似于在开发板上挂载NFS开发;第②种适合产品发布。
2.2.1 在开发板系统中添加界面
- 按照前面所讲的MVC模型,将涉及的三个文件夹列出来:
/usr/lib/lua/luci/controller/*/usr/lib/lua/luci/view/*/usr/lib/lua/luci/model/cbi/*- 后面我们也将围绕这三个文件夹进行界面开发。
(1) /usr/lib/lua/luci/controller/ – 控制
- 进入 /usr/lib/lua/luci/controller/ 目录下,
mkdir myapp创建myapp/目录,并在myapp目录下创建new_tab.lua 文件,在文件中输入如下内容:
module("luci.controller.myapp.new_tab", package.seeall)
function index()
    entry({"admin", "new_tab"}, firstchild(),translate("cfg"), 1).dependent=false
    entry({"admin", "new_tab", "sn"}, cbi("myapp-mymodule/gateway_sn"), translate("sn"), 2)
    entry({"admin", "new_tab", "hellworld"}, template("myapp-mymodule/helloworld"), _("HelloWorld"), 3)
end
- 语法说明 :
module(“luci.controller.myapp.new_tab”, package.seeall)
- 定义模块的入口
entry(path, target, title=nil, order=nil)
- entry表示添加一个新的选项入口
- “path” 是访问的路径,路径是按字符串数组给定的, 比如路径按如下方式写“{“admin”, “new_tab”,
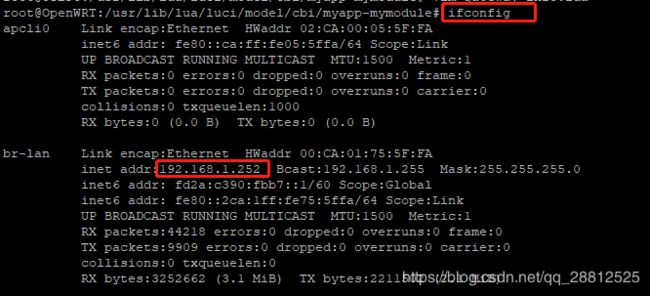
“hellworld”}”,那么就可以在浏览器里访问“http://192.168.1.252/cgibin/luci/;stok=21ec091dde3ffd 622912e32871159ea4/admin/new_tab/hellworld”来访问这个脚本。其中的“admin”表示为管理员添加脚本,“new_tab”即为一级菜单名,“hellworld”为菜单项名。系统会自动在对应的菜单中生成菜单项。比如想在“System”菜单下创建一个菜单项,那么一级菜单名可以写为“system”。
- “target”为调用目标,调用目标分为三种,分别是执行指定方法(Action)、访问指定页面(Views)以及调用
CBI Module。
1、第一种可以直接调用指定的函数,比如点击菜单项就直接重启路由器等等,比如写“call(“function_name”)”,然后在该lua文件下编写名为function_name的函数就可以调用了。
2、 第二种可以访问指定的页面,比如写为“template(“myapp-mymodule/helloworld”)”就可以调用/usr/lib/lua/luci/view//myapp-mymodule/helloworld.htm文件了。
3、第三种主要应用在配置界面,比如写为“cbi(“myapp/mymodule”)”就可以调用/usr/lib/lua/luci/model/cbi/myapp-mymodule/gateway_sn.lua文件了。
4、其他一些如 lias 是等同于别的链接,form 和 cgi 对应到 model/cbi 相应的目录下面.- title即是显示在网页上的内容,即选项名,可以用translate(“英文/中文”),也可以用_(“HelloWorld”)方式,还有一种就是利用.po 文件,将英文标识 与 翻译语言 一一对应,例如:
msgid “Default gateway”
msgstr “默认网关”
当title参数为_("Default gateway")时,如果路由设置为中文显示,则该选项自动显示为默认网关。- order就是菜单项在界面中显示的顺序,由上至下,由左至右,依次递增,可以缺省。
(2) /usr/lib/lua/luci/model/ – 模型
- 进入/usr/lib/lua/luci/model/cbi/ 目录下,
mkdir myapp-mymodule/创建myapp-mymodule/目录,并在myapp-mymodule/目录下创建gateway_sn.lua 文件(注:该文件夹与文件命名恰好对应new_tab.lua文件中的myapp-mymodule/gateway_sn),在文件中输入如下内容:
m = Map("sn_file", translate("产品序列号")) -- cbi_file is the config file in /etc/config
d = m:section(TypedSection, "gateway_sn")  -- info is the section called info in cbi_file
a = d:option(Value, "sn", translate("序列号"));
a.optional=false;
a.rmempty = false;  -- name is the option in the cbi_file
return m
语法说明:
官方文档 http://luci.subsignal.org/trac/wiki/Documentation/CBI
或详情 见 Openwrt:LuCI之CBI(二)
(3) /usr/lib/lua/luci/view/ – 视图
- 进入/usr/lib/lua/luci/view/目录下,
mkdir myapp-mymodule/创建myapp-mymodule/目录,并在myapp-mymodule/目录下新建helloworld.htm文件,输入内容如下:
<%+header%>
<h1><%: HelloWorld %></h1>
<%+footer%>
语法说明:
1、 包含Lua代码:
<% code %>
2、 输出变量和函数值:
<% write(value) %>
<%=value%>
3、 包含模板:
<% include(templatesName) %>
<%+templatesName%>
4、 转换:
<%= translate(“Text to translate”) %>
<%:Text to translate%>
5、 注释:
<%# comment %>
其他语法跟html和JavaScript一样。
(4) /etc/config/sn_file – 类数据库
- 进入/etc/config/ 目录下,新建 sn_file 文件, 输入内容如下:
config 'gateway_sn' 'sn'
    option 'sn' 'gw2019081300001'
语法说明:
- 详情 见 Openwrt:LuCI之UCI(三)
- 创建完上面的文件内容后
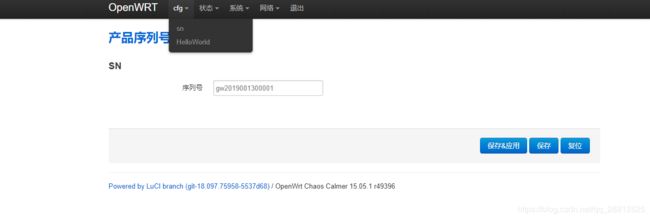
reboot重启一下路由板(注:凡是修改controller/文件夹中的配置,都需要重启板子或把/tmp/目录下luci-indexcache luci-modulecache/luci-sessions/删除才能生效,其他几个文件夹修改可不用,刷新一下网页即可),登录网页界面,可以看到效果如下:


2.2.2 在源码中添加界面
- 上面是在系统中添加luci界面,现在开始在源码中添加
(1) 创建目录及文件
include $(TOPDIR)/rules.mk

LUCI_TITLE:=LuCI Support for Test
LUCI_DEPENDS:=
include ../../luci.mk
# call BuildPackage - OpenWrt buildroot signature
- ② 在
luci-app-myapplication/luasrc/controller/myapp/new_tab.lua文件中 ,添加内容如下(注:与上面系统添加界面方式的内容一致):
module("luci.controller.myapp.new_tab", package.seeall)
function index()
    entry({"admin", "new_tab"}, firstchild(),translate("cfg"), 1).dependent=false
    entry({"admin", "new_tab", "sn"}, cbi("myapp-mymodule/gateway_sn"), translate("sn"), 2)
    entry({"admin", "new_tab", "hellworld"}, template("myapp-mymodule/helloworld"), _("HelloWorld"), 3)
end
- ③ 在
luci-app-myapplication/luasrc/model/cbi/myapp-mymodule/gateway_sn.lua文件中 ,添加内容如下(注:与上面系统添加界面方式的内容一致):
m = Map("sn_file", translate("产品序列号")) -- cbi_file is the config file in /etc/config
d = m:section(TypedSection, "gateway_sn")  -- info is the section called info in cbi_file
a = d:option(Value, "sn", translate("序列号"));
a.optional=false;
a.rmempty = false;  -- name is the option in the cbi_file
return m
- ④ 在
luci-app-myapplication/luasrc/view/myapp-mymodule/helloworld.htm文件中 ,添加内容如下(注:与上面系统添加界面方式的内容一致):
<%+header%>
<h1><%: HelloWorld %></h1>
<%+footer%>
(2) 执行更新
- 回退到Openwrt 源码顶层目录,依次执行以下命令:
./scripts/feeds update luci./scripts/feeds install -a -p lucimake menuconfig
进入
LuCI --->
	Applications --->
			 <*> luci-app-myapplication............................. LuCI Support for Test
- 选定,然后保存退出,编译
make V=s - 烧录固件
(3) uci文件创建
- 方式① 在openwrt源码目录
openwrt源码/package/base-files/files/etc/config/新建cbi_file文件 - 方式② 在开发板/etc/config目录下新建cbi_file文件,内容如下(注:该文件在重新烧录固件后不会丢失):
config 'gateway_sn' 'sn'
    option 'sn' 'gw2019081300001'
(4) 查看效果
三、结尾
3.1 总结&反思
3.2 名词解释
- Lua:解释性脚本语言
- Uci:(Unified Configuration Interface),OpenWrt中为实现所有系统配置的一个统一接口
- Luci:(Lua ConfigurationInterface ),由Lua实现的Openwrt网页系统配置接口
- MVC 框架:(model+view+controller ),要开发一个新的功能页面,开发者只要根据 MVC 框架写些简单的 Lua 脚本,剩下的部分由Openwrt为你自动完成
- CBI:(Configuration Binding Interface),CBI模型位于lua\luci\model\cbi
3.3 参考资料
- 官方说明文档: http://luci.subsignal.org/trac/wiki/Documentation
- Luci模块说明文档: http://luci.subsignal.org/trac/wiki/Documentation/ModulesHowTo
- 参考博客:
- https://blog.csdn.net/u012041204/article/details/54952376
- http://blog.chinaunix.net/uid-26824563-id-4591418.html
- https://blog.csdn.net/qq_37035946/article/details/93629149
跟随大师的脚步,模仿大师的行为,感受大师的意境,成为真正的大师。


