Hexo NexT 图片caption出现多次
摘要
https://wylu.github.io/posts/7bd83fc5/
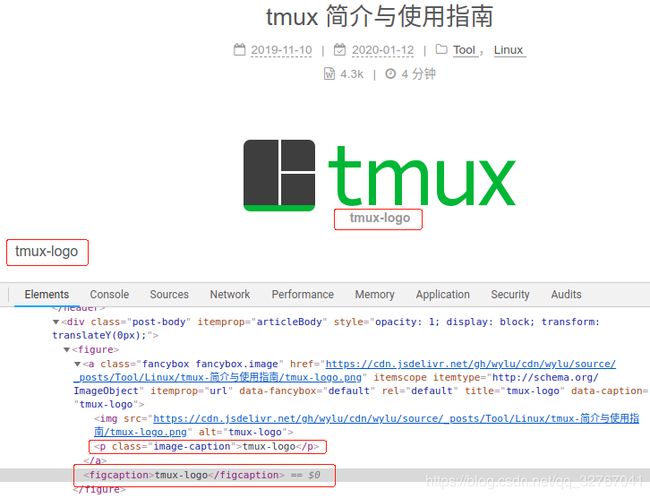
在使用 Hexo + NexT 搭建个人博客的过程中一直有个问题没有解决,直到今天才找到了解决方法。问题就是在展示同一张图片中,caption出现了两次,如图:
问题分析
图片正下方的 image-caption 是 NexT 给 fancybox 加上的;而图片左下方的 figcaption 是因为使用了 hexo-renderer-pandoc Markdown 渲染器导致的,hexo-renderer-pandoc 将 Markdown 文件渲染成 HTML 时,会对图片进行渲染,然后生成一个 figcaption 的标签。
很多人可能不会有这样的问题,因为 Hexo 默认的 Markdown 渲染器是 hexo-renderer-marked,hexo-renderer-marked 渲染图片时不会生成 figcaption。
如果你使用的是 hexo-renderer-marked 渲染器,就不会有这样的问题,但是相信很多人都是因为需要使用 mathjax,所以都将默认的 Hexo 默认的 Markdown 渲染器换成了 hexo-renderer-pandoc,hexo-renderer-pandoc 功能强大(依赖与 pandoc 自身强大的功能),它对数学公式的渲染简直可以说是吊打 hexo-renderer-marked,这也是我一直使用它的原因。
所以为了在使用 hexo-renderer-pandoc 的同时,把图片 caption 出现了两次的问题解决,我提过 issue,查阅了许多资料,终于找到了解决的方法。
解决方法
编辑站点配置文件 _config.yml,添加如下内容:
pandoc:
  extensions:
    - '-implicit_figures'
执行下列命令重新生成站点,展示效果如下:
$ hexo clean && hexo g && hexo s -o
隐藏 fancybox 的 caption
以 NexT v7.7.0 为例,通过查看 hexo-theme-next/source/js/utils.js 源码,发现 NexT 在使用 fancybox 时,如果图片 title 或 alt 属性不为空时,就会 fancybox 添加一个子标签展示图片的 title 或 alt 属性值。
var imageTitle = $image.attr('title') || $image.attr('alt');
if (imageTitle) {
  $imageWrapLink.append(`${imageTitle}`);
  // Make sure img title tag will show correctly in fancybox
  $imageWrapLink.attr('title', imageTitle).attr('data-caption', imageTitle);
}
如果想通过配置支持选择是否展示 caption,可以参考下方的方法(在 NexT v7.7.0 已测试过),其实不管 NexT 的版本如何,解决方法的思路基本是一致的。
首先修改主题配置文件 _config.yml,找到 fancybox 的配置,将 fancybox 的配置改成如下所示内容:
# FancyBox is a tool that offers a nice and elegant way to add zooming functionality for images.
# For more information: https://fancyapps.com/fancybox
fancybox:
  enable: true
  caption: false
其中,enable 控制是否启用 fancybox,而 caption 控制是否展示 caption (当然只有在 enable 为 true 时,caption 配置才有效),如果你不启用 fancybox 自然也不会有 caption。
然后,编辑 hexo-theme-next/source/js/utils.js 文件,将上面的代码修改成如下内容:
var imageTitle = $image.attr('title') || $image.attr('alt');
if (imageTitle) {
  if (CONFIG.fancybox.caption) {
    $imageWrapLink.append(`${imageTitle}`);
  }
  // Make sure img title tag will show correctly in fancybox
  $imageWrapLink.attr('title', imageTitle).attr('data-caption', imageTitle);
}
接着,编辑 hexo-theme-next/source/js/next-boot.js 文件,将 CONFIG.fancybox && NexT.utils.wrapImageWithFancyBox(); 替换成如下内容:
/**
 * Register JS handlers by condition option.
 * Need to add config option in Front-End at 'layout/_partials/head.swig' file.
 */
CONFIG.fancybox.enable && NexT.utils.wrapImageWithFancyBox();
相信你可以发现,我们这里将 CONFIG.fancybox 替换成 CONFIG.fancybox.enable,正是因为我们自定义的配置是通过 fancybox 下的 enable 的值来确定是否启用的。另外从源码上方的注释可以看到,CONFIG 下的配置项需要在前端文件 ‘layout/_partials/head.swig’ (实际上该文件在’layout/_partials/head/head.swig’)中加上。
所以最后,我们需要在 layout/_partials/head/head.swig 中修改一下上面我们所使用 CONFIG.fancybox.caption 配置。参照其它配置,这里需要将 fancybox: {{ theme.fancybox }},修改成如下内容:
fancybox: {{ theme.fancybox | json }}
重新生成,效果如下:
References
https://github.com/wzpan/hexo-renderer-pandoc/issues/34
https://github.com/theme-next/hexo-theme-next/issues/857


