Spring boot集成Mybatis与Shiro无状态权限管理,实现RESTful风格的API
前言
最近一直在研究SpringBoot和Shiro框架,在百度和Google上参考了很多很多资料,发现大多数集成都是使用session来管理用户状态的,由于自己对前后端分离特别情有独钟,所以想自己搭建出一个无状态的RESTful风格的框架。研究了好几个星期,这里写一下步骤,也当自己复习一下遇到的问题。
由于内容有点多,打算分开来记录。
此框架涉及到的一些技术:
1.Spring Boot + Mybatis +Shiro
2.JWT
3.RBAC(基于角色的权限控制)
4.Redis缓存
开发环境:Ubuntu17.10 + IntelliJ IDEA + Maven3.5
测试工具:Postman
Github:https://github.com/phw-nightingale/govern
那么Let's do it!
1.准备工作
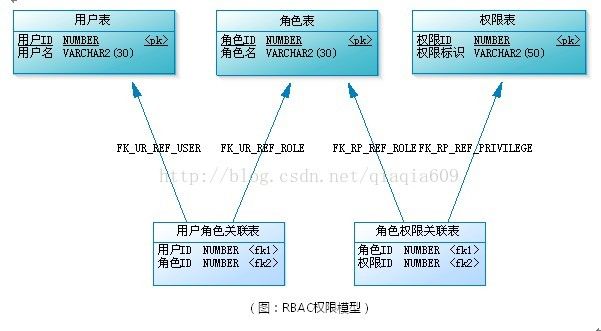
开始的时候我需要准备五张表,这五张表是基于RBAC权限管理的标准表,那么引用一张图:
具体的sql文件在Github中。这里我考虑用户和角色多对多,角色和权限多对多;角色为一系列权限的集合,用户也可以理解为一系列角色的集合。这样会好理解一些。
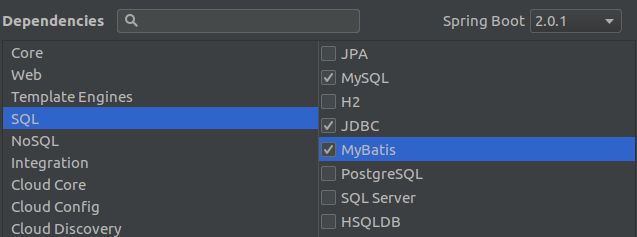
建好数据库后,打开IDEA开始搭建框架,File->New->Project,选择Spring Initializr,这里JDK版本一定要在1.8及以上,然后Next,填写包名和项目名,然后到框架选择界面:
按照图示选择即可。如果想用其他的数据库,在SQL界面选择对应的数据库即可。然后点击Finish,进入主界面。
进入主界面后可能会发现一个问题,那就Maven下载依赖的速度简直太慢了,那是因为Maven默认的设置是从国外的Maven镜像下载依赖,因为种种原因,有时候甚至还可能被墙,因此这里有个小技巧,修改一下Maven的配置,使用国内阿里云的Maven镜像来下载速度可成倍成倍提升(阿里可真是什么镜像都有),File->Settings->搜索Maven:
可以看到有一栏用户设置文件,自己新建一个settings.xml,或者有的可以直接修改如下内容:
        nexus-aliyun
        *
        Nexus aliyun
        http://maven.aliyun.com/nexus/content/groups/public
然后保存,将文件路径设置为settings.xml的路劲即可。这是你可以看到Maven正在飞快的下载依赖~
稍微配置一下application.properties文件:
#mysql
spring.datasource.url=jdbc:mysql://127.0.0.1:3306/demo?useSSL=false
spring.datasource.username=root
spring.datasource.password=199798
spring.datasource.driver-class-name=com.mysql.jdbc.Driver

#mybatis
mybatis.mapper-locations=classpath:mapper/*.xml
mybatis.type-aliases-package=xyz.frt.gov.govern.model

#log
#logging.level.xyz.frt.gov.govern=WARN
#logging.level.xyz.frt.gov.govern.dao=DEBUG
#logging.file=logs/spring-boot-logging.log
#logging.pattern.console=%d{yyyy/MM/dd-HH:mm:ss} [%thread] %-5level %logger- %msg%n
#logging.pattern.file=%d{yyyy/MM/dd-HH:mm} [%thread] %-5level %logger- %msg%n
下面的log是我测试mybatis的时候用的,平时可以不用打开它。上面的mybatis第一个是xml文件的路径,第二个是实体类的包名。配置完后我们再pom.xml文件里加上几个依赖,再把pom.xml贴上来,有点多~
    4.0.0

    xyz.frt.gov
    govern
    0.0.1-SNAPSHOT
    jar

    govern
    Demo project for Spring Boot


        org.springframework.boot
        spring-boot-starter-parent
        2.0.1.RELEASE


        UTF-8
        UTF-8
        1.8


            org.springframework.boot
            spring-boot-starter-jdbc


            org.springframework.boot
            spring-boot-starter-web


            org.mybatis.spring.boot
            mybatis-spring-boot-starter
            1.3.2


            mysql
            mysql-connector-java
            runtime


            org.springframework.boot
            spring-boot-starter-test
            test


            com.alibaba
            druid
            1.1.9


            com.github.pagehelper
            pagehelper
            5.1.3


            com.alibaba
            druid-spring-boot-starter
            1.1.9


            org.apache.shiro
            shiro-spring
            1.4.0


            io.jsonwebtoken
            jjwt
            0.9.0


            com.google.code.gson
            gson
            2.8.2


                org.springframework.boot
                spring-boot-maven-plugin


                org.mybatis.generator
                mybatis-generator-maven-plugin
                1.3.2

                    ${basedir}/src/main/resources/generator/generatorConfig.xml
                    false
                    true
这里还用到了mybatis自动生成代码的插件Mybatis Generator,新建一个generatorConfig.xml,再configuration中填入路径,overwrite最好选择false。
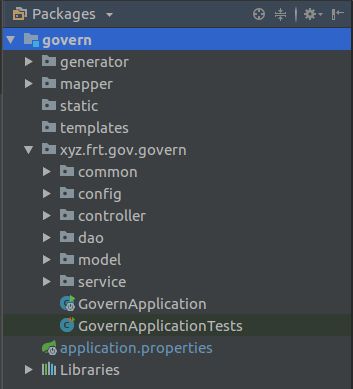
到了这里最好把自己项目的包结构划分清楚,我的是这样的:
由于我对Dao层和Service层都做了一些封装,所以几个实体类的代码就不贴了,直接贴Controller层的代码了,Dao层和Service层根据自己的喜好,当然Github里面都有:
@RestController
public class UserController {

    @Autowired
    private UserService userService;

    @GetMapping("/users/{id}")
    public JsonResult findUserByPrimaryKey(@PathVariable Integer id) {
        return userService.findByPrimaryKey(id);
    }
}
使用@RestController表明这是一个RESTful风格的WebService,就不用在每个方法上加@ResponseBody了。这个类里我们现在只关注findUserByPrimaryKey这个方法,效果就是当我们输入http://localhost:8080/users/1的时候能够返回id为1的用户。
在这之前最好先统一定义一下返回的Json数据格式,我也做了一个类:
/**
 * @author phw
 * @date 04-08-2018
 * @description 所有请求返回的结果类
 */
public class JsonResult {

    private Integer code = 0;

    private String msg;

    private Map dataMap = new HashMap<>();

    public JsonResult() {

    }

    private JsonResult(Integer code, String msg, Map dataMap) {
        this.code = code;
        this.msg = msg;
        this.dataMap = dataMap;
    }

    private JsonResult(Integer code, String msg) {
        this.code = code;
        this.msg = msg;
    }

    /**
     * 成功提示
     * @param msg 提示消息
     * @return json result
     */
    public static JsonResult success(String msg) {
        return new JsonResult(AppConst.RESULT_SUCCESS, msg);
    }

    /**
     * 附带数据的成功提示
     * @param msg 提示消息
     * @param dataMap 返回的数据
     * @return json result
     */
    public static JsonResult success(String msg, Map dataMap) {
        return new JsonResult(AppConst.RESULT_SUCCESS, msg, dataMap);
    }

    /**
     * 错误提示
     * @param msg 提示消息
     * @return json result
     */
    public static JsonResult error(String msg) {
        return new JsonResult(AppConst.RESULT_ERROR, msg);
    }

    /**
     * 错误提示
     * @param code 错误码
     * @param msg 提示消息
     * @return json result
     */
    public static JsonResult error(Integer code, String msg) {
        return new JsonResult(code, msg);
    }

    /**getter and setter**/

}
在启动Application之前,还需要做一件事就是在Application上再加上一个注释:
@SpringBootApplication
@MapperScan("xyz.frt.gov.govern.dao")
public class GovernApplication {

    public static void main(String[] args) {
        SpringApplication.run(GovernApplication.class, args);
    }
}
意思是扫描Dao层的包名路径。
最后点击右上角的启动,看到Spring Boot的启动Logo而且没有报错的话就是启动成功了:
  .   ____          _            __ _ _
 /\\ / ___'_ __ _ _(_)_ __  __ _ \ \ \ \
( ( )\___ | '_ | '_| | '_ \/ _` | \ \ \ \
 \\/  ___)| |_)| | | | | || (_| |  ) ) ) )
  '  |____| .__|_| |_|_| |_\__, | / / / /
 =========|_|==============|___/=/_/_/_/
 :: Spring Boot ::        (v2.0.1.RELEASE)
还挺好看的Q.Q
最后到Postman测试一下,如果返回的是这样的:
{
    "code": 200,
    "msg": "Success",
    "dataMap": {
        "data": {
            "id": 1,
            "username": "admin",
            "password": "admin",
            "phone": "1899728714",
            "enable": 0
        }
    }
}
那就说明恭喜你,成功啦~
今天就到这里,未完待续......


