ionic5 + cordova:使用QRScanner完成扫描二维码功能
接到一个app的改造的任务,主要是适配一款手持设备,在页面上增加一个类似微信的二维码扫描的唤醒按钮,点击之后进入扫描二维码的页面————
步骤如下:
1、在项目中下载QRCode的cordova插件:
ionic cordova plugin add codova-plugin-qrscanner2、下载QRScanner插件:
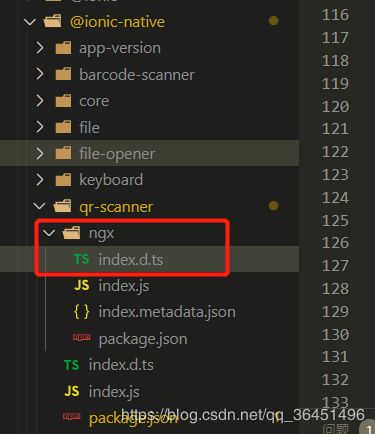
npm install --save @ionic-native/qr-scanner这里要注意一下你下载的qr-scanner版本是什么,就我的来说,4.0+的版本的引入和5.0+的版本引入有一些区别,导致我调试了好久才发现引入的问题;
3、创建一个扫描仪页面,整个页面都是拿来作扫描的界面,这个界面在调用qrscanner对象的scan方法,此方法会返回文本扫描的Observable,使用订阅subscribe,scanner对象的调用unsubscribe将会取消订阅;
这个页面我是这样做的——————
1️⃣qrscanner.html:
扫描二维码
2️⃣qrscanner.ts:
import { Component, forwardRef, Inject } from '@angular/core';
import { Events, IonicPage, NavController } from 'ionic-angular';
import { QRScanner, QRScannerStatus } from '@ionic-native/qr-scanner/ngx';
import { NativeService } from '../../../providers/scan/NativeService';

/**
 * 扫描二维码
 * @example
 this.navCtrl.push('QrscannerPage').then(() => {
        this.events.subscribe('qrscanner:result', text => {
          alert('扫描结果:' + text);
        });
      });
 */
@IonicPage()
@Component({
  selector: 'page-qrscanner',
  templateUrl: 'qrscanner.html',
})

export class QrscannerPage {
  light: boolean = false; // 判断闪光灯
  isShow: boolean = false; // 控制显示背景,避免切换页面卡顿

  constructor(
    private navCtrl: NavController,
    private nativeService: NativeService,
    private events: Events,
    // **如果没有注意版本问题,引入的方式错误,下面的依赖会报错:
    // Error: Can't resolve all parameters for QrscannerPage: ([object Object], [object Object], [object Object], ?).
    private qrScanner: QRScanner,
  ) { }

  ionViewDidLoad() {
    if (!this.nativeService.isMobile()) {
      alert('请使用真机调试');
      return;
    }
    this.qrScanner.prepare().then((status: QRScannerStatus) => {
      if (status.authorized) { // 判断是否有摄像头权限
        let scanSub = this.qrScanner.scan().subscribe((text: string) => {
          this.events.publish('qrscanner:result', text);
          scanSub.unsubscribe();
          this.navCtrl.pop();
        });
        // 打开摄像头
        this.qrScanner.show();
      } else if (status.denied) {
        alert('没有摄像头权限,请前往设置中开启');
      } else {
        alert('没有摄像头权限,请前往设置中开启');
      }
    }).catch((e: any) => console.log('调用二维码扫描插件失败', e));
  }

  ionViewWillEnter() {
    (window.document.querySelector('ion-app') as HTMLElement).classList.add('cameraView'); // tslint:disable-line
    this.isShow = true; // 显示背景
  }

  ionViewWillLeave() {
    (window.document.querySelector('ion-app') as HTMLElement).classList.remove('cameraView'); // tslint:disable-line
    this.qrScanner.hide(); // 需要关闭扫描,否则相机一直开着
    this.qrScanner.destroy(); // 关闭
    this.events.unsubscribe('qrscanner:result'); // 退出页面取消所有订阅,进入页面前需订阅
  }


  /* 切换前后摄像头 */
  toggleCamera() {
    if (this.frontCamera) {
      this.qrScanner.useBackCamera();
    } else {
      this.qrScanner.useFrontCamera();
    }
    this.frontCamera = !this.frontCamera;
  }


  // 开关手电筒
  toggleLight() {
    this.light ? this.qrScanner.disableLight() : this.qrScanner.enableLight();
    this.light = !this.light;
  }
}
注意上面的QRScanner这个依赖,我使用的QRScanner插件的版本是5.0+的版本(5.25.0版本),在它的依赖目录里面qr-scanner,index.d.ts中,QRScanner这个依赖不是作为类输出的,所以我们应该在页面上引用qr-scanner的ngx文件夹中的index.d.ts中输出的QRScanner类:
3️⃣qrscanner.module.ts:
import { NgModule } from '@angular/core';
import { IonicPageModule } from 'ionic-angular';
import { QrscannerPage } from './qrscanner';
import { ComponentsModule } from '../../components/components.module';

@NgModule({
  imports: [
    ComponentsModule,
    IonicPageModule.forChild(QrscannerPage),
  ],
  declarations: [
    QrscannerPage,
  ],
})
export class QrscannerPageModule {
}
4️⃣qrscanner.scss:
ion-app.cameraView,
ion-app.cameraView ion-content,
ion-app.cameraView .nav-decor {
  background: transparent none !important;

  .tabbar.show-tabbar {
    opacity: 0;
  }
}

page-qrscanner {
  .qrscannerMenu {
    background: none transparent;

    .area {
      margin-top: 30px;
      width: 100%;
      height: 90%;
      background: url(../assets/imgs/qrscanner/scanner.svg) no-repeat center center;
      background-size: contain;
    }

    .line {
      left: 25%;
      width: 50%;
      height: 2px;
      background: red;
      position: absolute;
      animation: myfirst 2s linear infinite alternate;
    }

    @keyframes myfirst {
      0% {
        background: red;
        top: 34%;
      }

      25% {
        background: yellow;
        top: 40%;
      }

      50% {
        background: blue;
        top: 46%;
      }

      75% {
        background: green;
        top: 52%;
      }

      100% {
        background: red;
        top: 60%;
      }
    }
  }

  ion-footer {
    display: flex;
    justify-content: space-around;
    padding: 22px;

    .warp-icon {
      width: 45px;
      height: 45px;
      background: #0071ff;
      border-radius: 50%;
      display: flex;
      justify-content: center;
      align-items: center;

      span {
        position: absolute;
        margin-top: 38px;
        font-size: 12px;
        color: #fff;
      }
    }
  }
}
以上的这个组件作为一个封装好的页面,可以一次封装,到处引用。
4、注意要在app.module.ts中引入QRScanner依赖:
import { QRScanner } from '@ionic-native/qr-scanner/ngx';

providers: [
    QRScanner,
    .....
]
5、variables.scss:
在后面增加样式,用于扫码的页面透明显示:
ion-app.cameraView,
ion-app.cameraView ion-content,
ion-app.cameraView .nav-decor {
  background: transparent none !important;

  .tabbar.show-tabbar {
    opacity: 0;
  }
}
6、index.html中,需要修改
7、AndroidManifest.xml文件中,配置相机、手电筒等的调用权限:
增加如下代码:
______________________________________________________
下面开始使用上面封装的扫码页面:
在需要使用的页面上,直接跳转到扫码页面上即可:
在html上增加扫码入口按钮:
在ts上跳转页面:
showScanner() {
    this.navCtrl.push('QrscannerPage').then(() => {
      this.events.subscribe('qrscanner:result', text => {
        // 可以将扫描的结果text拿去使用啦
      });
    });
  }
——————————————————————————————————————
附上scss中用到的图片素材,自己放到自己项目的图片文件夹中:
 close.svg
 flashlight.svg
 scanner.svg
 camera.svg
——————————————————————————————————————
由于厂商的设备还没有寄到我手上,所以暂时没有办法调试,现在在笔记本本地调试的效果如下,页面显示暂时没有办法正常展示,大家可以作为参考(更新后可以正常使用,请参考下方2020.05.22的更新):
_________________________________________________________________________________
2020.05.22更新:
这两天一直在调试设备上的QRScanner扫码的问题,首先交代一下我的本地环境:
--------------------- ---------------------- ------------------------ ----------------------
node v10.16.3
android Android SDK Manager上相关配置见下图:
![]()
ionic 5.4.16
--------------------- ---------------------- ------------------------ ----------------------
之前我安装的QRScanner版本是5.25.0的;
cordova-plugin-qrscanner是3.1.0版本的。
虽然引入没什么问题,但是所有的方法,qrscanner.prepare()、qrscanner.show().....都会报错:
ERROR TypeError: Object(...) is not a function
所以我怀疑可能是版本不匹配的问题,下载安装其他的QRScanner版本试试看——
接下来我们先将QRScanner插件卸载:
npm uninstall @ionic-native/qr-scanner 重新安装插件,这一次我们选择安装低版本的QRScanner插件:
ionic cordova plugin add [email protected]npm install @ionic-native/[email protected]安装成功之后,我们要将封装好的扫描页面和其他引入了QRScanner插件的页面上的引入方式改一下:
import { QRScanner, QRScannerStatus } from '@ionic-native/qr-scanner';这样引入之后,可以正常使用了,扫描的效果见下图:


