用mmdetection跑通自己的数据集
一、准备自己的数据集
mmdetection支持coco格式和voc格式的数据集,下面将分别介绍这两种数据集的使用方式 - coco数据集 官方推荐coco数据集按照以下的目录形式存储,以voc2007数据集为例
mmdetection
├── mmdet
├── tools
├── configs
├── data
│   ├── VOCdevkit
│   │   ├── VOC2007
│   │   │   ├── Annotations
│   │   │   ├── JPEGImages
│   │   │   ├── ImageSets
│   │   │   │   ├── Main
│   │   │   │   │   ├── test.txt
│   │   │   │   │   ├── trainval.txt
1、根据voc2007的格式创建文件夹
Annotations:为xml格式文件,用来记录目标的坐标以及类别信息。(可以使用LabelImg工具标注自己的数据集,可以生成与voc相同的xml格式标签。)
JPEGImages:基本为jpg格式文件,将自己整理的图片存入此文件夹
ImageSets:test.txt:测试集 ,train.txt:训练集 ,val.txt:验证集 ,trainval.txt:训练和验证集
生成txt文件的代码如下:
import os
import random

trainval_percent = 0.5  #训练集和验证集
train_percent = 0.5     #训练集
xmlfilepath = 'Annotations'
txtsavepath = 'ImageSets\Main'
total_xml = os.listdir(xmlfilepath)

num = len(total_xml)
list = range(num)
tv = int(num * trainval_percent)
tr = int(tv * train_percent)
trainval = random.sample(list, tv)
train = random.sample(trainval, tr)

ftrainval = open(txtsavepath + '/trainval.txt', 'w')
ftest = open(txtsavepath + '/test.txt', 'w')
ftrain = open(txtsavepath + '/train.txt', 'w')
fval = open(txtsavepath + '/val.txt', 'w')

for i in list:
    name = total_xml[i][:-4] + '\n'
    if i in trainval:
        ftrainval.write(name)
        if i in train:
            ftrain.write(name)
        else:
            fval.write(name)
    else:
        ftest.write(name)

ftrainval.close()
ftrain.close()
fval.close()
ftest.close()
2、以软连接的方式创建
cd mmdetection
mkdir data
ln -s $VOC2007_ROOT data/VOCdevkit
$VOC2007_ROOT为你的VOC2007数据集根目录,比如VOC2007存放在/root/VOCdevkit目录下。
3、修改相关代码
(1)、找到文件mmdet/dataset/voc.py,把CLASSES类别改成你自己数据集的类别。
(2)、找到文件mmdet/core/evaluation/class_name.py,把里面的voc_classes()改成你自己数据集的类别。这个关系到后面test的时候结果图中显示的类别名称。
(3)、找到anaconda的文件夹,anaconda3/envs/mmdetection/lib/python3.6/site-packages/mmdet-0.6.0+68589d3-py3.6.egg/mmdet,其中的mmdetection为自己创建的anaconda名,这个文件夹里有mmdet/dataset/voc.py和mmdet/core/evaluation/class_name.py两个文件,其中的内容也要对应做修改,否则跑的时候依然会报错/显示错误。
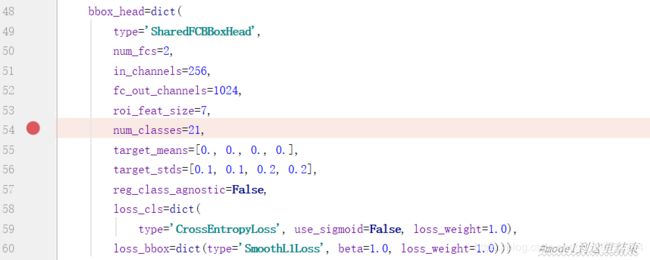
(4)、修改configs文件,在mmdetection中的configs文件找到自己选择的模型, 在num_classes修改为自己的类别数(自己数据集类别数+1)
这里附上configs文件中VOC数据集的代码部分:
# dataset settings
dataset_type = 'VOCDataset'                     #数据集类型
data_root = 'data/VOCdevkit/'                   #数据集根目录
img_norm_cfg = dict(
    mean=[123.675, 116.28, 103.53], std=[58.395, 57.12, 57.375], to_rgb=True)#输入图像初始化,减去均值mean并处以方差std,to_rgb表示将bgr转为rgb
data = dict(
    imgs_per_gpu=2,                             #每个gpu计算的图像数量
    workers_per_gpu=2,                          #每个gpu分配的线程数
    train=dict(
        type='RepeatDataset',  # to avoid reloading datasets frequently
        times=3,
        dataset=dict(
            type=dataset_type,                  #数据集类型
            ann_file=[
                data_root + 'VOC2007/ImageSets/Main/trainval.txt',#
                data_root + 'VOC2012/ImageSets/Main/trainval.txt'#
            ],
            img_prefix=[data_root + 'VOC2007/', data_root + 'VOC2012/'],
            img_scale=(1333, 800),              #改变图像尺寸,使其短边为600像素,同时长边不应超过1000像素
            img_norm_cfg=img_norm_cfg,          #图像初始化参数
            size_divisor=32,                    #对图像进行resize时的最小单位,32表示所有的图像都会被resize成32的倍数
            flip_ratio=0.5,                     #图像的随机左右翻转的概率
            with_mask=False,                    #训练时附带mask
            with_crowd=False,                    #训练时附带difficult的样本
            with_label=True)),                  #训练时附带label
    val=dict(
        type=dataset_type,
        ann_file=data_root + 'VOC2007/ImageSets/Main/trainval.txt',
        img_prefix=data_root + 'VOC2007/',
        img_scale=(1333, 600),
        img_norm_cfg=img_norm_cfg,
        size_divisor=32,
        flip_ratio=0,
        with_mask=False,
        with_crowd=False,
        with_label=True),
    test=dict(
        type=dataset_type,
        ann_file=data_root + 'VOC2007/ImageSets/Main/test.txt',
        img_prefix=data_root + 'VOC2007/',
        img_scale=(1333, 600),
        img_norm_cfg=img_norm_cfg,
        size_divisor=32,
        flip_ratio=0,
        with_mask=False,
        with_label=False,
        test_mode=True))
# optimizer
optimizer = dict(type='SGD', lr=0.01, momentum=0.9, weight_decay=0.0001)
#优化参数,lr为学习率,momentum为动量因子,weight_decay为权重衰减因子
#当gpu数量为8时,lr=0.02;当gpu数量为4时,lr=0.01;我只要一个gpu,所以设置lr=0.0025,修改前是0.02
optimizer_config = dict(grad_clip=dict(max_norm=35, norm_type=2))#梯度均衡参数
# learning policy
lr_config = dict(policy='step', step=[3])  # actual epoch = 3 * 3 = 9优化策略,在第3个epoch降低学习率
checkpoint_config = dict(interval=1)       #间隔1epoch,存储一次模型
# yapf:disable
log_config = dict(
    interval=50,                            #每50个batch输出一次信息
    hooks=[
        dict(type='TextLoggerHook'),        #控制台输出信息的风格
        # dict(type='TensorboardLoggerHook')
    ])
# yapf:enable
# runtime settings
total_epochs = 4  # actual epoch = 4 * 3 = 12   最大epoch数
dist_params = dict(backend='nccl')          #分布式参数
log_level = 'INFO'                          #输出信息的完整度级别
work_dir = './work_dirs' #log文件和模型文件存储路径
load_from = None                            #加载模型的路径,None表示从预训练模型加载
resume_from = None                          #恢复训练模型的路径
workflow = [('train', 1)]                   #当前工作区名称
二、训练
运行下方的代码:
python tools/train.py --gpus --work_dir 比如,python tools/train.py configs/pascal_voc/faster_rcnn_r50_fpn_1x_voc0712.py --gpus 1 --validate

