linux下安装tensorflow-gpu
安装英伟达驱动
1、驱动下载地址: https://www.nvidia.cn/Download/index.aspx?lang=cn
2、卸载原有驱动
Ctrl+Alt+F1
sudo apt-get remove nvidia-*
sudo apt-get autoremove
sudo nvidia-uninstall
重启电脑
shutdown -r now
3、驱动安装
Ctrl+Alt+F1
sudo service lightdm stop
sudo sh ./filename.run -no-x-check -no-nouveau-check -no-opengl-files
sudo service lightdm restart
如果遇到如下问题:
ERROR: Unable to load the kernel module 'nvidia.ko'.  This happens most
   frequently when this kernel module was built against the wrong or
   improperly configured kernel sources, with a version of gcc that differs
   from the one used to build the target kernel, or if a driver such as
   rivafb/nvidiafb is present and prevents the NVIDIA kernel module from
   obtaining ownership of the NVIDIA graphics device(s), or NVIDIA GPU
   installed in this system is not supported by this NVIDIA Linux graphics
   driver release.
解决方法:更新Ubuntu16.04源
cd /etc/apt/
sudo cp sources.list sources.list.bak
sudo gedit sources.list
在sources.list中添加如下代码:
deb http://mirrors.ustc.edu.cn/ubuntu/ xenial main restricted universe multiverse
deb http://mirrors.ustc.edu.cn/ubuntu/ xenial-security main restricted universe multiverse
deb http://mirrors.ustc.edu.cn/ubuntu/ xenial-updates main restricted universe multiverse
deb http://mirrors.ustc.edu.cn/ubuntu/ xenial-proposed main restricted universe multiverse
deb http://mirrors.ustc.edu.cn/ubuntu/ xenial-backports main restricted universe multiverse
deb-src http://mirrors.ustc.edu.cn/ubuntu/ xenial main restricted universe multiverse
deb-src http://mirrors.ustc.edu.cn/ubuntu/ xenial-security main restricted universe multiverse
deb-src http://mirrors.ustc.edu.cn/ubuntu/ xenial-updates main restricted universe multiverse
deb-src http://mirrors.ustc.edu.cn/ubuntu/ xenial-proposed main restricted universe multiverse
deb-src http://mirrors.ustc.edu.cn/ubuntu/ xenial-backports main restricted universe multiverse
最后更新源和更新已安装的包后重新安装即可:
sudo apt-get update
sudo apt-get upgrade
安装Anaconda
1、Anaconda下载地址: https://www.anaconda.com/distribution/#linux
2、安装
bash Anaconda3-5.1.0-Linux-x86_64.sh
3、配置环境变量
sudo gedit /etc/profile
末尾添加:
export PATH=/root/anaconda2/bin:$PATH
保存并应用
source /etc/profile
重启终端后更新
conda update -n base conda
安装Tensorflow-gpu和Keras
创建环境并指定python版本
conda create -n tf python=2.7
激活环境
conda activate tf 或 source activate tf
安装
conda install tensorflow-gpu==1.6.0 keras
安装其他库
conda install tensorflow-gpu keras
conda install matplotlib
conda install scikit-learn
conda install graphviz pydot
退出环境
conda deactivate 或 source deactivate
测试
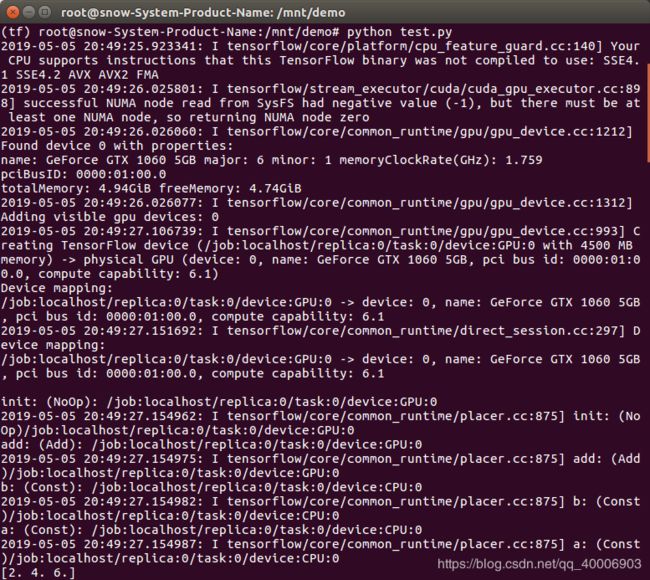
运行 test.py 如下:
import tensorflow as tf

with tf.device('/cpu:0'):
    a = tf.constant([1.0,2.0,3.0],shape=[3],name='a')
    b = tf.constant([1.0,2.0,3.0],shape=[3],name='b')
with tf.device('/gpu:1'):
    c = a+b

sess = tf.Session(config=tf.ConfigProto(allow_soft_placement=True,log_device_placement=True))
#sess = tf.Session(config=tf.ConfigProto(log_device_placement=True))
sess.run(tf.global_variables_initializer())
print(sess.run(c))
参考
https://blog.csdn.net/gsww404/article/details/78328897
https://blog.csdn.net/weixin_39954229/article/details/79961172
