Netty底层也是基于NIO,所以在分析服务启动的流程之前,我们先回顾一下NIO的启动Server的代码,写的一个Server例子如下,只保留和Netty启动相关的代码
public class NioServer implements Runnable {
    public static void main(String[] args) {
        new Thread(new NioServer(8080)).start();
    }
    private Selector selector;
    private ServerSocketChannel serverChannel;
    public NioServer(int port) {
        try {
            selector = Selector.open();
            serverChannel = ServerSocketChannel.open();
            serverChannel.socket().bind(new InetSocketAddress(port), 1024);
            serverChannel.configureBlocking(false);
            serverChannel.register(selector, SelectionKey.OP_ACCEPT);
        } catch (IOException e) {
        }
    }
    public void run() {
        //SelectionKey处理
    }
}
构造方法里先创建Selector和ServerSocketChannel,绑定端口和地址,然后Channel设置为非阻塞, 最后将该Channel注册到Selector上,一个简单的NIO初始化代码就是这样,Netty启动的时候核心也是这个代码,只不过Netty封装了(感觉有点复杂=_=)下面会看下Netty是怎么处理的
源码分析
首先看下NettyServer的Demo(本文基于netty4.1.22版本)
    public void bind(int port) {
        //配置服务端的NIO线程组
        EventLoopGroup bossGroup = new NioEventLoopGroup(1);
        EventLoopGroup workerGroup = new NioEventLoopGroup(4);

        try {
            ServerBootstrap b = new ServerBootstrap();
            b.group(bossGroup, workerGroup)
                .channel(NioServerSocketChannel.class)
                .option(ChannelOption.SO_BACKLOG, 1024)
                .childHandler(new ChannelInitializer(){
                    @Override
                    protected void initChannel(SocketChannel socketChannel) throws Exception {
                        socketChannel.pipeline()
                            .addLast(new NettyServerHandler());
                    }
                });
            //绑定端口,同步等待成功
            ChannelFuture f = b.bind(port).sync();
            //等待服务端监听端口关闭
            f.channel().closeFuture().sync();
        } catch (InterruptedException e) {
        } finally {
            bossGroup.shutdownGracefully();
            workerGroup.shutdownGracefully();
        }
    }
这次会根据NIO的demo的几步操作来分析Netty的如何封装的:
- 创建Channel并设置非阻塞
- Channel绑定地址
- Channel注册Selector
ServerBootstrap的bind方法是入口,主要做了个校验,然后再调用核心的doBind方法
创建Channel并设置非阻塞
doBind方法
    private ChannelFuture doBind(final SocketAddress localAddress) {
        final ChannelFuture regFuture = initAndRegister();
        //....
            return promise;
        }
    }
initAndRegister方法实现如下:
    final ChannelFuture initAndRegister() {
        Channel channel = null;
        try {
            channel = channelFactory.newChannel();
            init(channel);
        } catch (Throwable t) {
            if (channel != null) {
                channel.unsafe().closeForcibly();
                return new DefaultChannelPromise(channel, GlobalEventExecutor.INSTANCE).setFailure(t);
            }
            return new DefaultChannelPromise(new FailedChannel(), GlobalEventExecutor.INSTANCE).setFailure(t);
        }

        ChannelFuture regFuture = config().group().register(channel);
        if (regFuture.cause() != null) {
            if (channel.isRegistered()) {
                channel.close();
            } else {
                channel.unsafe().closeForcibly();
            }
        }
        return regFuture;
    }
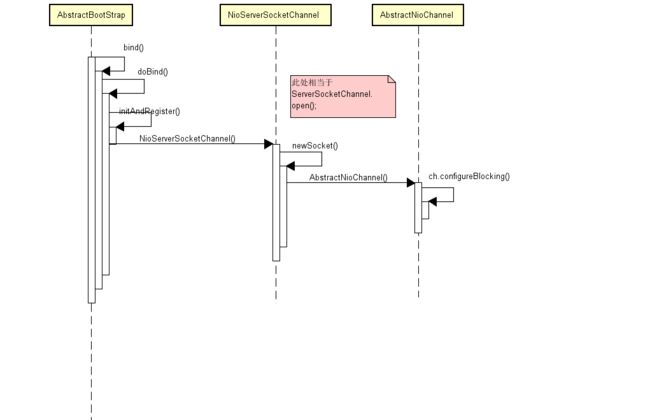
一开始就初始化了Channel,但是这个Channel是Netty的Channel,而不是我们要找的ServerSocketChannel,但是可能是Netty封装的。
newChannel是根据一开始b.channel这个方法的参数,通过反射调用其构造方法,由于传入的是NioServerSocketChannel,那么看下其构造方法
    private static ServerSocketChannel newSocket(SelectorProvider provider) {
        try {
            return provider.openServerSocketChannel();
        } catch (IOException e) {
            throw new ChannelException(
                    "Failed to open a server socket.", e);
        }
    }

    private final ServerSocketChannelConfig config;

    public NioServerSocketChannel() {
        this(newSocket(DEFAULT_SELECTOR_PROVIDER));
    }

    public NioServerSocketChannel(ServerSocketChannel channel) {
        super(null, channel, SelectionKey.OP_ACCEPT);
        config = new NioServerSocketChannelConfig(this, javaChannel().socket());
    }
的确是封装了ServerSocketChannel,在NioServerSocketChannel初始化的时候就会open一个Channel,和NIO的demo类似。
再看起其父类AbstractNioChannel实现(直接父类是AbstractNioMessageChannel,但是其构造方法什么都没做,所以直接跳过)
    protected AbstractNioChannel(Channel parent, SelectableChannel ch, int readInterestOp) {
        super(parent);
        this.ch = ch;
        this.readInterestOp = readInterestOp;
        try {
            ch.configureBlocking(false);
        } catch (IOException e) {
            // ....
        }
    }
这里就是将需要监听的事件保存起来,然后设置之前创建的Channel为非阻塞。
再看下其父类AbstractChannel的构造方法:
    protected AbstractChannel(Channel parent) {
        this.parent = parent;
        id = newId();
        unsafe = newUnsafe();
        pipeline = newChannelPipeline();
    }
就是初始化pipeline和unsafe以及其他属性,这里的unsafe是NioMessageUnsafe,主要用于底层的register,bind,read和write等操作,后续会用到
总结时序图如下
Channel注册Selector
回到initAndRegister方法,有一句代码如下:
ChannelFuture regFuture = config().group().register(channel);
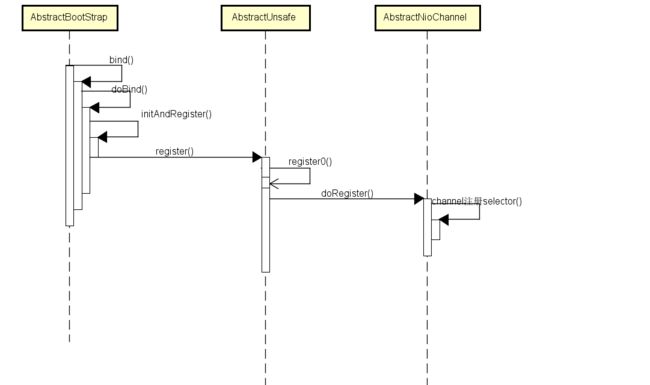
这里间接会通过EventLoopGroup选择一个EventLoop,然后调用其register方法
    @Override
    public ChannelFuture register(final ChannelPromise promise) {
        promise.channel().unsafe().register(this, promise);
        return promise;
    }
之前说过,unsafe是NioMessageUnsafe类型,由于registert在其父类AbstractUnsafe中实现,那么直接看AbstractUnsafe的register方法
        @Override
        public final void register(EventLoop eventLoop, final ChannelPromise promise) {
            //....

            AbstractChannel.this.eventLoop = eventLoop;

            if (eventLoop.inEventLoop()) {
                register0(promise);
            } else {
                try {
                    eventLoop.execute(new Runnable() {
                        @Override
                        public void run() {
                            register0(promise);
                        }
                    });
                } catch (Throwable t) {
                    //....
                }
            }
        }
核心是register0方法
        private void register0(ChannelPromise promise) {
            try {
                if (!promise.setUncancellable() || !ensureOpen(promise)) {
                    return;
                }
                boolean firstRegistration = neverRegistered;
                doRegister();
                neverRegistered = false;
                registered = true;

                pipeline.invokeHandlerAddedIfNeeded();

                safeSetSuccess(promise);
                pipeline.fireChannelRegistered();
                if (isActive()) {
                    if (firstRegistration) {
                        pipeline.fireChannelActive();
                    } else if (config().isAutoRead()) {
                        beginRead();
                    }
                }
            } catch (Throwable t) {
                closeForcibly();
                closeFuture.setClosed();
                safeSetFailure(promise, t);
            }
        }
doRegister方法如下:
    protected void doRegister() throws Exception {
        boolean selected = false;
        for (;;) {
            try {
                selectionKey = javaChannel().register(eventLoop().unwrappedSelector(), 0, this);
                return;
            } catch (CancelledKeyException e) {
                if (!selected) {
                    eventLoop().selectNow();
                    selected = true;
                } else {
                    throw e;
                }
            }
        }
    }
这里就是将NIO中将Channel注册到Selector的过程
流程总结如下
Channel绑定地址
调用initAndRegister的方法后,该方法会返回一个ChannelFuture,如果initAndRegister的操作完成了,那么isDone为true,直接调用doBind0,否则,在ChannelFuture上注册一个回调,在完成时再调用doBind0方法,doBind0方法实现如下
    private static void doBind0(
            final ChannelFuture regFuture, final Channel channel,
            final SocketAddress localAddress, final ChannelPromise promise) {
        // 这里使用了EventLoop的execute方法,可以先暂时理解,开启一个线程异步处理一个任务
        channel.eventLoop().execute(new Runnable() {
            @Override
            public void run() {
                if (regFuture.isSuccess()) {
                    channel.bind(localAddress, promise).addListener(ChannelFutureListener.CLOSE_ON_FAILURE);
                } else {
                    promise.setFailure(regFuture.cause());
                }
            }
        });
    }
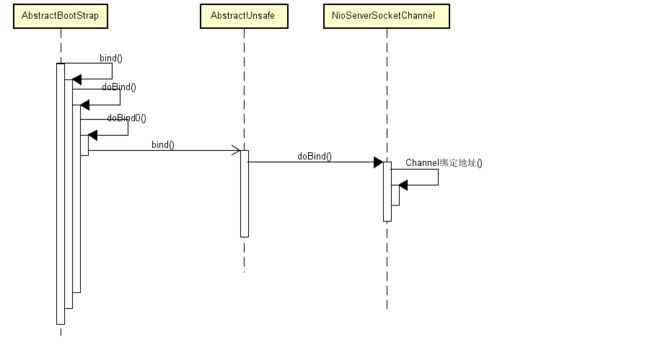
在EventLoop中执行Channel的bind方法,最终也是会调用到NioMessageUnsafe父类的bind方法
        public final void bind(final SocketAddress localAddress, final ChannelPromise promise) {
            //....
            boolean wasActive = isActive();
            try {
                doBind(localAddress);
            } catch (Throwable t) {
                //....
            }
           // ....
        }
核心是doBind方法
    @Override
    protected void doBind(SocketAddress localAddress) throws Exception {
        if (PlatformDependent.javaVersion() >= 7) {
            javaChannel().bind(localAddress, config.getBacklog());
        } else {
            javaChannel().socket().bind(localAddress, config.getBacklog());
        }
    }
又是非常的熟悉的代码,总结一下流程图:
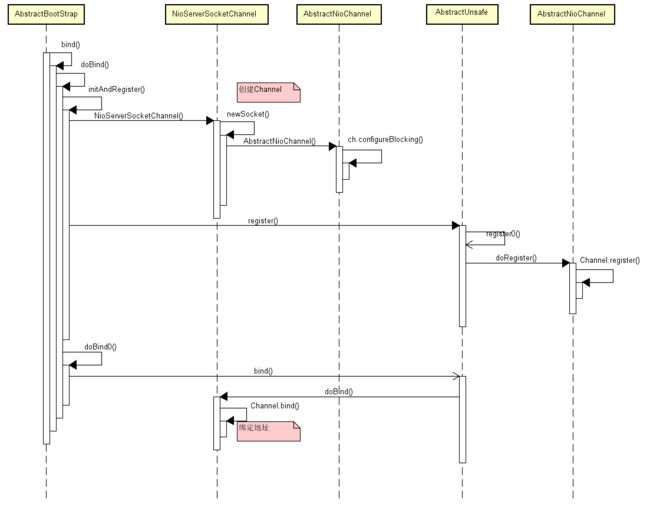
到这里,NIO的ServerSocketChannel初始化的几个点都找到了,整个流程的流程图如下:
另外,会发现把Channel注册到Selector上的时候,没有分析Selector是怎么来的,这个其实是是在EventLoop初始化的时候进行赋值的,具体会在后续EventLoop的分析中再说一下
注:上面的流程图都是主要的实现类,忽略pipeline一些handler的处理


