Java基础:GUI
文章目录
- Java基础:GUI
- 1、Swing概述
- 2、Swing顶级容器
- 2.1、JFrame
- 2.2、JDialog
- 3、布局管理器
- 3.1、BorderLayout
- 3.2、FlowLayout
- 3.3、GridLayout
- 4、事件处理
- 4.1、事件处理机制
- 4.2、Swing常用事件处理
- 5、Swing常用组件
- 5.1、面板组件
- 5.2、文本组件
- 5.3、标签组件
- 5.4、按钮组件
- 5.5、下拉框组件
- 5.6、菜单组件 —— 下拉式菜单
- 5.7、菜单组件 —— 弹出式菜单
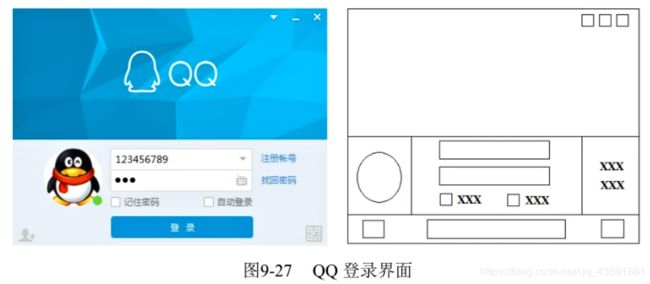
- 6、Swing组件的整合使用——QQ登录界面实现
- 7、JavaFX图形用户界面工具
- 7.1、JavaFX概述
- 7.2、JavaFX开发环境配置
- 7.3、JavaFX可视化工具
Java基础:GUI
GUI(Graphical User Interface):图形用户接口
1、Swing概述
什么是Swing?
- Swing是在原有AWT(抽象窗口工具包)的基础上进行了补充和改进,提供了更加丰富的组件和功能,来满足GUI设计的一切需求。
几点说明:
-
Swing组件的所有类都继承子Container类,然后根据GUI开发的功能扩展了2个主要的分支:容器分支(包括Window窗口和Panel面板)和组件分支。
-
容器分支就是为了实现图形用户界面窗口容器而设计的。
-
组件分支则是为了实现向容器中填充数据、元素以及人机交互组件等功能。
-
Swing组件类中,常用的顶级容器类包括JApplet、JFrame和JDialog。
-
常用组件AbstractButton类及其子类使用来定义按钮常见行为的工具类。
-
JTextComponent类及其子类是用来定义文本内容编辑区区域的工具类。
下面重点介绍 JFrame和 JDialog:
2、Swing顶级容器
2.1、JFrame
- 在Swing组件中,最常见的一个容器就是JFrame;
- JFrame是一个独立存在的顶级容器(也叫窗口),不能放置在其他容器之中;
- JFrame支持通用窗口所有的基本功能,例如窗口最小化、设定窗口大小等;
示例:
import javax.swing.*;

public class JFrameDemo {
    public static void main(String[] args) {
        // 在主线程中开启另一条线程,比较安全,主线程不能更新 UI
        /*SwingUtilities.invokeLater(new Runnable() {
            @Override
            public void run() {
                createWindow();
            }
        });*/

        // lambda表达式
        // SwingUtilities.invokeLater(() -> createWindow());

        // 方法引用
        SwingUtilities.invokeLater(JFrameDemo::createWindow);

    }

    private static void createWindow() {
        JFrame jf = new JFrame();
        // 设置窗体可见,不设置无法显示
        jf.setVisible(true);
        // 设置窗口的标题,也可以写在构造方法中
        jf.setTitle("窗口标题");
        // 设置关闭窗口时,一同关闭后台的Java程序
        jf.setDefaultCloseOperation(JFrame.EXIT_ON_CLOSE);
        // 设置窗口的大小,单位为像素
        jf.setSize(400, 600);
    }
}
2.2、JDialog
- JDialog是Swing的另一个顶级容器,通常用来表示对话框窗口;
- JDialog对话框可分为两种:模态对话框和非模态对话框;
- 模态对话框:是指用户需要等到处理完对话框后才能继续与其他对话框交互
- 非模态对话框:是指允许用户在处理对话框的同时与其他窗口交互
常用构造方法:
对话框是模态还是非模态,可以在创建JDialog对象时为构造方法传入参数来设置,也可以在创建JDialog对象后,调用 setModal() 方法来设置
-
modal:true为模态对话框,false为非模态对话框(默认)
-
owner:为对话框拥有者(顶级窗口JFrame),具体是指JDialog对话框在哪个JFrame窗口对象里面。
| 方法声明 | 功能描述 |
|---|---|
| JDialog(Frame owner) | 用来创建一个非模态无标题的对话框 |
| JDialog(Frame owner, boolean modal) | 创建一个非模态有标题对话框 |
| JDialog(Frame owner, boolean modal) | 创建一个指定模式无标题的对话框 |
| JDialog(Frame owner, String title, boolean modal) | 创建一个指定模式有标题对话框 |
示例:
import javax.swing.*;

public class JDialogDemo {
    public static void main(String[] args) {

        SwingUtilities.invokeLater(JDialogDemo::createAndShowGUI);

    }

    private static void createAndShowGUI() {
        // 创建JFrame窗口对象
        JFrame jf = new JFrame("窗口标题");
        // 设置窗口的宽和高,单位为像素
        jf.setSize(400, 600);
        // 点击关闭窗口时,关闭后台Java程序
        jf.setDefaultCloseOperation(JFrame.EXIT_ON_CLOSE);
        // 设置窗口可见
        jf.setVisible(true);

        // 创建JDialog对话框对象,默认为非模态对话框
        // JDialog dialog = new JDialog(jf, "对话框标题");
        // 模态对话框
        JDialog dialog = new JDialog(jf, "对话框标题", true);
        // 设置对话框的宽和高,单位为像素
        dialog.setSize(300, 200);
        // 点击关闭对话框时隐藏对话框
        dialog.setDefaultCloseOperation(JDialog.HIDE_ON_CLOSE);
        // 设置对话框可见
        dialog.setVisible(true);

    }
}
注意:
- 虽然JFrame和JDialog都可以创建顶级容器窗口,但JDialog创建的窗口右上角没有放大和缩小功能;
- 由于创建JDialog容器对象时,设置的模态参数modal为true,所以在操作时,必须先关闭JDialog对话框后,才可以与JFrame窗口对象进行交互;
3、布局管理器
Swing组件不能单独存在,必须放置于容器当中,而组件在容器中的位置和尺寸是由布局管理器决定的。
8大分类:
| 类 | 解释 |
|---|---|
| BorderLayout | 边界布局管理器 |
| BoxLayout | 箱式布局管理器 |
| CardLayout | 卡片布局管理器 |
| FlowLayout | 流式布局管理器 |
| GridBagLayout | 网格包布布局管理器 |
| GridLayout | 网格布局管理器 |
| GroupLayout | 分组布局管理器 |
| SpringLayout | 弹性布局管理器 |
3.1、BorderLayout
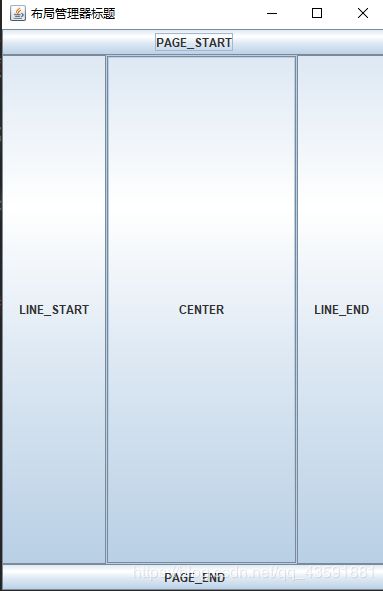
BorderLayout(边界布局管理器)是一种较为复杂的布局方式,它将容器划分为五个区域,分别是页头(PAGE_START)、页尾(PAGE_END)、行头(LINE_START)、行尾(LINE_END)、中部(LINE_CENTER)。
组件可以被放置在这五个区域中的任意一个位置。
使用:
- 向BorderLayout布局管理器的容器中添加组件时,需要使用 JFrame中的 void add(Component comp, Object constraints) 方法。
- 参数 comp表示要添加的组件,constraints 指定组件添加到布局中的位置
- 传参时,可以使用 BorderLayout 类中提供的五个常量设置组件位置。
PAGE_START、PAGE_END、LINE_START、LINE_END、CENTER
示例:
import javax.swing.*;
import java.awt.*;

public class BorderLayoutDemo {
    public static void main(String[] args) {
        SwingUtilities.invokeLater(BorderLayoutDemo::createAndShowGUI);
    }

    private static void createAndShowGUI() {
        // 1、首先创建顶级容器
        JFrame jf = new JFrame("布局管理器标题");
        // 2、指定使用哪种布局管理器 --> 边界布局管理器
        jf.setLayout(new BorderLayout());
        jf.setSize(400, 600);
        jf.setLocation(800, 100);
        jf.setDefaultCloseOperation(JFrame.EXIT_ON_CLOSE);
        // 3、设置组件(按钮)
        JButton btn1 = new JButton("PAGE_START");
        JButton btn2 = new JButton("PAGE_END");
        JButton btn3 = new JButton("LINE_START");
        JButton btn4 = new JButton("CENTER");
        JButton btn5 = new JButton("LINE_END");
        // 4、添加组件
        jf.add(btn1, BorderLayout.PAGE_START);
        jf.add(btn2, BorderLayout.PAGE_END);
        jf.add(btn3, BorderLayout.LINE_START);
        jf.add(btn4, BorderLayout.CENTER);
        jf.add(btn5, BorderLayout.LINE_END);

        // 5、设置容器可见
        jf.setVisible(true);
    }
}
注意:
- 使用BorderLayout的好处是可以限定各区域的边界,当用户改变容器窗口大小时,各组件的相对位置不变;
- 想BorderLayout的布局管理器添加组件时,如果不指定添加到哪个区域,则默认添加到CENTER区域;
- 每个区域只能放置一个组件,如果向一个区域中添加多个组件时,后放入额组件会覆盖先放入的组件;
3.2、FlowLayout
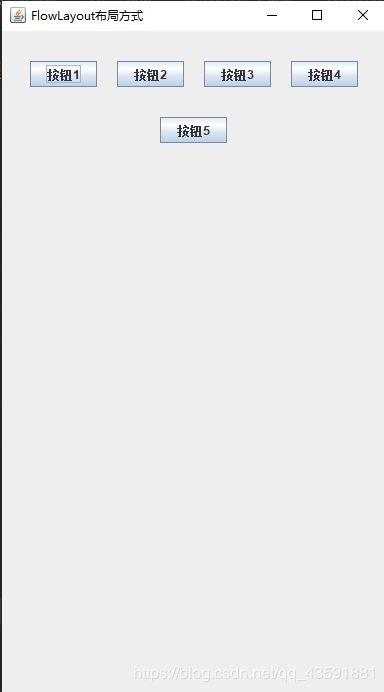
- FlowLayout(流式布局管理器)是最简单布局管理器
- 在这种布局下,容器会将组件按照添加顺序从左往右放置,当达到容器的边界时,会自动将组件放到下一行的开始位置;
- 这个组件可以按左对齐、居中对齐(默认方式)、右对齐的方式排列
示例:
import javax.swing.*;
import java.awt.*;

public class FlowLayoutDemo {
    public static void main(String[] args) {
        SwingUtilities.invokeLater(FlowLayoutDemo::creatAndShowGUI);
    }

    private static void creatAndShowGUI() {
        JFrame jf = new JFrame("FlowLayout布局方式");

        // jf.setLocation(800, 100);
        // jf.setSize(400, 700);
        // 同时指定摆放的水平、垂直位置,窗口的宽和高
        jf.setBounds(800, 100, 400, 700);
        /*
            指定布局管理器, 构造方法长度对齐方式、组件之间的水平间距和垂直间距
         */
        jf.setLayout(new FlowLayout(FlowLayout.CENTER, 20, 30));
        // 添加组件
        jf.add(new JButton("按钮1"));
        jf.add(new JButton("按钮2"));
        jf.add(new JButton("按钮3"));
        jf.add(new JButton("按钮4"));
        jf.add(new JButton("按钮5"));

        jf.setDefaultCloseOperation(JFrame.EXIT_ON_CLOSE);
        jf.setVisible(true);
    }
}
3.3、GridLayout
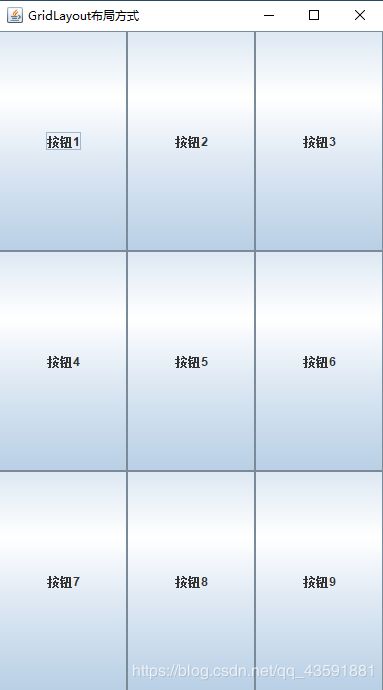
- GridLayout(网格布局管理器)使用纵横线将容器分成n行m列大小相等的网格,每个网格中可以添加一个组件;
- 添加到容器中的组件会从左往右、从上往下依次填充到网格中;
- 与FlowLayout不同的是:放置在GridLayout布局管理器中的组件将自动占据网格的整个区域;
特点:
- 组件的相对位置不随区域的缩放而改变,但组件的大小会随之改变,组件始终占据网格的整个区域;
缺点:
- 总是忽略组件的最佳大小,所有组件的宽和高都相同
示例:
import javax.swing.*;
import java.awt.*;

public class GridLayoutDemo {
    public static void main(String[] args) {
        SwingUtilities.invokeLater(GridLayoutDemo::creatAndShowGUI);
    }

    private static void creatAndShowGUI() {
        JFrame jf = new JFrame("GridLayout布局方式");

        // jf.setLocation(800, 100);
        // jf.setSize(400, 700);
        // 同时指定摆放的水平、垂直位置,窗口的宽和高
        jf.setBounds(800, 100, 400, 700);
        /*
            指定布局管理器, 构造方法中指定列数和行数,此外还有组件之间的水平和垂直间距
         */
        jf.setLayout(new GridLayout(3, 3));
        // 添加组件
        for (int i = 1; i <= 9; i++) {
            JButton btn = new JButton("按钮" + i);
            jf.add(btn);
        }
        jf.setDefaultCloseOperation(JFrame.EXIT_ON_CLOSE);
        jf.setVisible(true);
    }
}
4、事件处理
4.1、事件处理机制
Swing组件中的时间处理专门用于响应用户的操作,例如,响应用户单击鼠标,按下键盘等操作。
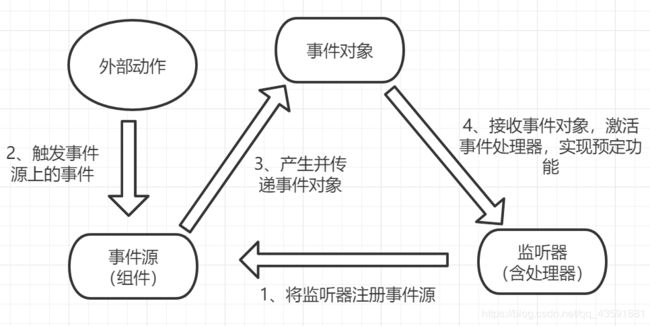
Swing事件处理涉及的三类对象:
| 名称 | 含义 |
|---|---|
| 事件源(Event Source) | 事件发生的场所,通常就是产生事件的组件,例如窗口、按钮、菜单等 |
| 事件对象(Event) | 封装了GUI组件上发生的特定事件(通常就是用户的一次操作) |
| 监听器(Listener) | 负责监听时间源上发生的事件,并对各种事件作出相应处理的对象(对象中包含事件处理器) |
事件处理机制 —— 事件处理流程
事件源是一个组件,当用户进行一些操作时,如按下鼠标或者释放键盘等,都会触发相应的事件,如果事件源注册了监听器,则触发的相应事件将会被处理。
事件处理机制 —— 主要步骤
1、创建事件源
除了一些常见的按钮、键盘等组件可以作为事件源外,包括JFrame窗口在内的顶级容器也可以作为事件源;
2、自定义事件监听器
根据要监听的事件源创建指定类型的监听器进行事件处理,该监听器是一个特殊的Java类,必须时间 XxxListener接口(根据组件触发的动作区分,如WindowsListener用于监听窗口时间,ActionListener用于监听动作事件)
3、为事件源注册监听器
使用addXxxListener()方法为指定事件源添加特定类型的监听器。当事件源上发生监听的事件后,就会触发绑定的事件监听器,然后由监听器中的方法进行相应处理。
示例:
import javax.swing.*;
import java.awt.*;
import java.awt.event.ActionEvent;

public class DemoActionListener {
    public static void main(String[] args) {
        SwingUtilities.invokeLater(DemoActionListener::createAndShowGUI);
    }

    private static void createAndShowGUI() {
        JFrame jf = new JFrame("事件学习");
        jf.setBounds(800, 100, 400, 600);

        jf.setLayout(new FlowLayout());
        JButton btn = new JButton("按钮");
        btn.addActionListener(new AbstractAction() {
            @Override
            public void actionPerformed(ActionEvent e) {
                System.out.println("我被点击了");
            }
        });

        jf.add(btn);
        jf.setDefaultCloseOperation(JFrame.EXIT_ON_CLOSE);
        jf.setVisible(true);

    }
}
4.2、Swing常用事件处理
主要事件分类:
- 窗体事件(WindowEvent)
- 鼠标事件(MouseEvent)
- 键盘事件(KeyEvent)
- 动作事件(ActionEvent)
1、窗体事件(WindowEvent)
对窗体进行操作时,例如窗体的打开、关闭、激活、停用等,这些动作都属于窗体事件。
Java中提供了一个WindowEvent类用于表示窗体事件
使用:
- 首先需要定义一个实现了WindowEvent接口的类作为窗体监听器
- 然后通过 addWindowListener() 方法将窗体对象与窗体监听器进行绑定
示例:
import javax.swing.*;
import java.awt.*;
import java.awt.event.ActionEvent;
import java.awt.event.WindowAdapter;
import java.awt.event.WindowEvent;
import java.awt.event.WindowListener;

public class WindowListenerDemo {
    public static void main(String[] args) {
        SwingUtilities.invokeLater(WindowListenerDemo::createAndShowGUI);
    }

    private static void createAndShowGUI() {
        JFrame jf = new JFrame("窗体事件学习");
        jf.setBounds(800, 100, 400, 600);

        jf.addWindowListener(new WindowListener() {
            @Override
            public void windowOpened(WindowEvent e) {
                System.out.println("windowOpened --> 窗体打开事件...");
            }

            @Override
            public void windowClosing(WindowEvent e) {
                System.out.println("windowClosing --> 窗体正在关闭事件...");
            }

            @Override
            public void windowClosed(WindowEvent e) {
                System.out.println("windowClosed --> 窗体关闭事件...");
            }

            @Override
            public void windowIconified(WindowEvent e) {
                System.out.println("windowIconified --> 窗体图标化事件/最小化...");
            }

            @Override
            public void windowDeiconified(WindowEvent e) {
                System.out.println("windowDeiconified --> 窗体取消图标化事件/取消最小化...");
            }

            @Override
            public void windowActivated(WindowEvent e) {
                System.out.println("windowActivated --> 窗体激活事件...");
            }

            @Override
            public void windowDeactivated(WindowEvent e) {
                System.out.println("windowDeactivated --> 窗体停用事件...");
            }
        });

        jf.setDefaultCloseOperation(JFrame.EXIT_ON_CLOSE);
        jf.setVisible(true);

    }
}
2、鼠标事件(MouseEvent)
示例:
import javax.swing.*;
import java.awt.*;
import java.awt.event.MouseEvent;
import java.awt.event.MouseListener;

public class MouseListenerDemo {
    public static void main(String[] args) {
        SwingUtilities.invokeLater(MouseListenerDemo::creatAndShowGUI);
    }

    private static void creatAndShowGUI() {
        JFrame jf = new JFrame("窗口标题");
        jf.setBounds(800, 100, 400, 700);
        jf.setLayout(new FlowLayout(FlowLayout.CENTER, 20, 30));

        JButton button = new JButton("按钮");
        button.addMouseListener(new MouseListener() {
            @Override
            public void mouseClicked(MouseEvent e) {
                System.out.println("mouseClicked --> 按钮区域被鼠标点击了");
            }

            @Override
            public void mousePressed(MouseEvent e) {
                System.out.println("mousePressed --> 按钮区域被鼠标按住了");
            }

            @Override
            public void mouseReleased(MouseEvent e) {
                System.out.println("mouseReleased --> 按钮区域被鼠标松开了");
            }

            @Override
            public void mouseEntered(MouseEvent e) {
                System.out.println("mouseEntered --> 鼠标进入按钮区域了");
            }

            @Override
            public void mouseExited(MouseEvent e) {
                System.out.println("mouseExited --> 鼠标离开按钮区域了");
            }
        });
        jf.add(button);
        jf.setDefaultCloseOperation(JFrame.EXIT_ON_CLOSE);
        jf.setVisible(true);
    }
}
MouseEvent类中定义了很多常量来识别鼠标动作
- MouseEvent.BUTTON1:用来判定鼠标左击事件
- MouseEvent.BUTTON2:用来判定鼠标滑轮点击事件
- MouseEvent.BUTTON3:用来判定鼠标右击事件
示例:
import javax.swing.*;
import java.awt.*;
import java.awt.event.MouseAdapter;
import java.awt.event.MouseEvent;

public class MouseListenerDemo {
    public static void main(String[] args) {
        SwingUtilities.invokeLater(MouseListenerDemo::creatAndShowGUI);
    }

    private static void creatAndShowGUI() {
        JFrame jf = new JFrame("窗口标题");
        jf.setBounds(800, 100, 400, 700);
        jf.setLayout(new FlowLayout(FlowLayout.CENTER, 20, 30));
        JButton btn = new JButton("按钮");
        btn.addMouseListener(new MouseAdapter() {
            @Override
            public void mousePressed(MouseEvent e) {
                int button = e.getButton();
                if (button == MouseEvent.BUTTON1) {
                    System.out.println("鼠标左键被点击了");
                } else if (button == MouseEvent.BUTTON2) {
                    System.out.println("鼠标滑轮键被点击了");
                } else if (button == MouseEvent.BUTTON3) {
                    System.out.println("鼠标右键被点击了");
                }
            }
        });
        jf.add(btn);
        jf.setDefaultCloseOperation(JFrame.EXIT_ON_CLOSE);
        jf.setVisible(true);
    }
}
3、键盘事件(KeyEvent)
- 键盘操作也是最常用的用户交互方式,例如键盘按下,释放等,这些操作被定义为键盘事件。
- Java中提供了一个KeyEvent类表示键盘事件。
使用:
- 处理键盘事件的监听器对象需要实现KeyListener接口或继承KeyAdapter抽象类;
- 然后调用 addKeyListener() 方法将监听器绑定到事件源对象;
示例:
import javax.swing.*;
import java.awt.*;
import java.awt.event.KeyAdapter;
import java.awt.event.KeyEvent;

public class KeyListenerDemo {
    public static void main(String[] args) {
        SwingUtilities.invokeLater(KeyListenerDemo::creatAndShowGUI);
    }

    private static void creatAndShowGUI() {
        JFrame jf = new JFrame("窗口标题");
        jf.setBounds(800, 100, 400, 700);
        jf.setLayout(new FlowLayout(FlowLayout.CENTER));

        // 文本输入框注册监听
        JTextField textField = new JTextField(30);
        textField.addKeyListener(new KeyAdapter() {
            @Override
            public void keyPressed(KeyEvent e) {
                // 获取键盘按下的字符
                char keyChar = e.getKeyChar();
                System.out.println(keyChar);

                // 获取键盘按下的字符对应的ASCLL数值
                int keyCode = e.getKeyCode();
                System.out.println(keyCode);
            }
        });
        jf.add(textField);

        // 按钮注册监听
        JButton btn = new JButton("登录");
        btn.addKeyListener(new KeyAdapter() {
            @Override
            public void keyPressed(KeyEvent e) {
                int keyCode = e.getKeyCode();
                if (keyCode == 10) {
                    System.out.println("回车被按下了,可以登录...");
                }
            }
        });

        jf.add(btn);
        jf.setDefaultCloseOperation(JFrame.EXIT_ON_CLOSE);
        jf.setVisible(true);
    }
}
4、动作事件(ActionEvent)(常用)
- 动作监听与前面的三种事件有所不同,它不代表某类事件,只是表示一个动作发生了;
- 例如:在关闭一个文件时,可以通过键盘关闭,也可以通过鼠标关闭;
- 在Java中,动作事件用ActionEvent表示
使用:
- 处理动作事件的监听器对象需要实现ActionListener接口
示例:
import javax.swing.*;
import java.awt.*;
import java.awt.event.ActionEvent;
import java.awt.event.ActionListener;

public class ActionListenerDemo {
    public static void main(String[] args) {
        SwingUtilities.invokeLater(ActionListenerDemo::creatAndShowGUI);
    }

    private static void creatAndShowGUI() {
        JFrame jf = new JFrame("窗口标题");
        jf.setBounds(800, 100, 400, 700);
        jf.setLayout(new FlowLayout(FlowLayout.CENTER, 20, 30));

        JButton btn = new JButton("按钮");
        // 最常用的监听鼠标点击事件,如果没有特殊要求的话
        btn.addActionListener(new ActionListener() {
            @Override
            public void actionPerformed(ActionEvent e) {
                System.out.println("我被点击了,我也能监听动作事件...");
            }
        });
        jf.add(btn);

        jf.setDefaultCloseOperation(JFrame.EXIT_ON_CLOSE);
        jf.setVisible(true);
    }
}
5、Swing常用组件
5.1、面板组件
Swing组件中提供了一些面板组件(中间容器),这些面板组件不能单独存在,只能放置在顶级窗口容器中。
常见组件:
1)JPanel:
- JPanel面板组件是一个无边框,不能移动、放大、缩小或者关闭的面板,它的默认布局管理器是FlowLayout;
2)JScrollPane:
- JScrollPane是一个带滚动条的面板容器,且只能添加一个组件;
- 想向JScrollPane面板中添加多个组件,应先将这多个组件添加到某个组建中,然后再将这个组件添加到JScrollPanel中;
面板组件——JScrollPane常用构造方法
| 方法声明 | 功能描述 |
|---|---|
| JScrollPane() | 创建一个空的JScrollPane面板 |
| JScrollPane(Component view) | 创建一个显示指定组件的JScrollPane面板,只要组件的内容超过视图大小就会显示水平和垂直滚动条 |
| JScrollPane(Component view, int vsbPolicy, int hsbPolicy) | 创建一个显示指定容器,并具有滚动条策略的JScrollPane。参数 vsbPolicy:垂直滚动条策略;hsbPolicy:水平滚动条策略 |
第三个构造方法,是在第二个构造方法的基础上指定滚动条策略。如果在构造方法中没有指定显示组件和滚动条策略,也可以使用提供的 setXxx() 等方法进行设置。
示例:
import javax.swing.*;
import java.awt.*;

/**
 * 面板容器的核心思想:中间容器
 * JPanel:无滚动条,可以存放多个组件
 * JScrollPanel:有滚动条,只能存放一个组件
 */
public class DemoPanel1 {
    public static void main(String[] args) {
        SwingUtilities.invokeLater(DemoPanel1::creatAndShowGUI);
    }

    private static void creatAndShowGUI() {
        JFrame jf = new JFrame("窗口标题");
        jf.setBounds(800, 100, 400, 700);
        jf.setLayout(new BorderLayout());
        // 创建JScrollPanel带有滚动条的面板
        JScrollPane jScrollPane = new JScrollPane();
        // 设置滚动条的水平滚动策略,水平超过时,显示滚动条
        jScrollPane.setHorizontalScrollBarPolicy(ScrollPaneConstants.HORIZONTAL_SCROLLBAR_AS_NEEDED);
        // 设置滚动条的垂直滚动策略,一直显示垂直滚动条
        jScrollPane.setVerticalScrollBarPolicy(ScrollPaneConstants.VERTICAL_SCROLLBAR_ALWAYS);
        // 创建无滚动条的jPanel面板
        JPanel jPanel = new JPanel();
        for (int i = 1; i <= 10; i++) {
            JButton btn = new JButton("按钮" + i);
            jPanel.add(btn);
        }
        // 将Jpanel添加到JScrollPane中
        jScrollPane.setViewportView(jPanel);
        // 将JScrollPane添加到JFrame窗口对象中
        // jf.add(jScrollPane, BorderLayout.CENTER);
        jf.add(jScrollPane);

        jf.setDefaultCloseOperation(JFrame.EXIT_ON_CLOSE);
        jf.setVisible(true);
    }
}
5.2、文本组件
文本组件用于接收用户输入的信息,包括文本框(JTextField)、文本域(JTextArea)等。它们都有一个共同的父类 JTextComponent,JTextComponent是一个抽象类。
JTextComponent抽象类中常用的方法:
| 方法声明 | 功能描述 |
|---|---|
| String getText() | 返回文本组件中所有的文本内容 |
| String getSelectedText() | 返回文本组件中选的的文本内容 |
| void selectAll() | 在文本组件中选中所有的内容 |
| void setEditable(boolean b) | 设置文本组件为可编辑或者不可编辑状态 |
| void setText(String t) | 设置文本组件的内容 |
| void replaceSelection(String content) | 用给定的内容替换当前选定的内容 |
1、JTextField
- JTextField称为文本框,它只能接收单行文本的输入;
- JTextField有一个子类 JPasswrodField,表示一个单行输入密码框;
- 在JPasswrodField框中时通过显示指定回显字符作为占位符,默认为“*”
2、JTextArea
- JTextArea称为文本域,它能接受多行文本的输入,使用JTextArea构造方法创建对象时,可以设定区域的行数、列数。
import javax.swing.*;
import java.awt.*;
import java.awt.event.ActionEvent;
import java.awt.event.ActionListener;

public class DemoText {
    public static void main(String[] args) {
        SwingUtilities.invokeLater(DemoText::creatAndShowGUI);
    }

    private static void creatAndShowGUI() {
        JFrame jf = new JFrame("聊天窗口");
        jf.setBounds(800, 100, 400, 300);
        // 指定布局方式
        jf.setLayout(new BorderLayout());

        // 1、创建JTextArea文本区域,并添加到面板
        JTextArea showArea = new JTextArea(12, 16);
        // 设置文本域为不可编辑状态
        showArea.setEditable(false);
        // 1.1、创建JScrollPane滚动面板
        JScrollPane jScrollPane = new JScrollPane(showArea);
        // jScrollPane.add(showArea); 无效

        // 1.2、添加到窗口的页头
        jf.add(jScrollPane, BorderLayout.PAGE_START);

        // 2、创建Jpaenl面板
        JPanel jPanel = new JPanel();
        // 2.1、创建JLabel标签
        JLabel label = new JLabel("发送消息");

        // 2.2、创建JTextField单行文本输入框
        JTextField textField = new JTextField(16);

        // 2.3、创建JButton按钮
        JButton btn = new JButton("发送");
        // 为按钮注册监听鼠标点击事件,发送到文本域
        btn.addActionListener(new ActionListener() {
            @Override
            public void actionPerformed(ActionEvent e) {
                // 发送输入框的内容到文本域
                String content = textField.getText();
                // 用户发送的内容不为空,才发送
                if (content != null && content.length() != 0) {
                    showArea.append("发送内容为:" + content + "\r\n");
                } else {
                    showArea.append("发送内容不得为空" + "\r\n");
                }
                // 清空输入框中的内容
                textField.setText("");
            }
        });

        // 将组件添加到Jpaenl中
        jPanel.add(label);
        // 将JTextField添加到Jpaenl
        jPanel.add(textField);
        // 将按钮添加到Panel面板
        jPanel.add(btn);

        // 添加到窗口的页脚位置
        jf.add(jPanel, BorderLayout.PAGE_END);

        jf.setDefaultCloseOperation(JFrame.EXIT_ON_CLOSE);
        jf.setVisible(true);
    }
}
5.3、标签组件
Swing中提供了仅用于展示的标签组件。
标签组件主要用到的是 JLabel,JLabel组件可以显示文本、图像,还可以设置标签内容的垂直和水平对齐方式;
package cn.me.gui;

import javax.swing.*;
import java.awt.*;

public class DemoLabel {
    public static void main(String[] args) {
        SwingUtilities.invokeLater(DemoLabel::creatAndShowGUI);
    }

    private static void creatAndShowGUI() {
        JFrame jf = new JFrame("窗口");
        jf.setBounds(800, 100, 400, 700);
        // 指定布局方式
        jf.setLayout(new BorderLayout());
        JLabel label1 = new JLabel();
        // 创建图片画布对象
        ImageIcon icon = new ImageIcon("src/cn/me/1.jpg");
        // 获取图片
        Image image = icon.getImage();
        image = image.getScaledInstance(400, 400, Image.SCALE_DEFAULT);
        icon.setImage(image);
        // 给标签设置图片
        label1.setIcon(icon);

        Label label2 = new Label("你好", Label.CENTER);
        label2.setFont(new Font("Default", Font.PLAIN,40));

        // 添加到组件中
        jf.add(label1, BorderLayout.PAGE_START);
        jf.add(label2, BorderLayout.PAGE_END);

        jf.setDefaultCloseOperation(JFrame.EXIT_ON_CLOSE);
        jf.setVisible(true);
    }
}
5.4、按钮组件
在Swing中常见的按钮组件有JButton、JCheckBox、JRadioButton等,它们都是抽象类 AbstractButton 类的直接或间接子类。
AbstractButton 抽象类中常用的方法
| 方法声明 | 功能描述 |
|---|---|
| Icon getIcon() | 获取按钮的图标 |
| void setIcon(Icon defaultIcon) | 设置按钮的图标 |
| String getText() | 获取按钮的文本 |
| void setText(String text) | 设置按钮的文本 |
| void setEnabled(boolean b) | 设置按钮是否可用 |
| void setSelected(boolean b) | 设置按钮是否为选中状态 |
| boolean isSelected() | 返回按钮的状态(true为选中) |
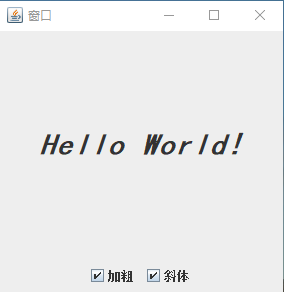
多选框示例:
import javax.swing.*;
import java.awt.*;
import java.awt.event.ActionEvent;
import java.awt.event.ActionListener;

public class DemoJCheckBox {
    public static void main(String[] args) {
        SwingUtilities.invokeLater(DemoJCheckBox::creatAndShowGUI);
    }

    private static void creatAndShowGUI() {
        JFrame jf = new JFrame("窗口");
        jf.setBounds(800, 100, 300, 300);
        // 指定布局方式为边界布局
        jf.setLayout(new BorderLayout());
        // 创建标签组件
        JLabel label = new JLabel("Hello World!", JLabel.CENTER);
        // 设置字体
        label.setFont(new Font("黑体", Font.PLAIN, 30));
        // 创建复选框按钮
        JCheckBox cb1 = new JCheckBox("加粗");
        JCheckBox cb2 = new JCheckBox("斜体");
        // 创建Jpanel面板容器,存放两复选框按钮
        JPanel jPanel = new JPanel();
        jPanel.add(cb1);
        jPanel.add(cb2);

        // 为复选框按钮注册监听
        ActionListener listener = new ActionListener() {
            @Override
            public void actionPerformed(ActionEvent e) {
                // 累加字体的状态值
                int mode = 0;
                // 加粗
                if (cb1.isSelected()) {
                    mode += Font.BOLD;
                }
                // 斜体
                if (cb2.isSelected()) {
                    mode += Font.ITALIC;
                }
                // 修改字体样式
                label.setFont(new Font("黑体", mode, 30));
            }
        };

        cb1.addActionListener(listener);
        cb2.addActionListener(listener);

        // 添加到容器中
        jf.add(label);
        jf.add(jPanel, BorderLayout.PAGE_END);

        jf.setDefaultCloseOperation(JFrame.EXIT_ON_CLOSE);
        jf.setVisible(true);
    }
}
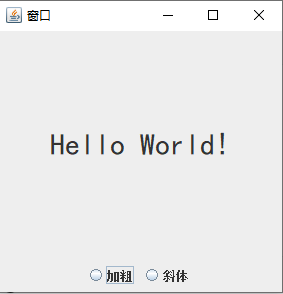
单选框示例:
import javax.swing.*;
import java.awt.*;
import java.awt.event.ActionEvent;
import java.awt.event.ActionListener;

public class DemoJRadioButton {
    public static void main(String[] args) {
        SwingUtilities.invokeLater(DemoJRadioButton::creatAndShowGUI);
    }

    private static void creatAndShowGUI() {
        JFrame jf = new JFrame("窗口");
        jf.setBounds(800, 100, 300, 300);
        // 指定布局方式为边界布局
        jf.setLayout(new BorderLayout());
        // 创建标签组件
        JLabel label = new JLabel("Hello World!", JLabel.CENTER);
        // 设置字体
        label.setFont(new Font("黑体", Font.PLAIN, 30));
        // 创建单选框按钮
        JRadioButton jb1 = new JRadioButton("加粗");
        JRadioButton jb2 = new JRadioButton("斜体");
        // 将单选按钮放到一个组中,实现单选效果
        ButtonGroup group = new ButtonGroup();
        group.add(jb1);
        group.add(jb2);

        // 创建Jpanel面板容器,存放两单选框按钮
        JPanel jPanel = new JPanel();
        jPanel.add(jb1);
        jPanel.add(jb2);

        // 为单选框按钮注册监听
        ActionListener listener = new ActionListener() {
            @Override
            public void actionPerformed(ActionEvent e) {
                // 累加字体的状态值
                int mode = 0;
                // 加粗
                if (jb1.isSelected()) {
                    mode += Font.BOLD;
                }
                // 斜体
                if (jb2.isSelected()) {
                    mode += Font.ITALIC;
                }
                // 修改字体样式
                label.setFont(new Font("黑体", mode, 30));
            }
        };

        jb1.addActionListener(listener);
        jb2.addActionListener(listener);

        // 添加到容器中
        jf.add(label);
        jf.add(jPanel, BorderLayout.PAGE_END);

        jf.setDefaultCloseOperation(JFrame.EXIT_ON_CLOSE);
        jf.setVisible(true);
    }
}
5.5、下拉框组件
JComboBox组件被称为下拉框或者组合框,它将所有的选项折叠在一起,默认显示的是第一个添加的选项。
当用户点击下拉框时,会出现下拉式的选择列表,用户可以从中选择其中一项并显示。
JComboBox下拉框组件分为可编辑和不可编辑两种形式;
-
对于不可编辑的下拉框,用户只能选择现有的选项列表;
-
对于不可编辑的下拉框,用户既可选择现有的选项列表,也可以自己输入新的内容;
注意:自己输入的内容只能作为当前项显示,并不会添加到下拉框的选项列表中。
import javax.swing.*;
import java.awt.*;
import java.awt.event.ActionEvent;
import java.awt.event.ActionListener;

public class DemoJComboBox {
    public static void main(String[] args) {
        SwingUtilities.invokeLater(DemoJComboBox::creatAndShowGUI);
    }

    private static void creatAndShowGUI() {
        JFrame jf = new JFrame("窗口");
        jf.setBounds(800, 100, 400, 700);
        // 指定布局方式
        jf.setLayout(new BorderLayout());
        // 1.创建Jpanel容器,存放组件
        JPanel jPanel = new JPanel();
        // 2.创建下拉框和文本输入框
        JComboBox<String> comboBox = new JComboBox<String>();
        String defaultItem = "请选择城市";
        comboBox.addItem(defaultItem);
        comboBox.addItem("北京");
        comboBox.addItem("上海");
        comboBox.addItem("深圳");
        comboBox.addItem("广州");

        JTextField textField = new JTextField(16);
        jPanel.add(comboBox);
        jPanel.add(textField);

        // 为下拉框注册监听
        comboBox.addActionListener(new ActionListener() {
            @Override
            public void actionPerformed(ActionEvent e) {
                // 选中的文本
                String selectedItem = (String) comboBox.getSelectedItem();
                // 如果选中默认文本,则不再文本输入框中显示
                if (defaultItem.equals(selectedItem)) {
                    textField.setText("");
                } else {
                    textField.setText(selectedItem);
                }
            }
        });

        // 将Jpanel面板放入JFrame窗口
        jf.add(jPanel, BorderLayout.PAGE_START);

        jf.setDefaultCloseOperation(JFrame.EXIT_ON_CLOSE);
        jf.setVisible(true);
    }
}
5.6、菜单组件 —— 下拉式菜单
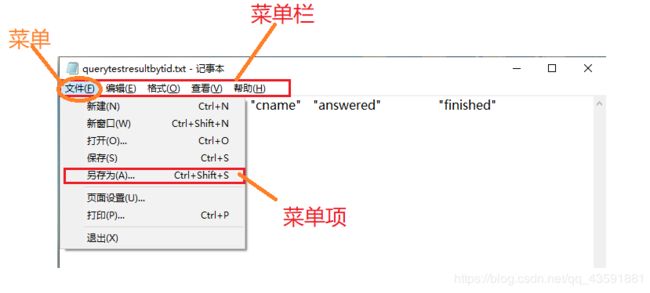
计算机中很多文件的菜单都是下拉式的,如记事本的菜单。
在Swing中,创建下拉式菜单需要使用三个组件:
- JMenuBar(菜单栏)
- JMenu(菜单)
- JMenuItem(菜单项)
- JMenuBar表示一个水平的菜单栏,它用来管理一组菜单,不参与同用户的交互式操作;
- 菜单栏可以放在容器的任何位置,但通常情况下会使用顶级容器(如JFrame、JDialog)的 setJMenuBar() 方法将它放置在顶级容器的顶部;
- 创建菜单栏时,只需要使用 new 关键字创建 JMenuBar 对象即可;
- 创建完菜单栏对象后,可以调用它的 add(JMenu c) 方法为其添加 JMenu 菜单;
2、JMenu(菜单)
- JMenu表示一个菜单,它用来整合管理菜单项;
- 菜单可以是单一层次的结构,也可以是多层次的结构;
- 大多情况下,会使用 JMenu(String text)构造函数创建JMenu菜单,参数text表示菜单上的文本内容;
3、JMenuItem(菜单项)
- JMenuItem表示一个菜单项,它是菜单系统中最基本的组件;
- 通常会使用JMenuItem(String text)这个构造方法为菜单指定文本内容;
- JMenuItem继承自AbstractButton类,因此可以把它看成是一个按钮;
- 如果使用无参的构造方法创建一个菜单项,则可以调用从AbstractButton类中继承的setText(String text)方法和setIcon()方法为其设置文本和图标;
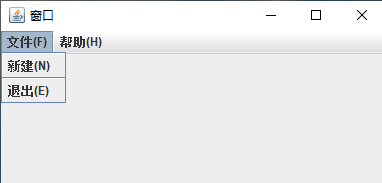
示例:
import javax.swing.*;
import java.awt.event.ActionEvent;
import java.awt.event.ActionListener;

public class DemoJMenuBar {
    public static void main(String[] args) {
        SwingUtilities.invokeLater(DemoJMenuBar::creatAndShowGUI);
    }

    private static void creatAndShowGUI() {
        JFrame jf = new JFrame("窗口");
        jf.setBounds(800, 100, 400, 700);
        // 1.创建菜单栏对象
        JMenuBar menuBar = new JMenuBar();
        // 2.创建菜单对象
        JMenu menu1 = new JMenu("文件(F)");
        JMenu menu2 = new JMenu("帮助(H)");
        // 3.创建菜单项对象
        JMenuItem item1 = new JMenuItem("新建(N)");
        JMenuItem item2 = new JMenuItem("退出(E)");
        // 为菜单项注册监听
        // 3.1 当点击新建时新建一个JDialog对话框
        item1.addActionListener(new ActionListener() {
            @Override
            public void actionPerformed(ActionEvent e) {
                JDialog dialog = new JDialog(jf, "无标题", true);
                dialog.setBounds(850, 150, 300, 300);
                dialog.setDefaultCloseOperation(JDialog.HIDE_ON_CLOSE);
                dialog.setVisible(true);
            }
        });
        // 3.2 当点击退出时,退出整个容器
        item2.addActionListener(e -> System.exit(0));

        // 4.将菜单项装入菜单中
        menu1.add(item1);
        // 创建分隔符
        menu1.addSeparator();
        menu1.add(item2);
        // 5.将菜单装入菜单栏中
        menuBar.add(menu1);
        menuBar.add(menu2);
        // 6.将为JFrame设置菜单栏
        jf.setJMenuBar(menuBar);

        jf.setDefaultCloseOperation(JFrame.EXIT_ON_CLOSE);
        jf.setVisible(true);
    }
}
5.7、菜单组件 —— 弹出式菜单
-
例如在Window桌面单击鼠标右键会出现一个菜单,这就是弹出式菜单;
-
在Swing组件中,弹出式菜单可以用JPopupMenu来实现;
使用:
- JPopupMenu弹出式菜单同样通过来调用add()方法添加JMenuItem菜单项,但它默认是不可见的;
- 想要显示弹出式菜单,必须调用show(Component invoker, int x, int y)方法。
- invoker:表示JPopupMenu菜单显示位置的参考组件;
- x,y:表示invoker组件坐标空间中的一个坐标,显示的是JPopupMenu菜单的左上角坐标;
示例:
import javax.swing.*;
import java.awt.*;
import java.awt.event.MouseAdapter;
import java.awt.event.MouseEvent;

public class DemoJPopupMenu {
    public static void main(String[] args) {
        SwingUtilities.invokeLater(DemoJPopupMenu::creatAndShowGUI);
    }

    private static void creatAndShowGUI() {
        JFrame jf = new JFrame("窗口标题");
        jf.setBounds(800, 100, 400, 700);
        jf.setDefaultCloseOperation(JFrame.EXIT_ON_CLOSE);

        // 创建弹出式菜单
        JPopupMenu popupMenu = new JPopupMenu();
        // 创建菜单项
        JMenuItem item1 = new JMenuItem("刷新");
        JMenuItem item2 = new JMenuItem("新建");
        // 添加到菜单中
        popupMenu.add(item1);
        popupMenu.addSeparator();
        popupMenu.add(item2);
        // 为窗体添加鼠标右键点击事件
        jf.addMouseListener(new MouseAdapter() {
            @Override
            public void mouseClicked(MouseEvent e) {
                // 如果是鼠标右键点击
                if (e.getButton() == MouseEvent.BUTTON3) {
                    popupMenu.show(e.getComponent(), e.getX(), e.getY());
                }
            }
        });
        jf.setVisible(true);
    }
}
6、Swing组件的整合使用——QQ登录界面实现
简易版代码:
package cn.me.gui.qqcase;

import javax.swing.*;
import java.awt.*;

/**
 * QQ登录案例,只实现界面布局和显示
 */
public class QQLogin {
    public static void main(String[] args) {
        SwingUtilities.invokeLater(QQLogin::initLogin);
    }

    private static void initLogin() {
        // 创建空的JFrame顶级容器对象
        JFrame jFrame = new JFrame();
        // 指定布局方式
        jFrame.setLayout(new BorderLayout());
        // 设置起始摆放位置和宽高,单位: 像素
        jFrame.setBounds(497, 242, 426, 300);
        // 禁止修改窗口大小
         jFrame.setResizable(false);
        // 设置窗口边框不显示
        // jFrame.setUndecorated(true);
        // 设置关闭时停止java后台程序
        jFrame.setDefaultCloseOperation(JFrame.EXIT_ON_CLOSE);

        // 创建顶部面板
        JPanel topPabel = CreatePanel.createTopPabel(jFrame);
        jFrame.add(topPabel, BorderLayout.PAGE_START);
        // 创建左侧面板
        JPanel leftPabel = CreatePanel.createLeftPabel();
        jFrame.add(leftPabel, BorderLayout.LINE_START);
        // 创建中间面部
        JPanel centerPabel = CreatePanel.createCenterPabel();
        jFrame.add(centerPabel);
        // 创建右侧面板
        JPanel rightPabel = CreatePanel.createRightPabel();
        jFrame.add(rightPabel, BorderLayout.LINE_END);
        // 创建底部面部
        JPanel bottomPabel = CreatePanel.createBottomPabel();
        jFrame.add(bottomPabel, BorderLayout.PAGE_END);

        // 设置为可见
        jFrame.setVisible(true);
    }
}
package cn.me.gui.qqcase;

import javax.swing.*;
import java.awt.*;

public class CreatePanel {

    private static LoginListener loginListener;

    public static JPanel createTopPabel(JFrame jFrame) {
        JPanel jPanel = new JPanel();
        // 不使用默认布局
        jPanel.setLayout(null);
        // 创建背景图 ImageIcon
        ImageIcon icon = new ImageIcon("src/images/background.jpg");
        // 1、创建JLabel,存放背景图
        JLabel background = new JLabel(icon);
        // 2、设置面板尺寸
        jPanel.setPreferredSize(new Dimension(0, 140));
        // 3、设置背景图的位置以及尺寸
        background.setBounds(0, 0, 426, icon.getIconHeight());
        // 4、在右上角添加按钮 --> 退出按钮
        JButton out = new JButton(new ImageIcon("src/images/close_normal.jpg"));
        out.setBounds(403, 0, 26, 26);
        // 5、设置鼠标移到退出按钮时,更改图片
        out.setRolloverIcon(new ImageIcon("src/images/close_hover.jpg"));
        // 添加到面板
        jPanel.add(background);
        jPanel.add(out);
        // 6、为退出按钮注册监听,关闭窗口
        out.addActionListener(e -> jFrame.dispose());

        return jPanel;
    }

    public static JPanel createLeftPabel() {
        JPanel jPanel = new JPanel();
        // 设置默认布局方式为 null
        jPanel.setLayout(null);
        // 设置面板尺寸
        jPanel.setPreferredSize(new Dimension(130, 0));
        // 创建图片对象
        ImageIcon icon = new ImageIcon("src/images/icon_qq.png");
        JLabel label = new JLabel(icon);
        label.setBounds(0, 0, 120, 110);
        jPanel.add(label);

        return jPanel;
    }

    public static JPanel createRightPabel() {
        JPanel jPanel = new JPanel();
        // 设置默认布局方式为 null
        jPanel.setLayout(null);
        // 设置面板尺寸
        jPanel.setPreferredSize(new Dimension(100, 0));
        // 创建JLabel
        JLabel regetAccount = new JLabel("注册账号");
        regetAccount.setForeground(new Color(100, 149, 238));
        regetAccount.setFont(new Font("宋体", Font.PLAIN, 12));
        regetAccount.setBounds(0, 13, 60, 30);

        JLabel regetPwd = new JLabel("找回密码");
        regetPwd.setForeground(new Color(100, 149, 238));
        regetPwd.setFont(new Font("宋体", Font.PLAIN, 12));
        regetPwd.setBounds(0, 43, 60, 30);

        jPanel.add(regetAccount);
        jPanel.add(regetPwd);

        return jPanel;
    }

    public static JPanel createCenterPabel() {
        JPanel jPanel = new JPanel();
        jPanel.setLayout(null);
        // 模拟账号
        String[] data = {"1315480331", "1234567890"};
        // 创建下拉框
        JComboBox<Object> jComboBox = new JComboBox<>(data);
        // 设置为可编辑状态
        jComboBox.setEditable(true);
        jComboBox.setBounds(0, 15, 175, 30);
        jComboBox.setFont(new Font("微软雅黑", Font.PLAIN, 13));
        // 创建密码输入框
        JPasswordField passwordField = new JPasswordField();
        passwordField.setLayout(new FlowLayout(FlowLayout.RIGHT, 0, 0));
        passwordField.setBounds(0, 44, 175, 30);
        passwordField.setPreferredSize(new Dimension(185, 25));

        JCheckBox box1 = new JCheckBox("自动登录");
        box1.setFocusPainted(false);
        box1.setFont(new Font("宋体", Font.PLAIN, 13));
        box1.setBounds(0, 85, 80, 20);

        JCheckBox box2 = new JCheckBox("记住密码");
        box2.setFocusPainted(false);
        box2.setFont(new Font("宋体", Font.PLAIN, 13));
        box2.setBounds(100, 85, 80, 20);

        jPanel.add(box1);
        jPanel.add(box2);
        jPanel.add(jComboBox);
        jPanel.add(passwordField);

        loginListener = new LoginListener(jComboBox, passwordField);

        return jPanel;
    }

    public static JPanel createBottomPabel() {
        JPanel jPanel = new JPanel();
        jPanel.setLayout(null);
        jPanel.setPreferredSize(new Dimension(0, 51));

        // 创建左侧多人登录的按钮
        ImageIcon leftIcon = new ImageIcon("src/images/");
        JButton leftBtn = new JButton();
        // 设置按钮不要边框
        leftBtn.setFocusPainted(false);
        leftBtn.setBorderPainted(false);
        // 设置鼠标悬浮时的图标
        leftBtn.setRolloverIcon(new ImageIcon("src/images/"));
        leftBtn.setPreferredSize(new Dimension(40, 40));
        /*
            设置不显示按钮区域
            如果为true:按钮绘制区域会显示效果
            如果为false:绘制区域是一个透明的区域
         */
        leftBtn.setContentAreaFilled(false);
        leftBtn.setBounds(0, 0, 40, 40);
        leftBtn.setToolTipText("多账号登录");

        // 创建中间登录按钮
        ImageIcon loginIcon = new ImageIcon();
        // JButton loginBtn = new JButton("登录", loginIcon);
        JButton loginBtn = new JButton("登录");
        loginBtn.setFont(new Font("宋体", Font.PLAIN, 12));
        loginBtn.setBounds(130, 0, 175, 40);
        // loginBtn.setRolloverIcon(new ImageIcon("src/images/"));

        // 为登录按钮绑定点击事件
        loginBtn.addActionListener(loginListener);

        // 让文字显示在按钮的中间
//        loginBtn.setHorizontalTextPosition(SwingConstants.CENTER);
//        loginBtn.setContentAreaFilled(false);
//        loginBtn.setFocusPainted(false);
//        loginBtn.setBorderPainted(false);

        // 创建右侧二维码登录按钮
        JButton rightBtn = new JButton(new ImageIcon(""));
        rightBtn.setBounds(380, 10, 40, 40);
        // 鼠标获取焦点时切换图片
        rightBtn.setRolloverIcon(new ImageIcon(""));

        rightBtn.setContentAreaFilled(false);
        rightBtn.setFocusPainted(false);
        rightBtn.setBorderPainted(false);
        rightBtn.setToolTipText("二维码登录");

        jPanel.add(leftBtn);
        jPanel.add(loginBtn);
        jPanel.add(rightBtn);

        return jPanel;
    }

}
package cn.me.gui.qqcase;

import javax.swing.*;
import java.awt.event.ActionEvent;
import java.awt.event.ActionListener;

public class LoginListener implements ActionListener {

    private JComboBox<Object> jComboBox;
    private JPasswordField jPasswordField;
    private JFrame jFrame;


    public LoginListener() {
    }

    public LoginListener(JComboBox<Object> jComboBox, JPasswordField jPasswordField) {
        this.jComboBox = jComboBox;
        this.jPasswordField = jPasswordField;
    }

    public LoginListener(JComboBox<Object> jComboBox, JPasswordField jPasswordField, JFrame jFrame) {
        this.jComboBox = jComboBox;
        this.jPasswordField = jPasswordField;
        this.jFrame = jFrame;
    }

    @Override
    public void actionPerformed(ActionEvent e) {
        String username = (String) jComboBox.getSelectedItem();
        String password = new String(jPasswordField.getPassword());
        if ("".equals(password)) {
            JOptionPane.showMessageDialog(null, "密码不能为空");
            return;
        }

        // 查询数据库得知
        if (!"123456".equals(password)) {
            JOptionPane.showMessageDialog(null, "数据有误,账号或密码错误!");
            return;
        }

        JOptionPane.showMessageDialog(null, "登录成功!");

    }
}
7、JavaFX图形用户界面工具
7.1、JavaFX概述
- JavaFX是一个强大的图像和多媒体处理工具包集合
- 它允许开发者来设计、创建、测试、调试和部署客户端程序 (Rich Client Applications)
- JavaFX和Java一样具有跨平台特性
7.2、JavaFX开发环境配置
JavaFX开发环境配置教程:https://blog.csdn.net/hst_gogogo/article/details/82530929
7.3、JavaFX可视化工具
JavaFX Scene Builder 2.0
JavaFX打包使用教程:https://blog.csdn.net/wangyinlon/article/details/79247606
