Caffe 实现多标签分类
最近在用Caffe做验证码识别时,发现没有用Tensorflow简单(tensorflow中可以用one-hot, 参考我的另一篇blog: http://blog.csdn.net/sushiqian/article/details/78305340 ),需要修改Caffe的源码,做完后,觉得也不复杂。
1. 首先,就是修改源码了,
本文介绍的方法是修改ImageDataLayer,修改下面的三个文件:
$CAFFE_ROOT/src/caffe/proto/caffe.proto
$CAFFE_ROOT/include/caffe/layers/image_data_layer.hpp
$CAFFE_ROOT/src/caffe/layers/image_data_layer.cpp
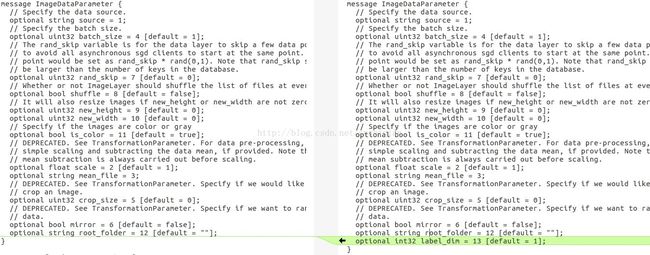
(1) 修改 caffe.proto
在文件 caffe.proto 里的 message ImageDataParameter { } 里添加新的一项,用于表示标签的维度
optional int32 label_dim = 13 [default = 1];
(2) 修改 image_data_layer.hpp
把原先成员 lines_ 的定义修改为
vector

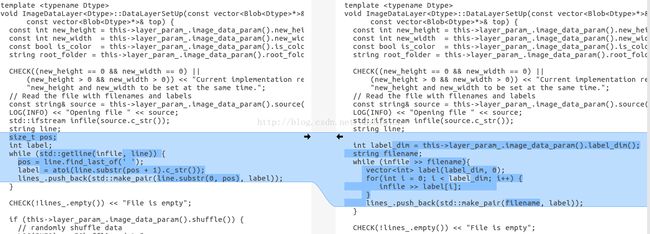
(3) 修改 image_data_layer.cpp
修改函数 DataLayerSetUp()
新的代码如下:
  int label_dim = this->layer_param_.image_data_param().label_dim();
  string filename;
  while (infile >> filename){
     vector label(label_dim, 0);
     for(int i = 0; i < label_dim; i++) {
        infile >> label[i];
     }
     lines_.push_back(std::make_pair(filename, label));
} 
vector label_shape(2);
label_shape[0] = batch_size;
label_shape[1] = label_dim; 
修改函数 load_batch()
int label_dim = image_data_param.label_dim();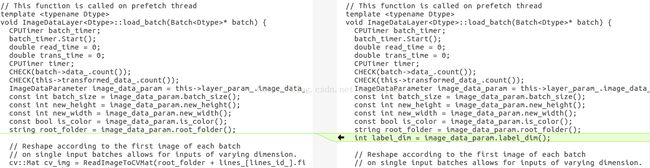
for(int i = 0;i < label_dim;++i){
    prefetch_label[item_id * label_dim + i] = lines_[lines_id_].second[i];
}
(4) 用 make 编译
$CAFFE_ROOT/build$ make
$CAFFE_ROOT/build$ make install
2. 编写用于训练的网络结构
可以在caffe examples 里的某个net上修改一个, 例如,本文中所讲例子是在mnist中LeNet(lenet_train_test.prototxt)基础上修改出一个net
captcha_train_test.prototxt
name: "captcha"
layer {
name: "Input"
type: "ImageData"
top: "data"
top: "label"
include {
phase: TRAIN
}
transform_param {
scale: 0.00390625
}
image_data_param {
source: "/home/mark/data/train.txt"
root_folder: "/home/mark/data/"
new_height: 60
new_width: 160
is_color: true
batch_size: 50
shuffle: true
label_dim: 4
}
}
layer {
name: "Input"
type: "ImageData"
top: "data"
top: "label"
include {
phase: TEST
}
transform_param {
scale: 0.00390625
}
image_data_param {
source: "/home/mark/data/test.txt"
root_folder: "/home/mark/data/"
new_height: 60
new_width: 160
is_color: true
batch_size: 20
shuffle: true
label_dim: 4
}
}
layer {
name: "slice"
type: "Slice"
bottom: "label"
top: "label_1"
top: "label_2"
top: "label_3"
top: "label_4"
slice_param {
axis: 1
slice_point:1
slice_point:2
slice_point:3
}
}
layer {
name: "conv1"
type: "Convolution"
bottom: "data"
top: "conv1"
param {
lr_mult: 1
}
param {
lr_mult: 2
}
convolution_param {
num_output: 20
kernel_size: 5
stride: 1
weight_filler {
type: "xavier"
}
bias_filler {
type: "constant"
}
}
}
layer {
name: "pool1"
type: "Pooling"
bottom: "conv1"
top: "pool1"
pooling_param {
pool: MAX
kernel_size: 2
stride: 2
}
}
layer {
name: "conv2"
type: "Convolution"
bottom: "pool1"
top: "conv2"
param {
lr_mult: 1
}
param {
lr_mult: 2
}
convolution_param {
num_output: 50
kernel_size: 5
stride: 1
weight_filler {
type: "xavier"
}
bias_filler {
type: "constant"
}
}
}
layer {
name: "pool2"
type: "Pooling"
bottom: "conv2"
top: "pool2"
pooling_param {
pool: MAX
kernel_size: 2
stride: 2
}
}
layer {
name: "ip1"
type: "InnerProduct"
bottom: "pool2"
top: "ip1"
param {
lr_mult: 1
}
param {
lr_mult: 2
}
inner_product_param {
num_output: 500
weight_filler {
type: "xavier"
}
bias_filler {
type: "constant"
}
}
}
layer {
name: "relu1"
type: "ReLU"
bottom: "ip1"
top: "ip1"
}
layer {
name: "ip2"
type: "InnerProduct"
bottom: "ip1"
top: "ip2"
param {
lr_mult: 1
}
param {
lr_mult: 2
}
inner_product_param {
num_output: 100
weight_filler {
type: "xavier"
}
bias_filler {
type: "constant"
}
}
}
layer {
name: "ip3_1"
type: "InnerProduct"
bottom: "ip2"
top: "ip3_1"
param {
lr_mult: 1
}
param {
lr_mult: 2
}
inner_product_param {
num_output: 10
weight_filler {
type: "xavier"
}
bias_filler {
type: "constant"
}
}
}
layer {
name: "ip3_2"
type: "InnerProduct"
bottom: "ip2"
top: "ip3_2"
param {
lr_mult: 1
}
param {
lr_mult: 2
}
inner_product_param {
num_output: 10
weight_filler {
type: "xavier"
}
bias_filler {
type: "constant"
}
}
}
layer {
name: "ip3_3"
type: "InnerProduct"
bottom: "ip2"
top: "ip3_3"
param {
lr_mult: 1
}
param {
lr_mult: 2
}
inner_product_param {
num_output: 10
weight_filler {
type: "xavier"
}
bias_filler {
type: "constant"
}
}
}
layer {
name: "ip3_4"
type: "InnerProduct"
bottom: "ip2"
top: "ip3_4"
param {
lr_mult: 1
}
param {
lr_mult: 2
}
inner_product_param {
num_output: 10
weight_filler {
type: "xavier"
}
bias_filler {
type: "constant"
}
}
}
layer {
name: "accuracy1"
type: "Accuracy"
bottom: "ip3_1"
bottom: "label_1"
top: "accuracy1"
include {
phase: TEST
}
}
layer {
name: "loss1"
type: "SoftmaxWithLoss"
bottom: "ip3_1"
bottom: "label_1"
top: "loss1"
}
layer {
name: "accuracy2"
type: "Accuracy"
bottom: "ip3_2"
bottom: "label_2"
top: "accuracy2"
include {
phase: TEST
}
}
layer {
name: "loss2"
type: "SoftmaxWithLoss"
bottom: "ip3_2"
bottom: "label_2"
top: "loss2"
}
layer {
name: "accuracy3"
type: "Accuracy"
bottom: "ip3_3"
bottom: "label_3"
top: "accuracy3"
include {
phase: TEST
}
}
layer {
name: "loss3"
type: "SoftmaxWithLoss"
bottom: "ip3_3"
bottom: "label_3"
top: "loss3"
}
layer {
name: "accuracy4"
type: "Accuracy"
bottom: "ip3_4"
bottom: "label_4"
top: "accuracy4"
include {
phase: TEST
}
}
layer {
name: "loss4"
type: "SoftmaxWithLoss"
bottom: "ip3_4"
bottom: "label_4"
top: "loss4"
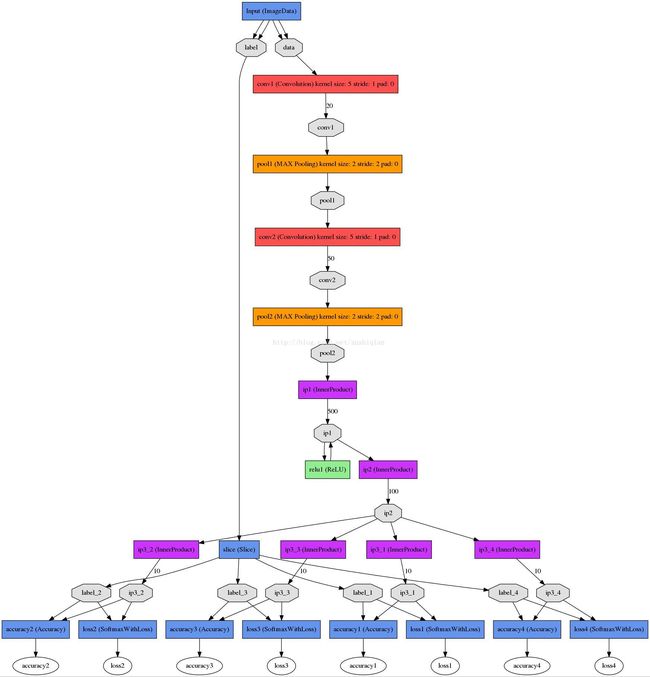
}/home/mark/data/train.txt 里面存放的是训练所用图片的路径和标签,

该网络的结构图如下所示:
solver 文件
captcha_solver.prototxt
# The train/test net protocol buffer definition
net: "examples/captcha/captcha_train_test.prototxt"
# test_iter specifies how many forward passes the test should carry out.
# covering the full 9,800 testing images.
test_iter: 200
# Carry out testing every 200 training iterations.
test_interval: 200
# The base learning rate, momentum and the weight decay of the network.
base_lr: 0.001
momentum: 0.9
weight_decay: 0.0005
# The learning rate policy
lr_policy: "inv"
gamma: 0.0001
power: 0.75
# Display every 100 iterations
display: 100
# The maximum number of iterations
max_iter: 10000
# snapshot intermediate results
snapshot: 5000
snapshot_prefix: "examples/captcha/captcha"
# solver mode: CPU or GPU
solver_mode: GPU./build/tools/caffe train --solver=examples/captcha/captcha_solver.prototxt
Note: 训练过程中如果发现 loss 不下降,可以把学习率(base_lr)调小一点试试
3. 模型训练成功后,进行测试
首先,需要一个deploy.prototxt文件,在captcha_train_test.prototxt的基础上修改,修改后保存为 captcha_deploy.prototxt 内容如下
name: "captcha"

input: "data"
input_dim: 1   # batchsize
input_dim: 3   # number of channels - rgb
input_dim: 60  # height
input_dim: 160 # width

layer {
  name: "conv1"
  type: "Convolution"
  bottom: "data"
  top: "conv1"
  param {
    lr_mult: 1
  }
  param {
    lr_mult: 2
  }
  convolution_param {
    num_output: 20
    kernel_size: 5
    stride: 1
    weight_filler {
      type: "xavier"
    }
    bias_filler {
      type: "constant"
    }
  }
}
layer {
  name: "pool1"
  type: "Pooling"
  bottom: "conv1"
  top: "pool1"
  pooling_param {
    pool: MAX
    kernel_size: 2
    stride: 2
  }
}
layer {
  name: "conv2"
  type: "Convolution"
  bottom: "pool1"
  top: "conv2"
  param {
    lr_mult: 1
  }
  param {
    lr_mult: 2
  }
  convolution_param {
    num_output: 50
    kernel_size: 5
    stride: 1
    weight_filler {
      type: "xavier"
    }
    bias_filler {
      type: "constant"
    }
  }
}
layer {
  name: "pool2"
  type: "Pooling"
  bottom: "conv2"
  top: "pool2"
  pooling_param {
    pool: MAX
    kernel_size: 2
    stride: 2
  }
}
layer {
  name: "ip1"
  type: "InnerProduct"
  bottom: "pool2"
  top: "ip1"
  param {
    lr_mult: 1
  }
  param {
    lr_mult: 2
  }
  inner_product_param {
    num_output: 500
    weight_filler {
      type: "xavier"
    }
    bias_filler {
      type: "constant"
    }
  }
}
layer {
  name: "relu1"
  type: "ReLU"
  bottom: "ip1"
  top: "ip1"
}

layer {
  name: "ip2"
  type: "InnerProduct"
  bottom: "ip1"
  top: "ip2"
  param {
    lr_mult: 1
  }
  param {
    lr_mult: 2
  }
  inner_product_param {
    num_output: 100
    weight_filler {
      type: "xavier"
    }
    bias_filler {
      type: "constant"
    }
  }
}

layer {
  name: "ip3_1"
  type: "InnerProduct"
  bottom: "ip2"
  top: "ip3_1"
  param {
    lr_mult: 1
  }
  param {
    lr_mult: 2
  }
  inner_product_param {
    num_output: 10
    weight_filler {
      type: "xavier"
    }
    bias_filler {
      type: "constant"
    }
  }
}

layer {
  name: "ip3_2"
  type: "InnerProduct"
  bottom: "ip2"
  top: "ip3_2"
  param {
    lr_mult: 1
  }
  param {
    lr_mult: 2
  }
  inner_product_param {
    num_output: 10
    weight_filler {
      type: "xavier"
    }
    bias_filler {
      type: "constant"
    }
  }
}

layer {
  name: "ip3_3"
  type: "InnerProduct"
  bottom: "ip2"
  top: "ip3_3"
  param {
    lr_mult: 1
  }
  param {
    lr_mult: 2
  }
  inner_product_param {
    num_output: 10
    weight_filler {
      type: "xavier"
    }
    bias_filler {
      type: "constant"
    }
  }
}

layer {
  name: "ip3_4"
  type: "InnerProduct"
  bottom: "ip2"
  top: "ip3_4"
  param {
    lr_mult: 1
  }
  param {
    lr_mult: 2
  }
  inner_product_param {
    num_output: 10
    weight_filler {
      type: "xavier"
    }
    bias_filler {
      type: "constant"
    }
  }
}

layer {
  name: "prob1"
  type: "Softmax"
  bottom: "ip3_1"
  top: "prob1"
}
layer {
  name: "prob2"
  type: "Softmax"
  bottom: "ip3_2"
  top: "prob2"
}
layer {
  name: "prob3"
  type: "Softmax"
  bottom: "ip3_3"
  top: "prob3"
}
layer {
  name: "prob4"
  type: "Softmax"
  bottom: "ip3_4"
  top: "prob4"
}
编写测试代码:
import numpy as np
import os
import sys
os.environ['GLOG_minloglevel'] = '3'
import caffe

CAFFE_ROOT = '/home/mark/caffe'
deploy_file_name = 'captcha_deploy.prototxt'
model_file_name  = 'captcha_iter_10000.caffemodel'

IMAGE_HEIGHT = 60
IMAGE_WIDTH = 160
IMAGE_CHANNEL = 3

def classify(imageFileName):
    deploy_file = CAFFE_ROOT + '/examples/captcha/' + deploy_file_name
    model_file  = CAFFE_ROOT + '/examples/captcha/' + model_file_name
    #初始化caffe
    net = caffe.Net(deploy_file, model_file, caffe.TEST)

    #数据预处理
    transformer = caffe.io.Transformer({'data': net.blobs['data'].data.shape})
    transformer.set_transpose('data', (2, 0, 1))#pycaffe读取的图片文件格式为H×W×C,需转化为C×H×W

    #pycaffe将图片存储为[0, 1], 如果模型输入用的是0~255的原始格式,需要做如下转换
    #transformer.set_raw_scale('data', 255)

    transformer.set_channel_swap('data', (2, 1, 0))#caffe中图片是BGR格式,而原始格式是RGB,所以要转化

    # 将输入图片格式转化为合适格式(与deploy文件相同)
    net.blobs['data'].reshape(1, IMAGE_CHANNEL, IMAGE_HEIGHT, IMAGE_WIDTH)

    #读取图片
    #参数color: True(default)是彩色图,False是灰度图
    img = caffe.io.load_image(imageFileName, color=True)

    #数据输入、预处理
    net.blobs['data'].data[...] = transformer.preprocess('data', img)

    #前向迭代,即分类
    out = net.forward()

    #求出每个标签概率最大值的下标
    result = []
    predict1 = out['prob1'][0].argmax()
    result.append(predict1)

    predict2 = out['prob2'][0].argmax()
    result.append(predict2)

    predict3 = out['prob3'][0].argmax()
    result.append(predict3)

    predict4 = out['prob4'][0].argmax()
    result.append(predict4)

    return result

if __name__ == '__main__':

   imgList = sys.argv[1:]
   for captcha in imgList:
       predict = classify(captcha)
       print "captcha:", captcha, "  predict:", predict
执行上面的脚本,进行测试
![]()
测试用到的图片如下