6、Google TPU 入手教程
最近获得一块Google TPU ,简单介绍一下启动过程:具体参考手册:
https://coral.withgoogle.com/resources/
https://www.mrtbc.com/318.html
1、首先,在宿主主机(PC)安装(exfat-fuse 后期识别SD卡做准备):
sudo apt-get install screen fastboot minicom exfat-fuse
其实官方手册中的screen,应该和minicon串口工具类似;
2、然后查看一下是否安装成功
screen --version

Screen version 4.03.01 (GNU) 28-Jun-15

fastboot --version

fastboot version debian
3、因为需要对新的开发板TPU进行一次刷机操作,所以首先需要在宿主机安装驱动程序;
sudo sh -c "echo 'SUBSYSTEM=="usb", ATTR{idVendor}=="0525", MODE="0664",GROUP="plugdev", TAG+="uaccess"' >> /etc/udev/rules.d/65-edgetpu-board.rules"4、然后创建新的链接,使其生效
sudo udevadm control --reload-rules && udevadm trigger5、然后设置新的开发板TPU进行一次刷机操作,所以需要预先设置刷机的方式(类似zedboard刷机)
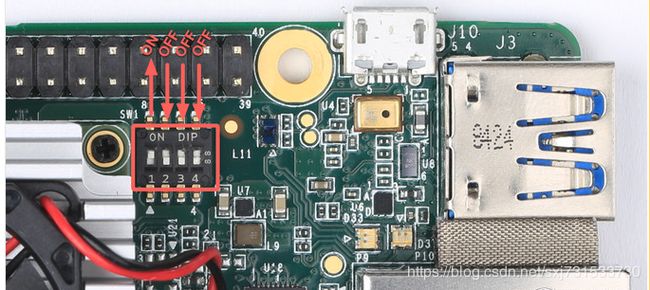
设置完硬件的刷机方式之后,然后就可以串口读取信息了;
6、然后连接串口线,打开串口监控程序即可;(注 先不要插电,因为,稍后插电,就可以打印的启动过程uboot读取硬件的信息)
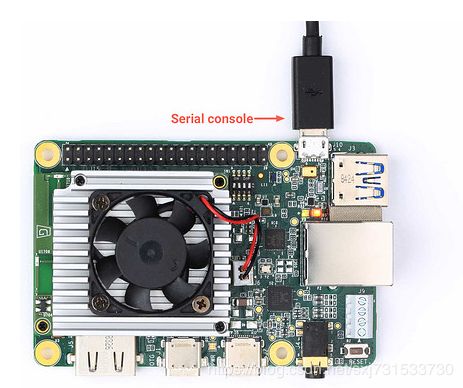
7、查看宿主机连接的USB接口名称
dmesg | grep ttyUSB[534605.535179] usb 1-3: cp210x converter now attached to ttyUSB0
[534605.536907] usb 1-3: cp210x converter now attached to ttyUSB1
[534734.937608] cp210x ttyUSB0: cp210x converter now disconnected from ttyUSB0
[534734.938263] cp210x ttyUSB1: cp210x converter now disconnected from ttyUSB1
[537639.540031] usb 1-3: cp210x converter now attached to ttyUSB0
[537639.542614] usb 1-3: cp210x converter now attached to ttyUSB1
[537757.868380] cp210x ttyUSB0: cp210x converter now disconnected from ttyUSB0
[537757.869118] cp210x ttyUSB1: cp210x converter now disconnected from ttyUSB1
[546225.024362] usb 1-3: cp210x converter now attached to ttyUSB0
[546225.026140] usb 1-3: cp210x converter now attached to ttyUSB1
8、查看到[534734.937608] cp210x ttyUSB0: cp210x converter now disconnected from ttyUSB0
然后输入 下面命令进行串口监控或者使用mincom监控
sudo screen /dev/ttyUSB0 115200 或者使用minicom,这是本人开机启动后,minicom的信息;(minicom配置很简单,可以参考:https://jingyan.baidu.com/article/6b182309f9dd6dba59e1597a.html),本人使用minicom,
只需把port配置成/dev/ttyUSB0 即可;
Hardware Flow Contorl选项改成No;
相比而言,minicom 比较好用,因为每次监听串口 只需一条命令即可,然而screen 还需记住设备名和波特率~~~
sudo minicom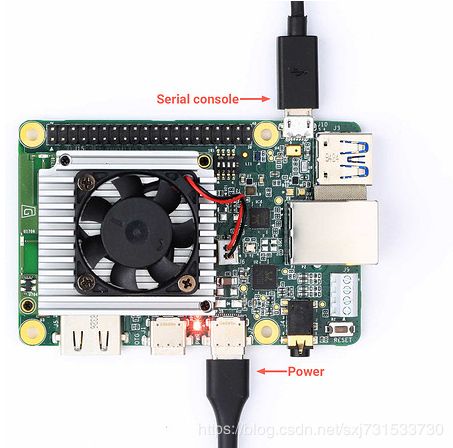
9、连接电源之后,(不要使用计算机给开发板供电,会供电不足 )在屏幕显示信息如下;
Welcome to minicom 2.7

OPTIONS: I18n
Compiled on Nov 15 2018, 20:18:47.
Port /dev/ttyUSB0, 18:42:48

Press CTRL-A Z for help on special keys


U-Boot SPL 2017.03 (Dec 06 2018 - 19:26:58)
power_bd71837_init
pmic debug: name=BD71837
check ddr4_pmu_train_imem code
check ddr4_pmu_train_imem code pass
check ddr4_pmu_train_dmem code
check ddr4_pmu_train_imem code pass
check ddr4_pmu_train_dmem code
check ddr4_pmu_train_dmem code pass
Training PASS
Normal Boot
Trying to boot from MMC1


U-Boot 2017.03 (Dec 06 2018 - 19:26:58 +0000)

CPU:   Freescale i.MX8MQ rev2.0 1500 MHz (running at 1000 MHz)
CPU:   Com at 32C
Reset cause: POR
Model: Freescale i.MX8MQ Phanbell
DRAM:  1 GiB
Board id: 6
Baseboard id: 1
MMC:   FSL_SDHC: 0, FSL_SDHC: 1
*** Warning - bad CRC, using default environment

In:    serial
Out:   serial
Err:   serial

 BuildInfo:
  - ATF
  - U-Boot 2017.03

flash target is MMC:0
Net:
Warning: ethernet@30be0000 using MAC address from ROM
eth0: ethernet@30be0000
Fastboot: Normal
Hit any key to stop autoboot:  2 sh the latest firmware.
Please follow the instructions at g.co/coral/setup.


u-boot=>
10、然后插上白色的数据线(otg)

11、输入:(本人的好卡,我也不知为啥,输入好多次都错误,还是复制一步到位~~~)
fastboot 012、打开一个新终端界面(宿主机)
fastboot devices
提示如下表示成功,如果不提示,就是fastboot 版本太低 链接:https://pan.baidu.com/s/1EHe-2vvuxWTq6bn5gBNL8w 密码:u57y
mkdir -p ~/.local/bin
sudo mv ~/platform-tools/fastboot ~/.local/bin/

ubuntu@ubuntu:~$ fastboot --version
fastboot version 28.0.2-5303910
Installed as /home/ubuntu/.local/bin/fastboot
ubuntu@ubuntu:~$ fastboot devices
170349d6ef944da7	fastboot
ubuntu@ubuntu:~$
13、然后下载百度云的 mendel-enterprise-chef-13.zip 然后进行刷机~~
ubuntu@ubuntu:~/mendel-enterprise-chef-13$ bash flash.sh
Sending 'bootloader0' (1006 KB)                    OKAY [  0.051s]
Writing 'bootloader0'                              OKAY [  0.191s]
Finished. Total time: 0.261s
Rebooting into bootloader                          OKAY [  0.024s]
Finished. Total time: 0.125s
Sending 'gpt' (33 KB)                              OKAY [  0.017s]
Writing 'gpt'                                      OKAY [  0.308s]
Finished. Total time: 0.344s
Rebooting into bootloader                          OKAY [  0.022s]
Finished. Total time: 0.122s
Erasing 'misc'                                     OKAY [  0.072s]
Finished. Total time: 0.082s
Sending 'boot' (131072 KB)                         OKAY [  4.474s]
Writing 'boot'                                     OKAY [  3.628s]
Finished. Total time: 8.178s
Sending sparse 'rootfs' 1/3 (397265 KB)            OKAY [ 13.622s]
Writing 'rootfs'                                   OKAY [ 24.925s]
Sending sparse 'rootfs' 2/3 (408325 KB)            OKAY [ 14.008s]
Writing 'rootfs'                                   OKAY [ 46.386s]
Sending sparse 'rootfs' 3/3 (352960 KB)            OKAY [ 12.192s]
Writing 'rootfs'                                   OKAY [ 85.402s]
Finished. Total time: 196.586s
Rebooting                                          OKAY [  0.005s]
Finished. Total time: 0.105s
ubuntu@ubuntu:~/mendel-enterprise-chef-13$
然后刷完了。哈哈哈 然后屏幕有画面了~~~

然后就出来图形化界面了~~~~
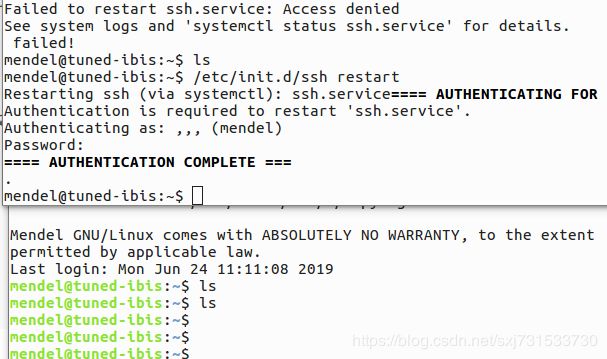
14、然后插上网线,就可以愉快的访问TPU了,但是,突然发现ssh链接不上去,提示
Permission denied (publickey).因为Google TPU默认禁用了ssh密码登录权限,此时你需要在串口中设置一下TPU配置即可;
打开 /etc/ssh/sshd_config
修改PasswordAuthentication no 为:
PasswordAuthentication yes

重启服务
/etc/init.d/sshd restart
这样就好了,小组其它成员都可以通过网口命令ssh远程联接TPU设备了。
依次为TPU串口终端和ssh连接的命令行终端(都一样)
15、测试一下demo,进入TPU终端;
cd ~

wget https://dl.google.com/coral/canned_models/mobilenet_v2_1.0_224_inat_bird_quant_edgetpu.tflite
wget https://dl.google.com/coral/canned_models/inat_bird_labels.txt
wget https://www.mrtbc.com/wp-content/uploads/2019/05/parrot.jpg
然后执行命令;
mendel@tuned-ibis:~$ python3 /usr/lib/python3/dist-packages/edgetpu/demo/classify_image.py --model ~/mobilenet_v2_1.0_224_inat_bird_quant_edgetpu.tflite --label ~/inat_bird_labels.txt --image ~/parrot.jpg
---------------------------
Ara macao (Scarlet Macaw)
Score :  0.761719
mendel@tuned-ibis:~$
mendel@tuned-ibis:/etc/apt/sources.list.d$ ls
00-mdt-services.list  multistrap-bsp.list
coral-cloud.list      multistrap-main.list
需要更新一下源,否则哎~~China vs Google
deb http://mirrors.aliyun.com/debian stretch main contrib non-free
deb-src http://mirrors.aliyun.com/debian stretch main contrib non-free
deb http://mirrors.aliyun.com/debian stretch-updates main contrib non-free
deb-src http://mirrors.aliyun.com/debian stretch-updates main contrib non-free
deb http://mirrors.aliyun.com/debian-security stretch/updates main contrib non-free
deb-src http://mirrors.aliyun.com/debian-security stretch/updates main contrib non-free
deb http://ftp.cn.debian.org/debian/ stretch main contrib non-free
deb http://ftp.cn.debian.org/debian/ stretch-updates main contrib non-free
deb http://mirrors.ustc.edu.cn/debian-security/ stretch/updates main contrib non-free
deb http://ftp.cn.debian.org/debian/ stretch-backports main contrib non-free
deb http://mirrors.ustc.edu.cn/ubuntu-ports xenial-security main restricted
deb-src http://mirrors.ustc.edu.cn/ubuntu-ports xenial-security main restricted
deb http://mirrors.ustc.edu.cn/ubuntu-ports xenial-security universe
deb-src http://mirrors.ustc.edu.cn/ubuntu-ports xenial-security universe
deb http://mirrors.ustc.edu.cn/ubuntu-ports xenial-security multiverse
deb-src http://mirrors.ustc.edu.cn/ubuntu-ports xenial-security multiverse
进行源更新
sudo apt-get update如果出现问题:如
Reading package lists... Done
W: GPG error: http://mirrors.ustc.edu.cn/ubuntu-ports xenial-security InRelease: The following signatures couldn't be verified because the public key is not available: NO_PUBKEY 40976EAF437D05B5 NO_PUBKEY 3B4FE6ACC0B21F32
W: The repository 'http://mirrors.ustc.edu.cn/ubuntu-ports xenial-security InRelease' is not signed.
N: Data from such a repository can't be authenticated and is therefore potentially dangerous to use.
N: See apt-secure(8) manpage for repository creation and user configuration details.
需要执行下面的命令:
sudo apt-get install debian-archive-keyring debian-keyring dirmngr//安上公钥
然后执行:
sudo apt-key adv --keyserver keyserver.ubuntu.com --recv-keys 40976EAF437D05B5
重新更新数据源就可以了~~
在把TPU作为PC端时,突然发现其无法通过串口调试其它设备,即TPU不支持lsusb的使用~~
~~~然后发现这是debain系统的问题~~~
sudo apt-get install usbutilsubuntu@ubuntu:~$ lsusb
Bus 002 Device 001: ID 1d6b:0003 Linux Foundation 3.0 root hub
Bus 001 Device 105: ID 1a2c:2124 China Resource Semico Co., Ltd
Bus 001 Device 104: ID 413c:301a Dell Computer Corp.
Bus 001 Device 001: ID 1d6b:0002 Linux Foundation 2.0 root hub
然后取得其串口的控制权限~~~
cd /etc/udev/rules.d/
sudo touch 51-android.rules
SUBSYSTEM=="usb", ENV{DEVTYPE}=="usb_device", MODE="0666"
sudo chmod a+x 51-android.rules
拔掉usb重新插上就可以了,如:
ubuntu@ubuntu:~$ adb devices
List of devices attached
AB100607    device
这样就解决了识别(控制)串口USB的问题。
在TPU上执行apt-get install命令时,报如下warning
| 1 2 3 4 5 6 7 8 9 10 11 12 13 14 15 16 17 18 19 |
perl: warning: Setting locale failed. perl: warning: Please check that your locale settings: LANGUAGE = "zh_CN:zh", LC_ALL = (unset), LC_TIME = "zh_CN", LC_MONETARY = "zh_CN", LC_ADDRESS = "zh_CN", LC_TELEPHONE = "zh_CN", LC_NAME = "zh_CN", LC_MEASUREMENT = "zh_CN", LC_IDENTIFICATION = "zh_CN", LC_NUMERIC = "zh_CN", LC_PAPER = "zh_CN", LANG = "zh_CN.UTF-8" are supported and installed on your system. perl: warning: Falling back to the standard locale ("C"). locale: Cannot set LC_CTYPE to default locale: No such file or directory locale: Cannot set LC_MESSAGES to default locale: No such file or directory locale: Cannot set LC_ALL to default locale: No such file or directory |
sudo vim  ~/.bashrc
#add the command in bottom line
export LC_ALL=C
source ~/.bashrc