GDAL的JAVA编译和调用
使用GDAL源码版本GDAL1.9.2,目标是将GDAL编译成支持Linux64位的JAVA应用程序的类库。
-
GDAL的安装
下载GDAL的源码包(http://trac.osgeo.org/gdal/wiki/DownloadSource)。本文档以GDAL1.9.2为例。将压缩包解压到指定目录,本文档的目录以
(1)安装g++,在ubuntu的终端中输入命令apt-get install g++
(2)通过终端进去
(3)配置完成后,在终端中输入make命令。
(4)make完成后,在终端输入命令make install并执行。
(5)等待安装完成后,GDAL的默认安装路径为 /usr/local/lib,可在该路径下查看是否生成下列文件(python2.7,libgdal.a,libgdal.la,libgdal.so,libgdal.so.1,libgdak.so.1.16.2),如图所示:
图1-1 GDAL安装成功
至此,GDAL的安装工作已经完成。
2.GDAL的编译
(1)更改“java.opt”
进入到
#
# Java Stuff
JAVA_HOME = /usr/lib/jvm/jdk1.7.0_04
JAVADOC=$(JAVA_HOME)/bin/javadoc
JAVAC=$(JAVA_HOME)/bin/javac
JAVA=$(JAVA_HOME)/bin/java
JAR=$(JAVA_HOME)/bin/jar
JAVA_INCLUDE=-I$(JAVA_HOME)/include -I$(JAVA_HOME)/include/linux
(其中,第一行中的JAVA_HOME的值为本机上JDK的安装路径)
(2)安装“ant”
在终端中输入命令 apt-get install apt,执行完成安装。
(3)安装“swig”
在终端中输入命令 apt-get install swig ,执行并完成安装。
(4)通过终端进入到
(5)通过终端进入到
(6)make完成后在
如图所示,
图2-1 编译成功
至此,GDAL的编译工作完成。
3.GDAL的调用
(1)新建一个java project来说明GDAL的调用方法。
1,打开eclipse新建一个Java project ,名为GDALTest
2,导入“gdal.jar”
将
【Build path】下面的【Add to build path】, 添加jar包成功后在项目下【Referenced Libraries】文件夹下可以看到gdal.jar,
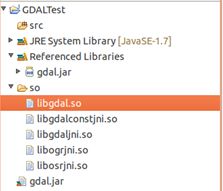
如图3-1所示。至此,jar包导入成功。
图3-1 导入“gdal.jar“
3,so动态链接库的引用
3.1:方式一 编码工具配置so动态链接库的引用
a,在GDALTest的根目录下新建一个名为so的文件夹,将
图3-2 复制so文件到项目文件夹下
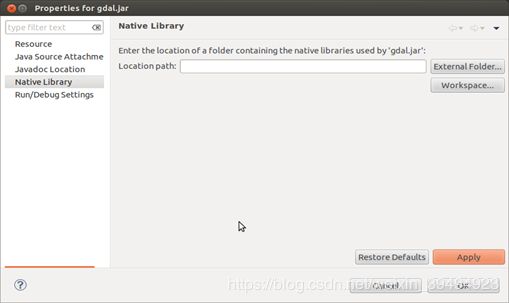
b ,右键点击“Referenced Libraries”文件夹下面的gdal.jar,选择【Properties】,在弹出窗口中选择左侧的
【Native Library】, 选择包含so文件的文件夹
c,点击窗口右侧的【Workspace】,在弹出窗口中选择项目下面的so文件夹,点击OK,如图所示
d,先后点击Properties窗口中的Apply和OK,对动态链接库的引用
3.2:方式二 通过代码加载so( linux上推荐本方式)
package com.huajie.gdal.util;


import org.apache.poi.util.IOUtils;

import java.io.*;
import java.net.JarURLConnection;
import java.net.URL;
import java.util.Enumeration;
import java.util.jar.JarEntry;
import java.util.jar.JarFile;


/**
 * NativeLoader
 *
 */
public class NativeLoader {

    private final static String WIN_TYEP = "win";
    private final static String DLL_SUFFIX = ".dll";
    private final static String SO_SUFFIX = ".so";
    private final static String OS_NAME = "os.name";
    private final static String JAR_PROTOCOL = "jar";
    private final static String FILE_PROTOCOL = "file";

    /**
     * 加载项目下的native文件,DLL或SO
     *
     * @param dirPath 需要扫描的文件路径,项目下的相对路径
     * @throws IOException IOException
     */
    public synchronized static void loader(String dirPath) throws IOException {
        Enumeration dir = Thread.currentThread().getContextClassLoader().getResources(dirPath);
        // 获取操作系统类型
        String systemType = System.getProperty(OS_NAME);
        // 获取动态链接库后缀名
        String ext = (systemType.toLowerCase().contains(WIN_TYEP)) ? DLL_SUFFIX : SO_SUFFIX;
        while (dir.hasMoreElements()) {
            URL url = dir.nextElement();
            String protocol = url.getProtocol();
            if (JAR_PROTOCOL.equals(protocol)) {
                JarURLConnection jarURLConnection = (JarURLConnection) url.openConnection();
                JarFile jarFile = jarURLConnection.getJarFile();
                // 遍历Jar包
                Enumeration entries = jarFile.entries();
                while (entries.hasMoreElements()) {
                    JarEntry jarEntry = entries.nextElement();
                    String entityName = jarEntry.getName();
                    if (jarEntry.isDirectory() || !entityName.startsWith(dirPath)) {
                        continue;
                    }
                    if (entityName.endsWith(ext)) {
                        loadJarNative(jarEntry);
                    }
                }
            } else if (FILE_PROTOCOL.equals(protocol)) {
                File file = new File(url.getPath());
                loadFileNative(file, ext);
            }
        }
    }

    /**
     * 加载Native File
     *
     * @param file File
     * @param ext  extion
     */
    private static void loadFileNative(File file, String ext) {
        if (null != file) {
            if (file.isDirectory()) {
                File[] files = file.listFiles();
                if (null != files) {
                    for (File f : files) {
                        loadFileNative(f, ext);
                    }
                }
            }
            if (file.canRead() && file.getName().endsWith(ext)) {
                try {
                    System.load(file.getPath());
                } catch (UnsatisfiedLinkError e) {
                    System.out.println("加载native文件 :" + file + "失败!!请确认操作系统是X86还是X64!!!");
                }
            }
        }
    }

    /**
     * 创建动态链接库缓存文件,然后加载资源文件
     *
     * @param jarEntry JarEntry
     */
    private static void loadJarNative(JarEntry jarEntry) {
        File path = new File(".");
        //将所有动态链接库dll/so文件都放在一个临时文件夹下,然后进行加载
        //这是应为项目为可执行jar文件的时候不能很方便的扫描里面文件
        //此目录放置在与项目同目录下的natives文件夹下
        String rootOutputPath = path.getAbsoluteFile().getParent() + File.separator;
        String entityName = jarEntry.getName();
        String fileName = entityName.substring(entityName.lastIndexOf("/") + 1);
        File tempFile = new File(rootOutputPath + File.separator + entityName);
        // 如果缓存文件路径不存在,则创建路径
        if (!tempFile.getParentFile().exists()) {
            tempFile.getParentFile().mkdirs();
        }
        // 如果缓存文件存在,则删除
        if (tempFile.exists()) {
            boolean delete = tempFile.delete();
        }
        byte[] buffer;
        InputStream in = null;
        BufferedInputStream reader = null;
        BufferedOutputStream writer = null;
        try {
            //读取文件形成输入流
            in = NativeLoader.class.getResourceAsStream(entityName);
            if (in == null) {
                in = NativeLoader.class.getResourceAsStream("/" + entityName);
                if (null == in) {
                    return;
                }
            }
            NativeLoader.class.getResource(fileName);
            reader = new BufferedInputStream(in);
            writer = new BufferedOutputStream(new FileOutputStream(tempFile));
            buffer = new byte[4096];
            while (reader.read(buffer) > 0) {
                writer.write(buffer);
                buffer = new byte[4096];
            }
        } catch (IOException e) {
            e.printStackTrace();
        } finally {
            buffer = null;
            IOUtils.closeQuietly(writer);
            IOUtils.closeQuietly(reader);
            IOUtils.closeQuietly(in);
        }
        try {
            System.load(tempFile.getPath());
        } catch (UnsatisfiedLinkError e) {
            System.out.println("加载native文件 :" + tempFile + "失败!!请确认操作系统是X86还是X64!!!");
        }
    }

}
至此,GDAL的工作环境搭建完成。
(2)使用示例
以下是简单的测试代码,输出图像的一些信息,主要参照的是gdal官网上一个例子(http://trac.osgeo.org/gdal/browser/trunk/gdal/swig/java/apps/GDALtest.java)
import org.gdal.gdal.Band;
import org.gdal.gdal.Dataset;
import org.gdal.gdal.gdal;
import org.gdal.gdalconst.gdalconst;

public class ImageTest{

     // 加载调用So方式二,linux上推荐方式二
     //private final static String WIN_TYEP = "win";
     //private final static String OS_NAME = "os.name";
     //private final static String SO_PATH = "so";
     //
     //static {
     //    //根据操作系统判断,如果是linux系统则加载c++方法库
     //    if (! System.getProperty(OS_NAME).toLowerCase().contains(WIN_TYEP)) {
     //        try {
     //            NativeLoader.loader(SO_PATH);
     //        } catch (Exception e) {
     //            e.printStackTrace();
     //     System.out.println("<< ==== 加载so库失败" + e.getMessage() + "==== >>");
     //        }
     //    }
     //  }

       public static void main(String[] args){

              //注册文件格式
              gdal.AllRegister();
              //使用只读的方式打开图像
              Dataset poDataset = gdal.Open("F:/image/result.tif",gdalconst.GA_ReadOnly);

           if (poDataset == null)

              {

                     System.out.println("The image could not be read.");

              }else {

                     //图像打开成功

                     System.out.println("The image could be read.");

                     //输出文件的格式

                     System.out.println("文件格式:"+poDataset.GetDriver().GetDescription());

                  //输出图像的大小和波段个数

                     System.out.println("size is:x:"+poDataset.getRasterXSize()+" ,y:"+

                  poDataset.getRasterYSize()+" ,band size:"+poDataset.getRasterCount());

                     //输出图像的投影信息

                     if (poDataset.GetProjectionRef() != null)

                     {

                            System.out.println("Projection is "+poDataset.GetProjectionRef());

                     }

                     //输出图像的坐标和分辨率信息

                     double[] adfGeoTransform = new double[6];

                  poDataset.GetGeoTransform(adfGeoTransform);

                  System.out.println("origin : "+adfGeoTransform[0]+","+adfGeoTransform[3]);

                  System.out.println("pixel size:"+adfGeoTransform[1]+","+adfGeoTransform[5]);

              //分别输出各个波段的块大小,并获取该波段的最大值和最小值,颜色表信息

                  for(int band = 0; band < poDataset.getRasterCount();band++)

                  {

                         Band poBand = poDataset.GetRasterBand(band+1);

                         System.out.println("Band"+(band+1)+":"+"size:x:"+poBand.getXSize()+",y:"+poBand.getYSize());

                         Double[] min = new Double[1];

                         Double[] max = new Double[2];

                         poBand.GetMinimum(min);

                         poBand.GetMaximum(max);

                         if (min[0] != null || max != null)

                            {

                                System.out.println("Min="+min[0]+",max="+max[0]);

                            }else {

                                   System.out.println("No Min/Max values stored in raster.");

                            }

                         if (poBand.GetColorTable() != null)

                            {

                                   System.out.println("band"+band+"has a color table with"

                                +poBand.GetRasterColorTable().GetCount()+"entries.");

                            }

                  }

              }

       }

}


