jQuery进阶上集--通过案例(五星好评、轮播图、递归实现动画、全选与反选...)深入知识点
jQuery是不是过了保质期了
现在前端三大框架,都是为了使操作者从繁琐的DOM操作中解脱出来。而现在都是面向数据编程,这样可以提高了性能和便于维护;而dom操作会让页面重绘和回流,且js数组API,字符串的API等其它操作数据的API都很完善了;在操作数据API比jQuery完善,又不建议dom操作;jQuery还有一席之地吗?
jQuery风华正茂
不管你面向数据编程还是面向老婆编程;根据江湖传言;全世界大约有80~90%的网站直接或间接地使用了jQuery。
第零点:鉴于它如此流行,又如此好用,所以每一个入门JavaScript的前端工程师都应该了解和学习它。
第一点:提高我们的竞争力;技多不压身,个人感觉只要没过时或则以后还有发展前途的语言可能都会增加我们的优势。多学习保证自己可持续发展战略。
第二点,兼容性。消除浏览器差异;它封装了很多兼容代码;不需要自己写冗长的代码来针对不同的浏览器来绑定事件
第三点:当然是它的链式编程和隐式迭代;什么是链式编程、隐式迭代后续讲
第四点:当然是它的Ajax;异步请求和跨域请求都封装得很完善
第五点:轻松实现动画、修改CSS等各种操作,简洁的操作DOM方法。
第六点:jQuery的理念“Write Less, Do More“,让你写更少的代码,完成更多的工作!这不正符合我们程序猿的懒出新高度吗
…
此文章较长;建议在有滴眼液的情况下观看
jQuery页面加载事件
- 页面中所有的内容加载完毕后触发;标签、图片、第三方文件加载后触发;和DOM中的window.onload事件是相同的
	$(window).load(function() {
	});
- 页面中的基本的标签加载完毕后就可以触发了
	$(function(){

	})
	$(document).ready(function($) {

	});
DOM对象和jQuery对象可以互转
DOM对象转jQuery对象;只需要加个$即可
- 比如我们需要获取页面上的li
    var list = document.querySelector('li')//这是个dom对象
    $(list).click(function () {//将list转化为jq对象
        $(this).css({backgroundColor:'red'})//将this转为jq对象
    })
jQuery对象转为DOM对象
- 使用get方法;
$(ele).get(index);index为索引值
$('li').get(0).style.background = 'yellow'
- 使用
[index]
$('li')[1].style.background = 'green'
设置文本和值的方法
.html()方法,设置标签中间显示其他标签及内容,类似于innerHTML
.text()方法,设置标签中间显示的文本内容,类似于innerText
.val()方法.设置input标签中value的值,类似于value
创建标签
$('div').html('')
$('')
选择器与隔行变色
jQuery所有选择器
感觉我举的用法例子都是很形象的…此处想象牛逼表情包…
| 选择器名称 | 选择器概述 | 选择器用法 |
|---|---|---|
#id、.class、element、* |
这是基本的选择器:id、类、标签、通配符选择器 | $(‘li’) |
selector1,selector2,selectorN |
指定任意多个选择器 | $(“div,span,p.myClass”) |
ancestor descendant |
祖先后代选择器 | $(“table td”) |
parent > child |
父子选择器 | $(“ul > li”) |
prev + next |
匹配所有紧接在 prev 元素后的 next 元素 | $(“label + input”) |
prev ~ siblings |
匹配 prev 元素之后的所有 siblings(作为第一个选择器的同辈) 元素 | $(‘dt dd’) |
:first、:last |
获取第一个元素、最后一个元素 | $(‘li:first’) |
:not(selector) |
去除所有与给定选择器匹配的元素 | $(“input:not(:checked)”) |
:enev、:odd |
偶数、奇数选择器;从0开始计数 | $(‘ul li:odd’) |
:eq(index)、:gt(index)、:lt(index) |
匹配一个给定索引值的元素、大于给定索引值的元素、小于给定索引值的元素 | $(‘p:eq(1)’) |
:lang |
:lang选择器,匹配有一个语言值等于所提供的语言代码,或以提供的语言代码开始,后面马上跟一个“ - ”的元素。例如,选择器$(“div:lang(en)”)将匹配 |
$(“p:lang(it)”) |
:header |
匹配如 h1, h2, h3之类的标题元素 | $(":header") |
:animated |
匹配所有正在执行动画效果的元素 | $(“div:animated”) |
:focus |
匹配当前获取焦点的元素。 | $(“input:focus”) |
:root |
在HTML中,文档的根元素,和$(":root")选择的元素一样, 永远是 |
$(":root") |
:target |
选择由文档URI的格式化识别码表示的目标元素。 | 类似我们的锚点链接(后面有案例理解) |
:contains(text) |
匹配包含给定文本的元素 | $(“div:contains(‘John’)”) 查找所有包含 “John” 的 div 元素 |
:empty、:parent |
匹配所有不包含子元素或者文本的空元素、 匹配含有子元素或者文本的元素 | $(“tr:empty”) |
:has(selector) |
匹配含有选择器所匹配的元素的元素 | :has(selector) |
:hidden、:visible |
匹配所有不可见元素,或者type为hidden的元素、 匹配所有的可见元素 | $(“input:hidden”) |
[attribute]、 [attribute=value]、[attribute^=value]、 [attribute$=value]、[attribute*=value]、[selector1][selector2][selectorN] |
匹配包含给定属性的元素、匹配给定的属性是某个特定值的元素、以某些值开始、以某些值结尾、以包含某些值、复合选择器 | $(“input[name*=‘username’]”) |
:first-child、:first-of-type、:last-child、:last-of-type |
即为每个父级元素匹配第一个子元素、匹配E的父元素的第一个E类型的孩子、匹配最后一个子元素、匹配E的父元素的最后一个E类型的孩子 | $(“ul li:first-child”) |
:nth-child(index)、:nth-last-child(n|even|odd|formula)、:nth-last-of-type(n|even|odd|formula)、:nth-of-type(n|even|odd|formula) |
匹配其父元素下的第N个子或奇偶元素;index从1算起、选择所有他们父元素的第n个子元素;计数从最后一个元素开始到第一个、选择的所有他们的父级元素的第n个子元素(类型),计数从最后一个元素到第一个、选择同属于一个父元素之下,并且标签名相同的子元素中的第n个。 | $(“ul li:nth-child(2)”) |
:only-child |
如果某个元素是父元素中唯一的子元素,那将会被匹配 | $(“ul li:only-child”) |
:only-of-type |
选择所有没有兄弟元素,且具有相同的元素名称的元素。 | |
:input |
匹配所有 input, textarea, select 和 button 元素 | |
:text、:password、:radio、:checkbox |
匹配所有的单行文本框(type=“text”) … | $(":text") |
:submit、:image、:reset、 :button、 :file |
||
:enabled、:disabled、 :checked、 :selected |
匹配所有可用元素、不可用元素、选中元素、选中的option元素 | $(“select option:selected”) |
其实上面很多选择器都类似我们css的选择器;真正用到的其实也就几个
:target
<a href="#foo">锚点链接a>
<p name="foo" id="foo">锚点位置p>
 $(function () {
        $('a').click(function () {
            $(':target').css({background:'red'}) //点击两下
        })
    })
:first-child
其实我们联合使用的时候我们可以看做一个交集选择器;比如看下面这段代码
<div><p>111</p> <p>222</p><p>333</p></div>
$('p:first-child').css({background:'red'})
111$('p:first-child')可以分解为p元素、p元素的父元素div的第一个子元素
隔行变色
<ul><li>1</li><li>2</li><li>3</li><li>4</li></ul>
    $('ul li:odd').css({background:'red'})
    $('ul li:even').css({background:'green'})
这样的代码比我们使用for循环来得更容易,简洁了些
操作样式
- addClass()添加一个类
$('div').addClass('cls1').addClass('cls2') //在addClass方法中类样式的名字前面没有点(.)
$('div').addClass('cls1 cls2')//第二种方案
- removeClass()移除样式
$("div").removeClass("cls1");//移除一个类
$("div").removeClass();//移除div所有的类样式
- hasClass()判断是否有该类
console.log($("div").hasClass("cls1")) //返回一个布尔类型
- toggleClass();切换元素的类样式的(有则删除该类;没有则添加该类)
链式编程
链式编程:对象.方法().方法().方法();…
就像一条链子一样,一环扣一环;也就是多行代码合并成一行代码,前提要认清此行代码返回的是不是对象.是对象才能进行链式编程。
链式编程实现的原理
- 实现链式编程的核心,是对象中的每一个方法都会返回当前对象。举个例子
JQuery.prototype.high = function(){
	......
	return this;//方法中,js提供一个this的关键字,表示当前对象。
}
五星好评案例谈断链
    <style>
        ul li{
            font-size: 30px;
            color: red;
            list-style: none;
            float: left;
            margin-right: 5px;
            cursor: pointer;
        }
    style>
<ul class="comment"><li>☆li><li>☆li><li>☆li><li>☆li><li>☆li>
ul>
    $('li').on('mouseenter',function () {
        $(this).html('★').prevAll('li').html('★').nextAll('li').html('☆')
    })
结果肯定不是我们想的这样;看了源码发现prevAll返回的是elem;不是this当前对象

prevAll()这个方法找到当前节点的所有节点,破坏了当前的链;那么我们必须写两行吗?
$(this).html('★').prevAll('li').html('★')
$(this).nextAll('li').html('☆')
end()方法回到最近的一个"破坏性"操作之前。即,将匹配的元素列表变为前一次的状态。(我们把整个五星好评写完)
$(this).html('★').prevAll('li').html('★').end().nextAll('li').html('☆')
完整的五星好评案例jq代码
   $('li').on('mouseenter',function () {
        $(this).html('★').prevAll('li').html('★').end().nextAll('li').html('☆')//鼠标经过li时之前的都点亮
    }).click(function () {
        flag = true //点击了;点亮效果按点击的来
        $(this).addClass('active') //记录一下点击的点亮效果
    })

    $('ul').on('mouseleave',function () {
        if(flag){//有点击的话记录下点击的效果
            $('.active').html('★').prevAll('li').html('★').end().nextAll('li').html('☆')
            //鼠标离开时有点击时不做任何操作
            return;
        }
        $(this).children('li').html('☆')//鼠标没有点击离开时不点亮
    })
兄弟元素节点
除了上面的prevAll()节点;还有.next():获取的是当前元素的下一个兄弟元素;.nextAll():获取的是当前元素的后面的所有的兄弟元素;.prev():获取的是当前元素的前一个兄弟元素;.siblings():获取的是当前元素的所有的兄弟元素(自己除外)
隐式迭代
隐式迭代的意思是:在方法的内部会为匹配到的所有元素进行循环遍历,执行相应的方法;而不用我们再进行循环,简化我们的操作,方便我们调用。如果获取的是多元素的值,大部分情况下返回的是第一个元素的值。
动画实现轮播图
我们说一下jq的一些动画
jq动画有:.show();.hide();.toggle();.slideDown();.slideUp();.slideToggle();.fadeIn();fadeOut();fadeToggle();fadeTo();stop();delay();finish(),animate
stop()
stop(clearQueue,jumpToEnd)
默认是false,false
第一个参数:是否清楚当前动画队列(干)
第二个参数:是否跳转到当前动画的最终效果
animate
animate(params,[speed],[easing],[fn])
params:一组包含作为动画属性和终值的样式属性和及其值的集合
speed:三种预定速度之一的字符串(“slow”,“normal”, or “fast”)或表示动画时长的毫秒数值(如:1000)
easing:要使用的擦除效果的名称(需要插件支持).默认jQuery提供"linear" 和 “swing”.
fn:在动画完成时执行的函数,每个元素执行一次。
自动轮播图
html结构和css样式
    <style>
        *{margin: 0;padding: 0;}
        ul,ol{list-style: none;width: 600%;}
        #box{width: 590px;height: 470px;position:relative;overflow: hidden;margin: 50px auto;border: 5px solid salmon;}
        ul{position: absolute;}
        ul li{float: left;}
        ol{position: absolute;width:100px;bottom:30px;right: 20px;}
        ol li{width: 10px;height: 10px;border-radius: 50%;background: #fff;float: left;margin-right: 10px;}
        ol li.active{background: crimson!important;}
        .all{position: absolute;top:220px;width: 590px;height: 30px;color: #fff;font-size: 30px;}
        .all .prev,.all .next{position: absolute;width: 50px;height: 50px;cursor: pointer;text-align: center;line-height: 50px;}
        .all .prev{left: 0;}
        .all .next{right: 0;}
    style>
<div id="box">
<ul>
    <li><a href="javascript:;"><img src="https://img1.360buyimg.com/pop/jfs/t10690/206/3097370816/93764/127557e1/5ce20feaN1a45b6f3.jpg" alt="">a>li>
    <li><a href="javascript:;"><img src="https://m.360buyimg.com/babel/jfs/t11128/214/2883349254/95465/af8c3037/5cdaaee2N7b987ba4.jpg" alt="">a>li>
    <li><a href="javascript:;"><img src="https://m.360buyimg.com/babel/jfs/t30112/111/1333616826/97831/56f1ccd1/5cde11c5Nf3a27eaa.jpg" alt="">a>li>
    <li><a href="javascript:;"><img src="https://m.360buyimg.com/babel/jfs/t9952/107/3036165520/32341/50f95de0/5cdeb766N3cbca073.jpg" alt="">a>li>
    <li><a href="javascript:;"><img src="https://m.360buyimg.com/babel/jfs/t10165/147/2935200796/94870/d506408a/5cde1f47N425b7214.jpg" alt="">a>li>
ul>
    <ol>
        <li class="active">li>
        <li>li>
        <li>li>
        <li>li>
        <li>li>
    ol>
    <div class="all">
        <span class="prev"><span>
        <span class="next">>span>
    div>
div>
复制第一张图片添加到ul子元素最后
 // 0. 做无缝滚动:所以需要在ul复制第一个图片然后添加到最后
 $(function () {
    $('ul li:first-child').clone().appendTo('ul')
    })
切换下一张:其实就是对index索引值的控制(接着第一步;后面代码都是写在 $(function () {}接着上面一步)
    var index = 0 //进来的时候显示的是第一张图片
    $('.next').on('click',function () {
        index++
        $('ul').animate({'left':-$('#box').width()*index},1000,function () {
            if(index>=$('ul li').length-1){
                index = 0
                $('ul').animate({'left':-$('#box').width()*index},0)
            }
            $('.active').removeClass('active')
            $('ol').children('li').eq(index).addClass('active') //按钮高亮显示
        })
    })
切换上一张也是一样:如何控制index是关键
    $('.prev').on('click',function () {
        // 上面切换下一张是动画完成,我们在切换到第一张的位置;所以在回调函数里面判断
        // 而这里我们需要在外面判断index;如果index<0;先让第一张切换到克隆的第六张在进行动画
        if(index<=0){
            index = $('ul li').length-1
            $('ul').animate({'left':-$('#box').width()*index},0)
        }
        index--
        $('ul').animate({'left':-$('#box').width()*index},1000,function () {
            $('.active').removeClass('active')
            $('ol').children('li').eq(index).addClass('active') //按钮高亮显示
        })
    })
点击底部右方按钮进行切换轮播图
    $('ol li').click(function () {
        index = $(this).index()
        $('ul').animate({'left':-$('#box').width()*index},1000,function () {
            $('.active').removeClass('active')
            $('ol').children('li').eq(index).addClass('active') //按钮高亮显示
        })
    })
自动播放:其实就是跟切换下一张是一样的
    setInterval(function () {
        $('.next').trigger('click') //触发点击事件
    },2000)
还有控制轮播(节阀流)、清除定时器、其它效果…这些逻辑运算自己可以想一下;不会很难.为了防止篇幅过长我就不写了…
添加内容与删除内容
将元素添加到某个元素里面去
append(content),appendTo(content),prepend(content),prependTo(content)这些都是父子元素间的添加内容after(content|fn),before(content|fn),insertAfter(content),insertBefore(content)这是兄弟元素间的添加内容
删除内容
- $(element).html("");//清空元素中的内容
- $(element).empty();//清空元素中的内容
- ("element).remove();//移除元素自身—自杀
克隆
clone([Even[,deepEven]])
- Events:一个布尔值(true 或者 false)指示事件处理函数是否会被复制。V1.5以上版本默认值是:false
- deepEvents:一个布尔值,指示是否对事件处理程序和克隆的元素的所有子元素的数据应该被复制。
选择添加元素案例
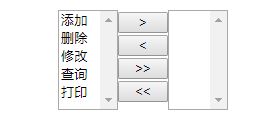
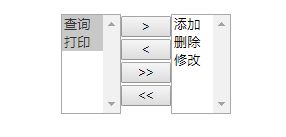
需求:1. 将我们选中的元素添加到另一个元素上面;2. 点击按钮,将全部元素添加到另一个元素上面

html结构
<div style="margin-left: 500px; margin-top: 20px; background-color: #999999">
    <select multiple="multiple" style="float: left; width: 60px; height: 100px;" id="se1">
        <option>添加</option>
        <option>删除</option>
        <option>修改</option>
        <option>查询</option>
        <option>打印</option>
    </select>
    <div style="width: 50px; float: left;">
        <input type="button" name="name" value=">" style="width: 50px;" id="toRight" />
        <input type="button" name="name" value="<" style="width: 50px;" id="toLeft" />
        <input type="button" name="name" value=">>" style="width: 50px;" id="toAllRight" />
        <input type="button" name="name" value="<<" style="width: 50px;" id="toAllLeft" />
    </div>
    <select multiple="multiple" style="float: left; width: 60px; height: 100px;" id="se2">
    </select>
</div>
jq代码
       $(function () {
            //第一个按钮:获取按钮添加点击事件,获取第一个下拉框中被选中的option添加到第二个下拉框
            $("#toRight").click(function () {
                $("#se2").append($("#se1>option:selected"));
            });

            //第二个按钮
            $("#toLeft").click(function () {
                $("#se1").append($("#se2>option:selected"));
            });
            //第三个按钮
            $("#toAllRight").click(function () {
                $("#se2").append($("#se1>option"));
            });
            //第四个按钮
            $("#toAllLeft").click(function () {
                $("#se1").append($("#se2>option"));
            });
        });
自定义属性attr无效问题
我们可以先来看attr的用法
$('点击').attr("href","https://blog.csdn.net/weixin_41105030").appendTo($('body'))
它如果是两个参数是设置属性,一个参数是获取属性,这点和css方法一样
设置复选框选中问题
<input type="button" value="点击勾选" id="btn"/>
<input type="checkbox" value="1" id="ck" />打豆豆
![]()
看上面的结构也知道我们需求:点击勾选;复选框被勾选(即设置属性checked=true)…如果已经勾选则取消
- 先判断它是否已经勾选
onsole.log($('#ck').attr('checked'))
结果打印undefined;一脸黑人问号…是因为表单元素用得是prop
2. 点击按钮:判断是否已经勾选来切换按钮状态和改变文本内容
    $(function(){
        $('#btn').on('click',function () {
            console.log($('#ck').prop('checked'))
            if($('#ck').prop('checked')){ //如果已经勾选
                $('#ck').prop('checked',false)
                $(this).val('取消勾选')
            }else{
                $('#ck').prop('checked',true)
                $(this).val('点击勾选')
            }
        })
    })
- 如果想移除属性可以使用
removeProp(name)或removeAttr(name)
如果上面使用$('#ck').removeProp('checked')而不是设置为false的话;随着一些内置属性的DOM元素或window对象,如果试图将删除该属性,浏览器可能会产生错误。jQuery第一次分配undefined值的属性,而忽略了浏览器生成的任何错误所以是不可行的
防止篇幅过长,影响观看效果,写成两集
https://blog.csdn.net/weixin_41105030/article/details/90399418
