初学react native基础(组件、API、插件、样式、布局)
React Native
React Native 看起来很像 React,只不过其基础组件是原生组件而非 web 组件。要理解 React Native 应用的基本结构,首先需要了解一些基本的 React 的概念,比如 JSX 语法、组件、state状态以及props属性。如果你已经了解了 React,那么还需要掌握一些 React Native 特有的知识,比如原生组件的使用。这篇教程可以供任何基础的读者学习,不管你是否有 React 方面的经验。
TextInput
通过 value 属性指定文本内容, 通过 onChangeText 属性监听文本的变化事件
从TextInput谈绑定this传参数
我们在使用TextInput发现每次输入完后;输入的都无效;这是因为要改变没有更改数据源
- 使用箭头函数实现;这样不会改变this的指向
import React from 'react';
import { View,  TextInput, StyleSheet } from 'react-native';
export default class ElseStudy extends React.Component{
    constructor(props){
        super(props)
        this.state = {myText:'Useless Placeholder'}
    }
    render(){
        return (
            <View>
                <TextInput
                    value={this.state.myText}
                    onChangeText={(text)=>this.changeTextHandle(text)}
                    ></TextInput>
            </View>
        )
    }
    changeTextHandle(newText){
        this.setState({
            myText:newText
        })
    }
}
- 当然代码少,我们可以不用声明一个函数,直接写在
{}
        return (
            <View>
                <TextInput
                    value={this.state.myText}
                    onChangeText={(myText)=>this.setState({myText})}
                    ></TextInput>
            </View>
        )
- 使用bind改变this的指向
    render(){
        return (
            <View>
                <TextInput
                    value={this.state.myText}
                    onChangeText={this.changeTextHandle.bind(this)}
                    ></TextInput>
            </View>
        )
    }
    changeTextHandle(newText){
        this.setState({
            myText:newText
        })
    }
ScrollView
- 默认情况下, 超出屏幕的内容是看不到的, 不像浏览器环境下会自动添加滚动条
- 如果需要滚动, 可以使用这个组件把要相应的内容包裹起来, 被包裹的内容就会处于滚动条中
- 滚动的过程中,可以通过onScroll绑定回调,每帧最多调用一次回调
import React from 'react';
import { StyleSheet, Text, View,ScrollView } from 'react-native';
export default class ScrollViewStudy extends React.Component{
    constructor(props) {
        super(props);
        this.state = {
            list: ["red", "yellow", "pink", "orange", "blue", "skyblue"]
        }
    }
    render(){
        return (
            <View>
            {
                this.state.list.map(color => (
                    <View
                        key={color}
                        style={{backgroundColor: color, width: 300, height: 180}}>
                        <Text>{color}</Text>
                    </View>
                ))
            }
            </View>
        )
    }
}
我们使用View包裹着每个View组件;发现手机只显示中间部分的组件;并不能滚动;我们可以使用scrollView进行包裹
    <ScrollView>
            {
                this.state.list.map(color => (
                    <View
                        key={color}
                        style={{backgroundColor: color, width: '100%', height: 180}}>
                        <Text>{color}</Text>
                    </View>
                ))
            }
            </ScrollView>
ScrollView实现轮播
import React from 'react'
import { StyleSheet, View,ScrollView,Text } from 'react-native';
const Dimensions = require('Dimensions');
const screenSize = Dimensions.get("window");
export default class Lunbotu extends React.Component{
    constructor(props){
        super(props)
        this.state = {
            list: ["red", "yellow", "pink", "orange"]
        }
    }
    getList(){
        return this.state.list.map((color,i) => (
            <View
            key={i}
            style={[styles.swipeItem, {backgroundColor: color}]}
            >
            <Text>i</Text>
            </View>
        ))
    }
    render(){
        return (
            <ScrollView
            horizontal={ true }
            pagingEnabled={ true }
            showsHorizontalScrollIndicator={ false }
            >

                {this.getList()}
            </ScrollView>
        )
    }
}
const styles = StyleSheet.create({
    swipeItem:{
        width: screenSize.width,
        height: 200
    }
})
- Dimensions可以动态获取屏幕的宽高,用这个宽高我们可以根据需求自己计算。使用它的时候,主要是因为我们不能确定父盒子的宽高与屏幕的关系
- horizontal属性可设置列表水平排列,pagingEnabled属性能够让列表一页一页切换,showsHorizontalScrollIndicator属性控制滚动条显示隐藏
- 其实我们只是让每一个子元素(轮播容器swiper-item)水平排列,请求去掉滚动条;然后在滑动一下显示一页即可
FastList
高性能的简单列表组件
使用方法
import React, { Component } from "react";
import { StyleSheet, View, Text, FlatList } from 'react-native';
export default class FlatListTest extends Component {
    render() {
        return (
            <View>
                <FlatList
                    data={[
                        {key: 'Devin'},
                        {key: 'Jackson'},
                        {key: 'James'},
                        {key: 'Joel'},
                        {key: 'John'},
                        {key: 'Jillian'},
                        {key: 'Jimmy'},
                        {key: 'Julie'}
                    ]}
                    renderItem={(e) => <Text style={styles.item}>{e.index + ":" + e.item.key}</Text>}
                />
            </View>
        );

    }
}

const styles = StyleSheet.create({
    item: {
        padding: 10,
        fontSize: 18,
        height: 44,
    },
});
ActivityIndicator
- 展示一个小圆形的loading
- 通过属性 animating 控制显示隐藏, color 设置颜色
- 我们可以用它来做数据的加载等等…
import React, { Component } from "react";
import { StyleSheet, View, Text, ActivityIndicator } from 'react-native';
export default class FlatListTest extends Component {
    render(){
        return (
            <ActivityIndicator
            animating={true}
            color="green"
            size="large" />
        )
    }
}
触控系列组件
在需要捕捉用户点击操作时,可以使用Touchable开头的一系列组件。这些组件通过onPress属性设置点击事件的处理函数。当在本组件上按下手指并且抬起手指时也没有移开到组件外时,此函数会被调用。Touchable组件最大的特点是附带反馈效果。
import React from 'react'
import {
    StyleSheet,
    View,
    Image,
    Text,
    TouchableHighlight,
    TouchableOpacity,
    TouchableNativeFeedback
} from 'react-native';
export default class TouchableStudy extends React.Component{
    render(){
        return (
            <View>
                <TouchableOpacity
                activeOpacity={0.5}
                >
                    <Text style={styles.baseFont}>透明按钮</Text>
                </TouchableOpacity>
                <TouchableHighlight
                underlayColor="#fal33j"
                    activeOpacity={0.5}>
                    <Text style={styles.baseFont}>高亮按钮</Text>
                </TouchableHighlight>
                <TouchableNativeFeedback
                    background={TouchableNativeFeedback.SelectableBackground()}
                    >
                    <View style={styles.base}>
                        <Text style={styles.baseFont}>原生按钮</Text>
                    </View>
                </TouchableNativeFeedback>
            </View>
        )
    }
}
const styles = StyleSheet.create({
    base: {
        margin: 10,
        width: 300,
        height: 100,
        borderRadius: 5,
        backgroundColor: 'green',
        justifyContent: 'center',
    },
    baseFont: {
        color: "orange",
        textAlign: "center",
        lineHeight: 50
    }
})
使用原生状态渲染反馈效果,比如涟漪,只能放置一个view子组件;效果有三个可选方法:SelectableBackground、SelectableBackgroundBorderless、Ripple(color)
Alter
import React from 'react'
import {
    Alert,
    Button,
} from 'react-native';
export default class AlertStudy extends React.Component{
    alertHandle(){
        Alert.alert(
            'Alert Title',
            'My Alert Msg',
            [
              {text: 'Ask me later', onPress: () => console.log('Ask me later pressed')},
              {text: 'Cancel', onPress: () => console.log('Cancel Pressed'), style: 'cancel'},
              {text: 'OK', onPress: () => console.log('OK Pressed')},
            ],
            { cancelable: false }
          )

    }
    render(){
        return(
            <Button title="点我弹框" onPress={()=>this.alertHandle()}></Button>
        )
    }
}
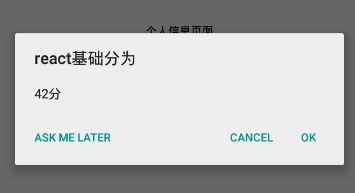
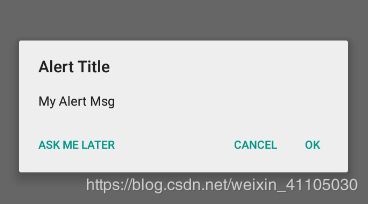
看界面一下子就能知道它的各个含义: 配置一个按钮是确定,两个按钮是取消与确定,三个按钮是稍后再试、取消与确定
Dimensions
const Dimensions = require('Dimensions');
const screenSize = Dimensions.get("window");

const styles = StyleSheet.create({
    container: {
        width: screenSize.width,
        height: screenSize.height
    }
});
本模块用于获取设备屏幕的宽高。尽管尺寸信息立即就可用,但它可能会在将来被修改(譬如设备的方向改变),所以基于这些常量的渲染逻辑和样式应当每次render之后都调用此函数,而不是将对应的值保存下来。
Picker
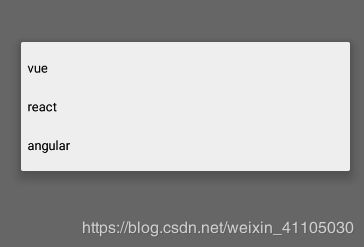
本组件可以在iOS和Android上渲染原生的选择器(Picker)
import React from 'react'
import {View,Text,StyleSheet,Picker} from 'react-native'
export default class Products extends React.Component{
    constructor(props) {
        super(props);
        this.state = {
            language:'react',
            pickerOptions:[
                {
                    id:1,
                    value:'vue'
                },
                {
                    id:2,
                    value:'react'
                },
                {
                    id:3,
                    value:'angular'
                }
            ]
        }
    }
    render(){
        return (
          <View style={styles.container}>
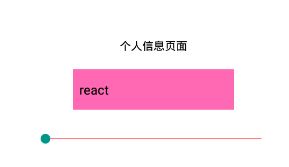
            <Text>个人信息页面</Text>
            <Picker
                selectedValue={this.state.language}
                style={{ height: 50, width: 200,backgroundColor:'hotpink',marginVertical:20 }}
                onValueChange={(itemValue, itemIndex) => this.setState({language: itemValue})}>
                {
                    this.state.pickerOptions.map((item)=>{
                        return <Picker.Item label={item.value} value={item.value} key={item.id} />
                    })
                }
            </Picker>
          </View>
        )
    }
}
const styles = StyleSheet.create({
    container:{
        flex: 1,
        justifyContent: 'center',
        alignItems: 'center'
    }
})
Slider
- 引入我们的滑块和所需要的Alert方法
import {View,Text,StyleSheet,Picker,Slider,Alert} from 'react-native'
- 在render生命钩子里面渲染该组件
            <Slider
                style={styles.slider}
                maximumValue={100}
                minimumValue={0}
                minimumTrackTintColor='hotpink'
                step={1}
                maximumTrackTintColor='red'
                onSlidingComplete={this.completeHandler}
            >
            </Slider>
- 样式
const styles = StyleSheet.create({
    slider:{
        width: 300
    }
})
- 方法
    completeHandler= (val)=>{
        Alert.alert(
            this.state.language+'基础分为',
            val+'分',
            [
              {text: 'Ask me later'},
              {text: 'Cancel'},
              {text: 'OK'},
            ],
            { cancelable: false }
          )
    }
样式
StyleSheet
- 所有RN中的样式都必须用这个Api创建
- 所有样式名称都必须是驼峰命名
- RN中所有的组件默认display属性都是flex,而且主轴方向是column
- 每个元素可以通过数组设置多种样式,如果遇到相同的样式,后面样式的优先级大于前面
RN的盒子模型
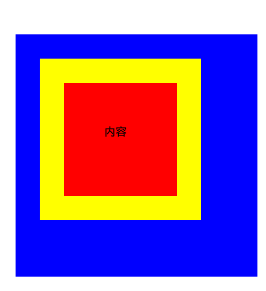
- 在RN中的元素同样拥有盒子模型:宽高、内边距、边框、外边距。
- 需要注意在RN中的样式大小不需要单位,同时没有css的复合样式,比如border、background、font,在RN中border宽度、颜色、圆角等样式需要一个一个设置,background和font也一样。
- 关于padding与margin,在css中可以赋予多个值来设置四边不一样的大小,在RN中只能给定一个值,指定相同的大小,如果四边大小不一样,就需要按照方向一个一个设置。同时RN也提供了paddingHorizontal、marginHorizontal、paddingVertical、marginVertical同时设置左右和上下两个方向的值。
- 另外补充一下,在设置字体时,Android内建的有这么几个: normal、serif、monospace
import React, { Component } from "react";
import { StyleSheet, View, Text } from 'react-native';
export default class LayoutStudy extends React.Component{
    render(){
        return (
            <View style={styles.container}>
                <View style={styles.box}>
                    <Text>内容</Text>
                </View>
            </View>
        )
    }
}
const styles = StyleSheet.create({
    container: {
        width: 300,
        height: 300,
        backgroundColor: "blue"
    },
    box:{
        width: 200,
        height: 200,
        backgroundColor: "red",
        paddingHorizontal: 50,
        paddingVertical: 50,
        borderWidth: 30,
        borderColor: "yellow",
        margin: 30
    }
})
RN的伸缩布局
- ReactNative中组件默认采用flex弹性布局,使用flex可以使其在可利用的空间中动态地扩张或收缩。
- ReactNative中的flex工作原理和web上的CSS基本一致,当然也存在少许差异。首先是默认值不同:flexDirection的默认值是column而不是row,也就是元素纵向排列;而flex也只能指定一个数字值
import React, { Component } from "react";
import { StyleSheet, View, Text } from 'react-native';
export default class FlexLayout extends Component{
    render(){
        return (
            <View>
                <View>
                    <View><Text>123</Text></View>
                    <View><Text>456</Text></View>
                </View>
                {/* 改为横向排列 */}
                <View style={styles.row}>
                    <View><Text>123</Text></View>
                    <View><Text>456</Text></View>
                </View>
            </View>
        )
    }
}
const styles = StyleSheet.create({
    row:{
        flexDirection: 'row'
    }
})
fetch
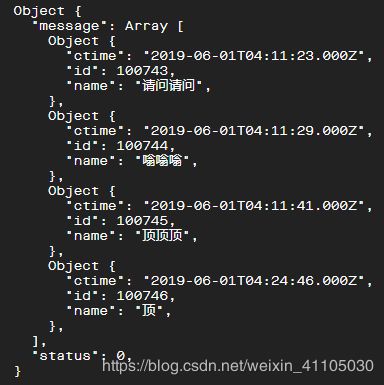
React Native 提供了和 web 标准一致的Fetch API,用于满足开发者访问网络的需求。如果你之前使用过XMLHttpRequest(即俗称的 ajax)或是其他的网络 API,那么 Fetch 用起来将会相当容易上手。这篇文档只会列出 Fetch 的基本用法,并不会讲述太多细节,你可以使用你喜欢的搜索引擎去搜索fetch api关键字以了解更多信息。
https://developer.mozilla.org/en-US/docs/Web/API/Fetch_API
发送请求获取数据
import React, { Component } from "react";
import { View, Text } from 'react-native';
export default class AjaxStudy extends Component{
    render(){
        return (
            <View>
                <Text>fetch的使用</Text>
            </View>
        )
    }
    componentWillMount(){
        fetch('http://www.liulongbin.top:3005/api/getprodlist')
        .then((response) => response.json())
        .then((responseJson) => {
            console.log(responseJson);
        })
        .catch((error) => {
            console.error(error);
        });
    }
}
第三方插件
react-native-swiper
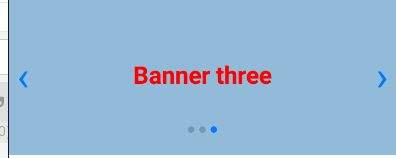
这是一个可实现典型的轮播效果或翻页效果插件,该插件只提供了一个组件Swiper,全部功能由该组件提供。该插件在内部对android与ios系统提供了不同的实现方式,如果是android系统才采用ViewPagerAndroid组件实现,ios系统则采用ScrollView实现。
- 需要注意,Swiper组件的高度依赖与父元素,所以在使用时嵌套一个View标签控制Swiper展示高度
- 另外该库的源码使用了一个叫
Arial的字体,模拟器中可以没有这个字体导致报错,可以修改为normal、serif、monospace中的任意一个字体,或者删除该样式也可以。
github react-native-swiper
安装:yarn add react-native-swiper -S
import React, { Component } from 'react';
import {
  StyleSheet,
  Text,
  View
} from 'react-native';

import Swiper from 'react-native-swiper';

export default class SwiperTest extends Component {
  render(){
    let height = this.props.height || 200;

    return (
        <View style={[styles.wrapper, {height: height}]}>
            {/* showsButtons控制左右箭头显示,autoplay控制自动轮播 */}
            <Swiper showsButtons={true} autoplay={true}>
                <View style={[styles.item, styles.item1]}>
                    <Text style={styles.text}>Banner one</Text>
                </View>
                <View style={[styles.item, styles.item2]}>
                    <Text style={styles.text}>Banner two</Text>
                </View>
                <View style={[styles.item, styles.item3]}>
                    <Text style={styles.text}>Banner three</Text>
                </View>
            </Swiper>
        </View>
    );
  }
}

const styles = StyleSheet.create({
    wrapper: {
        marginTop: 24
    },
    item: {
        flex: 1,
        justifyContent: 'center',
        alignItems: 'center',
    },
    item1: {
        backgroundColor: '#9DD6EB',
    },
    item2: {
        backgroundColor: '#97CAE5',
    },
    item3: {
        backgroundColor: '#92BBD9',
    },
    text: {
        color: 'red',
        fontSize: 30,
        fontWeight: 'bold',
    }
});
react-navigation(更)
在 web 浏览器中, 你可以使用 (
) 标签作为锚点,链接到不同的页面。 当用户单击某个链接时, 该 URL 就会被推送到浏览器历史记录堆栈。 当用户点击返回按钮时, 浏览器会从历史堆栈顶部删除正在访问的页面, 因此当前页现在就成了以前访问过的页面。 React Native没有像Web浏览器那样的内置全局历史堆栈的想法 – 这就是 React Navigation 存在的意义
- 通常我们开发的App是由多个页面构成的,那么我们就需要一种或多种方式去管理这些页面,在Web开发中,比较常见的管理方式有:Tab栏单页嵌多内容,或者路由管理多页面切换。
- react-navigation便是实现这种需求的RN插件,同时它还是官方推荐使用的第三方导航插件,可实现单页多内容切换,也可以实现路由跳转。
- react-navigation提供了几种不同类型或者效果的导航组件,每个组件都由对应的工厂函数来创建,这些工厂函数在调用时通常都需要两个参数,第一个参数统一为路由配置对象,第二个参数则是一个个性化的配置对象,不同组件的配置项存在差异。
- [官网]https://reactnavigation.org/
- [github]https://github.com/react-navigation/react-navigation
使用
# 安装两套包
yarn add react-navigation
yarn add react-native-gesture-handler
