RN实现商城案例
案例说明
- 案例界面
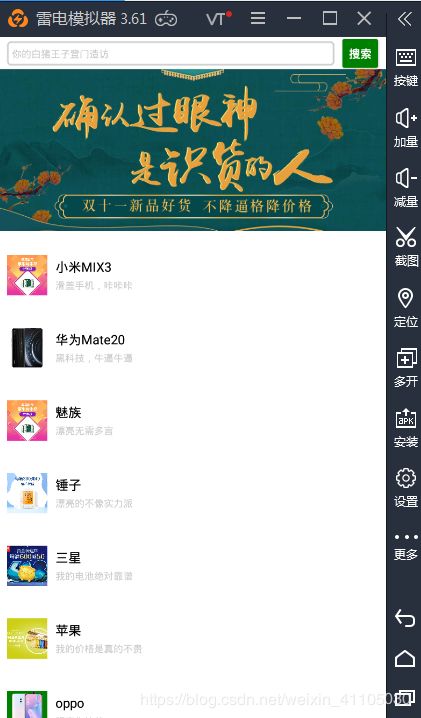
项目由搜索框+轮播图+一个可以下拉的列表组成;不涉及后台接口(均为模拟数据) - 案例所用技术
需要使用react native脚手架+expo;主要是对react native的组件进行学习 - 文档
https://reactnative.cn/docs/tutorial/
使用脚手架创建空的一个项目
# 没有脚手架自行安装脚手架
create-react-native-app myStore
# 打开项目并启动
cd myStore
expo start

安装模拟器
启动模拟器,将我们的expo软件拖动进去,此时它会帮我们安装这个软件;安装完成后打开

我们回到项目,按下a键会自动编译到模拟器中(如果报错可能是我们的版本问题;打开我们的app.json-- 更改 “sdkVersion”: “31.0.0”,)
首页架子
React Native采用的是伸缩布局;而且它屏幕不会因为像浏览器那样超出会出现滚动条…所以我们可以使用flex属性来使其占满达到我们想要的效果
首页组件抽取(在项目根目录下创建components)
- /component/Searchbar.js
import React from 'react'
import {View,Text,StyleSheet} from 'react-native'
export default class Searchbar extends React.Component{
    render(){
        return <View style={styles.searchbar}>
            <Text>搜素</Text>
        </View>
    }
}
const styles = StyleSheet.create({
    searchbar:{
        height:40,
        backgroundColor: 'red'
    }
})
- /component/Adverticement.js
import React from 'react'
import {View,Text,StyleSheet} from 'react-native'
export default class Adverticement extends React.Component{
    render(){
        return <View style={styles.adverticement}>
            <Text>广告</Text>
        </View>
    }
}
const styles = StyleSheet.create({
    adverticement:{
        height:200,
        backgroundColor: 'green'
    }
})
- /component/Products.js
import React from 'react'
import {View,Text,StyleSheet} from 'react-native'
export default class Products extends React.Component{
    render(){
        return <View style={styles.products}>
            <Text>产品</Text>
        </View>
    }
}
const styles = StyleSheet.create({
    products:{
        flex: 1,
        backgroundColor: 'blue'
    }
})
导入到我们的App.js
import React from 'react';
import { StyleSheet, Text, View } from 'react-native';

// 导入组件
import Adverticement from './components/Adverticement.js'
import Products from './components/Products.js'
import SearchBar from './components/SearchBar.js'
export default class App extends React.Component {
  render() {
    return (
      <View style={styles.container}>
        <SearchBar></SearchBar>
        <Adverticement></Adverticement>
        <Products></Products>
      </View>
    );
  }
}

const styles = StyleSheet.create({
  container: {
    flex: 1,
    backgroundColor: '#fff'
  },
});

状态栏的配置
我们可以看到顶部状态栏遮挡住我们的页面;我们此时可以使用StatusBar控制应用状态栏的组件进行配置。
由于StatusBar可以在任意视图中加载,且后加载的设置会覆盖先前的设置。因此在配合导航器使用时,请务必考虑清楚StatusBar的放置顺序。
      <View style={styles.container}>
        <StatusBar
          hidden={false}
          animated={true}
          backgroundColor="#ccc"
          barStyle="light-content"
          translucent={false}
        ></StatusBar>
        <SearchBar></SearchBar>
        <Adverticement></Adverticement>
        <Products></Products>
      </View>
searchBar页面
我们从图片中可以看出,它是由一个搜索框TextInput和一个按钮组成Button;我们布局的话使用伸缩布局,而按钮的背景色需要在props给的属性里面设置也就是给color属性一个值,搜索框flex:1使其占满自适应
import React from 'react'
import {View,Button,StyleSheet,TextInput,Alert} from 'react-native'
export default class Searchbar extends React.Component{
    // 文本框改变处理函数
    constructor(props){
        super(props)
        this.state = {
            searchVal:''
        }
    }
    // 文本框改变时,改变内容状态
    changeTextHandle = (newSearchVal)=>{
        this.setState({
            searchVal:newSearchVal
        })
    }
    searchHandle = () =>{
        Alert.alert(this.state.searchVal)
    }
    render(){
        return <View style={styles.searchbar}>
            <TextInput
            style={styles.input}
            placeholder='你的白猪王子登门造访'
            value={this.state.value}
            onChangeText={this.changeTextHandle}
            ></TextInput>
            <Button
            style={styles.button}
            onPress={this.searchHandle}
            title="搜索"
            ></Button>
        </View>
    }
}
const styles = StyleSheet.create({
    searchbar:{
        flexDirection: "row",
        justifyContent: "center",
        alignItems: 'center',
        paddingHorizontal: 10,
        height: 40,
    },
    input: {
        flex: 1,
        marginRight: 10,
        paddingLeft: 6,
        height: 30,
        borderWidth: 2,
        borderColor: "#ccc",
        borderRadius: 5,
        lineHeight: 12,
        fontSize: 12
    },
    button: {
    }
})
我们使用inputText需要绑定数据;然后通过操作状态数据来改变其内容(可以理解为模拟双向数据绑定);我们点击按钮发送请求(因为我们这里不涉及真正的接口,所以给一个弹框);最后测试一下各个方法有没有写错

Adverticement页面
Adverticement部分是一个轮播图
如果只是开发安卓的话可以使用react-native-swiper;我们这里使用scrollView来兼容平台
- 我们需要使用
Dimensions来获取屏幕的宽度 - 自己准备图片;使用Image;引入图片;给图片设置宽度
- 使用
scrollView实现轮播图:隐藏滚动条、水平分布排列、使滚动条分页滑动
明白以上三点;再使用魔法能量;一个轮播图就产生了…
import React from 'react'
import {View,Dimensions,StyleSheet,ScrollView,Image} from 'react-native'
export default class Adverticement extends React.Component{
    // 这是模拟数据
    constructor(props) {
        super(props);
        this.state = {
            currentPage: 0,
            advertisements: [
                {
                    uri: require("../assets/double-11.png")
                },
                {
                    uri: require("../assets/eyes.png")
                },
                {
                    uri: require("../assets/five-year.png")
                }
            ]
        }
    }
    render(){
        return <View style={styles.adverticement}>
            <ScrollView
            horizontal={true}
            showsHorizontalScrollIndicator={false}
            pagingEnabled={true}
            ref="scrollView"
            >
            {this.state.advertisements.map((item)=>{
                return <View style={styles.itemCon} key={item.uri}>
                    <Image
                    source={item.uri}
                    style={styles.image}
                    resizeMode="cover"
                    ></Image>
                </View>
            })}
            </ScrollView>
        </View>
    }
}
const styles = StyleSheet.create({
    adverticement:{
        height:200,
    },
    itemCon:{
        width: Dimensions.get("window").width,
        height: 200,
        backgroundColor: 'green'
    },
    image:{
        width:'100%',
        height:'100%'
    }
})
当然,我们还需要设置自动轮播;使用其方法scrollTo();来实现自动轮播
    // 启动定时器实现轮播
    componentDidMount(){
        this.startTimerHandler()
    }
    startTimerHandler = ()=>{
        this.timerId = setInterval(()=>{
            // 每次都切换一张图片
            let nextPage = this.state.currentPage + 1
            // 当切换到最后一张,跳回到第一张
            nextPage = nextPage>=this.state.advertisements.length?0:nextPage
            this.setState({
                currentPage:nextPage
            })
            let offsetX = Dimensions.get("window").width * this.state.currentPage
            this.refs.scrollView.scrollTo({x: offsetX, y: 0, animated: true})
        },3000)
    }
当然轮播图也可以深入,比如做一下分页器或则做成缓动动画
Products
我们已经将屏幕剩下的高度占满,但我们的内容需要滚动,此时则需要使用FlatList实现上拉加载;这是一个懒加载的.
- 我们首先定义一个模拟数据,绑定到该组件FlatList的data上
- 使用
renderItem渲染我们的数据;此时记得渲染时的参数是解构赋值 - keyExtractor绑定唯一的key值
- 接着写样式观看一下效果
- 这里使用onRefresh、refreshing模拟一下下拉刷新的功能
import React from 'react'
import {View,Text,StyleSheet,FlatList,Image} from 'react-native'
export default class Products extends React.Component{
    constructor(props) {
        super(props);
        this.state = {
            products: [
                {
                    id: "1",
                    title: "小米MIX3",
                    subTitle: "滑盖手机,咔咔咔",
                    image: "",
                    uri:{uri:'https://img1.360buyimg.com/pop/s590x470_jfs/t1/37180/6/6998/68136/5ccaaefeE884199bf/89f7a9047ab2fffa.jpg!q90!cc_590x470.webp'}
                },
                {
                    id: "2",
                    title: "华为Mate20",
                    subTitle: "黑科技,牛逼牛逼",
                    image: "",
                    uri:{uri:'https://img11.360buyimg.com/n7/jfs/t1/38769/11/2224/318485/5cbfcfaaEfe8197e5/f67f128aef875b28.jpg'}
                },
                {
                    id: "3",
                    title: "魅族",
                    subTitle: "漂亮无需多言",
                    image: "",
                    uri:{uri:'https://img1.360buyimg.com/pop/s590x470_jfs/t1/37180/6/6998/68136/5ccaaefeE884199bf/89f7a9047ab2fffa.jpg!q90!cc_590x470.webp'}
                },
                {
                    id: "4",
                    title: "锤子",
                    subTitle: "漂亮的不像实力派",
                    image: "",
                    uri:{uri:'https://imgcps.jd.com/ling/100000770620/6JCl5YW75L-d5YGl/5q-P5ruhMzAw5YePNDA/t-5bd95d4f8e34e21f3ff67e71/65275632.jpg'}
                },
                {
                    id: "5",
                    title: "三星",
                    subTitle: "我的电池绝对靠谱",
                    image: "",
                    uri:{uri:'https://img1.360buyimg.com/pop/s590x470_jfs/t1/54899/5/1500/99514/5cf4dd53E4e65595d/ec452f29a3874f16.jpg!q90!cc_590x470.webp'}
                },
                {
                    id: "6",
                    title: "苹果",
                    subTitle: "我的价格是真的不贵",
                    image: "",
                    uri:{uri:'https://img1.360buyimg.com/pop/s590x470_jfs/t1/40249/38/7444/64209/5ceb5c2bE89cadbd8/812bcae0b22e2a38.jpg!q90!cc_590x470.webp'}
                },
                {
                    id: "7",
                    title: "oppo",
                    subTitle: "照亮你的美",
                    image: "",
                    uri:{uri:'https://img10.360buyimg.com/n7/jfs/t29065/335/1630058179/447068/5770c26f/5ce66f29Nca358e47.png'}
                },
                {
                    id: "8",
                    title: "vivo",
                    subTitle: "柔光拍摄",
                    image: "",
                    uri:{uri:'https://img11.360buyimg.com/n7/jfs/t1/38769/11/2224/318485/5cbfcfaaEfe8197e5/f67f128aef875b28.jpg'}
                },
            ],
            loading:true
        }
    }
    renderItemHandler = ({item,index})=>{//从data(products)中抽取数据进行渲染
        return <View style={styles.item}>
            <Image
                source={item.uri}
                style={styles.image}>
            </Image>
            <View style={styles.content}>
                <Text style={styles.title}>{item.title}</Text>
                <Text style={styles.subTitle}>{item.subTitle}</Text>
            </View>
        </View>
    }
    keyExtractorHandler = (item)=>{ //需要指定key;否则会警告
        return item.id
    }
    // 模拟下拉刷新功能
    timerId = ()=>{
        setTimeout(()=>{
            this.setState({
                loading:false
            })
        },2000)
    }
    componentDidMount(){
        this.timerId()
    }
    loadingHandler = ()=>{
        this.setState({
            loading:true
        },()=>{
            this.timerId()
        })
    }
    render(){
        return (
            <FlatList
                onEndReachedThreshold={0.1}
                onRefresh={this.loadingHandler}
                refreshing={this.state.loading}
                data={this.state.products}
                renderItem={this.renderItemHandler}
                keyExtractor={this.keyExtractorHandler}
            >
            </FlatList>
        )
    }
}
const styles = StyleSheet.create({
    products: {
        flex: 1,
        backgroundColor: "blue"
    },
    item: {
        flexDirection: 'row',
        justifyContent: "center",
        alignContent: 'center',
        marginHorizontal: 10,
        marginTop: 30,
        height: 60,
    },
    image: {
        marginRight: 10,
        width: 50,
        height: 50,
        backgroundColor: "green"
    },
    content: {
        flex: 1
    },
    title: {
        lineHeight: 28,
        fontSize: 16,
        color: "#000"
    },
    subTitle: {
        lineHeight: 18,
        fontSize: 12,
        color: "#ccc"
    }
})
基本的页面已经构成了…接下来丰富我们的页面
Adverticement组件添加分页器(完善轮播图)
也就是添加指示器,就是轮播图上面可以点击的小圆圈;我们做web的时候一般都是ul和li,然后给其样式,最后定位;我们同样可以使用View然后通过定位和伸缩布局来做其效果;当然为了方便维护我们可以将初始化其大小等一些基本样式…
- 我们现在状态里面初始化它的大小;
        this.state = {
            circleSize: 8,//指示器的大小
            circleMR: 5//指示器左右的距离
        }
- 写组件,初始化样式
- 我们通过自调用函数,将基本的样式写在
circleStyle;动态写数据方便我们后期的维护
    render(){
        return <View style={styles.adverticement}>
            <ScrollView
			......
            </ScrollView>
            <View style={styles.circle}>
                {
                    // 一个自调用函数
                    (()=>{
                        // 先把基本的样式在状态里面定义好
                        const circleStyle = {
                            width: this.state.circleSize,
                            height: this.state.circleSize,
                            borderRadius: this.state.circleSize /2,
                            marginHorizontal: this.state.circleMR
                        }
                        return this.state.advertisements.map((item,index)=>{
                            return (
                                <View
                                style={[circleStyle,this.state.currentPage===index?styles.circleActiveStyle:styles.indicator]}
                                key={index}>
                                </View>
                            )
                        })
                    })()
                }
            </View>
        </View>
    }
- 定位和高亮显示
const styles = StyleSheet.create({
......
   // 给指示器进行定位
    circle:{
        position: 'absolute',
        left: '50%',
        bottom: 10,
        display: 'flex',
        flexDirection: 'row',
        marginLeft: -32
    },
    // 指示器背景颜色
    indicator:{
        backgroundColor: '#ccc',
    },
    // 指示器高亮样式
    circleActiveStyle:{
        backgroundColor: 'red'
    },
})

5. 当然可以根据自己的思维写;以上的写法只是为了方便修改数据
完善Products加载功能
上面我们只是模拟上拉加载的效果;现在完善加载数据
- 我们使用
RefreshControl组件(这一组件可以用在ScrollView或FlatList内部,为其添加下拉刷新的功能);需要引入该组件RefreshControl - 我们将方法还有一些样式全部定义在该组件内
   render(){
        return (
            <FlatList
                onEndReachedThreshold={0.1}
                data={this.state.products}
                renderItem={this.renderItemHandler}
                keyExtractor={this.keyExtractorHandler}
                refreshControl={
                    <RefreshControl
                        refreshing={this.state.loading}
                        onRefresh={this.loadingHandler}
                        title="loading"
                        colors={['red','yellow']}
                        progressBackgroundColor={['transparent']}
                        progressViewOffset={50}
                    ></RefreshControl>
                }
            >
            </FlatList>
        )
    }
- 定义一个模拟数据,下拉更新数据
    loadingHandler = ()=>{
        const products = Array.from(Array(10)).map((v,i)=>{
            return {
                id: i.toString(),
                title: "vivo"+i,
                subTitle: "vivo-限时至高直降300+领券减300iQOO水滴全面屏超广",
                image: "",
                uri:{uri:'https://img11.360buyimg.com/n7/jfs/t1/42675/4/1533/86437/5cc6a322E10252bba/64158e66e444403b.jpg'}
            }
        })
        this.setState({
            products,
            loading:true
        },()=>{
            this.timerId()
        })
    }
- 对于
RefreshControl组件的属性不懂也可以查阅文档;看一下效果也能明白

走过路过不要错过,以下是对新鲜便宜的路由导航的学习
点击Products的每一项调整到详情页面
react-navigation
文档
https://reactnavigation.org/docs/zh-Hans/getting-started.html
可能遇到的一些问题
- 我们下载过程尽量使用
npm来下载这套包,不要使用cnpm或则yarn - 如果还是报错,删除我们的包
node_modules;然后重新安装npm i - 在不行就下载稳定版本得
npm install --save [email protected] - 使用的使用记得导入的配置
import {
    createStackNavigator,
    createAppContainer
} from 'react-navigation';
我们对整体的文件进行改造

- 上面我们的搜索栏,轮播图,产品列表都是我们首页的内容;所以我们将其放到我们的Home.js
import React from 'react';
import { StyleSheet, Text, View,StatusBar } from 'react-native';
// 导入组件
import Adverticement from '../../components/Adverticement.js'
import Products from '../../components/Products.js'
import SearchBar from '../../components/SearchBar.js'
export default class Home extends React.Component {
  render() {
    return (
      <View style={styles.container}>
        <StatusBar
          hidden={true}
          animated={true}
          backgroundColor="#ccc"
          barStyle="light-content"
          translucent={false}
        ></StatusBar>
        <SearchBar></SearchBar>
        <Adverticement></Adverticement>
        <Products></Products>
      </View>
    );
  }
}

const styles = StyleSheet.create({
  container: {
    flex: 1,
    backgroundColor: '#fff'
  },
});
- 在App.js使用我们的
react-navigation
// import GlobalStack from './navigation/GlobalStack.js'
// export default GlobalStack
import {
  createStackNavigator,
  createAppContainer
} from 'react-navigation';
import Home from './pages/Home/Home.js';
import Detail from './pages/Products/Detail.js';

const RootStack = createStackNavigator(
{
  home: {
    screen: Home,
    navigationOptions: ({navigation, navigationOptions}) => ({
      header: null,
    })
  },
  detail: {
    screen: Detail,
    navigationOptions: ({navigationOptions}) => ({
      title: "商品详情",
    })
  }
},
{
  initialRouteName: "detail"
}
)
const App = createAppContainer(RootStack)
export default App;
- 我们更改默认配置使用的导航测试一下是否引入成功
initialRouteName: "home"
- 我们点击Products的列表需要跳转到我们的详情页面’./pages/Products/Detail.js’;那么我们的home页面需要到导航传给它
<Products {...this.props}></Products>
- 我们到Products页面绑定一个点击事件,导入TouchableNativeFeedback;将产品列表每一项item包裹在里面
    renderItemHandler = ({item,index})=>{//从data(products)中抽取数据进行渲染
        return (
        <TouchableNativeFeedback
        onPress={this.toProductDetailHandler.bind(this,item)}
        >
        <View style={styles.item}>
            <Image
                source={item.uri}
                style={styles.image}>
            </Image>
            <View style={styles.content}>
                <Text style={styles.title}>{item.title}</Text>
                <Text style={styles.subTitle}>{item.subTitle}</Text>
            </View>
        </View>
        </TouchableNativeFeedback>
        )
    }
- 点击跳转
    toProductDetailHandler = (item)=>{
        const {navigation} = this.props
        // console.log(navigation)
        navigation.push("detail",item)
    }
- Detail.js
import React from 'react'
import {View,Text,StyleSheet,Button,Image,Dimensions} from 'react-native'
export default class Products extends React.Component{
    constructor(props) {
        super(props);
        this.state = {
            product:props.navigation.state.params
        }
    }
    goBachHandler=()=>{
        const {navigation} = this.props
        console.log(navigation)
        navigation.pop()//这是返回功能
    }
    render(){
        return (
          <View style={styles.container}>
              <Text style={styles.mgtop}>产品序列号:{this.state.product.id}</Text>
              <Text style={styles.mgtop}>{this.state.product.subTitle}</Text>
              <Text style={styles.mgtop}>{this.state.product.title}</Text>
              <Image
                style={styles.mgtop}
                source={this.state.product.uri}
                style={styles.image}
                resizeMode="contain"
                >
            </Image>
              <Button
              style={[styles.mgtop,styles.btn]}
              onPress={this.goBachHandler} title="返回"></Button>
              {/* 商品详情  */}
          </View>
        )
    }
    componentWillMount(){
        console.log(this.props.navigation.state.params)//接收传递过来的参数
    }
}
const styles = StyleSheet.create({
    container:{
        width: Dimensions.get("window").width,
        display: 'flex',
        flexDirection: 'column',
        justifyContent: 'center',
        alignItems: 'center',
        marginTop: 100,
        height: 300,
        width: Dimensions.get("window").width
    },
    mgtop:{
        marginVertical: 20
    },
    btn:{
        width: 300,
        height: 200
    },
    image:{
        width: Dimensions.get("window").width,
        height: 260,
        padding: 30
    }
})

导航栏的制作
- 在navigation里面新建MainTab来制作我们的导航栏
import {createBottomTabNavigator} from 'react-navigation'
import Home from '../pages/Home/Home.js'
import Profile from '../pages/Profile/Profile.js'

export default createBottomTabNavigator(
    {
        // 路由配置,key值会作为tabBar的label显示
        Home: {
            screen: Home,
            navigationOptions: () => ({
                tabBarLabel: "首页"
            })
        },
        Profile: {
            screen: Profile,
            navigationOptions: () => ({
                tabBarLabel: "我的"
            })
        },
    },
    {

    }
)
- 在pages页面新建一个Profile文件夹放一个Profile.js文件
import React from 'react'
import {View,Text,StyleSheet} from 'react-native'
export default class Products extends React.Component{
    constructor(props) {
        super(props);
        this.state = {
        }
    }
    render(){
        return (
          <View>
            <Text>我的</Text>
          </View>
        )
    }
}
const styles = StyleSheet.create({

})
- 在app.js配置底部路由导航
// import GlobalStack from './navigation/GlobalStack.js'
// export default GlobalStack
import {
  createStackNavigator,
  createAppContainer
} from 'react-navigation';
import Detail from './pages/Products/Detail.js';
import MainTab from './navigation/MainTab.js'
const RootStack = createStackNavigator(
{
  main:{
    screen: MainTab,
    navigationOptions: ({navigation, navigationOptions}) => ({
      header: null,
    })
  },
  detail: {
    screen: Detail,
    navigationOptions: ({navigationOptions}) => ({
      title: "商品详情",
    })
  }
},
{
  initialRouteName: "main"
}
)
const App = createAppContainer(RootStack)
export default App;
