本地Django项目上传云服务器(CentOS 7.6系统)并采用uWSGI进行部署
自从上次在云服务器(Centos7.6)上新建Django项目并成功配置MySQL数据库,便一直想着如何将本地的Django项目部署到云服务器。这个项目是一个简单的人脸识别应用,采用的是SSD算法,在本地通过 runserver 启动后,在浏览器中打开后效果如下:
目录
一、利用FileZilla将本地Django项目上传云服务器
二、Face_detect在云服务器上的配置与调试
1. MySQL数据库的配置
1.1 pymysql
1.2 DATABASES
2. python第三方库的安装与配置
2.1 requirements.txt
2.2 mysqlclient
2.3 opencv
3. 通过runserver在本地查看项目
三、利用uWSGI部署Face_Detect项目
一、利用FileZilla将本地Django项目上传云服务器
打开FileZilla,输入主机(云服务器的公网ip),用户名(root),密码(root账户密码)和端口号(22)

点击快速连接,出现关于主机密钥的提示,如图,先直接点击确定

连接成功后如图
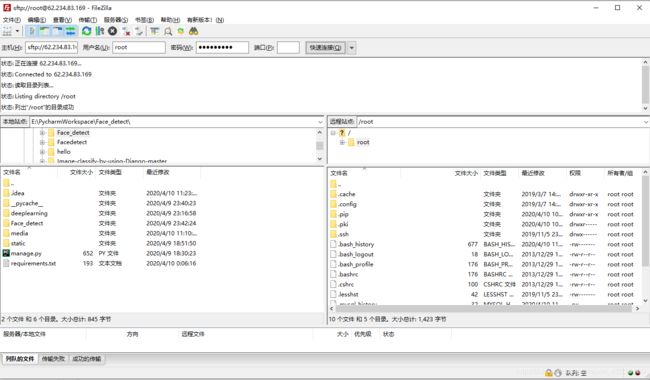
然后在云服务器端新建DjangoProjects目录用于存放Django项目
[root@VM_0_3_centos ~]# mkdir /home/DjangoProjects在FileZilla的远程站点中选中\home\DjangoProjects,在本地站点中选中需要上传的文件夹Face_detect,右击上传

至此完成了本地Django项目Face_detect的上传
二、Face_detect在云服务器上的配置与调试
项目上传服务器后,还需要进行项目中所需的第三方库的安装,数据库的配置及迁移等
1. MySQL数据库的配置
主要包括两个方面,一是pymysql用于python和mysql的连接,二是settings.py中DATABASES的配置
1.1 pymysql
pymysql作为第三方库用于python和mysql的数据库的连接
首先cd到项目文件夹
[root@VM_0_3_centos ~]# cd /home/DjangoProjects/Face_detect/vi打开./Face_detect/__init__.py,进行如下配置
import pymysql
pymysql.install_as_MySQLdb()
同时注释掉文件/usr/local/lib64/python3.6/site-packages/django/db/backends/mysql/base.py中的两行
#if version < (1, 3, 13):
#    raise ImproperlyConfigured('mysqlclient 1.3.13 or newer is required; you have %s.' % Database.__version__)
1.2 DATABASES
vi打开./Face_detect/settings.py
[root@VM_0_3_centos Face_detect]# vi ./Face_detect/settings.py 对其中的DATABASES配置如下
DATABASES = {
    'default': {
        'ENGINE': 'django.db.backends.mysql',
        'NAME': 'Face_detect',
        'USER': 'root',
        'PASSWORD': 'Tianwan3!',
        'HOST': '',
        'PORT': '3306'
    }
}
最后进入mysql新建Face_detect数据库
mysql> CREATE DATABASE Face_detect;
Query OK, 1 row affected (0.01 sec)
2. python第三方库的安装与配置
2.1 requirements.txt
根据在本地通过命令pip freeze > requirements.txt获得在云服务器上需要安装的包,通过cat命令查看
[root@VM_0_3_centos Face_detect]# cat requirements.txt
asgiref==3.2.7
certifi==2020.4.5.1
Django==3.0.5
mysqlclient==1.4.6
numpy==1.18.2
opencv-python==4.2.0.34
Pillow==7.1.1
PyMySQL==0.9.3
pytz==2019.3
sqlparse==0.3.1
wincertstore==0.2
通常在通过pip install -r requirements.txt安装时,会有部分库缺乏依赖包,导致安装中断,如下所示
pip install -r requirements.txt
WARNING: Running pip install with root privileges is generally not a good idea. Try `pip install --user` instead.
Collecting asgiref==3.2.7 (from -r requirements.txt (line 1))
  Downloading http://mirrors.tencentyun.com/pypi/packages/68/00/25013f7310a56d17e1ab6fd885d5c1f216b7123b550d295c93f8e29d372a/asgiref-3.2.7-py2.py3-none-any.whl
Collecting certifi==2020.4.5.1 (from -r requirements.txt (line 2))
  Downloading http://mirrors.tencentyun.com/pypi/packages/57/2b/26e37a4b034800c960a00c4e1b3d9ca5d7014e983e6e729e33ea2f36426c/certifi-2020.4.5.1-py2.py3-none-any.whl (157kB)
    100% |████████████████████████████████| 163kB 1.3MB/s
Collecting Django==3.0.5 (from -r requirements.txt (line 3))
  Downloading http://mirrors.tencentyun.com/pypi/packages/a9/4f/8a247eee2958529a6a805d38fbacd9764fd566462fa0016aa2a2947ab2a6/Django-3.0.5-py3-none-any.whl (7.5MB)
    100% |████████████████████████████████| 7.5MB 11.6MB/s
Collecting mysqlclient==1.4.6 (from -r requirements.txt (line 4))
  Downloading http://mirrors.tencentyun.com/pypi/packages/d0/97/7326248ac8d5049968bf4ec708a5d3d4806e412a42e74160d7f266a3e03a/mysqlclient-1.4.6.tar.gz (85kB)
    100% |████████████████████████████████| 92kB 639kB/s
    Complete output from command python setup.py egg_info:
    /bin/sh: mysql_config: command not found
    /bin/sh: mariadb_config: command not found
    /bin/sh: mysql_config: command not found
    Traceback (most recent call last):
      File "", line 1, in
      File "/tmp/pip-build-1ybcw4eg/mysqlclient/setup.py", line 16, in
        metadata, options = get_config()
      File "/tmp/pip-build-1ybcw4eg/mysqlclient/setup_posix.py", line 61, in get_config
        libs = mysql_config("libs")
      File "/tmp/pip-build-1ybcw4eg/mysqlclient/setup_posix.py", line 29, in mysql_config
        raise EnvironmentError("%s not found" % (_mysql_config_path,))
    OSError: mysql_config not found

    ----------------------------------------
Command "python setup.py egg_info" failed with error code 1 in /tmp/pip-build-1ybcw4eg/mysqlclient/
在安装到mysqlclient时,安装中断了。安装中断导致一个库都无法顺利安装,可以通过pip list查看已安装的python库
[root@VM_0_3_centos Face_detect]# pip list
pip (9.0.3)
setuptools (39.2.0)
此时可以先删除requirements.txt中不能安装的库(可以通过vi编辑器进行删除)
删除后重新安装,安装成功
[root@VM_0_3_centos Face_detect]# pip install -r requirements.txt
...
...
...
Successfully installed Django-3.0.5 Pillow-7.1.1 PyMySQL-0.9.3 asgiref-3.2.7 certifi-2020.4.5.1 numpy-1.18.2 opencv-python-4.2.0.34 pytz-2019.3 sqlparse-0.3.1 wincertstore-0.2
2.2 mysqlclient
现在来单独安装mysqlclient(上述数据库的配置利用了pymysql,这里mysqlclient也可以不用安装)
使用python3.x连接mysql服务器,需要第三方库,常见的就是pymysql(python2中用的是mysqldb)和mysqlclient,pymysql纯python实现,安装方便,但是mysqlclient则性能更好
直接pip install mysqlclient 一般会报错
需安装以下依赖包
[root@VM_0_3_centos ~]# yum install mysql-devel python3-devel安装结束后,再进行mysqlclient安装
[root@VM_0_3_centos ~]# pip install mysqlclient2.3 opencv
opencv是Face_detect项目中用的一个库,之所以单独拎出来是因为安装成功后不能正常调用,一般显示如下报错
>>> import cv2
Traceback (most recent call last):
  File "", line 1, in
  File "/usr/local/lib64/python3.6/site-packages/cv2/__init__.py", line 5, in
    from .cv2 import *
ImportError: libSM.so.6: cannot open shared object file: No such file or directory
>>>
此时运行如下命令
[root@VM_0_3_centos Face_detect]# yum install opencv opencv-devel opencv-python[root@VM_0_3_centos Face_detect]# yum install libSM-1.2.2-2.el7.x86_64 --setopt=protected_multilib=false再次导入opencv,显示安装成功
>>> import cv2
>>> cv2.__version__
'4.2.0'
3. 通过runserver在本地查看项目
打开settings.py,将ALLOWED_HOSTS修改如下
ALLOWED_HOSTS = ['*']然后将数据库进行迁移,先后执行python manage.py makemigrations和python manage.py migrate
[root@VM_0_3_centos Face_detect]# python manage.py makemigrations
No changes detected
[root@VM_0_3_centos Face_detect]# python manage.py migrate
Operations to perform:
  Apply all migrations: admin, auth, contenttypes, deeplearning, sessions
Running migrations:
  Applying contenttypes.0001_initial... OK
  Applying auth.0001_initial... OK
  Applying admin.0001_initial... OK
  Applying admin.0002_logentry_remove_auto_add... OK
  Applying admin.0003_logentry_add_action_flag_choices... OK
  Applying contenttypes.0002_remove_content_type_name... OK
  Applying auth.0002_alter_permission_name_max_length... OK
  Applying auth.0003_alter_user_email_max_length... OK
  Applying auth.0004_alter_user_username_opts... OK
  Applying auth.0005_alter_user_last_login_null... OK
  Applying auth.0006_require_contenttypes_0002... OK
  Applying auth.0007_alter_validators_add_error_messages... OK
  Applying auth.0008_alter_user_username_max_length... OK
  Applying auth.0009_alter_user_last_name_max_length... OK
  Applying auth.0010_alter_group_name_max_length... OK
  Applying auth.0011_update_proxy_permissions... OK
  Applying deeplearning.0001_initial... OK
  Applying sessions.0001_initial... OK
接着runserver开启服务,ip地址加上端口号这样的组合成为套接字(Socket),这里的套接字为0.0.0.0:8000(0.0.0.0用在服务器上时表示主机上任意ipv4地址或者说就是代表主机本身)
[root@VM_0_3_centos Face_detect]# python manage.py runserver 0.0.0.0:8000
Watching for file changes with StatReloader
Performing system checks...

System check identified no issues (0 silenced).
April 10, 2020 - 07:57:39
Django version 3.0.5, using settings 'Face_detect.settings'
Starting development server at http://0.0.0.0:8000/
Quit the server with CONTROL-C.
最后本地浏览器打开网址输入62.234.83.169:8000,显示如下

三、利用uWSGI部署Face_Detect项目
在项目文件夹下新建uwsgi.ini
[root@VM_0_3_centos Face_detect]# vi uwsgi.ini并编辑如下(这里不考虑并发性等情况,只单纯实现功能)
[uwsgi]
http = :8080
chdir = /home/DjangoProjects/Face_detect/
wsgi-file = Face_detect/wsgi.py
打开settings.py,添加
STATIC_ROOT=os.path.join(BASE_DIR, '/static/')然后执行collectstatic
[root@VM_0_3_centos Face_detect]# python manage.py collectstatic

137 static files copied to '/home/DjangoProjects/Face_detect/static'.
打开Face_detect/urls.py,编辑后如下
from django.contrib import admin
from django.urls import path, include
from deeplearning import urls
from . import settings
from django.conf.urls.static import static

urlpatterns = [
    path('admin/', admin.site.urls),
    path('', include(urls))
]+ static(settings.STATIC_URL, document_root=settings.STATIC_ROOT)
安装uwsgi,首先要安装python3-devel依赖包(上文在安装mysqlclient时已经安装了python3-devel),python3-devel安装成功后,进行uwsgi的安装
[root@VM_0_3_centos Face_detect]# pip install uwsgi最后启动服务
[root@VM_0_3_centos Face_detect]# uwsgi uwsgi.ini 在浏览器上输入http://62.234.83.169:8080/即可访问该项目,如图所示

补充:
若是想让网站服务一直保持运行状态,可编辑uwsgi.ini文件,添加如下两行
pidfile = uwsgi.pid
daemonize = uwsgi.log
然后启动服务,若是要想关闭服务,可以输入如下命令
[root@VM_0_3_centos Face_detect]# uwsgi --stop uwsgi.pid