Tensorflow2.* 利用tensorflow_hub内置模型进行目标检测
在开始正题之前,先介绍一下Tensorflow-hub, Tensorflow-hub 是 google 提供的机器学习模组打包函式库,帮开发者把TensorFlow的训练模型发布成模组,方便再次使用或是与社交共享。目前官网上已经发布了不少模组,可以直接下载使用。
在之前博客【Tensorflow2.*教程之使用Tensorflow Hub 对IMDB电影评论数据集进行文本分类(2)】中也使用到Tensorflow-hub中名为 google/tf2-preview/gnews-swivel-20dim/1 的一种预训练文本嵌入(text embedding)模型,将文本中的句子转换为嵌入向量 。
本次博客按照如下顺序进行书写:
- 先使用示例方式介绍本次使用到的一些内置包和函数。
- 接着简介一下目标检测方面两种模型:Faster_RCNN和SSD。
- 利用tensorflow_hub内置的模型进行图像目标定位和识别。
使用到API函数
1. tempfile函数之mkstemp
tempfile包用于创建临时文件和临时目录。
tempfile.mkstemp([suffix=”[, prefix=’tmp'[, dir=None[, text=False]]]])
该函数用于创建一个临时文件夹。该方法仅仅用于创建临时文件,调用tempfile.mkstemp函数后,返回包含两个元素的元组,第一个元素指示操作该临时文件的安全级别,第二个元素指示该临时文件的路径。
参数:
suffix: 临时文件名称的后缀
prefix: 临时文件名称的前缀
dir:指定了临时文件所在的目录,如果没有指定目录,将根据系统环境变量TMPDIR, TEMP或者TMP的设置来保存临时文件
text:指定了是否以文本的形式来操作文件,默认为False,表示以二进制的形式来操作文件
import tempfile
_, filename = tempfile.mkstemp(suffix=".jpg",prefix="xcq_")
print(filename)

# output:
# C:\Users\ADMINI~1\AppData\Local\Temp\xcq_ii8_ofjq.jpg
2. 给定URL,从远端下载图片
from PIL import Image
from PIL import ImageOps
from six import BytesIO
from six.moves.urllib import urlopen
_, filename = tempfile.mkstemp(suffix=".jpg",prefix="xcq_")
response = urlopen("https://tvax4.sinaimg.cn/crop.10.2.218.218.180/cde96b64ly8g998b1v37oj206o06omxe.jpg?KID=imgbed,tva&Expires=1589980803&ssig=LjtuGxCeaW")

# BytesIO实现了在内存中读写bytes
img_data = BytesIO(response.read())
pill_img = Image.open(img_data)
print(pill_img.mode)
pill_image = ImageOps.fit(pill_img,(256,256),Image.ANTIALIAS)
print(pill_image.mode)
pill_image = pill_image.convert("RGB")
pill_image.save(filename,format="JPEG",quality=90)
3. ImageFont,ImageDraw使用
from PIL import Image, ImageDraw, ImageFont
from six.moves.urllib.request import urlopen
import tempfile
from six import BytesIO
_, filename = tempfile.mkstemp(suffix=".jpg")
http_obj = urlopen("https://timgsa.baidu.com/timg?image&quality=80&size=b9999_10000&sec=1590058483067&di=415c6d9a2afab9482fe6e811f3414137&imgtype=0&src=http%3A%2F%2F5b0988e595225.cdn.sohucs.com%2Fq_70%2Cc_zoom%2Cw_640%2Fimages%2F20200202%2F95a2bc53e5914d7d94875cb902be3f50.jpeg")
img_obj = Image.open(BytesIO(http_obj.read()))
img_obj.save(filename,quality=90,format="JPEG")
# 新建绘画对象
draw = ImageDraw.Draw(img_obj)
ft = ImageFont.truetype("simsun.ttc",20)
text_width,text_height = ft.getsize(u"中国科学院大学")
# 左上角为坐标(0,0)点
draw.text((0,0),u"中国科学院大学",font=ft,fill="red")
img_obj.show()
结果显示:
4. draw.line,draw.rectangle,ImageColor使用
from PIL import ImageColor,ImageOps,ImageDraw,ImageFont
from PIL import Image
from six.moves.urllib.request import urlopen
from six import BytesIO
import tempfile

_,filename = tempfile.mkstemp(suffix=".jpg")
response = urlopen("https://timgsa.baidu.com/timg?image&quality=80&size=b9999_10000&sec=1590145667495&di=9abd8c1c1bdaa5141ddc6b832b4cdb1e&imgtype=0&src=http%3A%2F%2Fimg.pconline.com.cn%2Fimages%2Fphotoblog%2F7%2F5%2F0%2F0%2F7500109%2F20089%2F21%2F1222003484742.jpg")
image_data = response.read()
# BytesIO实现了在内存中读写bytes
image_data = BytesIO(image_data)
img_obj = Image.open(image_data)
img_obj = ImageOps.fit(img_obj,(256,256),Image.ANTIALIAS)
img_obj_rgb = img_obj.convert("RGB")
print(img_obj.mode)
width,height = img_obj.size
img_obj.save(filename,quality=90,format="JPEG")
draw = ImageDraw.Draw(img_obj)
colors = list(ImageColor.colormap.values())
color = colors[6]
draw.line([(0,0),(0,height-2),(width-2,height-2),(width-2,0),(0,0)],fill="red")
ft = ImageFont.truetype("simsun.ttc",20)
str_cc = u"这有两只猫猫!!"
text_width,text_height = ft.getsize(str_cc)
draw.rectangle([(0,0),(text_width,text_height)],fill=color)
draw.text((0,0),str_cc,font=ft,fill="blue")
img_obj.show()
结果图:
Faster-RCNN和SSD
1. Faster-RCNN
具体可以参照博客:https://zhuanlan.zhihu.com/p/31426458
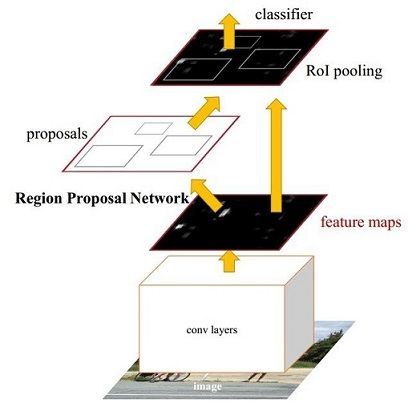
FasterRCNN主要有四个模块组成:
- Conv layers。作为一种CNN网络目标检测方法,Faster RCNN首先使用一组基础的conv+relu+pooling层提取image的feature maps。该feature maps被共享用于后续RPN层和全连接层。
- Region Proposal Networks。RPN网络用于生成region proposals。该层通过softmax判断anchors属于positive或者negative,再利用bounding box regression修正anchors获得精确的proposals。
- Roi Pooling。该层收集输入的feature maps和proposals,综合这些信息后提取proposal feature maps,送入后续全连接层判定目标类别。
- Classification。利用proposal feature maps计算proposal的类别,同时再次bounding box regression获得检测框最终的精确位置。
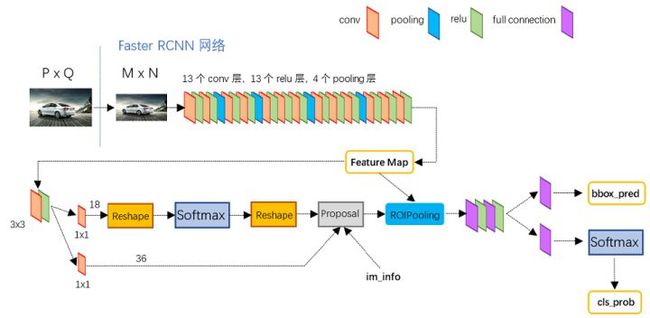
以VGG16为基干网络的FasterRCNN的网络图如下:
2. SSD
具体可以参照博客:https://www.jianshu.com/p/d306922ee5df
SSD主要模块
- 主干网络为 VGG16,VGG-16在图中包含了Con4_3的卷积网络。图中的con4_3, conv6都是卷积层的名字,可以自己定义。主干网络是可以替换的,替换为深度可分离卷积即可
- 对于每一个特征图,都会进行对目标区域的定位,完成目标的区域位置与类别预测
- Default Bounding Box的类别分数,偏移量。
利用Faster-RCNN/SSD进行目标定位
import tensorflow as tf
import tensorflow_hub as hub
import matplotlib.pyplot as plt
import time
import numpy as np
from PIL import Image
from PIL import ImageColor
from PIL import ImageDraw
from PIL import ImageFont
from PIL import ImageOps
import tempfile
from six.moves.urllib.request import urlopen
from six import BytesIO


# module_handle = "https://tfhub.dev/google/faster_rcnn/openimages_v4/inception_resnet_v2/1"
module_handle = "https://tfhub.dev/google/openimages_v4/ssd/mobilenet_v2/1"
# Tensorflow-hub 是 google 提供的机器学习模组打包函式库,
# 帮开发者把TensorFlow的训练模型发布成模组,方便再次使用或是与社交共享。
detector = hub.load(module_handle).signatures['default']

def load_img(path):
	'''加载图片'''
	img = tf.io.read_file(path)
	img = tf.image.decode_jpeg(img,channels=3)
	return img

def draw_bounding_box_on_image(image,
                               ymin,
                               xmin,
                               ymax,
                               xmax,
                               color,
                               font,
                               thickness=4,
                               display_str_list=()):
    draw = ImageDraw.Draw(image)
    im_width, im_height = image.size
    print([ymin,xmin,ymax,xmax])
    (left, right, top, bottom) = (xmin * im_width, xmax * im_width,
    							  ymin * im_height, ymax * im_height)
    draw.line([(left,top),(left,bottom),(right,bottom),(right,top)],
    		  width=thickness,
    		  fill=color)
    display_str_heights = [font.getsize(ds)[1] for ds in display_str_list]
    total_display_str_height = (1 + 2 * 0.05) * sum(display_str_heights)

    if top > total_display_str_height:
    	text_bottom = top
    else:
    	text_bottom = top + total_display_str_height

    for display_str in display_str_list[::-1]:
    	text_width, text_height = font.getsize(display_str)
    	margin = np.ceil(0.05 * text_height)
    	draw.rectangle([(left, text_bottom - text_height - 2 * margin),
                       (left + text_width, text_bottom)],
                   	   fill=color)

    	draw.text((left + margin, text_bottom - text_height - margin),
	              display_str,
	              fill="black",
	              font=font)
    	text_bottom -= text_height - 2 * margin


def draw_boxes(image,boxes,class_names,scores,max_boxes=10,min_score=0.9):
	'''绘制边框'''
	colors = list(ImageColor.colormap.values())
	try:
		font = ImageFont.truetype("./font/LiberationSansNarrow-Regular.ttf",25)
	except IOError:
		print("Font not found,using default font!")
		font = ImageFont.load_default()

	for i in range(min(boxes.shape[0],max_boxes)):
		if scores[i] > min_score:
			ymin,xmin,ymax,xmax = tuple(boxes[i])
			display_str = "{},{}%".format(class_names[i].decode("ascii"),
										  int(100*scores[i]))

			color = colors[hash(class_names[i]) % len(colors)]
			image_pii = Image.fromarray(np.uint8(image)).convert("RGB")
			draw_bounding_box_on_image(image_pii,
									   ymin,
									   xmin,
									   ymax,
									   xmax,
									   color,
									   font,
									   display_str_list=[display_str])
			np.copyto(image, np.array(image_pii))

	return image

def display_image(image):
	fig = plt.figure(figsize=(20, 15))
	plt.grid(False)
	plt.imshow(image)
	plt.show()

def run_detector(detector,path):
	img = load_img(path)

	converted_img = tf.image.convert_image_dtype(img,tf.float32)[tf.newaxis,...]
	start_time = time.time()
	result = detector(converted_img)
	print(result)
	end_time = time.time()

	result = {key:value.numpy() for key,value in result.items()}

	print("Found %d objects" % len(result['detection_scores']))
	print("Inference time:", end_time - start_time)

	image_with_boxes = draw_boxes(img.numpy(),result['detection_boxes'],
								  result['detection_class_entities'],result['detection_scores'])

	display_image(image_with_boxes)

def download_and_resize_image(url, new_width=256, new_height=256,
                              display=False):

	_, filename = tempfile.mkstemp(suffix=".jpg")
	response = urlopen(url)
	image_data = response.read()
	image_data = BytesIO(image_data)
	pil_image = Image.open(image_data)
	pil_image = ImageOps.fit(pil_image, (new_width, new_height), Image.ANTIALIAS)
	pil_image_rgb = pil_image.convert("RGB")
	pil_image_rgb.save(filename, format="JPEG", quality=90)
	print("Image downloaded to %s." % filename)
	if display:
		display_image(pil_image)
	return filename

image_url = "https://timgsa.baidu.com/timg?image&quality=80&size=b9999_10000&sec=1589961846828&di=cb34a51566fe6c21fb1466c06707207a&imgtype=0&src=http%3A%2F%2Fphotocdn.sohu.com%2F20060904%2FImg245149166.jpg"
downloaded_image_path = download_and_resize_image(image_url, 1280, 856, True)

run_detector(detector, downloaded_image_path)
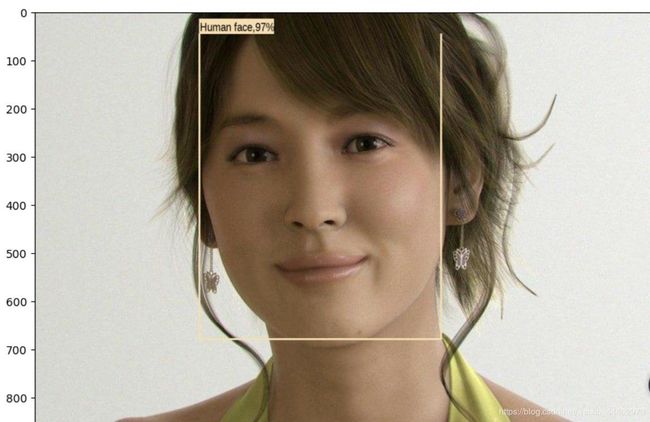
结果图:
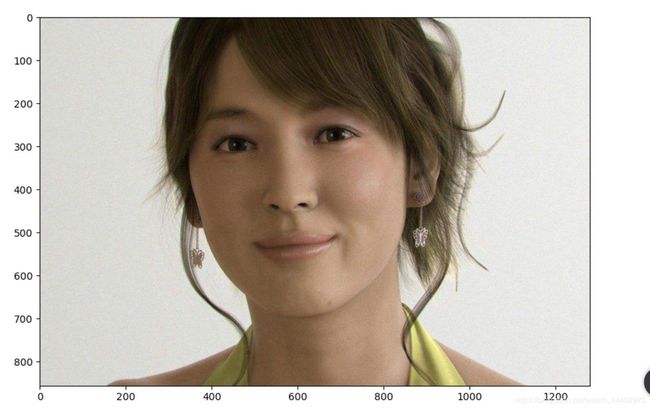
原图:
程序正确检测出了人脸的位置:


