【并发编程笔记】 ---- 控制并发流程(CountDownLatch、Semaphore、Condition、CyclicBarrier介绍和用法)
目录
1. 什么是控制并发流程?
2. CountDownLatch
3. Semaphore
4. Condition
5. CyclicBarrier
1. 什么是控制并发流程?
- 控制并发流程的工具类,作用就是帮助我们程序员更容易的让线程之间合作
- 让线程之间相互配合,来满足业务逻辑
- 比如让线程A等待线程B执行完毕后再执行等合作策略
| 类 | 作用 | 说明 |
|---|---|---|
| Semaphore | 信号量,可以通过控制"许可证"的数量,来保证线程之间的配合 | 线程只有在拿到"许可证"后才能继续运行。相比于其他的同步器,更灵活 |
| CyclicBarrier | 线程会等待,直到足够多线程达到了事先规定的数目。一旦达到触发条件,就可以进行下一步的动作 | 适用于线程之间相互等待处理结果就绪的场景 |
| Phaser | 和CycliBarrier类似,但是计数可变 | Java 7 加入的 |
| CountDownLatch | 和CyclicBarrier类似,数量递减到0时,触发动作 | 不可重复使用 |
| Exchanger | 让两个线程在合适时交换对象 | 适用场景:当两个线程工作在同一个类的不同实例上时,用于交换数据 |
| Condition | 可以控制线程的"等待"和"唤醒" | 是Object.wait()的升级版 |
2. CountDownLatch倒计时门闩
- CountDownLatch类的作用
- 两个典型用法
- 总结
2.1 CountDownLatch类的作用
并发流程控制的工具
类的主要方法介绍
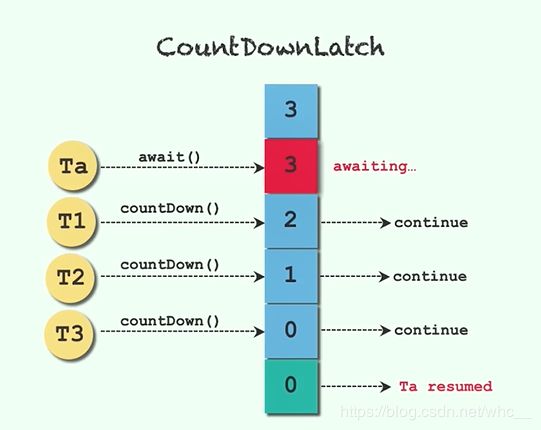
- CountDownLatch(int count):仅有一个构造函数,参数count为需要倒数的数值
- await():调用await()方法的线程会被挂起,它会等待直到count值为0才继续执行
- countDown():将count值减1,直到为0时,等待的线程会被唤起
2.2 两个典型用法
-
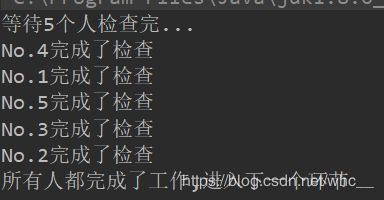
用法一: 一个线程等待多个线程都执行完毕,再继续自己的工作
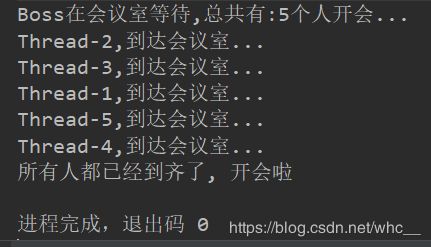
/** * 描述: 工厂中,质检,5个工人检查,所有人都认为通过,才通过 */ public class CountDownLatchDemo1 { public static void main(String[] args) throws InterruptedException { CountDownLatch latch = new CountDownLatch(5); ExecutorService service = Executors.newFixedThreadPool(5); for (int i = 0; i < 5; i++) { final int no = i + 1; Runnable runnable = new Runnable() { @Override public void run() { try { Thread.sleep((long) (Math.random() * 10000)); System.out.println("No." + no + "完成了检查"); } catch (InterruptedException e) { e.printStackTrace(); } finally { latch.countDown(); } } }; service.submit(runnable); } System.out.println("等待5个人检查完..."); latch.await(); System.out.println("所有人都完成了工作,进入下一个环节"); } }public class CountDownLatchTest { private static CountDownLatch countDownLatch = new CountDownLatch(5); /** * Boss线程,等待员工到达开会 */ static class BossThread extends Thread { @Override public void run(){ System.out.println("Boss在会议室等待,总共有:" + countDownLatch.getCount() + "个人开会..."); try { // Boss等待 countDownLatch.await(); } catch (InterruptedException e) { e.printStackTrace(); } System.out.println("所有人都已经到齐了, 开会啦"); } } // 员工到达会议室线程 static class EmployeeThread extends Thread{ @Override public void run(){ System.out.println(Thread.currentThread().getName() + ",到达会议室..."); // 员工到达会议室 count - 1 countDownLatch.countDown(); } } public static void main(String[] args) { // Boss线程启动 new BossThread().start(); for (int i = 0; i < countDownLatch.getCount(); i++) { new EmployeeThread().start(); } } } -
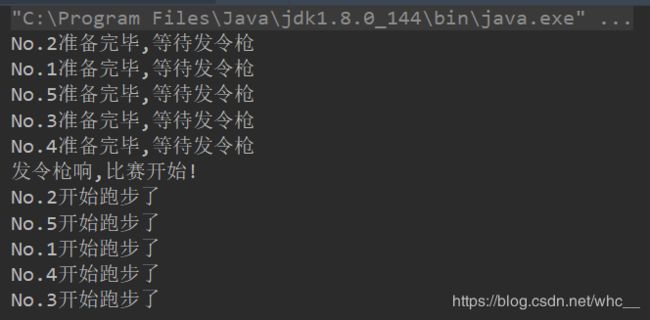
用法二: 多个线程等待某一个线程的信号,同时开始执行
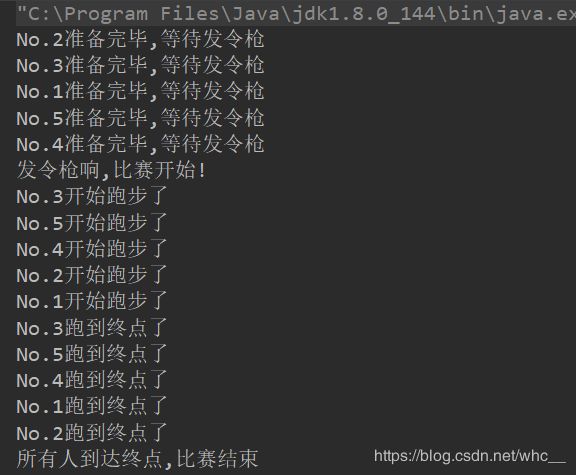
/** * 描述: 模拟100米跑步,5名选手都准备好了,只等裁判员一声令下,所有人同时开始跑步 */ public class CountDownLatchDemo2 { public static void main(String[] args) throws InterruptedException { CountDownLatch begin = new CountDownLatch(1); ExecutorService service = Executors.newFixedThreadPool(5); for (int i = 0; i < 5; i++) { final int no = i + 1; Runnable runnable = new Runnable() { @Override public void run() { System.out.println("No." + no + "准备完毕,等待发令枪"); try { begin.await(); System.out.println("No." + no + "开始跑步了"); } catch (InterruptedException e) { e.printStackTrace(); } } }; service.submit(runnable); } // 裁判员检查发令枪... Thread.sleep(5000); System.out.println("发令枪响,比赛开始!"); begin.countDown(); } } -
综合运用: 一对多和多对一
/** * 多等1, 1等多; 描述: 模拟100米跑步,5名选手都准备好了,只等裁判员一声令下,所有人同时开始跑步 * 当所有人到终点后,比赛才结束 */ public class CountDownLatchDemo1And2 { public static void main(String[] args) throws InterruptedException { // 所有运动员等待裁判员发枪 CountDownLatch begin = new CountDownLatch(1); // 裁判员在终点等待所有运动员到达 CountDownLatch end = new CountDownLatch(5); ExecutorService service = Executors.newFixedThreadPool(5); for (int i = 0; i < 5; i++) { final int no = i + 1; Runnable runnable = new Runnable() { @Override public void run() { System.out.println("No." + no + "准备完毕,等待发令枪"); try { begin.await(); System.out.println("No." + no + "开始跑步了"); Thread.sleep((long)(Math.random()*1000)); System.out.println("No." + no + "跑到终点了"); } catch (InterruptedException e) { e.printStackTrace(); } finally { end.countDown(); } } }; service.submit(runnable); } // 裁判员检查发令枪... Thread.sleep(5000); System.out.println("发令枪响,比赛开始!"); begin.countDown(); end.await(); System.out.println("所有人到达终点,比赛结束"); } } -
两个典型用法: 一等多和多等一
-
CountDownLatch类在创建实例的时候,需要传递倒数次数。倒数到0的时候,之前等待的线程会继续运行
-
CountDownLatch内部通过共享锁实现
- 在创建CountDownLatch实例时,需要传递一个int型的参数:
count,该参数为计数器的初始值,也可以理解为该共享锁可以获取的总次数 - 当某个线程调用
#await()方法时,则执行释放共享锁状态,使count值-1 - 当在创建CountDownLatch时初始化的
count参数,必须要有count线程调用#countDown()方法,才会使计数器count等于0,锁才会释放,前面等待的线程才会继续运行 - 注意CountDownLatch不能回滚重置
- 在创建CountDownLatch实例时,需要传递一个int型的参数:
3. Semaphore
3.1 信号量使用流程
- 初始化Semaphore并指定许可证的数量
- 在需要被现在的代码前加 acquire() 或者acquireUninterruptibly()方法
- 在执行任务结束后,调用 release() 来释放许可证
3.2 信号量主要方法介绍
- new Semaphore(int permits, boolean fair):这里可以设置是否要使用公平策略,如果传入true,那么Semaphore会把之前等待的线程放到FIFO的队列里,以便于当有了新的许可证,可以分发给之前等了最长时间的线程
- acquire():
- acquireUninterruptibly():
- tryAcquire():看看现在有没有空闲的许可证,如果有的话就获取,如果没有的话也没关系,不必陷入阻塞,可以去做别的事,过一会再来查看许可证的空闲情况
- tryAcquire(timeout): 和tryAcquire()一样,但是多了一个超时时间,比如"在3秒内获取不到许可证,我就去做别的事"
- release()
3.3 案例演示
/**
 * 描述: 演示Semaphore用法
 */
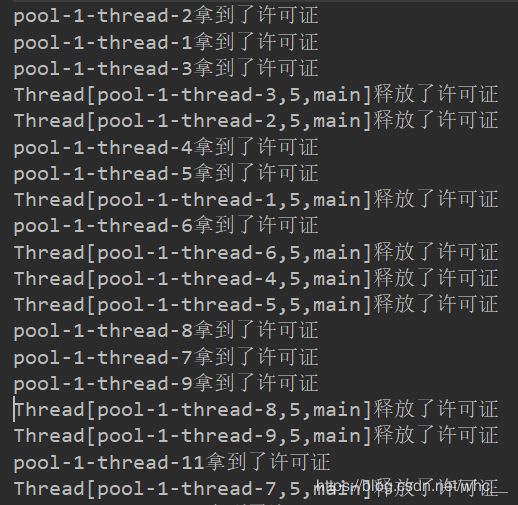
public class SemaphoreDemo {
	static Semaphore semaphore = new Semaphore(3, true);

	public static void main(String[] args) {
		ExecutorService service = Executors.newFixedThreadPool(50);

		for (int i = 0; i < 100; i++) {
			service.submit(new Task());
		}

		service.shutdown();
	}

	static class Task implements Runnable {

		@Override
		public void run() {
			try {
				semaphore.acquire();
			} catch (InterruptedException e) {
				e.printStackTrace();
			}
			System.out.println(Thread.currentThread().getName() + "拿到了许可证");
			try {
				Thread.sleep(2000);
			} catch (InterruptedException e) {
				e.printStackTrace();
			}
			System.out.println(Thread.currentThread() + "释放了许可证");
			semaphore.release();
		}
	}
}
停车场案例
public class SemaphoreTest {
	static class Parking {
		// 信号量
		private Semaphore semaphore;

		Parking(int count) {
			semaphore = new Semaphore(count);
		}

		public void park(){
			try {
				// 获取信号量
				semaphore.acquire();
				long time = (long)(Math.random() * 1000);
				System.out.println(Thread.currentThread().getName() + "进入停车场,停车" + time + "毫秒...");
				Thread.sleep(time);
				System.out.println(Thread.currentThread().getName() + "开出停车场");
			} catch (InterruptedException e) {
				e.printStackTrace();
			} finally {
				semaphore.release();
			}
		}
	}

	static class Car extends Thread {
		Parking parking;

		Car(Parking parking) {
			this.parking = parking;
		}

		@Override
		public void run() {
			parking.park(); // 进入停车场
		}
	}

	public static void main(String[] args) {
		Parking parking = new Parking(3);

		for (int i = 0; i < 5; i++) {
			new Car(parking).start();
		}
	}
}
- 一次性获取或释放多个许可证
- 比如TaskA会调用很消耗资源的method1(),而TaskB调用的是不太消耗资源的method2(),假设我们一共有5个许可证。那么我们就可以要求TaskA获取5个许可证才能执行,而TaskB只需要获取到一个许可证就能执行,这样就避免了A和B同时运行的情况,我们可以根据自己的需求合理分配资源
3.5 注意点
- 获取和释放的许可数量必须一致,否则比如每次都获取2个但是只释放1个甚至不释放,随着时间的推移,到最后许可证数量不够用,会导致程序卡死。
- 注意在初始化Semaphore的时候设置公平性,一般设置为true会更合理
- 并不是必须由获取许可证的线程释放那个许可证,获取和释放许可证对线程并无要求,只要逻辑合理即可
4. Condition接口(又称条件对象)
4.1 Condition作用
- 当线程1需要等待某个条件的时候,它就去执行
condition.await()方法,一旦执行了await()方法,线程就会进入阻塞状态 - 然后通常会有另外一个线程,假设是线程2,去执行对应的条件,知道这个条件达成的时候,线程2就会去执行
condition.singnal()方法,这时JVM就会从被阻塞的线程里找,找到那些等待该condition的线程,当线程1就会收到可执行信息的时候,它的线程状态就会变成Runnable可执行状态
4.2 signalAll()和sigal()区别
- signalAll()会唤起所有的正在等待的线程
- 但是signal()是公平的,只会唤起那个等待时间最长的线程
4.3 案例演示
public class ConditionDemo1 {
	private ReentrantLock lock = new ReentrantLock();
	// 绑定在锁上面的
	private Condition condition = lock.newCondition();

	void method1(){
		lock.lock();
		try {
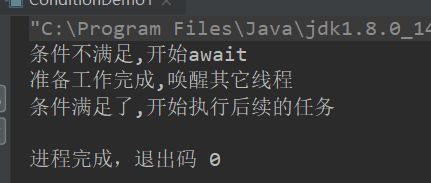
			System.out.println("条件不满足,开始await");
			condition.await();
			System.out.println("条件满足了,开始执行后续的任务");
		} catch (InterruptedException e) {
			e.printStackTrace();
		} finally {
			lock.unlock();
		}
	}

	void method2(){
		lock.lock();
		try {
			System.out.println("准备工作完成,唤醒其它线程");
			condition.signal();
		} finally {
			lock.unlock();
		}
	}

	public static void main(String[] args) {
		ConditionDemo1 conditionDemo1 = new ConditionDemo1();
		new Thread(new Runnable() {
			@Override
			public void run() {
				try {
					Thread.sleep(1000);
					conditionDemo1.method2();
				} catch (InterruptedException e) {
					e.printStackTrace();
				}
			}
		}).start();
		conditionDemo1.method1();

	}
}
生产者消费者模式
/**
 * 描述: 演示用Condition实现生产者消费者模式
 */
public class ConditionDemo2 {
	private int queueSize = 10;
	private PriorityQueue<Integer> queue = new PriorityQueue<Integer>();
	private Lock lock = new ReentrantLock();
	// 未满,交给生产者使用
	private Condition notFull = lock.newCondition();
	// 非空,交给消费者使用
	private Condition notEmpty = lock.newCondition();

	public static void main(String[] args) {
		ConditionDemo2 conditionDemo2 = new ConditionDemo2();
		Producer producer = conditionDemo2.new Producer();
		Consumer consumer = conditionDemo2.new Consumer();
		producer.start();
		consumer.start();
	}

	// 消费者
	class Consumer extends Thread {
		@Override
		public void run(){
			consume();
		}

		private void consume() {
			while(true) {
				lock.lock();
				try {
					while(queue.size() == 0) {
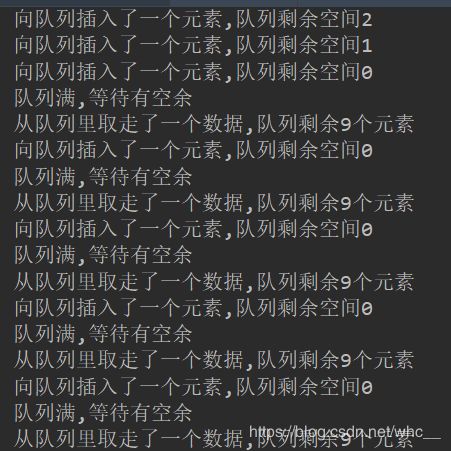
						System.out.println("队列空,等待数据");
						notEmpty.await();
					}
					queue.poll();
					notFull.signalAll();
					System.out.println("从队列里取走了一个数据,队列剩余" + queue.size() + "个元素");
				} catch (InterruptedException e) {
					e.printStackTrace();
				} finally {
					lock.unlock();
				}
			}
		}
	}

	// 生产者
	class Producer extends Thread {
		@Override
		public void run(){
			produce();
		}

		private void produce() {
			while(true) {
				lock.lock();
				try {
					while(queue.size() == queueSize) {
						System.out.println("队列满,等待有空余");
						notFull.await();
					}
					queue.offer(1);
					notEmpty.signalAll();
					System.out.println("向队列插入了一个元素,队列剩余空间" + (queueSize - queue.size()));
				} catch (InterruptedException e) {
					e.printStackTrace();
				} finally {
					lock.unlock();
				}
			}
		}
	}
}
4.4 Condition注意点
- 实际上,如果说Lock用来代替synchronized,那么Condition就是用来代替相对应的Object.wait/notify的,所以在用法和性质上,几乎一样
- await()方法会自动释放持有的Lock锁,和Object.wait一样,不需要自己手动先释放锁
- 调用await的时候,必须持有锁,否则会抛出异常,和Object.wait一样
5. CyclicBarrier循环栅栏
- CyclicBarrier循环栅栏和CountDownLatch很类似,都能阻塞一组线程
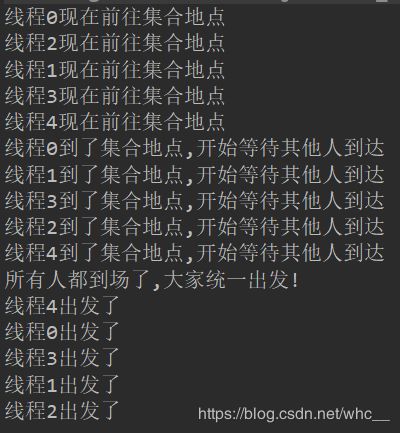
- 当有大量线程相互配合,分别计算不同任务,并且需要最后统一汇总的时候,我们可以使用CyclicBarrier。CyclicBarrie可以构造一个集结点,当某一个线程执行完毕,它就会到集结点等待,直到所有线程都到了集结点,那么该栅栏就被撤销,所有线程再统一出发,继续执行剩下的任务
5.1 案例演示
public class CyclicBarrierDemo {
	public static void main(String[] args) {
		CyclicBarrier cyclicBarrier = new CyclicBarrier(5, new Runnable() {
			@Override
			public void run() {
				System.out.println("所有人都到场了,大家统一出发!");
			}
		});

		for (int i = 0; i < 5; i++) {
			new Thread(new Task(i, cyclicBarrier)).start();
		}
	}

	static class Task implements Runnable {
		private int id;
		private CyclicBarrier cyclicBarrier;

		public Task(int id, CyclicBarrier cyclicBarrier) {
			this.id = id;
			this.cyclicBarrier = cyclicBarrier;
		}

		@Override
		public void run() {
			System.out.println("线程" + id + "现在前往集合地点");
			try {
				Thread.sleep((long)(Math.random() * 1000));
				System.out.println("线程" + id + "到了集合地点,开始等待其他人到达");
				cyclicBarrier.await();
				System.out.println("线程" + id +"出发了");
			} catch (InterruptedException e) {
				e.printStackTrace();
			} catch (BrokenBarrierException e) {
				e.printStackTrace();
			}
		}
	}
}
5.2 CyclicBarrier和CountDownLatch的区别
-
作用不同: CyclicBarrier要等固定数量的线程都到达了栅栏位置才能继续执行,而CountDownLatch只需等待数字到0,也就是说,CountDownLatch用于事件,但是CyclicBarrier是用于线程的。
-
可重用性不同: CountDownLatch在倒数到0并触发门闩打开后,就不能再次使用了,除非新建新的实例;而CyclicBarrier可以重复使用
摘要: 慕课网悟空老师课程~~

