cocos2d-x3.x学习之旅(一)
cocos2d-x3.x学习之旅(一)
今天下定决心开始研究cocos2d-x游戏引擎,特此决定写博客记录本人学习cocos2d-x过程中的一点一滴,如果一下内容有误,请大家帮忙矫正,请多多关照! 谢谢!
cocos2d-x简介:
Cocos2d-x是一个开源的移动2D游戏框架,MIT许可证下发布的。这是一个C++ Cocos2d-iPhone项目的版本。Cocos2d-X发展的重点是围绕Cocos2d跨平台,Cocos2d-x提供的框架。手机游戏,可以写在C++或者Lua中,使用API是Cocos2d-iPhone完全兼容。Cocos2d-x项目可以很容易地建立和运行在iOS,Android,黑莓Blackberry等操作系统中。Cocos2d-x还支持Windows、Mac和Linux等桌面操作系统,因此,开发者编写的源代码很容易在桌面操作系统中编辑和调试。(摘自百度)
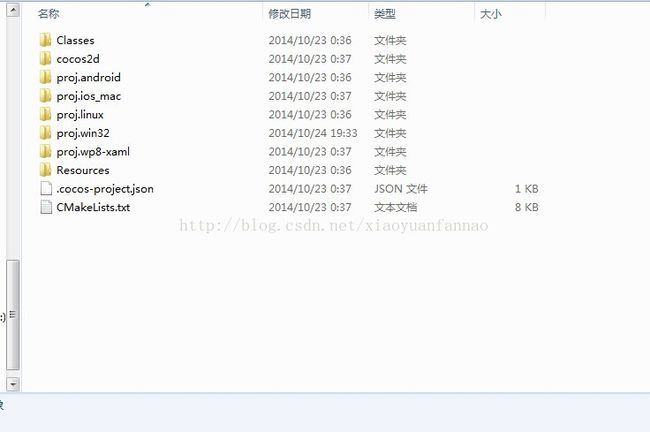
cocos2d-x项目中的目录结构:
 http://write.blog.csdn.net/postedithttp://write.blog.csdn.net/postedit
其中Classes文件是存放代码的。
proj.android、proj.ios_mac、proj.linux、proj.win32、proj.wp8-xaml是各各平台的工程文件。
Resources是存放音频文件,字体,字库,图片等资源。
(实际上每个项目里的文件都是在项目创建时把cocos2d-x-3.2\templates\cpp-template-default里的文件夹拷贝到项目文件夹里)
今天我们就以proj.win32为例, 点击proj.win32里的解决方案文件 。不用怀疑,因为youxi是我创建项目命名的。
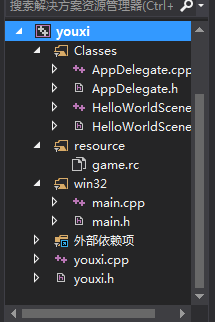
好了已经打开vs2013了,先来看解决方案‘游戏’:

libAudio是音效引擎,libchipmunk是物理引擎,libcocos2d是存放cocos2d的源代码的(在编译项目过程中是先编译这三个文件的),youxi就不用多说喽,哈哈!

这是项目中的源代码文件,这些文件都和项目文件夹里的文件相对应的,在开发中我们只关心Classes里面的代码就行。
目录结构介绍完了!下面是AppDelegate.cpp和HelloWorldScene.cpp的中文注释
AppDelegate.cpp:
#include "AppDelegate.h"
#include "HelloWorldScene.h"
USING_NS_CC;//命名空间
//应用程序委托对象"/"采用委托设计模式(游戏启动会调用它)
AppDelegate::AppDelegate() {
}
AppDelegate::~AppDelegate()
{
}
//应用程序启动时调用它
bool AppDelegate::applicationDidFinishLaunching() {
// 初始化导演
auto director = Director::getInstance();
//视图
auto glview = director->getOpenGLView();
if(!glview) {
//初始化视图
glview = GLView::create("My Game");
director->setOpenGLView(glview);
}
// 是否显示帧率
director->setDisplayStats(true);
// 设置帧率
director->setAnimationInterval(1.0 / 60);
// 初始化(创建)层(场景),把层添加到场景里
auto scene = HelloWorld::createScene();
// 场景跳转
director->runWithScene(scene);
return true;
}
// 游戏移到后台运行
void AppDelegate::applicationDidEnterBackground() {
Director::getInstance()->stopAnimation();
// if you use SimpleAudioEngine, it must be pause
// SimpleAudioEngine::getInstance()->pauseBackgroundMusic();
}
// 把游戏从后台移到前台运行
void AppDelegate::applicationWillEnterForeground() {
Director::getInstance()->startAnimation();
// if you use SimpleAudioEngine, it must resume here
// SimpleAudioEngine::getInstance()->resumeBackgroundMusic();
}
HelloWorldScene.cpp:
#include "HelloWorldScene.h"
USING_NS_CC;
Scene* HelloWorld::createScene()
{
// 创建场景对象
auto scene = Scene::create();
// 创建层对象
auto layer = HelloWorld::create();
//把层添加到场景里
scene->addChild(layer);
// return the scene
return scene;
}
// 初始化当前层
bool HelloWorld::init()
{
//////////////////////////////
// 1. super init first
if ( !Layer::init() )
{
return false;
}
//得到屏幕的大小
Size visibleSize = Director::getInstance()->getVisibleSize();
Vec2 origin = Director::getInstance()->getVisibleOrigin();
//得到屏幕原点的大小
/////////////////////////////
// 2. add a menu item with "X" image, which is clicked to quit the program
// you may modify it.
// 得到图片菜单
auto closeItem = MenuItemImage::create(
"CloseNormal.png",
"CloseSelected.png",
CC_CALLBACK_1(HelloWorld::menuCloseCallback, this));
//指定菜单位置
closeItem->setPosition(Vec2(origin.x + visibleSize.width - closeItem->getContentSize().width/2 ,
origin.y + closeItem->getContentSize().height/2));
// 菜单项
auto menu = Menu::create(closeItem, NULL);
menu->setPosition(Vec2::ZERO);
this->addChild(menu, 1);
/////////////////////////////
// 3. add your codes below...
// add a label shows "Hello World"
//标签
auto label = LabelTTF::create("Hello World", "Arial", 24);
// 指定标签的位置
label->setPosition(Vec2(origin.x + visibleSize.width/2,
origin.y + visibleSize.height - label->getContentSize().height));
// add the label as a child to this layer
this->addChild(label, 1);
// 创建图片精灵
auto sprite = Sprite::create("HelloWorld.png");
// 设置图片精灵的位置
sprite->setPosition(Vec2(visibleSize.width/2 + origin.x, visibleSize.height/2 + origin.y));
//把图片精灵放到层里
this->addChild(sprite, 0);
return true;
}
//点击close按钮时调用的回调函数
void HelloWorld::menuCloseCallback(Ref* pSender)
{
//如果是win8或rt平台就是true
#if (CC_TARGET_PLATFORM == CC_PLATFORM_WP8) || (CC_TARGET_PLATFORM == CC_PLATFORM_WINRT)
MessageBox("You pressed the close button. Windows Store Apps do not implement a close button.","Alert");
return;
#endif
Director::getInstance()->end();
//如果是ios平台就是true
#if (CC_TARGET_PLATFORM == CC_PLATFORM_IOS)
exit(0);
#endif
}
哎呀!其实每个源文件里的每一行代码都有英文注释,大家不懂的可以有道一下! 嘻嘻!
cocos2d-x简介:
Cocos2d-x是一个开源的移动2D游戏框架,MIT许可证下发布的。这是一个C++ Cocos2d-iPhone项目的版本。Cocos2d-X发展的重点是围绕Cocos2d跨平台,Cocos2d-x提供的框架。手机游戏,可以写在C++或者Lua中,使用API是Cocos2d-iPhone完全兼容。Cocos2d-x项目可以很容易地建立和运行在iOS,Android,黑莓Blackberry等操作系统中。Cocos2d-x还支持Windows、Mac和Linux等桌面操作系统,因此,开发者编写的源代码很容易在桌面操作系统中编辑和调试。(摘自百度)
cocos2d-x项目中的目录结构:
 http://write.blog.csdn.net/postedithttp://write.blog.csdn.net/postedit
其中Classes文件是存放代码的。
proj.android、proj.ios_mac、proj.linux、proj.win32、proj.wp8-xaml是各各平台的工程文件。
Resources是存放音频文件,字体,字库,图片等资源。
(实际上每个项目里的文件都是在项目创建时把cocos2d-x-3.2\templates\cpp-template-default里的文件夹拷贝到项目文件夹里)
今天我们就以proj.win32为例, 点击proj.win32里的解决方案文件
好了已经打开vs2013了,先来看解决方案‘游戏’:

libAudio是音效引擎,libchipmunk是物理引擎,libcocos2d是存放cocos2d的源代码的(在编译项目过程中是先编译这三个文件的),youxi就不用多说喽,哈哈!

这是项目中的源代码文件,这些文件都和项目文件夹里的文件相对应的,在开发中我们只关心Classes里面的代码就行。
目录结构介绍完了!下面是AppDelegate.cpp和HelloWorldScene.cpp的中文注释
AppDelegate.cpp:
#include "HelloWorldScene.h"
USING_NS_CC;//命名空间
//应用程序委托对象"/"采用委托设计模式(游戏启动会调用它)
AppDelegate::AppDelegate() {
}
AppDelegate::~AppDelegate()
{
}
//应用程序启动时调用它
bool AppDelegate::applicationDidFinishLaunching() {
// 初始化导演
auto director = Director::getInstance();
//视图
auto glview = director->getOpenGLView();
if(!glview) {
//初始化视图
glview = GLView::create("My Game");
director->setOpenGLView(glview);
}
// 是否显示帧率
director->setDisplayStats(true);
// 设置帧率
director->setAnimationInterval(1.0 / 60);
// 初始化(创建)层(场景),把层添加到场景里
auto scene = HelloWorld::createScene();
// 场景跳转
director->runWithScene(scene);
return true;
}
// 游戏移到后台运行
void AppDelegate::applicationDidEnterBackground() {
Director::getInstance()->stopAnimation();
// if you use SimpleAudioEngine, it must be pause
// SimpleAudioEngine::getInstance()->pauseBackgroundMusic();
}
// 把游戏从后台移到前台运行
void AppDelegate::applicationWillEnterForeground() {
Director::getInstance()->startAnimation();
// if you use SimpleAudioEngine, it must resume here
// SimpleAudioEngine::getInstance()->resumeBackgroundMusic();
}
HelloWorldScene.cpp:
#include "HelloWorldScene.h"
USING_NS_CC;
Scene* HelloWorld::createScene()
{
// 创建场景对象
auto scene = Scene::create();
// 创建层对象
auto layer = HelloWorld::create();
//把层添加到场景里
scene->addChild(layer);
// return the scene
return scene;
}
// 初始化当前层
bool HelloWorld::init()
{
//////////////////////////////
// 1. super init first
if ( !Layer::init() )
{
return false;
}
//得到屏幕的大小
Size visibleSize = Director::getInstance()->getVisibleSize();
Vec2 origin = Director::getInstance()->getVisibleOrigin();
//得到屏幕原点的大小
/////////////////////////////
// 2. add a menu item with "X" image, which is clicked to quit the program
// you may modify it.
// 得到图片菜单
auto closeItem = MenuItemImage::create(
"CloseNormal.png",
"CloseSelected.png",
CC_CALLBACK_1(HelloWorld::menuCloseCallback, this));
//指定菜单位置
closeItem->setPosition(Vec2(origin.x + visibleSize.width - closeItem->getContentSize().width/2 ,
origin.y + closeItem->getContentSize().height/2));
// 菜单项
auto menu = Menu::create(closeItem, NULL);
menu->setPosition(Vec2::ZERO);
this->addChild(menu, 1);
/////////////////////////////
// 3. add your codes below...
// add a label shows "Hello World"
//标签
auto label = LabelTTF::create("Hello World", "Arial", 24);
// 指定标签的位置
label->setPosition(Vec2(origin.x + visibleSize.width/2,
origin.y + visibleSize.height - label->getContentSize().height));
// add the label as a child to this layer
this->addChild(label, 1);
// 创建图片精灵
auto sprite = Sprite::create("HelloWorld.png");
// 设置图片精灵的位置
sprite->setPosition(Vec2(visibleSize.width/2 + origin.x, visibleSize.height/2 + origin.y));
//把图片精灵放到层里
this->addChild(sprite, 0);
return true;
}
//点击close按钮时调用的回调函数
void HelloWorld::menuCloseCallback(Ref* pSender)
{
//如果是win8或rt平台就是true
#if (CC_TARGET_PLATFORM == CC_PLATFORM_WP8) || (CC_TARGET_PLATFORM == CC_PLATFORM_WINRT)
MessageBox("You pressed the close button. Windows Store Apps do not implement a close button.","Alert");
return;
#endif
Director::getInstance()->end();
//如果是ios平台就是true
#if (CC_TARGET_PLATFORM == CC_PLATFORM_IOS)
exit(0);
#endif
}
哎呀!其实每个源文件里的每一行代码都有英文注释,大家不懂的可以有道一下! 嘻嘻!
(完)谢谢大家捧场! 献丑了!