KERAS-YOLOV3的代码走读
KERAS-YOLOV3的代码走读
GITHUB地址:
https://github.com/qqwweee/keras-yolo3
YOLOV3的论文中文翻译:
https://zhuanlan.zhihu.com/p/34945787
最好先把YOLOV2看明白,推荐一篇YOLOV2介绍的很清晰的博文:
https://blog.csdn.net/jesse_mx/article/details/53925356
网络框架:
train.py(create_model)
y_true = [Input(shape=(h//{0:32, 1:16, 2:8}[l], w//{0:32, 1:16, 2:8}[l], \
        num_anchors//3, num_classes+5)) for l in range(3)]
我们预测每个尺度的3个框,所以对于4个边界框偏移量,1个目标性预测和80个类别预测,张量为N×N×[3 *(4 + 1 + 80)]
默认参数下:y_true[l]的shape为(batch,H,W,3,num_classes+5)
model_body = yolo_body(image_input, num_anchors//3, num_classes)配置文件是:
voc_classes.txt和yolo_anchors.txt,默认的参数图像大小416*416,anchor使用论文中提到的K聚类得出的 9个anchor.
base model
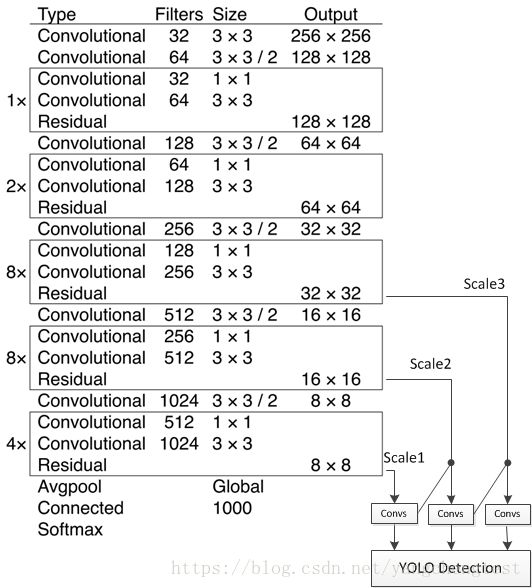
先上一下网络结构图。
基础是一个DARKNET53.
darknet = Model(inputs, darknet_body(inputs))def darknet_body(x):
```Darknent body having 52 Convolution2D layers```
x = DarknetConv2D_BN_Leaky(32, (3,3))(x)
x = resblock_body(x, 64, 1)
x = resblock_body(x, 128, 2)
x = resblock_body(x, 256, 8)
x = resblock_body(x, 512, 8)
x = resblock_body(x, 1024, 4)
return x注意一下,DARKNET卷积这里激活函数是LEAKYRELU。
def DarknetConv2D(*args, **kwargs):
    """Wrapper to set Darknet parameters for Convolution2D."""
    darknet_conv_kwargs = {'kernel_regularizer': l2(5e-4)}
    darknet_conv_kwargs['padding'] = 'valid' if kwargs.get('strides')==(2,2) else 'same'
    darknet_conv_kwargs.update(kwargs)
    return Conv2D(*args, **darknet_conv_kwargs)
def DarknetConv2D_BN_Leaky(*args, **kwargs):
    """Darknet Convolution2D followed by BatchNormalization and LeakyReLU."""
    no_bias_kwargs = {'use_bias': False}
    no_bias_kwargs.update(kwargs)
    return compose(
        DarknetConv2D(*args, **no_bias_kwargs),
        BatchNormalization(),
        LeakyReLU(alpha=0.1))
注意一下,DARKNET每块之间,使用了,(1,0,1,0)的PADDING层。
Darknet uses left and top padding instead of ‘same’ mode。
def resblock_body(x, num_filters, num_blocks):
    '''A series of resblocks starting with a downsampling Convolution2D'''
    # Darknet uses left and top padding instead of 'same' mode
    x = ZeroPadding2D(((1,0),(1,0)))(x)
    x = DarknetConv2D_BN_Leaky(num_filters, (3,3), strides=(2,2))(x)
    for i in range(num_blocks):
        y = compose(
                DarknetConv2D_BN_Leaky(num_filters//2, (1,1)),
                DarknetConv2D_BN_Leaky(num_filters, (3,3)))(x)
        x = Add()([x,y])
    return x
FPN
上图左边的卷积层框架已经搭完了,来看右下方的框架。
YOLOV3的借鉴了特征金字塔(FPN)的概念。
下面来看一下具体的实现:
x, y1 = make_last_layers(darknet.output, 512, num_anchors*(num_classes+5))
x = compose(
            DarknetConv2D_BN_Leaky(256, (1,1)),
            UpSampling2D(2))(x)
x = Concatenate()([x,darknet.layers[152].output])
x, y2 = make_last_layers(x, 256, num_anchors*(num_classes+5))
x = compose(
            DarknetConv2D_BN_Leaky(128, (1,1)),
            UpSampling2D(2))(x)
x = Concatenate()([x,darknet.layers[92].output])
x, y3 = make_last_layers(x, 128, num_anchors*(num_classes+5))
return Model(inputs, [y1,y2,y3])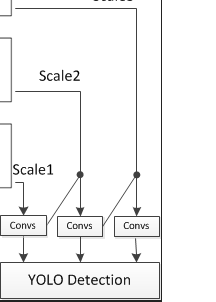
Convs由make_last_layers函数来实现。
def make_last_layers(x, num_filters, out_filters):
    '''6 Conv2D_BN_Leaky layers followed by a Conv2D_linear layer'''
    x = compose(
            DarknetConv2D_BN_Leaky(num_filters, (1,1)),
            DarknetConv2D_BN_Leaky(num_filters*2, (3,3)),
            DarknetConv2D_BN_Leaky(num_filters, (1,1)),
            DarknetConv2D_BN_Leaky(num_filters*2, (3,3)),
            DarknetConv2D_BN_Leaky(num_filters, (1,1)))(x)
    y = compose(
            DarknetConv2D_BN_Leaky(num_filters*2, (3,3)),
            DarknetConv2D(out_filters, (1,1)))(x)
    return x, y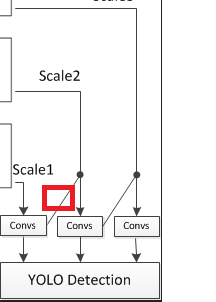
再看一下上图红色框图标注的流程实现:
x = compose(
            DarknetConv2D_BN_Leaky(256, (1,1)),
            UpSampling2D(2))(x)
x = Concatenate()([x,darknet.layers[152].output])

def compose(*funcs):
    """Compose arbitrarily many functions, evaluated left to right.
    Reference: https://mathieularose.com/function-composition-in-python/
    """
    # return lambda x: reduce(lambda v, f: f(v), funcs, x)
    if funcs:
        return reduce(lambda f, g: lambda *a, **kw: g(f(*a, **kw)), funcs)
    else:
        raise ValueError('Composition of empty sequence not supported.')
数据采集
数据生成通过:
train.py(data_generator)实现。
数据结构
关于PASCAL VOC的数据结构可以参考:
https://blog.csdn.net/zhangjunbob/article/details/52769381
本项目中,数据结构为:
Row format: image_file_path box1 box2 … boxN;
Box format: x_min,y_min,x_max,y_max,class_id (no space).
For VOC dataset, try python voc_annotation.py
Here is an example:
path/to/img1.jpg 50,100,150,200,0 30,50,200,120,3
path/to/img2.jpg 120,300,250,600,2
数据处理
主要是在utils.py(get_random_data)函数中实现:
先看not random的实现:
    if not random:
        # resize image
        #缩放大小
        scale = min(w/iw, h/ih)
        nw = int(iw*scale)
        nh = int(ih*scale)
        #中心点
        dx = (w-nw)//2
        dy = (h-nh)//2
        image_data=0
        if proc_img:
            image = image.resize((nw,nh), Image.BICUBIC)
            #背景
            new_image = Image.new('RGB', (w,h), (128,128,128))
            #黏贴图pain
            new_image.paste(image, (dx, dy))
            # 归一化
            image_data = np.array(new_image)/255.

        # correct boxes
        box_data = np.zeros((max_boxes,5))
        if len(box)>0:
            np.random.shuffle(box)
            # 最大20个BOX。
            if len(box)>max_boxes: box = box[:max_boxes]
            #根据缩放大小,生成新图中的BOX位置
            box[:, [0,2]] = box[:, [0,2]]*scale + dx
            box[:, [1,3]] = box[:, [1,3]]*scale + dy
            box_data[:len(box)] = box
        return image_data, box_data
数据增强请看:
KERAS-YOLOV3的数据增强
生成数据
图片缩放到固定大小后就是生成对应的数据。
BOX框定通过:model.py(preprocess_true_boxes)实现。
def preprocess_true_boxes(true_boxes, input_shape, anchors, num_classes):
    '''Preprocess true boxes to training input format

    Parameters
    ----------
    true_boxes: array, shape=(m, T, 5)
        Absolute x_min, y_min, x_max, y_max, class_id relative to input_shape.
    input_shape: array-like, hw, multiples of 32
    anchors: array, shape=(N, 2), wh
    num_classes: integer

    Returns
    -------
    y_true: list of array, shape like yolo_outputs, xywh are reletive value
#每个图片都需要单独处理。
for b in range(m):
intersect_mins = np.maximum(box_mins, anchor_mins)
intersect_maxes = np.minimum(box_maxes, anchor_maxes)
intersect_wh = np.maximum(intersect_maxes - intersect_mins, 0.)
intersect_area = intersect_wh[..., 0] * intersect_wh[..., 1]
box_area = wh[..., 0] * wh[..., 1]
anchor_area = anchors[..., 0] * anchors[..., 1]
iou = intersect_area / (box_area + anchor_area - intersect_area)
### 9个设定的ANCHOR去框定每个输入的BOX。
# Find best anchor for each true box
best_anchor = np.argmax(iou, axis=-1)
for t, n in enumerate(best_anchor):
for l in range(num_layers):
if n in anchor_mask[l]:
i = np.floor(true_boxes[b,t,0]*grid_shapes[l][1]).astype('int32')
j = np.floor(true_boxes[b,t,1]*grid_shapes[l][0]).astype('int32')
k = anchor_mask[l].index(n)
c = true_boxes[b,t, 4].astype('int32')
### 设定数据
### 将T个BOX的标的数据统一放置到3*B*W*H*3的维度上。
y_true[l][b, j, i, k, 0:4] = true_boxes[b,t, 0:4]
y_true[l][b, j, i, k, 4] = 1
y_true[l][b, j, i, k, 5+c] = 1loss
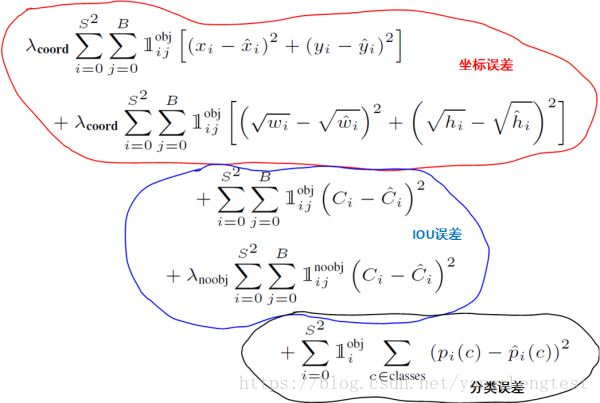
先上一张YOLOV1的误差公式。
model_loss = Lambda(yolo_loss, output_shape=(1,), name='yolo_loss',
        arguments={'anchors': anchors, 'num_classes': num_classes, 'ignore_thresh': 0.5})(
        [*model_body.output, *y_true])
首先根据模型返回的OUTPUT计算输入图片SHAPE以及3个LAYER下,3个切片的大小。
input_shape = K.cast(K.shape(yolo_outputs[0])[1:3] * 32, K.dtype(y_true[0]))
grid_shapes = [K.cast(K.shape(yolo_outputs[l])[1:3], K.dtype(y_true[0])) for l in range(num_layers)]
## loss是需要三层分别计算的
for l in range(num_layers):
## 置信率
object_mask = y_true[l][..., 4:5]
## 分类
true_class_probs = y_true[l][..., 5:]
grid, raw_pred, pred_xy, pred_wh = yolo_head(yolo_outputs[l],
anchors[anchor_mask[l]], num_classes, input_shape, calc_loss=True) anchor_mask = [[6,7,8], [3,4,5], [0,1,2]] if num_layers==3 else [[3,4,5], [1,2,3]]不同的欺骗对应不同的ANCHOR大小。
ANCHOR的大小如下:
10,13, 16,30, 33,23, 30,61, 62,45, 59,119, 116,90, 156,198, 373,326
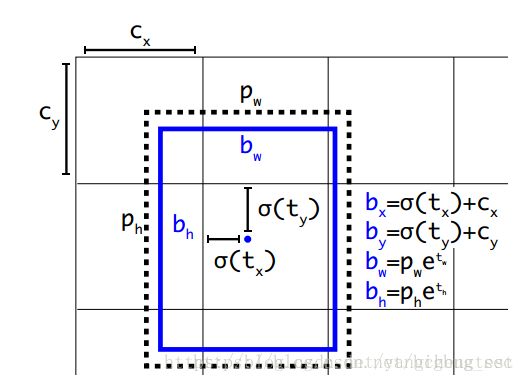
  # Adjust preditions to each spatial grid point and anchor size.
box_xy = (K.sigmoid(feats[..., :2]) + grid) / K.cast(grid_shape[::-1], K.dtype(feats))
box_wh = K.exp(feats[..., 2:4]) * anchors_tensor / K.cast(input_shape[::-1], K.dtype(feats))
box_confidence = K.sigmoid(feats[..., 4:5])
box_class_probs = K.sigmoid(feats[..., 5:])
if calc_loss == True:
   return grid, feats, box_xy, box_wh
通过上述代码,将box_xy,box_xy 从OUTPUT的预测数据转为真实坐标。
raw_pred是yolo_outputs[l]
通过:
feats = K.reshape(
feats, [-1, grid_shape[0], grid_shape[1], num_anchors, num_classes + 5])
经过yolo_head函数后,raw_pred数据并没有改变。
# Darknet raw box to calculate loss.
raw_true_xy = y_true[l][..., :2]*grid_shapes[l][::-1] - grid
raw_true_wh = K.log(y_true[l][..., 2:4] / anchors[anchor_mask[l]] * input_shape[::-1])
raw_true_wh = K.switch(object_mask, raw_true_wh, K.zeros_like(raw_true_wh)) # avoid log(0)=-inf
box_loss_scale = 2 - y_true[l][...,2:3]*y_true[l][...,3:4]
本人tensorflow不是很熟,
K.switch看一下
https://tensorflow.google.cn/api_docs/python/tf/keras/backend/switch
条件判断函数。
上图的反函数,通过真实值得到卷积网络对应的值。
疑问?raw_true_xy 为啥没有求SIGMOID的反函数?
# Find ignore mask, iterate over each of batch.
ignore_mask = tf.TensorArray(K.dtype(y_true[0]), size=1, dynamic_size=True)
object_mask_bool = K.cast(object_mask, 'bool')
def loop_body(b, ignore_mask):
    true_box = tf.boolean_mask(y_true[l][b,...,0:4], object_mask_bool[b,...,0])
    iou = box_iou(pred_box[b], true_box)
    best_iou = K.max(iou, axis=-1)
    ignore_mask = ignore_mask.write(b, K.cast(best_ioureturn b+1, ignore_mask
_, ignore_mask = K.control_flow_ops.while_loop(lambda b,*args: b0, ignore_mask])
ignore_mask = ignore_mask.stack()
ignore_mask = K.expand_dims(ignore_mask, -1)
m = K.shape(yolo_outputs[0])[0] # batch size, tensor
m表示采样batch_size.
 object_mask = y_true[l][..., 4:5]
 object_mask_bool = K.cast(object_mask, 'bool')
 true_box = tf.boolean_mask(y_true[l][b,...,0:4], object_mask_bool[b,...,0])
tf.boolean_mask Apply boolean mask to tensor. Numpy equivalent is tensor[mask].
根据y_true的置信度标识,来框定y_true的坐标系参数是否有效。
pred_box = K.concatenate([pred_xy, pred_wh])
iou = box_iou(pred_box[b], true_box)
loop_body计算batch_size内最大的IOU,这里主要还是看一下box_iou的计算方法。
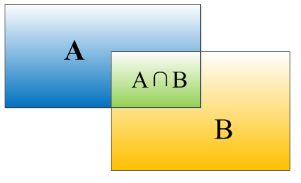
iou = intersect_area / (b1_area + b2_area - intersect_area)
ignore_mask = ignore_mask.write(b, K.cast(best_iou当一张图片的最大IOU低于ignore_thresh,则认为图片内是没有目标。
###    true_boxes[..., 0:2] = boxes_xy/input_shape[::-1]
###    true_boxes[..., 2:4] = boxes_wh/input_shape[::-1]
### 生成true_box做了类似归一化的处理,因此,true_box小于1,box_loss_scale一定大于0.
### 为什么用下面这个公式,不知道。。。
box_loss_scale = 2 - y_true[l][...,2:3]*y_true[l][...,3:4]
# K.binary_crossentropy is helpful to avoid exp overflow.
xy_loss = object_mask * box_loss_scale * K.binary_crossentropy(raw_true_xy, raw_pred[...,0:2], from_logits=True)
wh_loss = object_mask * box_loss_scale * 0.5 * K.square(raw_true_wh-raw_pred[...,2:4])
### 置信度
confidence_loss = object_mask * K.binary_crossentropy(object_mask, raw_pred[...,4:5], from_logits=True)+ \
(1-object_mask) * K.binary_crossentropy(object_mask, raw_pred[...,4:5], from_logits=True) * ignore_mask
### 分类
class_loss = object_mask * K.binary_crossentropy(true_class_probs,raw_pred[...,5:],from_logits=True)
没看到YOLOV2和YOLOV3的LOSS说明。。。和YOLO还是差距比较大的
这里有一个KERAS的技巧:
model = Model([model_body.input, *y_true], model_loss)
loss={'yolo_loss': lambda y_true, y_pred: y_pred}
把目标当成一个输入,构成多输入模型,把loss写成一个层,作为最后的输出,搭建模型的时候,就只需要将模型的output定义为loss,而compile的时候,直接将loss设置为y_pred(因为模型的输出就是loss,所以y_pred就是loss)
其中还有不少懵圈的地方,希望有大侠可以指正,谢谢!~