vs code 调试STM32
本次环境搭建主要参考如下文档或博客
使用VSCode和VS2017编译调试STM32程序
VS Code 搭建stm32开发环境
STM32高级开发(18)-使用VS Code搭建STM32开发环境
所需环境(软件或插件)
1.ARM GNU套件
这里面包含了arm-none-eabi-gcc和arm-none-eabi-gdb等工具。
(如果上面的网址打不开,试试这个GNU Arm嵌入式工具链)
2. mingw或者cygwin
选择其中1个即可,有了他们才能在windows操作系统使用GNU工具,如make指令等。
3.JLink或者STLink
提供gdb server。
4.vs code
下载安装即可。
vs code的插件必备C/C++,推荐Bracket Pair Colorizer(彩虹括号)、C/C++ Clang Command Adapter(提供自动补全功能,需要安装LLVM)。
5.stm32cubeMX
对于stm32的开发人员来说,简直神器。下载安装即可。
调试流程
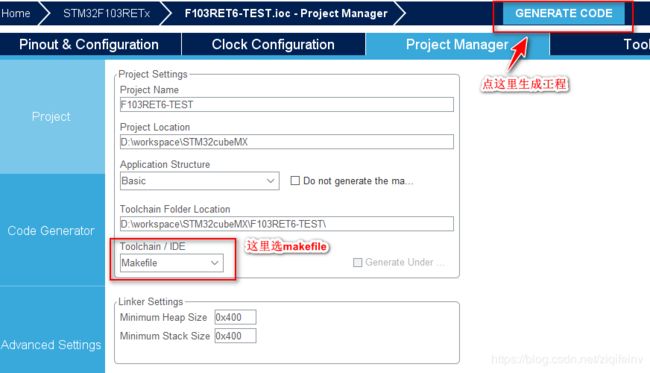
1.使用stm32cubeMX生成makefile工程
2.执行make指令编译
需要进入makefile文件所在的文件夹下执行make指令。
编译后在build目录下生成 *.elf *.bin *.hex等二进制文件。
3.j-flash或其他工具下载固件到目标板子
j-flash软件下载固件步骤如下:
j-link调试器连接好板子,确保板子供电ok,j-link调试器状态ok。
打开j-flash软件,选择 create project from template,去j-link安装目录下找到 Samples\JFlash\ProjectFiles\ST 文件夹,选择对应的芯片配置文件。
target->connect 连接板子。
file -> open data file 打开对应的程序文件,此时注意address,这是程序将要保存的位置,可以和链接脚本中的addr核对。
target->program 下载固件
target->start application 即可运行程序。至此,固件已经保存在目标板子中,可退出j-flash释放j-link调试器。
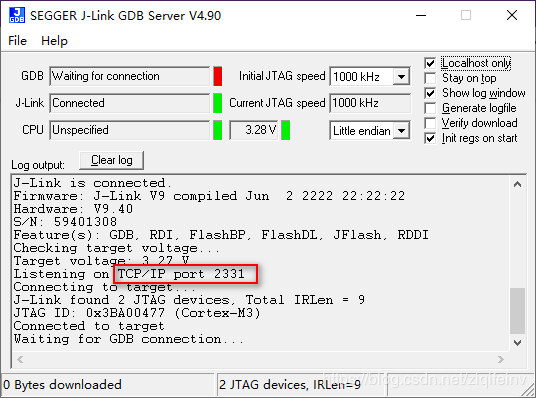
4.打开j-link GDB server,配置参数(一版默认即可),点击OK即可连接到目标板。
成功后显示如下界面,此时的端口号2331就是gdb连接的端口号。:
5.打开vs code,配置json文件
见“VS code配置文件”,注意将相关路径替换为自己电脑上对应的路径。
6.启动调试
按F5就行了。
VS code配置文件
vs code的使用就不讲了,直接给出配置文件内容吧(毕竟我也没有深入研究,哈哈哈)
1.task.json
主要配置调试开始和结束时要执行的任务,也可自己添加自定义任务。
{
    // See https://go.microsoft.com/fwlink/?LinkId=733558
    // for the documentation about the tasks.json format
    "version": "2.0.0",
    "tasks": [
        {
            "label": "编译",
            "type": "shell",
            "command": "make -j6",
            "problemMatcher": [],
            "group": {
                "kind": "build",
                "isDefault": true
            }
        }
    ]
}
2.c_cpp_properties.json
主要是添加头文件路径以及指定编译器路径
{
    "configurations": [
        {
            "name": "Win32",
            "includePath": [
                "${workspaceFolder}/**",
                "${workspaceFolder}/Inc",
                "${workspaceFolder}/Middlewares/Third_Party/FreeRTOS/Source/include",
                "${workspaceFolder}Drivers/STM32F1xx_HAL_Driver/Inc",
                "${workspaceFolder}Drivers/STM32F1xx_HAL_Driver/Inc/Legacy",
                "${workspaceFolder}Drivers/CMSIS/Include",
                "E:/GNU Tools ARM Embedded/5.4 2016q3/arm-none-eabi/include"
            ],
            "defines": [
                "_DEBUG",
                "UNICODE",
                "_UNICODE",
                "USE_HAL_DRIVER",
                "STM32F407xx"
            ],
            "compilerPath": "E:/GNU Tools ARM Embedded/5.4 2016q3/bin/arm-none-eabi-gcc.exe",
            "cStandard": "c11",
            "cppStandard": "c++17",
            "intelliSenseMode": "gcc-x86"
        }
    ],
    "version": 4
}
3.launch.json
主要指定调试器路径,以及连接gdb server和执行gdb指令
{
    // 使用 IntelliSense 了解相关属性。
    // 悬停以查看现有属性的描述。
    // 欲了解更多信息,请访问: https://go.microsoft.com/fwlink/?linkid=830387
    "version": "0.2.0",
    "configurations": [

        {
            "name": "blink Launch",
            "type": "cppdbg",
            "request": "launch",
            "targetArchitecture": "arm",//虽然官方说弃用了,但实际上必须指明
            "program": "build\\F103RET6-TEST.elf", // 采用了自定义的设置,这里没啥用了
            "args": [""],
            "stopAtEntry": true,
            "cwd": "${workspaceFolder}",
            "environment": [],
            "externalConsole": true,
            "MIMode": "gdb",
            "miDebuggerPath": "E:\\GNU Tools ARM Embedded\\5.4 2016q3\\bin\\arm-none-eabi-gdb.exe",
            "preLaunchTask": "编译",
            "setupCommands": [
                {
                    "description": "Enable pretty-printing for gdb",
                    "text": "-enable-pretty-printing",
                    "ignoreFailures": true
                }
            ],
            "launchCompleteCommand": "None",
            "miDebuggerServerAddress": "localhost:2331",
            "customLaunchSetupCommands": [
                {
                    "text": "target remote :2331",
                    "description": "connect to server",
                    "ignoreFailures": false
                },
                {
                    "text": "file D:/workspace/STM32cubeMX/F103RET6-TEST/build/F103RET6-TEST.elf",  //注意此处必须使用绝对地址,且使用反斜杠
                    "description": "load file to gdb",
                    "ignoreFailures": false
                },
                {
                    "text": "load",
                    "description": "download file to MCU",
                    "ignoreFailures": false
                },
                {
                    "text": "monitor reset",
                    "description": "reset MCU",
                    "ignoreFailures": false
                },
                {
                    "text": "b main",
                    "description": "set breakpoints at main",
                    "ignoreFailures": false
                },
            ]
        }
    ]
}

