手写一个基于NIO的迷你版Tomcat
笔者也建立的自己的公众号啦,平时会分享一些编程知识,欢迎各位大佬支持~
扫码或微信搜索北风IT之路关注

本文公众号地址:手写一个基于NIO的迷你版Tomcat
在很久之前看到了一篇文章写一个迷你版的Tomcat,觉得还是很有意思的,于是也跟着手敲了一遍,果不其然得出了想要的hello world,但是他这个是基于BIO的,正好最近看了并发编程的书,于是尝试将这位大佬的代码改一改,于是就有了这个基于NIO的迷你Tomcat。
源代码已更新至我的Github:https://github.com/tzfun/MyTomcat
BIO和NIO
BIO是同步阻塞IO,在实际场景中大部分时间消耗在了IO等待上了,比较消耗资源,所以这种IO方式逐渐被替代了,具体介绍这里不再赘述。取而代之的是NIO(New IO),它是一种同步非阻塞式的IO,它通过Selector自旋式或回调式的方式去处理准备好数据的Channel,Channel即通道,相当于BIO中的流,它不存在花费大量时间去IO等待,从而大大提升了吞吐量。Tomcat在老版本也是基于BIO的,后续版本更新也全部替换为NIO。
项目结构
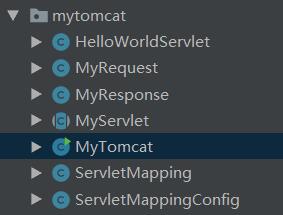
项目结构和原作者的结构几乎一样,只是代码实现不一样,具体结构看下图:
Request和Response
Tomcat主要是Http服务,所以处理的协议是Http协议,那么Http的头部信息由请求行、请求头部、空行、请求数据组成,只需要拆分这些数据即可处理http请求,这里我只是简单的处理了一下,其他详细内容看注释。
Request
package mytomcat;

import java.io.IOException;
import java.nio.ByteBuffer;
import java.nio.channels.SelectionKey;
import java.nio.channels.SocketChannel;
import java.util.HashMap;

/**
 * @author beifengtz
 * www.beifengtz.com
 * location: mytomcat.javase_learning
 * Created in 14:45 2019/4/21
 */
public class MyRequest {
    private String url;
    private String method;
    private HashMap<String,String> param = new HashMap<>();

    public MyRequest(SelectionKey selectionKey) throws IOException{
        //  从契约获取通道
        SocketChannel channel = (SocketChannel) selectionKey.channel();

        String httpRequest = "";
        ByteBuffer bb = ByteBuffer.allocate(16*1024);   //  从堆内存中获取内存
        int length = 0; //  读取byte数组的长度
        length = channel.read(bb);  //  从通道中读取数据到ByteBuffer容器中
        if (length < 0){
            selectionKey.cancel();  //  取消该契约
        }else {
            httpRequest = new String(bb.array()).trim();    //  将ByteBuffer转为String
            String httpHead = httpRequest.split("\n")[0];   //  获取请求头
            url = httpHead.split("\\s")[1].split("\\?")[0]; //  获取请求路径
            String path = httpHead.split("\\s")[1]; //  请求全路径,包含get的参数数据
            method = httpHead.split("\\s")[0];

            //  一下是拆分get请求的参数数据
            String[] params = path.indexOf("?") > 0 ? path.split("\\?")[1].split("\\&") : null;
            if (params != null){
                try{
                    for (String tmp : params){
                        param.put(tmp.split("\\=")[0],tmp.split("\\=")[1]);
                    }
                }catch (NullPointerException e){
                    e.printStackTrace();
                }
            }
            System.out.println(this);
        }
        bb.flip();
    }

    public String getUrl() {
        return url;
    }

    public void setUrl(String url) {
        this.url = url;
    }

    public String getMethod() {
        return method;
    }

    public void setMethod(String method) {
        this.method = method;
    }

    @Override
    public String toString() {
        return "MyRequest{" +
                "url='" + url + '\'' +
                ", method='" + method + '\'' +
                ", param=" + param +
                '}';
    }
}
Response
package mytomcat;

import java.io.IOException;
import java.nio.ByteBuffer;
import java.nio.channels.SelectionKey;
import java.nio.channels.SocketChannel;
import java.nio.charset.StandardCharsets;

/**
 * @author beifengtz
 * www.beifengtz.com
 * location: mytomcat.javase_learning
 * Created in 14:49 2019/4/21
 */
public class MyResponse {
    private SelectionKey selectionKey;

    public MyResponse(SelectionKey selectionKey){
        this.selectionKey = selectionKey;
    }

    public void write(String content) throws IOException{
        //  拼接相应数据包
        StringBuffer httpResponse = new StringBuffer();
        httpResponse.append("HTTP/1.1 200 OK\n")
                .append("Content-type:text/html\n")
                .append("\r\n")
                .append("")
                .append(content)
                .append("");

        // 转换为ByteBuffer
        ByteBuffer bb = ByteBuffer.wrap(httpResponse.toString().getBytes(StandardCharsets.UTF_8));
        SocketChannel channel = (SocketChannel) selectionKey.channel(); //  从契约获取通道
        long len = channel.write(bb);   //  向通道中写入数据
        if (len == -1){
            selectionKey.cancel();
        }
        bb.flip();
        channel.close();
        selectionKey.cancel();
    }
}
Servlet和Mapping映射类及其配置类
在Java web开发中都会遇到Servlet和Mapping的配置,这些是必备的元素,Servlet负责定义处理请求和响应的方法,它是一个抽象类。
Servlet
package mytomcat;

/**
 * @author beifengtz
 * www.beifengtz.com
 * location: mytomcat.javase_learning
 * Created in 14:53 2019/4/21
 */
public abstract class MyServlet {

    public abstract void doGet(MyRequest myRequest,MyResponse myResponse);

    public abstract void doPost(MyRequest myRequest,MyResponse myResponse);

    public void service(MyRequest myRequest,MyResponse myResponse){
        if (myRequest.getMethod().equalsIgnoreCase("POST")){
            doPost(myRequest,myResponse);
        }else if (myRequest.getMethod().equalsIgnoreCase("GET")){
            doGet(myRequest,myResponse);
        }
    }
}
Mapping映射是负责将某些请求路径分发到各自处理类进行处理,那么就需要一个配置类,以下是ServletMapping类的定义和Config类。
ServletMapping
package mytomcat;

/**
 * @author beifengtz
 * www.beifengtz.com
 * location: mytomcat.javase_learning
 * Created in 14:59 2019/4/21
 */
public class ServletMapping {
    private String servletName;
    private String url;
    private String clazz;

    public ServletMapping(String servletName, String url, String clazz) {
        this.servletName = servletName;
        this.url = url;
        this.clazz = clazz;
    }

    public String getServletName() {
        return servletName;
    }

    public void setServletName(String servletName) {
        this.servletName = servletName;
    }

    public String getUrl() {
        return url;
    }

    public void setUrl(String url) {
        this.url = url;
    }

    public String getClazz() {
        return clazz;
    }

    public void setClazz(String clazz) {
        this.clazz = clazz;
    }
}
ServletMappingConfig
package mytomcat;

import java.util.ArrayList;
import java.util.List;

/**
 * @author beifengtz
 * www.beifengtz.com
 * location: mytomcat.javase_learning
 * Created in 15:01 2019/4/21
 */
public class ServletMappingConfig {
    public static List<ServletMapping> servletMappingList = new ArrayList<>();

    static {
        servletMappingList.add(new ServletMapping("helloWorld","/world","mytomcat.HelloWorldServlet"));
    }
}
当然一般这个配置是通过xml文件去配置的。
下面是处理/world请求的处理类
package mytomcat;

import java.io.IOException;

/**
 * @author beifengtz
 * www.beifengtz.com
 * location: mytomcat.javase_learning
 * Created in 14:57 2019/4/21
 */
public class HelloWorldServlet extends MyServlet {
    @Override
    public void doGet(MyRequest myRequest, MyResponse myResponse) {
        try{
            myResponse.write("get hello world");
        }catch (IOException e){
            e.printStackTrace();
        }
    }

    @Override
    public void doPost(MyRequest myRequest, MyResponse myResponse) {
        try{
            myResponse.write("post hello world");
        }catch (IOException e){
            e.printStackTrace();
        }
    }
}
Tomcat核心启动类
Tomcat的启动类是它的核心,其中包含初始化Mapping、监听端口、处理请求和响应等,我与原作者的主要区别也就是在这一部分,用NIO替换了BIO的接收数据模式,采用线程池处理数据。
MyTomcat
package mytomcat;

import java.io.IOException;
import java.net.InetSocketAddress;
import java.nio.channels.SelectionKey;
import java.nio.channels.Selector;
import java.nio.channels.ServerSocketChannel;
import java.nio.channels.SocketChannel;
import java.nio.channels.spi.SelectorProvider;
import java.util.*;
import java.util.concurrent.ConcurrentLinkedQueue;
import java.util.concurrent.ExecutorService;
import java.util.concurrent.Executors;

/**
 * @author beifengtz
 * www.beifengtz.com
 * location: mytomcat.javase_learning
 * Created in 15:03 2019/4/21
 */
public class MyTomcat {
    private int port = 8080;
    private Map<String, String> urlServletMap = new HashMap<>();

    private Selector selector;
    private ExecutorService es = Executors.newCachedThreadPool();

    public MyTomcat() {
    }

    public MyTomcat(int port) {
        this.port = port;
    }

    public void start() throws IOException {
        //  初始化映射关系
        initServletMapping();

        // 启动Selector
        selector = SelectorProvider.provider().openSelector();
        // 启动Channel
        ServerSocketChannel ssc = ServerSocketChannel.open();
        // 配置非阻塞选择
        ssc.configureBlocking(false);

        // 监听端口
        InetSocketAddress isa = new InetSocketAddress(port);
        ssc.socket().bind(isa);

        // 将Channel绑定到Selector上,并选择准备模式为Accept,此处可能会失败,后续可再次开启
        SelectionKey acceptKey = ssc.register(selector, SelectionKey.OP_ACCEPT);

        System.out.println("MyTomcat is started...");

        ConcurrentLinkedQueue<MyRequest> requestList = new ConcurrentLinkedQueue<>();
        ConcurrentLinkedQueue<MyResponse> responseList = new ConcurrentLinkedQueue<>();

        while (true) {
            selector.select();  //  等待Channel准备数据
            Set readyKeys = selector.selectedKeys();
            Iterator i = readyKeys.iterator();

            while (i.hasNext()) {
                SelectionKey sk = (SelectionKey) i.next();
                i.remove(); //  从集合中移除,防止重复处理

                if (sk.isAcceptable()) { //  如果键的接收状态未正常打开,再次尝试打开
                    doAccept(sk);
                } else if (sk.isValid() && sk.isReadable()) {  // 可读
                    requestList.add(getRequest(sk));
                    //  切换准备状态
                    sk.interestOps(SelectionKey.OP_WRITE);
                } else if (sk.isValid() && sk.isWritable()) { //  可写
                    responseList.add(getResponse(sk));
                    //  切换准备状态
                    sk.interestOps(SelectionKey.OP_READ);
                }

                //  等待一对请求和响应均准备好时处理
                if (!requestList.isEmpty() && !responseList.isEmpty()) {
                    dispatch(requestList.poll(), responseList.poll());
                }
            }
        }
    }

    /**
     * 如果没有正常开启接收模式
     * 尝试开启接收模式
     * @param selectionKey
     */
    private void doAccept(SelectionKey selectionKey) {
        ServerSocketChannel server = (ServerSocketChannel) selectionKey.channel();
        SocketChannel clientChannel;
        try {
            clientChannel = server.accept();
            clientChannel.configureBlocking(false);

            SelectionKey clientKey = clientChannel.register(selector, SelectionKey.OP_READ);
        } catch (IOException e) {
            e.printStackTrace();
        }
    }

    /**
     * 从通道中获取请求并进行包装
     *
     * @param selectionKey
     * @return
     * @throws IOException
     */
    private MyRequest getRequest(SelectionKey selectionKey) throws IOException {
        return new MyRequest(selectionKey);    //  包装request
    }

    /**
     * 从通道中获取响应并进行包装
     *
     * @param selectionKey
     * @return
     */
    private MyResponse getResponse(SelectionKey selectionKey) {
        return new MyResponse(selectionKey);     //  包装response
    }

    /**
     * 初始化Servlet的映射对象
     */
    private void initServletMapping() {
        for (ServletMapping servletMapping : ServletMappingConfig.servletMappingList) {
            urlServletMap.put(servletMapping.getUrl(), servletMapping.getClazz());
        }
    }

    /**
     * 请求调度
     *
     * @param myRequest
     * @param myResponse
     */
    private void dispatch(MyRequest myRequest, MyResponse myResponse) {
        if (myRequest == null) return;
        if (myResponse == null) return;
        String clazz = urlServletMap.get(myRequest.getUrl());

        try {
            if (clazz == null) {
                myResponse.write("404");
                return;
            }
            es.execute(new Runnable() {
                @Override
                public void run() {
                    try {
                        Class<MyServlet> myServletClass = (Class<MyServlet>) Class.forName(clazz);
                        MyServlet myServlet = myServletClass.newInstance();
                        myServlet.service(myRequest, myResponse);
                    } catch (IllegalAccessException e) {
                        e.printStackTrace();
                    } catch (ClassNotFoundException e) {
                        e.printStackTrace();
                    } catch (InstantiationException e) {
                        e.printStackTrace();
                    }
                }
            });
        } catch (IOException e) {
            e.printStackTrace();
        }
    }

    public static void main(String[] args) throws IOException {
        new MyTomcat().start();
    }
}
测试
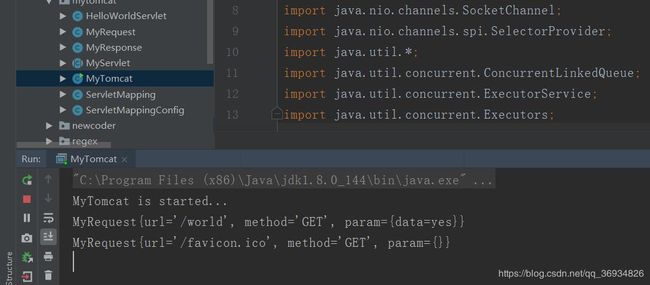
当我们在浏览器中输入http://localhost:8080/world?data=yes时,成功得到了预期的结果


