AndroidStudio AIDL进程间通信及Binder连接池的实现
前言
本文实现的是两个app间的进程间通信,具体实现采用Binder连接池;Binder连接池的优点:对于服务端来说,只需要一个Service就可以了,服务端提供一个queryBinder接口,这个接口根据业务模块的唯一标识来返回行营的Binder对象给他们,不同的业务模块拿到所需的Binder对象后就可以远程方法调用了。不用为单独的模块在服务端创建对应的Service了,不然十单独个模块要在服务端创建十个Service共其调用;
实现:
一,先写服务端;
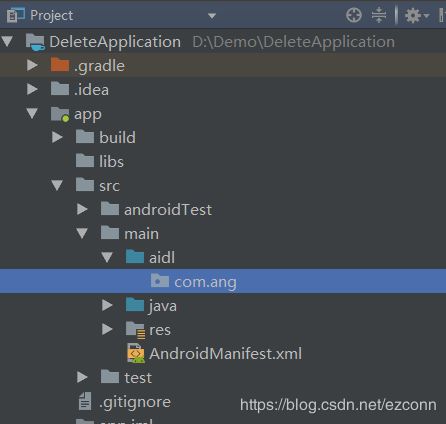
1,Android Studio新建项目,切换到project项目结构,右键main,new —>Folder—>AIDLFolder ,新建aidl文件夹如下图
2,右键aidl文件夹 new —> Package 新建aidl接口的包名
3,新建服务端需要的三个aidl接口文件
3.1 IBinderPool .aidl接口为Binder连接池
// IBinderPool.aidl
package com.ang;

// Declare any non-default types here with import statements

interface IBinderPool {
    /**
     * Demonstrates some basic types that you can use as parameters
     * and return values in AIDL.
     */
    IBinder queryBinder(int binderCode);
}
3.2 ICompute.aidl接口实现计算加法的功能
// ICompute.aidl
package com.ang;

// Declare any non-default types here with import statements

interface ICompute {
    /**
     * Demonstrates some basic types that you can use as parameters
     * and return values in AIDL.
     */
    int add(int a,int b);
}
3.3 ISecurityCenter.aidl接口实现加解密的功能
// ISecurityCenter.aidl
package com.ang;

// Declare any non-default types here with import statements

interface ISecurityCenter {
    /**
     * Demonstrates some basic types that you can use as parameters
     * and return values in AIDL.
     */

    String encrypt(String content);
    String decrypt(String password);
}
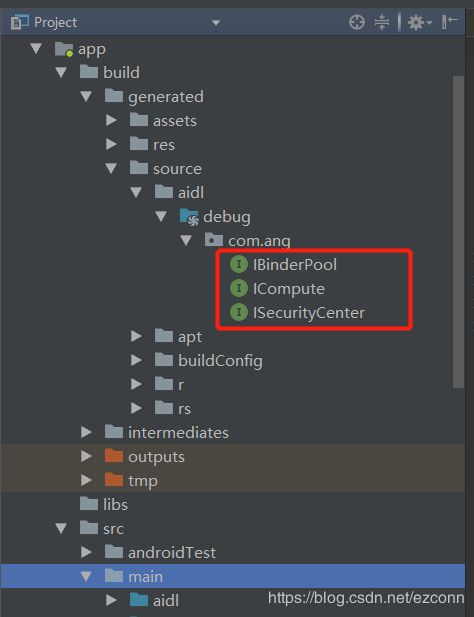
4,编译一下,在如下的目录下会自动生成三个aidl接口对应的java接口
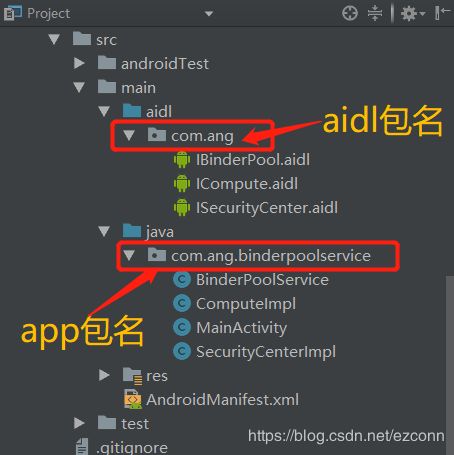
4,在Java包下实现以上三个自动生成的Java接口,注意是两个包名的区别
4.1 app的包名下创建BinderPoolService服务并实现IBinderPool.java接口;
注意 别忘了在清单文件中注册BinderPoolService,android:exported="true"属性设置为true;
package com.ang.binderpoolservice;

import android.app.Service;
import android.content.Intent;
import android.os.Binder;
import android.os.IBinder;
import android.os.RemoteException;
import android.util.Log;
import android.widget.Toast;

import com.ang.IBinderPool;

public class BinderPoolService extends Service {
    private static final String TAG = "BinderPoolService";
    public static final int BINDER_COMPUTE = 0;
    public static final int BINDER_SECURITY_CENTER = 1;

    private Binder mBinderPool = new IBinderPool.Stub() {
        @Override
        public IBinder queryBinder(int binderCode) throws RemoteException {
            IBinder binder = null;
            switch (binderCode) {
                case BINDER_SECURITY_CENTER:
                    binder = new SecurityCenterImpl();
                    break;

                case BINDER_COMPUTE:
                    binder = new ComputeImpl();
                    break;
            }
            return binder;
        }
    };

    public BinderPoolService() {

    }

    @Override
    public IBinder onBind(Intent intent) {
        return mBinderPool;
    }

    @Override
    public void onCreate() {
        Log.d(TAG, "onCreate 启动了");
        Toast.makeText(this,"onCreate 启动了",Toast.LENGTH_LONG).show();
        super.onCreate();
    }
}
4.2 实现另外两个aidl接口对应生成的java接口
package com.ang.binderpoolservice;

import android.os.RemoteException;

import com.ang.ICompute;

/**
 * @param a
 * @param b
 * @return
 */
public class ComputeImpl extends ICompute.Stub {
    @Override
    public int add(int a, int b) throws RemoteException {
        return a + b;
    }
}
package com.ang.binderpoolservice;

import android.os.RemoteException;

import com.ang.ISecurityCenter;

/**
 * @param a
 * @param b
 * @return
 */
public class SecurityCenterImpl extends ISecurityCenter.Stub {
    private static final char SECRET_CODE = '^';

    @Override
    public String encrypt(String content) throws RemoteException {
        char[] chars = content.toCharArray();
        for (int i=0;i
二,客户端实现
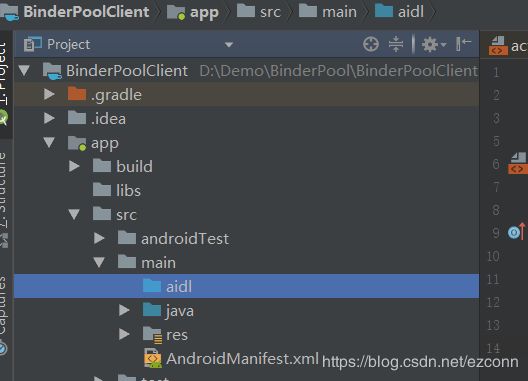
1,和服务端前两个步骤一样新建一个项目,然后新建aidl文件夹
2,把服务端的aidl文件夹下的连同包名和aidl文件复制到此,也就是要和服务端的aidl接口一样,不管是包名和路径必须都一样;
3,编译一下,出现的结果和服务端是一样的,自动生成和aidl接口一一对应的java接口;
4,在客户端的MainActivity中bindService绑定服务端的BinderPoolService;绑定成功后,就可以调用远程服务端方法;
package com.ang.binderpoolclient;

import android.content.ComponentName;
import android.content.Intent;
import android.content.ServiceConnection;
import android.os.IBinder;
import android.os.RemoteException;
import android.support.v7.app.AppCompatActivity;
import android.os.Bundle;
import android.util.Log;
import android.view.View;
import android.widget.Button;
import android.widget.Toast;

import com.ang.IBinderPool;
import com.ang.ICompute;

import java.util.concurrent.CountDownLatch;

public class MainActivity extends AppCompatActivity {
    private String TAG = "BinderPoolClientActivity";
    public static final int BINDER_COMPUTE = 0;
    public static final int BINDER_SECURITY_CENTER = 1;

    private CountDownLatch countDownLatch;

    private Button btn_bind_service;

    private IBinderPool binderPool;

    private IBinder.DeathRecipient deathRecipient = new IBinder.DeathRecipient() {
        @Override
        public void binderDied() {
            binderPool.asBinder().unlinkToDeath(deathRecipient, 0);
            binderPool = null;
            connectBinderPoolService();
        }
    };

    private ServiceConnection mConnection = new ServiceConnection() {
        @Override
        public void onServiceConnected(ComponentName name, IBinder service) {
            binderPool = IBinderPool.Stub.asInterface(service);
            Toast.makeText(MainActivity.this, "绑定成功", Toast.LENGTH_LONG).show();
            try {
                IBinder binder = binderPool.queryBinder(BINDER_COMPUTE);
                ICompute iCompute = ICompute.Stub.asInterface(binder);
                //iCompute.add(2, 5)调用远程服务端方法
                Toast.makeText(MainActivity.this, "" + iCompute.add(2, 5), Toast.LENGTH_LONG).show();
            } catch (RemoteException e) {
                e.printStackTrace();
            }

            try {
                binderPool.asBinder().linkToDeath(deathRecipient, 0);
            } catch (RemoteException e) {
                e.printStackTrace();
            }
            countDownLatch.countDown();
        }

        @Override
        public void onServiceDisconnected(ComponentName name) {

        }
    };

    @Override
    protected void onCreate(Bundle savedInstanceState) {
        super.onCreate(savedInstanceState);
        setContentView(R.layout.activity_main);


        btn_bind_service = findViewById(R.id.btn_bind_service);
        btn_bind_service.setOnClickListener(new View.OnClickListener() {
            @Override
            public void onClick(View v) {
                connectBinderPoolService();
            }
        });

    }

    private synchronized void connectBinderPoolService() {

        countDownLatch = new CountDownLatch(1);
        Intent intent = new Intent(Intent.ACTION_VIEW);
        String packageName = "com.ang.binderpoolservice";
        String className = "com.ang.binderpoolservice.BinderPoolService";
        intent.setClassName(packageName, className);
        bindService(intent, mConnection, MainActivity.BIND_AUTO_CREATE);

        Toast.makeText(MainActivity.this, "启动远程服务", Toast.LENGTH_LONG).show();
    }


    @Override
    protected void onDestroy() {
        super.onDestroy();
        unbindService(mConnection);
    }
}
注意:
bindService是异步操作;


