SpringBoot整合Mybatis最全教程
前言:自从Spring推出Boot,Cloud系列之后,一度成为热门的框架,现在大部分的招聘要求都要有相关的开发经验,借此我在这里就给大家分享一下如何玩转SpringBoot跟Mybatis。
源码地址:https://github.com/xiatengGG/SpringBoot-Mybatis
废话就不多说了,代码撸起来。
开发工具跟环境:IntelliJ IDEA ,JDK1.8,MySql数据库
所用技术:SpringBoot ,Mybatis,apache-maven-3.2.5,thymeleaf模板
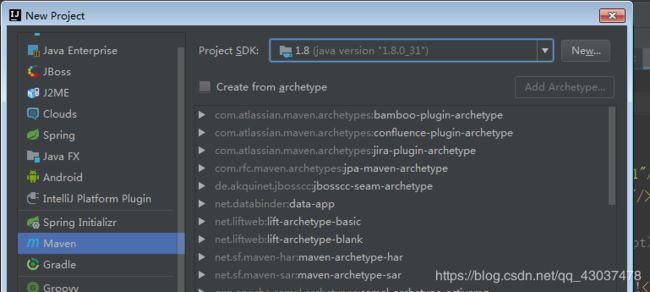
一、创建一个maven项目 File-->New-->Project
这里我们选择Maven,JDK1.8
然后填写项目坐标,这个自己命名,写好后Next-->Finish
二、编写pom.xml文件
        org.springframework.boot
        spring-boot-starter-parent
        2.0.0.RELEASE


            org.mybatis.spring.boot
            mybatis-spring-boot-starter
            1.3.1


            org.springframework.boot
            spring-boot-starter-thymeleaf


            org.springframework.boot
            spring-boot-starter-web


            com.yeepay.g3.yop
            yop-java-sdk
            3.1.3
            jdk17


            mysql
            mysql-connector-java


            org.springframework.boot
            spring-boot-starter-test


            org.mybatis.generator
         mybatis-generator-core
        1.3.6


                org.springframework.boot
                spring-boot-maven-plugin


                org.mybatis.generator
                mybatis-generator-maven-plugin
                1.3.3

                    true
                    true


                src/main/java

                    **/*.java


                src/main/resources

                    **/*.*
三、在resources下新建配置文件:applocation.yml
spring:
# 配置thymeleaf模板引擎
  thymeleaf:
    # 模板的字符集
    encoding: UTF-8
    # 使用的是什么类型模板
    mode: HTML5
    # 是否使用缓存,开发阶段最填false,方便使用ctrl+shift+F9 进行重新编译,无需重启服务
    cache: false
    #启动 MVC 对 thymeleaf 视图解析
    enabled: true
    # 在构建URL时附加到视图名称的后缀。就是我们用rest风格,不同加文件后缀名。自己加上去
    suffix: .html
    # 在构建URL时可以预览查看名称的前缀。就是路径在哪
    prefix: classpath:/templates/
    # 检查该模板是否存在
    check-template-location: true
    # 模板中内容的类型
    servlet:
      content-type: text/html

  datasource:
    url: jdbc:mysql://localhost:3306/mysql?useUnicode=true&characterEncoding=UTF-8&useSSL=false
    username: root
    password: 123456
    # 可省略驱动配置, sprin-boot 会由url检测出驱动类型
    # driver-class-name: com.mysql.jdbc.Driver
    hikari:
      connection-timeout: 60000
mybatis:
#mapper扫描地址
  mapperLocations: classpath:/com/xiateng/mapper/*.xml
  typeAliasesPackage: com.xiateng.entity
# spring-boot默认打印输出info级别以上的,可在此处修改输出级别
logging:
  level:
    root: info
四、创建Controller文件
package com.xiateng.controller.test;

import org.springframework.stereotype.Controller;
import org.springframework.web.bind.annotation.RequestMapping;
import org.springframework.web.bind.annotation.ResponseBody;

@Controller
public class TestController {

    @RequestMapping(value = "/index")
    @ResponseBody
    public String index(){
        return "Hello SpringBoot!";
    }
}
五、创建启动类Application.java
package com.xiateng;

import org.mybatis.spring.annotation.MapperScan;
import org.springframework.boot.SpringApplication;
import org.springframework.boot.autoconfigure.SpringBootApplication;
import org.springframework.context.annotation.ComponentScan;

@SpringBootApplication
@ComponentScan(basePackages = {"com.xiateng"})
@MapperScan("com.xiateng.dao")
public class Application{

    public static void main(String[] args) {
        SpringApplication.run(Application.class,args);
    }
}
点击main方法--》右键--》run Application
浏览器输入:http://localhost:8080/index 页面看到结果:
接下来我们从数据库查询数据返回前端页面
1.创建一个表:
CREATE TABLE `t_user` (
  `USER_ID` int(11) NOT NULL AUTO_INCREMENT,
  `USER_NAME` char(30) NOT NULL,
  `USER_PASSWORD` char(10) NOT NULL,
  `USER_EMAIL` char(30) NOT NULL,
  PRIMARY KEY (`USER_ID`),
  KEY `IDX_NAME` (`USER_NAME`)
);
2.创建实体类
package com.xiateng.entity;

public class TUser {
    private Integer userId;

    private String userName;

    private String userPassword;

    private String userEmail;

    public Integer getUserId() {
        return userId;
    }

    public void setUserId(Integer userId) {
        this.userId = userId;
    }

    public String getUserName() {
        return userName;
    }

    public void setUserName(String userName) {
        this.userName = userName == null ? null : userName.trim();
    }

    public String getUserPassword() {
        return userPassword;
    }

    public void setUserPassword(String userPassword) {
        this.userPassword = userPassword == null ? null : userPassword.trim();
    }

    public String getUserEmail() {
        return userEmail;
    }

    public void setUserEmail(String userEmail) {
        this.userEmail = userEmail == null ? null : userEmail.trim();
    }
}
3.创建一个dao方法
package com.xiateng.dao;

import com.xiateng.entity.TUser;
import org.apache.ibatis.annotations.Mapper;

import java.util.List;

@Mapper
public interface TUserMapper {
    int deleteByPrimaryKey(Integer userId);

    int insertSelective(TUser record);

    TUser selectByPrimaryKey(Integer userId);

    int updateByPrimaryKeySelective(TUser record);

    List selectByTUser(TUser record);
}
4.创建mapper.xml文件
USER_ID, USER_NAME, USER_PASSWORD, USER_EMAIL
delete from t_user
where USER_ID = #{userId,jdbcType=INTEGER}
insert into t_user
USER_ID,
USER_NAME,
USER_PASSWORD,
USER_EMAIL,
#{userId,jdbcType=INTEGER},
#{userName,jdbcType=CHAR},
#{userPassword,jdbcType=CHAR},
#{userEmail,jdbcType=CHAR},
update t_user
USER_NAME = #{userName,jdbcType=CHAR},
USER_PASSWORD = #{userPassword,jdbcType=CHAR},
USER_EMAIL = #{userEmail,jdbcType=CHAR},
where USER_ID = #{userId,jdbcType=INTEGER}
5.创建TUserService.java
package com.xiateng.service;

import com.xiateng.entity.TUser;

import java.util.List;

public interface TUserService {

    List selectByUserList(TUser example);

    int deleteByPrimaryKey(Integer userId);

    int insertSelective(TUser record);

    TUser selectByPrimaryKey(Integer userId);

    int updateByPrimaryKeySelective(TUser record);

    List selectByTUser(TUser record);
}
6.创建TUserServiceImpl.java
package com.xiateng.service.impl;

import com.xiateng.dao.TUserMapper;
import com.xiateng.entity.TUser;
import com.xiateng.service.TUserService;
import org.springframework.beans.factory.annotation.Autowired;
import org.springframework.stereotype.Service;

import java.util.List;

@Service
public class TUserServiceImpl implements TUserService{
    @Autowired
    private TUserMapper tUserMapper;

    @Override
    public List selectByUserList(TUser example) {
        return null;
    }

    @Override
    public int deleteByPrimaryKey(Integer userId) {
        return tUserMapper.deleteByPrimaryKey(userId);
    }

    @Override
    public int insertSelective(TUser record) {
        return tUserMapper.insertSelective(record);
    }

    @Override
    public TUser selectByPrimaryKey(Integer userId) {
        return tUserMapper.selectByPrimaryKey(userId);
    }

    @Override
    public int updateByPrimaryKeySelective(TUser record) {
        return tUserMapper.updateByPrimaryKeySelective(record);
    }

    @Override
    public List selectByTUser(TUser record) {
        return tUserMapper.selectByTUser(record);
    }
}
7.创建Controller类
package com.xiateng.controller.test;

import com.xiateng.entity.TUser;
import com.xiateng.service.TUserService;
import org.springframework.beans.factory.annotation.Autowired;
import org.springframework.stereotype.Controller;
import org.springframework.ui.Model;
import org.springframework.web.bind.annotation.RequestMapping;

import java.util.HashMap;
import java.util.Map;

@Controller
@RequestMapping("/user")
public class StarterController {

    @Autowired
    private TUserService tUserService;

    @RequestMapping(value = "/detail")
    public String index(Model model){
        Map map = new HashMap<>();
        TUser tUser = tUserService.selectByPrimaryKey(1);
        model.addAttribute("tUsers",tUser);
        return "index";
    }
}
8.创建html文件index.html
Hello !
访问地址:http://localhost:8080/user/detail


