使用vue-router页面跳转
单页应用的优缺点
每种技术都有其利弊,单页应用也是如此。
- 无刷新体验,这个应该是最显著的有点,由于路由分发直接在浏览器端完成,页面是不刷新,对用户的响应非常及时,因此提升了用户体验;
- 完全的前端组件化,前端开发不再以页面为单位,更多地采用组件化的思想,代码结构和组织方式更加规范化,便于修改和调整;
- API 共享,如果你的服务是多端的(浏览器端、Android、iOS、微信等),单页应用的模式便于你在多个端共用 API,可以显著减少服务端的工作量。容易变化的 UI 部分都已经前置到了多端,只受到业务数据模型影响的 API,更容易稳定下来,便于提供鲁棒的服务;
- 组件共享,在某些对性能体验要求不高的场景,或者产品处于快速试错阶段,借助于一些技术(Hybrid、React Native),可以在多端共享组件,便于产品的快速迭代,节约资源。
缺点:
- 首次加载大量资源,要在一个页面上为用户提供产品的所有功能,在这个页面加载的时候,首先要加载大量的静态资源,这个加载时间相对比较长;
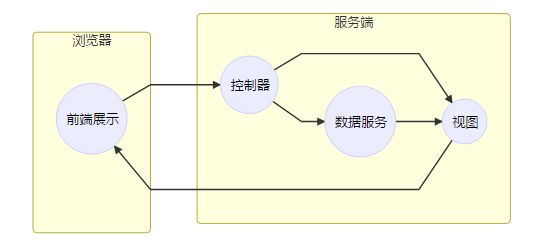
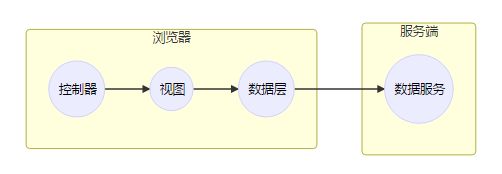
- 较高的前端开发门槛,MVC 前置,对前端工程师的要求提高了,不再是『切切图,画画页面这么简单』;同时工作量也会增加数倍,开发这类应用前端工程师的数量往往多于后端;
- 不利于 SEO,单页页面,数据在前端渲染,就意味着没有 SEO,或者需要使用变通的方案。
使用vue-router构建单页应用
vue-router.js是Vue.js官方的路由插件用于构建单页面应用。
vue的单页应用是基于路由和组件的。传统的页面应用,是用一些超链接来实现页面切换和跳转的。在vue-router单面应用中,则是路径之间的切换,也就是组件的切换。
先来看一下官方提供的最简单的例子:示例
HTML
<script src="https://unpkg.com/vue/dist/vue.js">script>
<script src="https://unpkg.com/vue-router/dist/vue-router.js">script>

<div id="app">
    <h1>Hello App!h1>
    <p>


        <router-link to="/foo">Go to Foorouter-link>
        <router-link to="/bar">Go to Barrouter-link>
    p>


    <router-view>router-view>
div>- router-link标签:跳转的链接,to=""是必须的属性,双引号中的内容是我们接下来在JS文件中定义的路由path。
- router-view标签:展示我们匹配到的组件的区域。
JavaScript
// 0. 如果使用模块化机制编程,导入Vue和VueRouter,要调用 Vue.use(VueRouter)

// 1. 定义(路由)组件。
// 也可以从其他文件 import 进来
const Foo = { template: 'foo' }
const Bar = { template: 'bar' }

// 2. 定义路由
// 每个路由应该映射一个组件。 其中"component" 可以是
// 通过 Vue.extend() 创建的组件构造器,
// 或者,只是一个组件配置对象。
const routes = [
    { path: '/foo', component: Foo },
    { path: '/bar', component: Bar }
]

// 3. 创建 router 实例,然后传 `routes` 配置
// 你还可以传别的配置参数, 不过先这么简单着吧。
const router = new VueRouter({
    routes // (缩写)相当于 routes: routes
})

// 4. 创建和挂载根实例。
// 记得要通过 router 配置参数注入路由,
// 从而让整个应用都有路由功能
const app = new Vue({
    router
}).$mount('#app')

// 现在,应用已经启动了!
JavaScript文件主要做的事情是:
- 定义路由列表,即routes。
- 创建router实例及router配置,即router。
- 创建和挂载根实例。
以上只是教我们用最简单的方法使用vue-router。但实际开发过程中,首先我们的vue组件显然不会只有一个template模板这么简单,会用到vue的单文件组件;
其次我们通常会希望
既然是单页应用(SPA),那么整个项目有以下三个文件是必要的:
- 一个html文件:index.html
- 一个webpack打包时的入口js文件:main.js
- 一个根vue组件,作为其他组件的挂载点:app.vue
接下来 我们就创建两个自定义组件:index.vue和hello.vue。我们希望的结果是他们之间互相跳转。
我们利用官方提供的脚手架vue-cli工具生成简单的一个基于webpack打包的vue项目
准备工作:
npm install webpack -g
npm install vue-cli -g
//打开要创建的项目路径目录,创建项目
vue init webpack-simple <项目名>
cd <项目名>
npm install vue-router --save
npm run dev
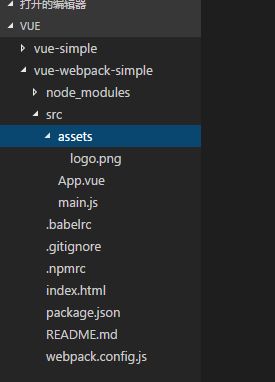
生成的vue项目如下图:
一、使用路由
- 首先在目录下创建components文件夹,然后再创建index.vue和hello.vue文件
//index.vue
<template>
 <div>
     <h2>Indexh2>
     <hr>
     <p>{{sContent}}p>
 div>
template>
<script>
 export default{
     data(){
         return {
             sContent:"This is index components"
         }
     }
 }
script>
//hello.vue <template> <div> <h2>Hello Vue.jsh2> <hr/> <p>{{sContent}}p> div> template> <script> export default{ data(){ return { sContent:"This is hello components" } } } script> - 修改main.js文件
//引入并安装vue-router插件 import Vue from 'vue'; import VueRouter from 'vue-router'; Vue.use(VueRouter); //引入index.vue和hello.vue组件 import App from './App.vue'; import index from './components/index.vue'; import hello from './components/hello.vue'; //定义路由 const routes = [ {path:'/',component:App}, { path: '/index', component: index }, { path: '/hello', component: hello } ] //创建 router 实例,然后传 routes 配置 const router=new VueRouter({ routes }); //创建和挂载根实例。通过 router 配置参数注入路由,从而让整个应用都有路由功能 new Vue({ el:"#app", router }); - 修改App.vue
<template> <div>  <h1>{{msg}}h1> <ul> <router-link to='/index' tag='li'><a href="/index">Indexa>router-link> <router-link to='/hello' tag='li'><a href="/hello">Helloa>router-link> ul> div> template> - 修改index.html
<html lang="en">
<head>
 <meta charset="utf-8">
 <title>vue-webpack-simpletitle>
head>
<body>
 <div id="app">
     <router-view>router-view>
 div>
 <script src="/dist/build.js">script>
body>
html>
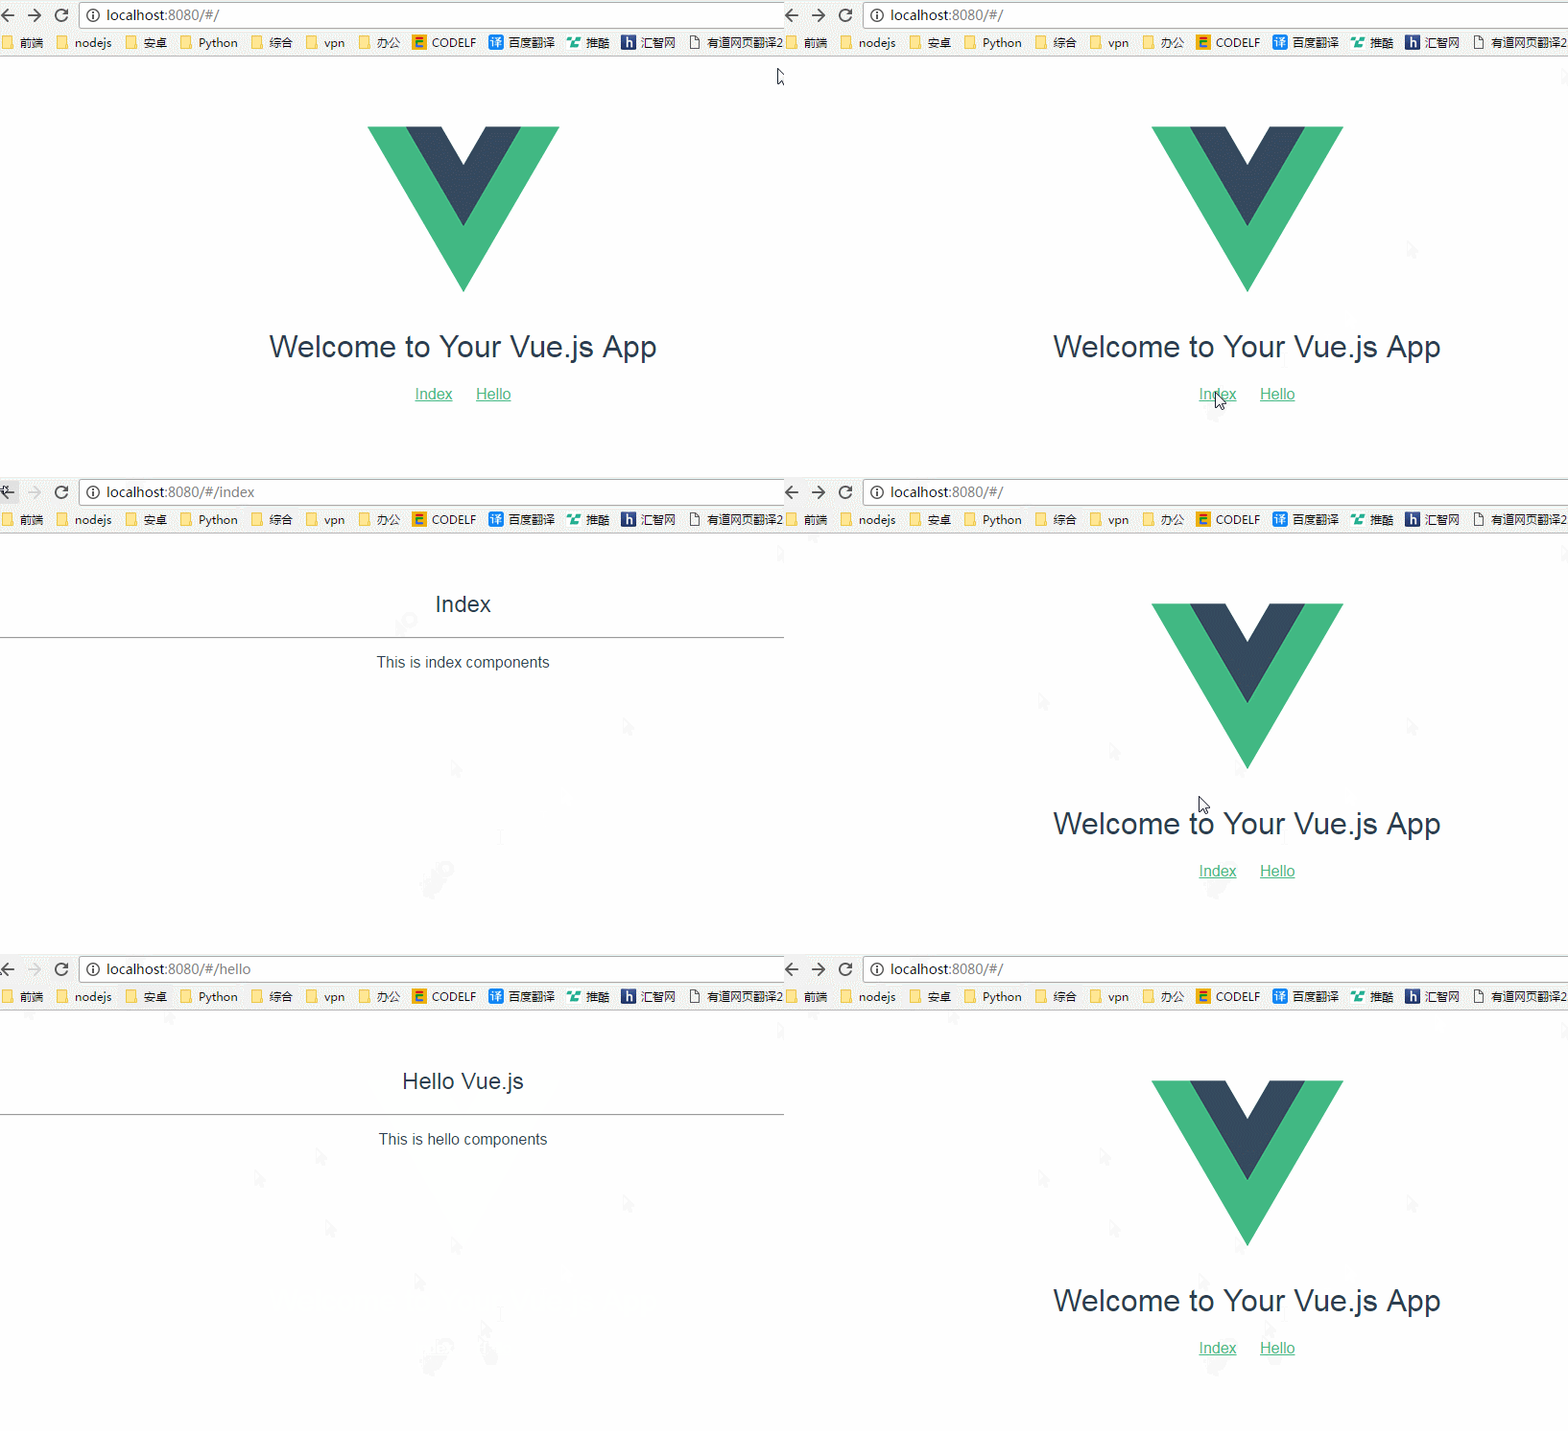
修改后运行的效果如下:
二、重定向 redirect
const routes = [
    { path: '/', redirect: '/index'},     // 这样进/ 就会跳转到/index
    { path: '/index', component: index }
]
三、嵌套路由
const routes = [
{ path: '/index', component: index,
children: [
{ path: 'info', component: {template:'This is info component
'}}
]
}
]四、命名路由
const routes = [
    { path: '/index', component: index,
      name:'index'
    }
] 五、标签属性
//to属性 string|object

<router-link to="home">Homerouter-link>

<a href="home">Homea>


<router-link v-bind:to="'home'">Homerouter-link>

<router-link :to="{ path: 'home' }">Homerouter-link>


<router-link :to="{ name: 'user', params: { userId: 123 }}">Userrouter-link>


<router-link :to="{ path: 'register', query: { plan: 'private' }}">Registerrouter-link>

//replace属性 true|false 不留下 history 记录。
<router-link to="home" replace>Homerouter-link>

//append属性 true|false 追加路径
<router-link to="home" append >Homerouter-link>

//tag属性 string 设置渲染标签
<router-link to="/foo" tag="li">foorouter-link>

<li>fooli>

//active-class 属性 string 激活时使用的 CSS 类名
五、路由信息对象
- $route.path
字符串,对应当前路由的路径,总是解析为绝对路径,如 "/foo/bar"。 - $route.params
一个 key/value 对象,包含了 动态片段 和 全匹配片段,如果没有路由参数,就是一个空对象。 - $route.query
一个 key/value 对象,表示 URL 查询参数。例如,对于路径 /foo?user=1,则有 $route.query.user == 1,如果没有查询参数,则是个空对象。 - $route.hash
当前路由的 hash 值 (不带 #) ,如果没有 hash 值,则为空字符串。 - $route.fullPath
完成解析后的 URL,包含查询参数和 hash 的完整路径。 - $route.matched
一个数组,包含当前路由的所有嵌套路径片段的 路由记录 。路由记录就是 routes 配置数组中的对象副本(还有在 children 数组)。
以上遍是vue-router基本使用方式了
更详细的vue-router功能请参考文档:https://router.vuejs.org/zh-cn/
单页应用的优缺点
每种技术都有其利弊,单页应用也是如此。
- 无刷新体验,这个应该是最显著的有点,由于路由分发直接在浏览器端完成,页面是不刷新,对用户的响应非常及时,因此提升了用户体验;
- 完全的前端组件化,前端开发不再以页面为单位,更多地采用组件化的思想,代码结构和组织方式更加规范化,便于修改和调整;
- API 共享,如果你的服务是多端的(浏览器端、Android、iOS、微信等),单页应用的模式便于你在多个端共用 API,可以显著减少服务端的工作量。容易变化的 UI 部分都已经前置到了多端,只受到业务数据模型影响的 API,更容易稳定下来,便于提供鲁棒的服务;
- 组件共享,在某些对性能体验要求不高的场景,或者产品处于快速试错阶段,借助于一些技术(Hybrid、React Native),可以在多端共享组件,便于产品的快速迭代,节约资源。
缺点:
- 首次加载大量资源,要在一个页面上为用户提供产品的所有功能,在这个页面加载的时候,首先要加载大量的静态资源,这个加载时间相对比较长;
- 较高的前端开发门槛,MVC 前置,对前端工程师的要求提高了,不再是『切切图,画画页面这么简单』;同时工作量也会增加数倍,开发这类应用前端工程师的数量往往多于后端;
- 不利于 SEO,单页页面,数据在前端渲染,就意味着没有 SEO,或者需要使用变通的方案。
使用vue-router构建单页应用
vue-router.js是Vue.js官方的路由插件用于构建单页面应用。
vue的单页应用是基于路由和组件的。传统的页面应用,是用一些超链接来实现页面切换和跳转的。在vue-router单面应用中,则是路径之间的切换,也就是组件的切换。
先来看一下官方提供的最简单的例子:示例
HTML
<script src="https://unpkg.com/vue/dist/vue.js">script>
<script src="https://unpkg.com/vue-router/dist/vue-router.js">script>

<div id="app">
    <h1>Hello App!h1>
    <p>


        <router-link to="/foo">Go to Foorouter-link>
        <router-link to="/bar">Go to Barrouter-link>
    p>


    <router-view>router-view>
div>- router-link标签:跳转的链接,to=""是必须的属性,双引号中的内容是我们接下来在JS文件中定义的路由path。
- router-view标签:展示我们匹配到的组件的区域。
JavaScript
// 0. 如果使用模块化机制编程,导入Vue和VueRouter,要调用 Vue.use(VueRouter)

// 1. 定义(路由)组件。
// 也可以从其他文件 import 进来
const Foo = { template: 'foo' }
const Bar = { template: 'bar' }

// 2. 定义路由
// 每个路由应该映射一个组件。 其中"component" 可以是
// 通过 Vue.extend() 创建的组件构造器,
// 或者,只是一个组件配置对象。
const routes = [
    { path: '/foo', component: Foo },
    { path: '/bar', component: Bar }
]

// 3. 创建 router 实例,然后传 `routes` 配置
// 你还可以传别的配置参数, 不过先这么简单着吧。
const router = new VueRouter({
    routes // (缩写)相当于 routes: routes
})

// 4. 创建和挂载根实例。
// 记得要通过 router 配置参数注入路由,
// 从而让整个应用都有路由功能
const app = new Vue({
    router
}).$mount('#app')

// 现在,应用已经启动了!
JavaScript文件主要做的事情是:
- 定义路由列表,即routes。
- 创建router实例及router配置,即router。
- 创建和挂载根实例。
以上只是教我们用最简单的方法使用vue-router。但实际开发过程中,首先我们的vue组件显然不会只有一个template模板这么简单,会用到vue的单文件组件;
其次我们通常会希望
既然是单页应用(SPA),那么整个项目有以下三个文件是必要的:
- 一个html文件:index.html
- 一个webpack打包时的入口js文件:main.js
- 一个根vue组件,作为其他组件的挂载点:app.vue
接下来 我们就创建两个自定义组件:index.vue和hello.vue。我们希望的结果是他们之间互相跳转。
我们利用官方提供的脚手架vue-cli工具生成简单的一个基于webpack打包的vue项目
准备工作:
npm install webpack -g
npm install vue-cli -g
//打开要创建的项目路径目录,创建项目
vue init webpack-simple <项目名>
cd <项目名>
npm install vue-router --save
npm run dev
生成的vue项目如下图:
一、使用路由
- 首先在目录下创建components文件夹,然后再创建index.vue和hello.vue文件
//index.vue
<template>
 <div>
     <h2>Indexh2>
     <hr>
     <p>{{sContent}}p>
 div>
template>
<script>
 export default{
     data(){
         return {
             sContent:"This is index components"
         }
     }
 }
script>
//hello.vue <template> <div> <h2>Hello Vue.jsh2> <hr/> <p>{{sContent}}p> div> template> <script> export default{ data(){ return { sContent:"This is hello components" } } } script> - 修改main.js文件
//引入并安装vue-router插件 import Vue from 'vue'; import VueRouter from 'vue-router'; Vue.use(VueRouter); //引入index.vue和hello.vue组件 import App from './App.vue'; import index from './components/index.vue'; import hello from './components/hello.vue'; //定义路由 const routes = [ {path:'/',component:App}, { path: '/index', component: index }, { path: '/hello', component: hello } ] //创建 router 实例,然后传 routes 配置 const router=new VueRouter({ routes }); //创建和挂载根实例。通过 router 配置参数注入路由,从而让整个应用都有路由功能 new Vue({ el:"#app", router }); - 修改App.vue
<template> <div>  <h1>{{msg}}h1> <ul> <router-link to='/index' tag='li'><a href="/index">Indexa>router-link> <router-link to='/hello' tag='li'><a href="/hello">Helloa>router-link> ul> div> template> - 修改index.html
<html lang="en">
<head>
 <meta charset="utf-8">
 <title>vue-webpack-simpletitle>
head>
<body>
 <div id="app">
     <router-view>router-view>
 div>
 <script src="/dist/build.js">script>
body>
html>
修改后运行的效果如下:
二、重定向 redirect
const routes = [
    { path: '/', redirect: '/index'},     // 这样进/ 就会跳转到/index
    { path: '/index', component: index }
]
三、嵌套路由
const routes = [
{ path: '/index', component: index,
children: [
{ path: 'info', component: {template:'This is info component
'}}
]
}
]四、命名路由
const routes = [
    { path: '/index', component: index,
      name:'index'
    }
] 五、标签属性
//to属性 string|object

<router-link to="home">Homerouter-link>

<a href="home">Homea>


<router-link v-bind:to="'home'">Homerouter-link>

<router-link :to="{ path: 'home' }">Homerouter-link>


<router-link :to="{ name: 'user', params: { userId: 123 }}">Userrouter-link>


<router-link :to="{ path: 'register', query: { plan: 'private' }}">Registerrouter-link>

//replace属性 true|false 不留下 history 记录。
<router-link to="home" replace>Homerouter-link>

//append属性 true|false 追加路径
<router-link to="home" append >Homerouter-link>

//tag属性 string 设置渲染标签
<router-link to="/foo" tag="li">foorouter-link>

<li>fooli>

//active-class 属性 string 激活时使用的 CSS 类名
五、路由信息对象
- $route.path
字符串,对应当前路由的路径,总是解析为绝对路径,如 "/foo/bar"。 - $route.params
一个 key/value 对象,包含了 动态片段 和 全匹配片段,如果没有路由参数,就是一个空对象。 - $route.query
一个 key/value 对象,表示 URL 查询参数。例如,对于路径 /foo?user=1,则有 $route.query.user == 1,如果没有查询参数,则是个空对象。 - $route.hash
当前路由的 hash 值 (不带 #) ,如果没有 hash 值,则为空字符串。 - $route.fullPath
完成解析后的 URL,包含查询参数和 hash 的完整路径。 - $route.matched
一个数组,包含当前路由的所有嵌套路径片段的 路由记录 。路由记录就是 routes 配置数组中的对象副本(还有在 children 数组)。
以上遍是vue-router基本使用方式了
更详细的vue-router功能请参考文档:https://router.vuejs.org/zh-cn/


