SpringBoot2.x系列教程41--整合使用JdbcTemplate
SpringBoot2.x系列教程41--整合使用JdbcTemplate
作者:一一哥
我在上一章节中,重点讲解了Spring中关于DataSource的一些理论知识点,接下来本章节我主要是带大家学习JdbcTemplate的使用。
一. JdbcTemplate
1. JdbcTemplate简介
JDBC虽然能够满足大部分用户最基本的需求,但是在使用JDBC时,必须自己来管理数据库的资源,如获取PreparedStatement,设置SQL语句参数,关闭连接等操作,使用起来非常的麻烦。
所以为了简化对JDBC的操作,Spring为数据库JDBC做了深层次的封装。它利用DI注入功能,把DataSource注入到了JdbcTemplate之中,从而得到了JdbcTemplate操作模板类。JdbcTemplate的出现,使得JDBC的操作更加简单易用。
2. JdbcTemplate的作用
JdbcTemplate可以帮助我们处理资源的建立和释放,运行核心的JDBC工作流,如Statement的建立和执行,而我们只需要提供SQL语句和提取结果;并且也可以使我们避免一些常见的错误,比如忘记关闭数据库连接。
3. JdbcTemplate依赖包介绍
JdbcTemplate位于spring-jdbc-xxx.jar包中,其全限定命名为org.springframework.jdbc.core.JdbcTemplate。要使用JdbcTemplate还需一个spring-tx-xxx.jar依赖包,该包包含了事务和异常控制。
4. JdbcTemplate主要提供以下五类方法:
- execute方法:可以用于执行任何SQL语句,一般用于执行DDL语句;
- update方法及batchUpdate方法:update方法用于执行INSERT、UPDATE、DELETE等DML语句;batchUpdate方法用于执行批处理相关语句;
- query方法及queryForXXX方法:用于执行DQL查询相关语句;
- call方法:用于执行存储过程、函数相关语句。
5. JdbcTemplate使用步骤
- 导入数据库相关依赖包,比如jpa或者jdbc;
- 获取所需的某个DataSource数据源连接池对象;
- 创建JdbcTemplate对象,传入到连接池中;
- 调用execute、update、queryXxx等方法。
二. Spring Boot中整合JdbcTemplate
1. 准备工作
- SpringBoot 2.x
- jdk 1.8
- maven 3.0
- ideal
- mysql
2. 创建一个web项目(略)
将该项目改造成spring-boot项目,具体过程请参考我之前关于spring-boot项目创建的章节。
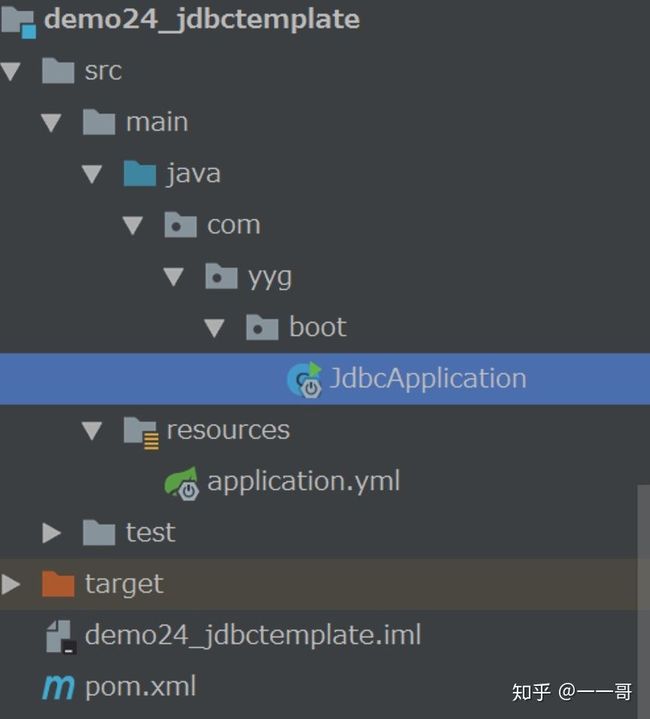
项目结构:
3. pom.xml文件中添加依赖
    org.springframework.boot
    spring-boot-starter-jdbc


   mysql
   mysql-connector-java


   com.alibaba
   druid
   1.1.10
4. 添加application.yml配置信息
spring:
  datasource:
    url: jdbc:mysql://127.0.0.1:3306/db5?useUnicode=true&characterEncoding=utf8&serverTimezone=UTC&useSSL=true
    username: root
    password: syc
    driver-class-name: com.mysql.cj.jdbc.Driver #mysql6.0之后推荐使用这个驱动包
注意:
- mysql-connector-java版本6.0以前使用的是com.mysql.jdbc.Driver;
- 6.0以后的使用com.mysql.cj.jdbc.Driver
5. 创建数据库配置
下面是第一种数据源配置方式。
package com.yyg.boot.config;

import com.alibaba.druid.pool.DruidDataSource;
import org.springframework.beans.factory.annotation.Autowired;
import org.springframework.context.annotation.Bean;
import org.springframework.context.annotation.ComponentScan;
import org.springframework.context.annotation.Configuration;
import org.springframework.core.env.Environment;

import javax.sql.DataSource;

/**
 * @Author 一一哥Sun
 * @Date Created in 2020/3/30
 * @Description 第一种配置方式
 */
@ComponentScan
@Configuration
public class DbConfig {

    @Autowired
    private Environment env;

    @Bean
    public DataSource getDataSource() {
        DruidDataSource dataSource = new DruidDataSource();
        dataSource.setUrl(env.getProperty("spring.datasource.url"));
        dataSource.setUsername(env.getProperty("spring.datasource.username"));
        dataSource.setPassword(env.getProperty("spring.datasource.password"));
        return dataSource;
    }

}
也可以采用第二种配置方式:
package com.yyg.boot.config;

import com.alibaba.druid.pool.DruidDataSource;
import lombok.Data;
import org.springframework.boot.context.properties.ConfigurationProperties;
import org.springframework.context.annotation.Bean;
import org.springframework.context.annotation.ComponentScan;
import org.springframework.context.annotation.Configuration;

import javax.sql.DataSource;

/**
 * @Author 一一哥Sun
 * @Date Created in 2020/3/30
 * @Description 第二种配置数据源的方式
 */
@Data
@ComponentScan
@Configuration
@ConfigurationProperties(prefix="spring.datasource")
public class SecondDbConfig {

    private String url;
    private String username;
    private String password;

    @Bean
    public DataSource getDataSource() {
        DruidDataSource dataSource = new DruidDataSource();
        dataSource.setUrl(url);
        dataSource.setUsername(username);
        dataSource.setPassword(password);
        return dataSource;
    }

}
6. 创建Users实体类
package com.yyg.boot.domain;

import lombok.Data;
import lombok.ToString;

/**
 * @Author 一一哥Sun
 * @Date Created in 2020/3/30
 * @Description Description
 */
@Data
@ToString
public class Users {

    private Integer id;

    private String username;

    private String password;

}
7. 创建Dao层代码
7.1 dao层的IUserDao接口
package com.yyg.boot.dao;

import com.yyg.boot.domain.Users;

import java.util.List;

/**
 * @Author 一一哥Sun
 * @Date Created in 2020/3/30
 * @Description Description
 */
public interface IUserDao {

    int add(Users student);

    int update(Users student);

    int delete(int id);

    Users findUserById(int id);

    List findUserList();

}
7.2 dao层的UserDaoImpl接口实现
package com.yyg.boot.dao.impl;

import com.yyg.boot.dao.IUserDao;
import com.yyg.boot.domain.Users;
import org.springframework.beans.factory.annotation.Autowired;
import org.springframework.jdbc.core.BeanPropertyRowMapper;
import org.springframework.jdbc.core.JdbcTemplate;
import org.springframework.stereotype.Repository;

import java.util.List;

/**
 * @Author 一一哥Sun
 * @Date Created in 2020/3/30
 * @Description Description
 */
@Repository
public class UserDaoImpl implements IUserDao {

    @Autowired
    private JdbcTemplate jdbcTemplate;

    @Override
    public int add(Users user) {
        return jdbcTemplate.update("insert into users(username, password) values(?, ?)",
                user.getUsername(),user.getPassword());
    }

    @Override
    public int update(Users user) {
        return jdbcTemplate.update("UPDATE  users SET username=? ,password=? WHERE id=?",
                user.getUsername(),user.getPassword(),user.getId());
    }

    @Override
    public int delete(int id) {
        return jdbcTemplate.update("DELETE from TABLE users where id=?",id);
    }

    @Override
    public Users findUserById(int id) {
        // BeanPropertyRowMapper 使获取的 List 结果列表的数据库字段和实体类自动对应
        List list = jdbcTemplate.query("select * from users where id = ?", new Object[]{id}, new BeanPropertyRowMapper(Users.class));
        return list.size()>0?list.get(0):null;
    }

    @Override
    public List findUserList() {
        // 使用Spring的JdbcTemplate查询数据库,获取List结果列表,数据库表字段和实体类自动对应,可以使用BeanPropertyRowMapper
        List list = jdbcTemplate.query("select * from users", new Object[]{}, new BeanPropertyRowMapper(Users.class));
        return list.size()>0?list:null;
    }

}
8. 创建Service层代码
8.1 创建service层的IUserService接口
package com.yyg.boot.service;

import com.yyg.boot.domain.Users;

import java.util.List;

/**
 * @Author 一一哥Sun
 * @Date Created in 2020/3/30
 * @Description Description
 */
public interface IUserService {

    int add(Users user);

    int update(Users user);

    int delete(int id);

    Users findUserById(int id);

    List findUserList();

}
8.2 创建service层的UserServiceImpl接口实现
package com.yyg.boot.service.impl;

import com.yyg.boot.dao.IUserDao;
import com.yyg.boot.domain.Users;
import com.yyg.boot.service.IUserService;
import org.springframework.beans.factory.annotation.Autowired;
import org.springframework.stereotype.Service;

import java.util.List;

/**
 * @Author 一一哥Sun
 * @Date Created in 2020/3/30
 * @Description Description
 */
@Service
public class UserServiceImpl implements IUserService {

    @Autowired
    private IUserDao userDao;

    @Override
    public int add(Users user) {
        return userDao.add(user);
    }

    @Override
    public int update(Users user) {
        return userDao.update(user);
    }

    @Override
    public int delete(int id) {
        return userDao.delete(id);
    }

    @Override
    public Users findUserById(int id) {
        return userDao.findUserById(id);
    }

    @Override
    public List findUserList() {
        return userDao.findUserList();
    }

}
9. 创建Web层的Controller
package com.yyg.boot.web;

import com.yyg.boot.domain.Users;
import com.yyg.boot.service.IUserService;
import org.springframework.beans.factory.annotation.Autowired;
import org.springframework.web.bind.annotation.*;

import java.util.List;

/**
 * @Author 一一哥Sun
 * @Date Created in 2020/3/30
 * @Description Description
 */
@RestController
@RequestMapping("/user")
public class UserController {

    @Autowired
    private IUserService iUserService;

    @PostMapping("")
    public int addUser(@RequestBody Users user){
        return iUserService.add(user);
    }

    @PutMapping("/{id}")
    public String updateUser(@PathVariable Integer id, @RequestBody Users user){
        Users oldUser = new Users();
        oldUser.setId(id);
        oldUser.setUsername(user.getUsername());
        oldUser.setPassword(user.getPassword());
        int t = iUserService.update(oldUser);
        if (t == 1){
            return user.toString();
        }else {
            return "更新学生信息错误";
        }
    }

    @GetMapping("/{id}")
    public Users findUserById(@PathVariable Integer id){
        return iUserService.findUserById(id);
    }

    @GetMapping("/list")
    public List findUserList(){
        return iUserService.findUserList();
    }

    @DeleteMapping("/{id}")
    public int deleteUserById(@PathVariable Integer id){
        return iUserService.delete(id);
    }

}
10. 创建启动类
package com.yyg.boot;

import org.springframework.boot.SpringApplication;
import org.springframework.boot.autoconfigure.SpringBootApplication;

/**
 * @Author 一一哥Sun
 * @Date Created in 2020/3/30
 * @Description Description
 */
@SpringBootApplication
public class JdbcApplication {

    public static void main(String[] args){
        SpringApplication.run(JdbcApplication.class,args);
    }

}
11. 完整项目结构
12. 接口测试
在浏览器或者postman中测试我们刚才创建的接口。
其他接口不一一测试,都可以正常使用!


