【Flink博客阅读】 Flink 作业执行深度解析(WordCount) 读后实战总结
Flink 作业执行解析
所有有关Flink作业执行的介绍都包含以下的这个流程,今天我们就是实战一些这些转换是如何完成的?
StreamGraphClass representing the streaming topology. It contains all the information necessary to build the jobgraph for the execution. 这个类表示流处理的拓扑结构,包含构造JobGraph的所有信息,从而满足任务执行。JobGraph:JobGraph代表Flink的dataflow程序,处于JobManager接受的底层。来自更高级别API的所有程序都将转换为JobGraphs。在此之前,都是在client里面进行运行的。并且可以根据ExplainPlan获取执行计划ExecutionGraph:ExecutionGraph是JobGraph的并行化版本,是调度层(Schduler)最核心的数据结构。- 物理执行计划
- StreamGraph: 流处理节点拓扑图

- JobGraph: Flink的数据流图。
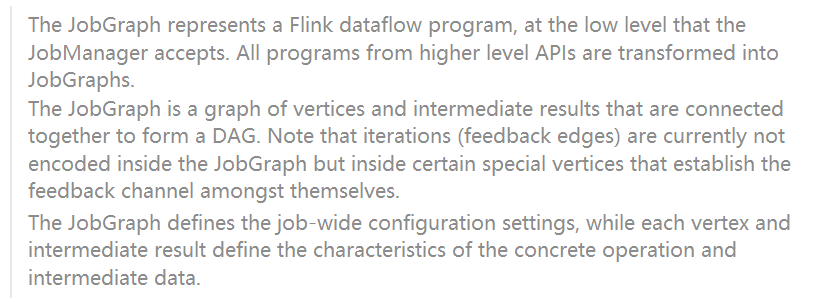
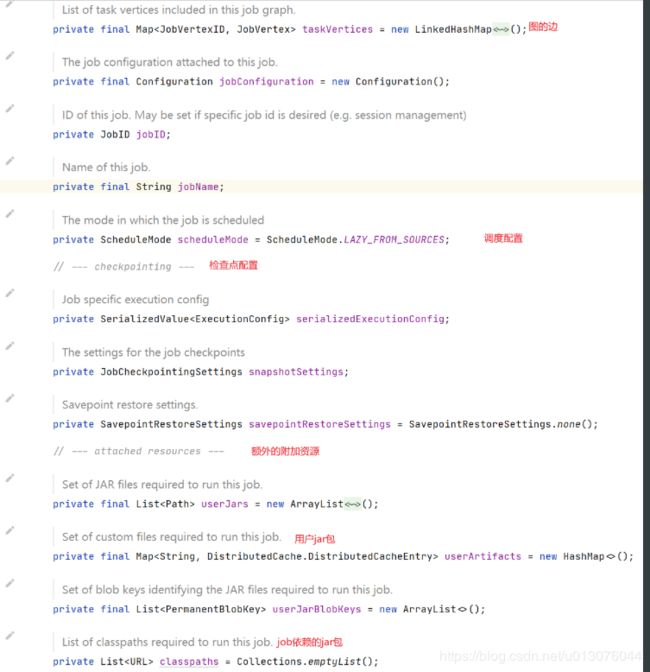
- JobGraph 属性
-
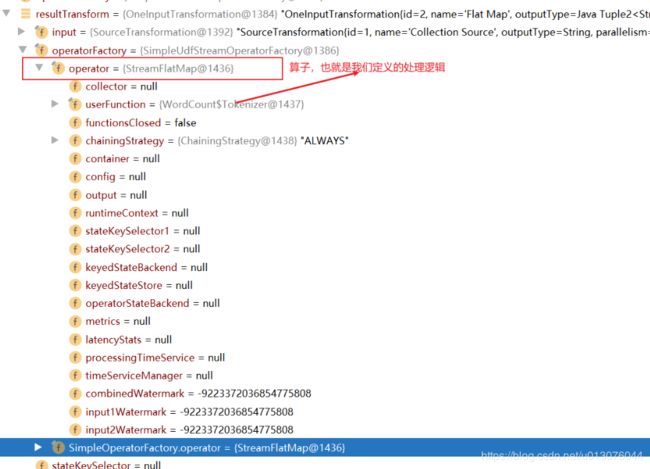
Operator : 算子,理解为function定义。
-
Transformation: 转换,包含输入、算子、与输出,理解为一个完整的流程,function runtime。
示例程序
flink-examples-streaming工程下面的org.apache.flink.streaming.examples.wordcount.WordCount
public static void main(String[] args) throws Exception {

		// Checking input parameters
		final MultipleParameterTool params = MultipleParameterTool.fromArgs(args);

		// set up the execution environment
		final StreamExecutionEnvironment env = StreamExecutionEnvironment.getExecutionEnvironment();

		// make parameters available in the web interface
		env.getConfig().setGlobalJobParameters(params);

		// get input data
		DataStream<String> text = null;
		if (params.has("input")) {
			// union all the inputs from text files
			for (String input : params.getMultiParameterRequired("input")) {
				if (text == null) {
					text = env.readTextFile(input);
				} else {
					text = text.union(env.readTextFile(input));
				}
			}
			Preconditions.checkNotNull(text, "Input DataStream should not be null.");
		} else {
			System.out.println("Executing WordCount example with default input data set.");
			System.out.println("Use --input to specify file input.");
			// get default test text data
			text = env.fromElements(WordCountData.WORDS);
		}

		DataStream<Tuple2<String, Integer>> counts =
			// split up the lines in pairs (2-tuples) containing: (word,1)
			text.flatMap(new Tokenizer())
			// group by the tuple field "0" and sum up tuple field "1"
			.keyBy(0).sum(1);

		// emit result
		if (params.has("output")) {
			counts.writeAsText(params.get("output"));
		} else {
			System.out.println("Printing result to stdout. Use --output to specify output path.");
			counts.print();
		}
		// execute program
		env.execute("Streaming WordCount");
	}
Flink Client
WordCount程序
text = env.fromElements(WordCountData.WORDS);

DataStream> counts =
			// split up the lines in pairs (2-tuples) containing: (word,1)
			text.flatMap(new Tokenizer())
			// group by the tuple field "0" and sum up tuple field "1"
			.keyBy(0).sum(1);
初始化
初始化是之前当前程序的定义,主要是整个数据流的定义元数据收集
Source

FlatMap
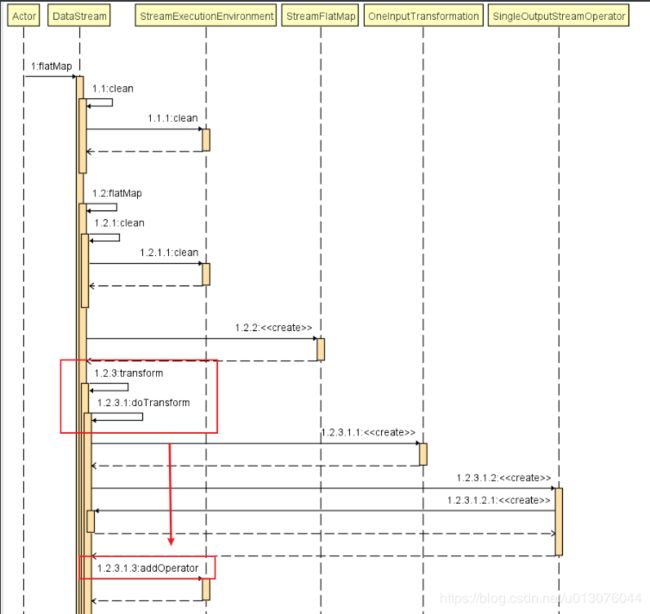
- (1) 首先调用DataStream的FlatMap方法 => transform 方法
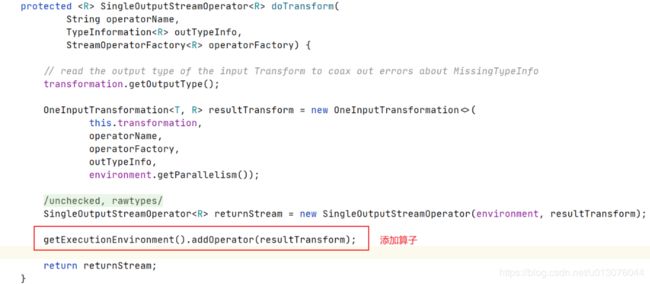
DataStream#doTransform
-
(2)创建Transformation(包含输入实例、算子 、输出)
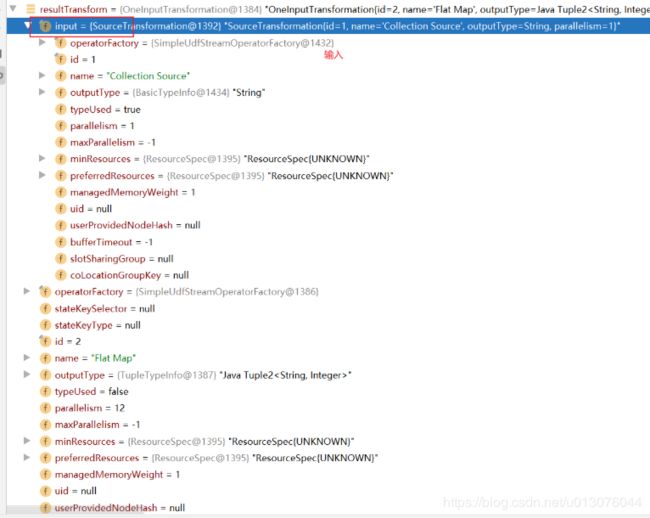
-
(3)创建结果流

-
(4)添加算子到当前上下文
public void addOperator(Transformation transformation) { Preconditions.checkNotNull(transformation, "transformation must not be null."); this.transformations.add(transformation); } -
(5)返回结果流
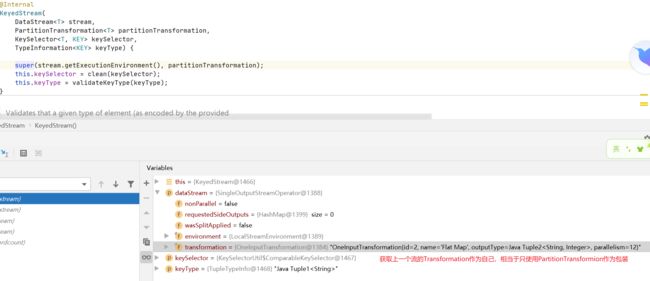
keyBy
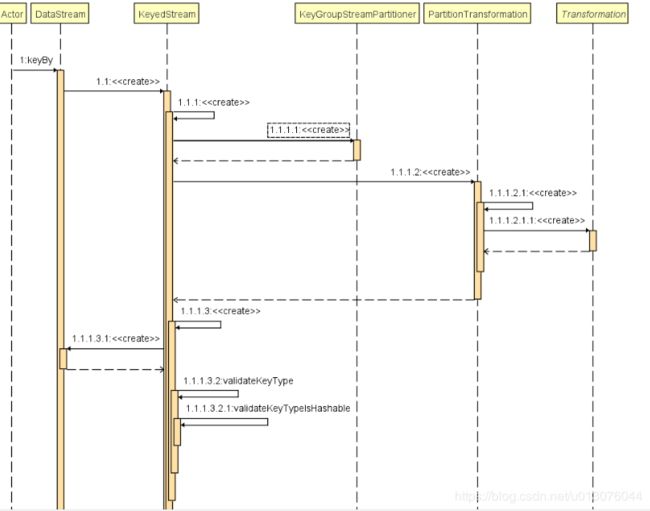
-
创建一个KeyStream 返回
sum
sum还是在当前的dataStream流上面。
需要注意的是,有些 transform 操作并不会生成StreamNode 如 PartitionTransformtion,而是生成个虚拟节点。
![]()
调用transform即可flatmap一样。会把自己作为transformations。

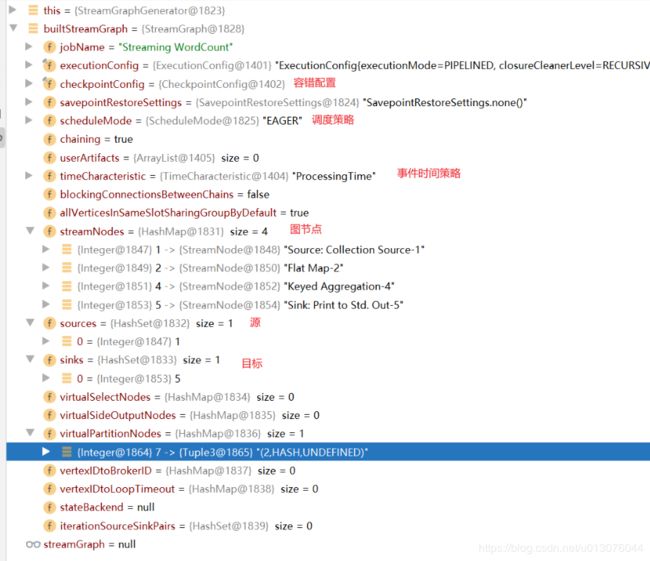
最终配置总览


执行提交
    env.execute("Streaming WordCount");

===>

     public JobExecutionResult execute(String jobName) throws Exception {
		Preconditions.checkNotNull(jobName, "Streaming Job name should not be null.");

		return execute(getStreamGraph(jobName));
	}
生成StreamGraph(Pipeline)
public StreamGraph getStreamGraph(String jobName, boolean clearTransformations) {
		StreamGraph streamGraph = getStreamGraphGenerator().setJobName(jobName).generate();
		if (clearTransformations) {
			this.transformations.clear();
		}
		return streamGraph;
	}
Generate全图
拓扑图的生成逻辑,循环处理每一个节点

Generate Transformation
这里对操作符的类型进行判断,并以此调用相应的处理逻辑.简而言之,
处理的核心:是递归的将该节点和节点的上游节点加入图
private Collection<Integer> transform(Transformation<?> transform) {

		if (alreadyTransformed.containsKey(transform)) {
			return alreadyTransformed.get(transform);
		}

		LOG.debug("Transforming " + transform);

		if (transform.getMaxParallelism() <= 0) {

			// if the max parallelism hasn't been set, then first use the job wide max parallelism
			// from the ExecutionConfig.
			int globalMaxParallelismFromConfig = executionConfig.getMaxParallelism();
			if (globalMaxParallelismFromConfig > 0) {
				transform.setMaxParallelism(globalMaxParallelismFromConfig);
			}
		}

		// call at least once to trigger exceptions about MissingTypeInfo
		transform.getOutputType();

		Collection<Integer> transformedIds;
		if (transform instanceof OneInputTransformation<?, ?>) {
			transformedIds = transformOneInputTransform((OneInputTransformation<?, ?>) transform);
		} else if (transform instanceof TwoInputTransformation<?, ?, ?>) {
			transformedIds = transformTwoInputTransform((TwoInputTransformation<?, ?, ?>) transform);
		} else if (transform instanceof SourceTransformation<?>) {
			// .......... 省略

		// need this check because the iterate transformation adds itself before
		// transforming the feedback edges
		if (!alreadyTransformed.containsKey(transform)) {
			alreadyTransformed.put(transform, transformedIds);
		}

		if (transform.getBufferTimeout() >= 0) {
			streamGraph.setBufferTimeout(transform.getId(), transform.getBufferTimeout());
		} else {
			streamGraph.setBufferTimeout(transform.getId(), defaultBufferTimeout);
		}

		if (transform.getUid() != null) {
			streamGraph.setTransformationUID(transform.getId(), transform.getUid());
		}
		if (transform.getUserProvidedNodeHash() != null) {
			streamGraph.setTransformationUserHash(transform.getId(), transform.getUserProvidedNodeHash());
		}

		if (!streamGraph.getExecutionConfig().hasAutoGeneratedUIDsEnabled()) {
			if (transform instanceof PhysicalTransformation &&
					transform.getUserProvidedNodeHash() == null &&
					transform.getUid() == null) {
				throw new IllegalStateException("Auto generated UIDs have been disabled " +
					"but no UID or hash has been assigned to operator " + transform.getName());
			}
		}

		if (transform.getMinResources() != null && transform.getPreferredResources() != null) {
			streamGraph.setResources(transform.getId(), transform.getMinResources(), transform.getPreferredResources());
		}

		streamGraph.setManagedMemoryWeight(transform.getId(), transform.getManagedMemoryWeight());

		return transformedIds;
	}
创建节点并加入图

生成结果
生成JobGraph
执行
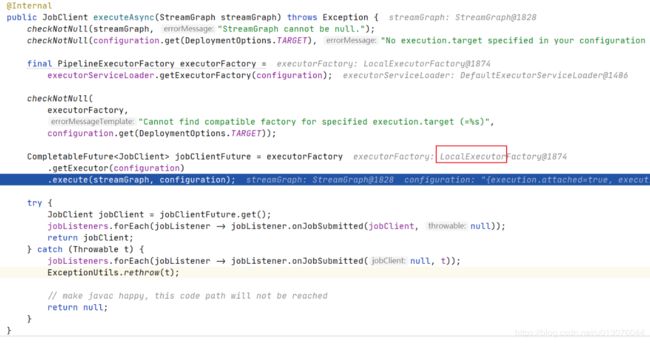
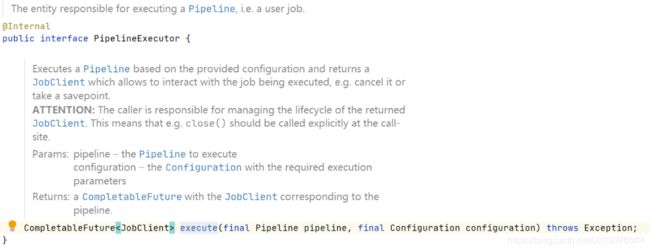
PipelinExecutor
execute 执行
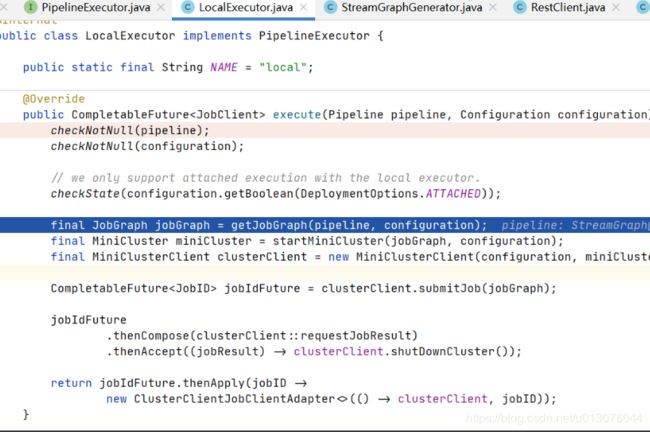
生成jobGraph

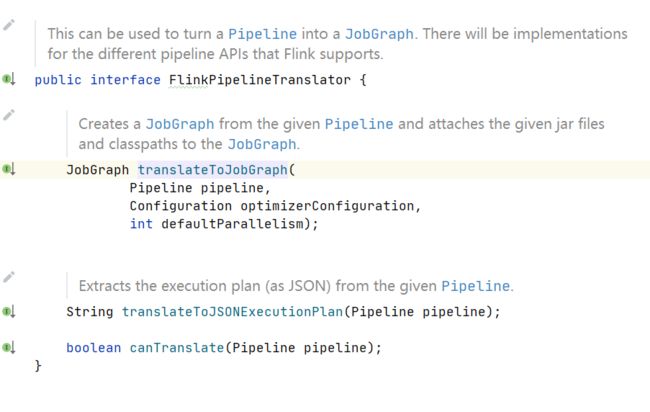
- 使用PipeLineTranslator生成JobGraph


Job Graph生成逻辑
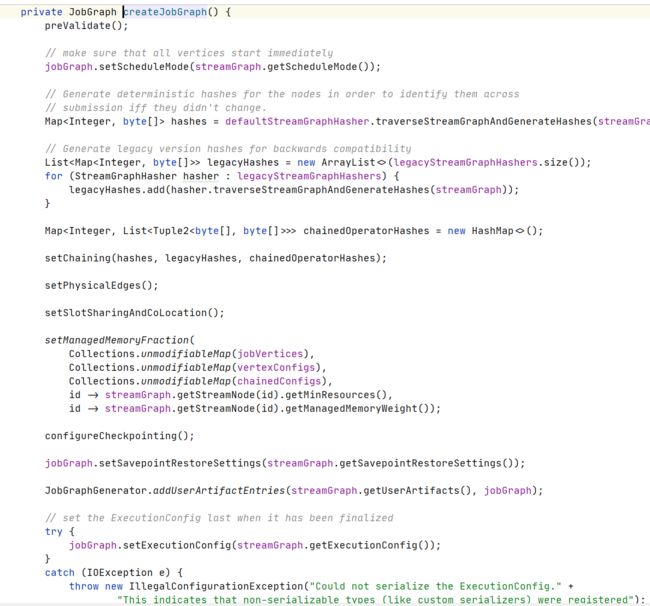
生成结果

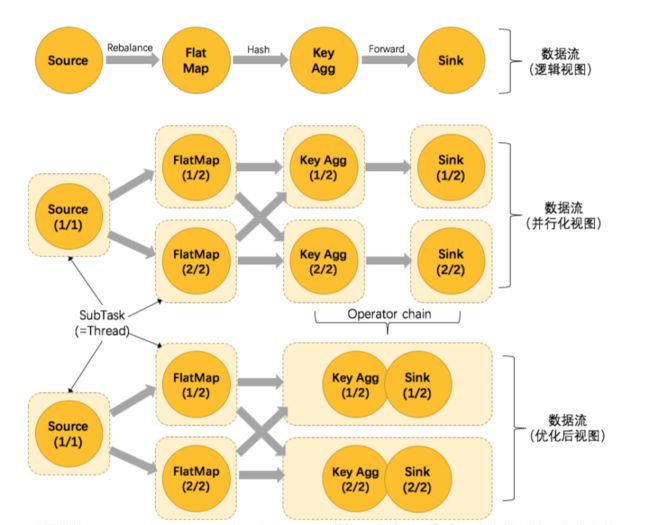
可以看到上面 key-aggregate-sink合并为了一个chain。
JobGraph 对象结构如上图所示,taskVertices 中只存在三个 TaskVertex,Sink operator 被嵌到 Keyed operator 中去了。


提交作业
这里相当于把本地作业提交到集群上面。就是一个作业元数据上传的过程。底层的RestClient使用的是Netty。
ClientUtils#submitJob
	public static JobExecutionResult submitJob(
			ClusterClient client,
			JobGraph jobGraph) throws ProgramInvocationException {
		checkNotNull(client);
		checkNotNull(jobGraph);
		try {
			return client
				.submitJob(jobGraph)
				.thenApply(DetachedJobExecutionResult::new)
				.get();
		} catch (InterruptedException | ExecutionException e) {
			ExceptionUtils.checkInterrupted(e);
			throw new ProgramInvocationException("Could not run job in detached mode.", jobGraph.getJobID(), e);
		}
	}
通过 RestClusterClient 提交到集群上
public CompletableFuture submitJob(@Nonnull JobGraph jobGraph) {
         // 生成二进制包,用于作业恢复
		CompletableFuture jobGraphFileFuture = CompletableFuture.supplyAsync(() -> {
			try {
				final java.nio.file.Path jobGraphFile = Files.createTempFile("flink-jobgraph", ".bin");
				try (ObjectOutputStream objectOut = new ObjectOutputStream(Files.newOutputStream(jobGraphFile))) {
					objectOut.writeObject(jobGraph);
				}
				return jobGraphFile;
			} catch (IOException e) {
				throw new CompletionException(new FlinkException("Failed to serialize JobGraph.", e));
			}
		}, executorService);
         // 查询所有需要上传的包
		CompletableFuture>> requestFuture = jobGraphFileFuture.thenApply(jobGraphFile -> {
			List jarFileNames = new ArrayList<>(8);
			List artifactFileNames = new ArrayList<>(8);
			Collection filesToUpload = new ArrayList<>(8);

			filesToUpload.add(new FileUpload(jobGraphFile, RestConstants.CONTENT_TYPE_BINARY));

			for (Path jar : jobGraph.getUserJars()) {
				jarFileNames.add(jar.getName());
				filesToUpload.add(new FileUpload(Paths.get(jar.toUri()), RestConstants.CONTENT_TYPE_JAR));
			}

			for (Map.Entry artifacts : jobGraph.getUserArtifacts().entrySet()) {
				final Path artifactFilePath = new Path(artifacts.getValue().filePath);
				try {
					// Only local artifacts need to be uploaded.
					if (!artifactFilePath.getFileSystem().isDistributedFS()) {
						artifactFileNames.add(new JobSubmitRequestBody.DistributedCacheFile(artifacts.getKey(), artifactFilePath.getName()));
						filesToUpload.add(new FileUpload(Paths.get(artifacts.getValue().filePath), RestConstants.CONTENT_TYPE_BINARY));
					}
				} catch (IOException e) {
					throw new CompletionException(
						new FlinkException("Failed to get the FileSystem of artifact " + artifactFilePath + ".", e));
				}
			}

			final JobSubmitRequestBody requestBody = new JobSubmitRequestBody(
				jobGraphFile.getFileName().toString(),
				jarFileNames,
				artifactFileNames);

			return Tuple2.of(requestBody, Collections.unmodifiableCollection(filesToUpload));
		});
         // 上传jar包,提交作业
		final CompletableFuture submissionFuture = requestFuture.thenCompose(
			requestAndFileUploads -> sendRetriableRequest(
				JobSubmitHeaders.getInstance(),
				EmptyMessageParameters.getInstance(),
				requestAndFileUploads.f0,
				requestAndFileUploads.f1,
				isConnectionProblemOrServiceUnavailable())
		);
         // 删除生成的jobGraph文件
		submissionFuture
			.thenCombine(jobGraphFileFuture, (ignored, jobGraphFile) -> jobGraphFile)
			.thenAccept(jobGraphFile -> {
			try {
				Files.delete(jobGraphFile);
			} catch (IOException e) {
				LOG.warn("Could not delete temporary file {}.", jobGraphFile, e);
			}
		});
        // 返回jobId
		return submissionFuture
			.thenApply(ignore -> jobGraph.getJobID())
			.exceptionally(
				(Throwable throwable) -> {
					throw new CompletionException(new JobSubmissionException(jobGraph.getJobID(), "Failed to submit JobGraph.", ExceptionUtils.stripCompletionException(throwable)));
				});
	}

	// 提交到集群
	private , U extends MessageParameters, R extends RequestBody, P extends ResponseBody> CompletableFuture
	sendRetriableRequest(M messageHeaders, U messageParameters, R request, Collection filesToUpload, Predicate retryPredicate) {
		return retry(() -> getWebMonitorBaseUrl().thenCompose(webMonitorBaseUrl -> {
			try {
				return restClient.sendRequest(webMonitorBaseUrl.getHost(), webMonitorBaseUrl.getPort(), messageHeaders, messageParameters, request, filesToUpload);
			} catch (IOException e) {
				throw new CompletionException(e);
			}
		}), retryPredicate);
	}
FlinkCluster Server
Dispatcher 接收请求
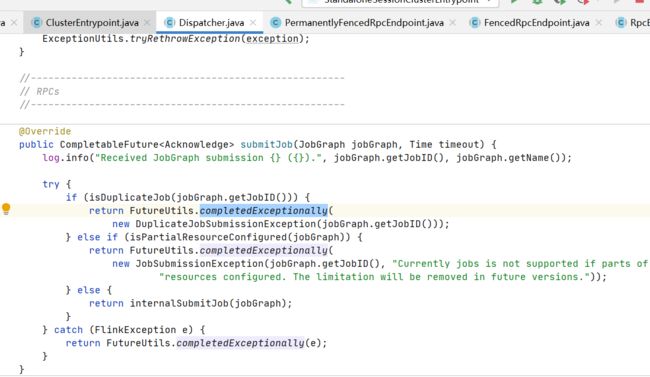

内部执行
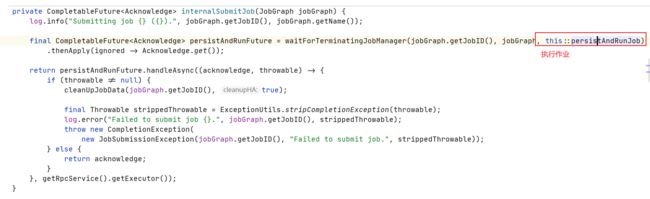
持久化和启动作业

持久化作业
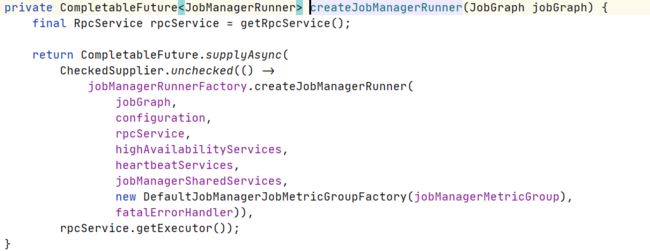
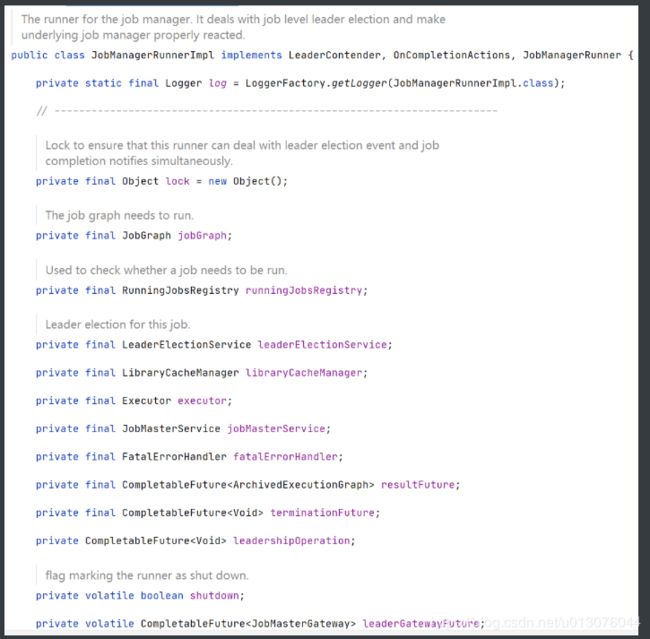
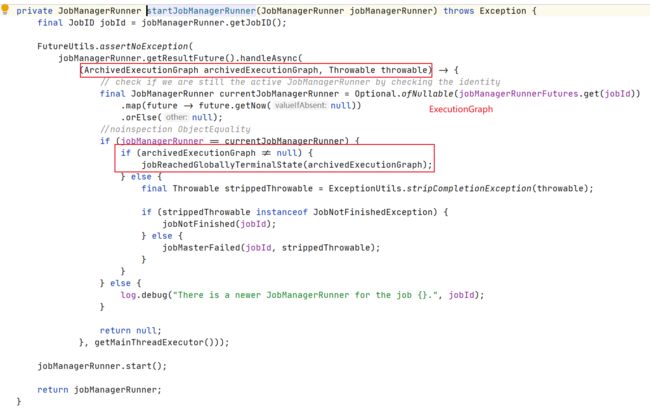
创建JobManagerRunner(JobManagerRunnerImpl)
属性
翻译JobGraph => ExecutionGraph
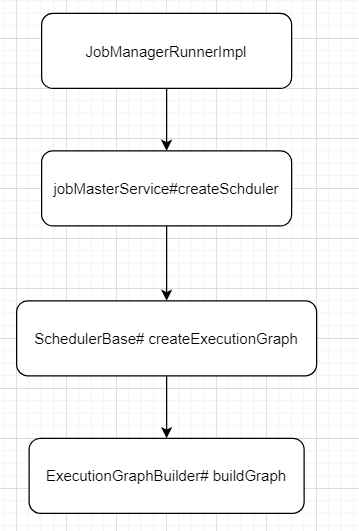
ExecutionGraphBuilder# buildGraph逻辑
-
create a new execution graph, if none exists so far
-
set the basic properties
-
initialize the vertices that have a master initialization hook
-
file output formats create directories here, input formats create splits
-
topologically sort the job vertices and attach the graph to the existing one
- 将 JobGraph 里面的 jobVertex 从 Source 节点开始排序。
- 在 executionGraph.attachJobGraph(sortedTopology)方法里面,根据 JobVertex 生成 ExecutionJobVertex,在 ExecutionJobVertex 构造方法里面,根据 jobVertex 的 IntermediateDataSet 构建 IntermediateResult,根据 jobVertex 并发构建 ExecutionVertex,ExecutionVertex 构建的时候,构建 IntermediateResultPartition(每一个 Execution 构建 IntermediateResult 数个IntermediateResultPartition );将创建的 ExecutionJobVertex 与前置的 IntermediateResult 连接起来。
- 构建 ExecutionEdge ,连接到前面的 IntermediateResultPartition,最终从 ExecutionGraph 到物理执行计划。
-
configure the state checkpointing
-
create all the metrics for the Execution Graph
实际启动作业
执行作业
JobMaster
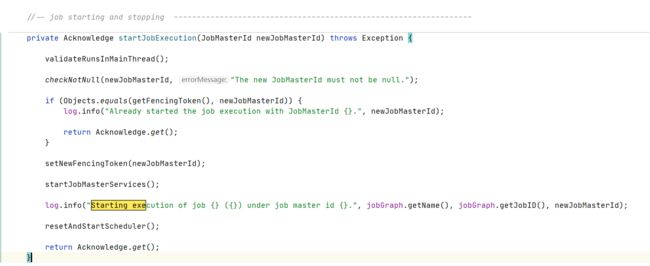
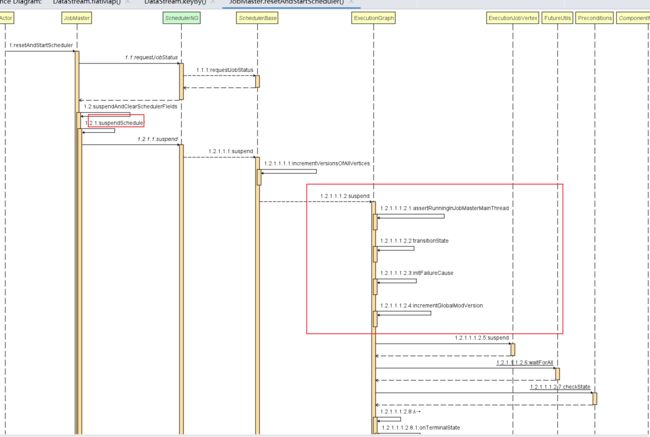
调度器执行
resetAndStartScheduler =》

总结
[外链图片转存失败,源站可能有防盗链机制,建议将图片保存下来直接上传(img-jC5iQsH7-1592732400299)(images/image-20200621172505926.png)]
- 第一层 StreamGraph 从 Source 节点开始,每一次 transform 生成一个 StreamNode,两个 StreamNode 通过 StreamEdge 连接在一起,形成 StreamNode 和 StreamEdge 构成的DAG。
- 第二层 JobGraph,依旧从 Source 节点开始,然后去遍历寻找能够嵌到一起的 operator,如果能够嵌到一起则嵌到一起,不能嵌到一起的单独生成 jobVertex,通过 JobEdge 链接上下游 JobVertex,最终形成 JobVertex 层面的 DAG。
- JobVertex DAG 提交到任务以后,从 Source 节点开始排序,根据 JobVertex 生成ExecutionJobVertex,根据 jobVertex的IntermediateDataSet 构建IntermediateResult,然后 IntermediateResult 构建上下游的依赖关系,形成 ExecutionJobVertex 层面的 DAG 即 ExecutionGraph。
- 最后通过 ExecutionGraph 层到物理执行层。
参考资料
https://ververica.cn/developers/advanced-tutorial-2-flink-job-execution-depth-analysis/ Flink 作业执行深度解析