自己手写一个RPC,实现远程调用功能(基于netty、反射和代理)
emmm,昨天蘑菇街一面,我感觉面试官特别好,最后的时候给了我一些建议和方向,感觉启发很大。面试过程中,问了我几个相对开放的问题,没怎么问基础。但是我感觉我答的不很好,第一次面大公司有点紧张。希望过过过!!!其中有一个题,面试官说你手动搭建过springboo + zookeeper + dubbo是吧,那么dubbo的原理是怎样的呢,或者你手动搭建一个dubbo你想这么做呢?基于这个原因,我今天就花费了半天的时间通过查资料做了一个远程调用rpc。
首先呢,我们的这个项目是基于netty、动态代理、反射等知识实现的,如果童鞋们对这块内容还有不熟的地方,建议去先了解一下这些知识,再来看这篇文章,我觉得才有意义。
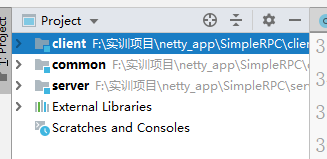
项目结构:
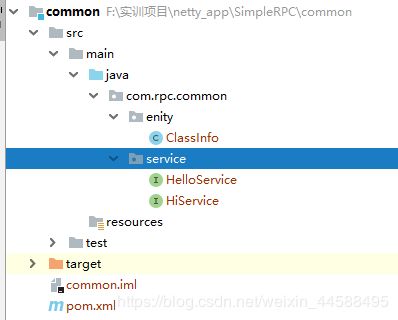
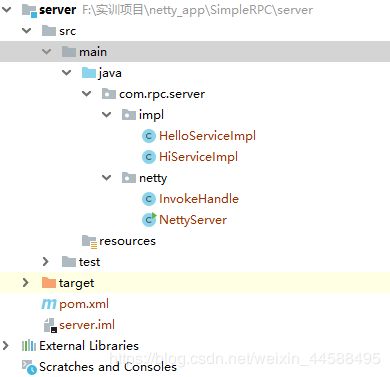
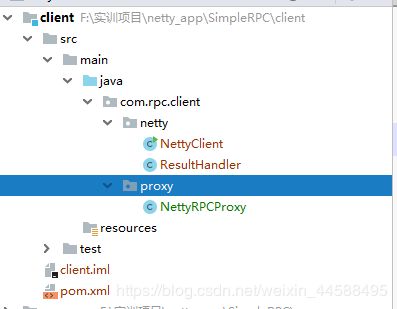
这里有三个module,先说common,它里面主要包含了我们的client和server共同的东西(一会细说),它是以依赖形式在我们的其他两个子项目中的pom.xml里的。server,里面包含了我们的一个服务器,具体的serviceimpl实现的类,client,里面包含了我们的客户端。这两个就是client调用的server的方法(注意这里不是通过rest接口实现的)。这两个项目可以独立部署在服务器上也是可以的。
common
这里的ClassInfo是我们要传递的类的信息,一会大家就很清楚了(悄悄的透露一下,就是下面两个service的方法具体信息)。它是建立我们调用的核心!!!下面两个service就是我们要远程调用他们的实现类的。
package com.rpc.common.enity;

import lombok.Data;

import java.io.Serializable;

@Data
public class ClassInfo implements Serializable {


    private String className;

    private String methodName;

    private Class[] types;

    private Object[] objects;

}
这个老哥就详细的记录着我们调用方法的接口方法的类名、方法名、参数类型和参数s。奥力给!!
package com.rpc.common.service;

public interface HelloService {
    String helloRPC();
}
package com.rpc.common.service;

ublic interface HiService {
    String HiRPC(String name);
}
这两个就是普通的接口,就是我们在dubbo框架中熟悉的@Service下面的接口。在dubbo里就是通过这个注册中心注册的。
Server
接下来我们再一起康康Server
先看看这两个没啥好说的实现类吧
package com.rpc.server.impl;

import com.rpc.common.service.HelloService;

public class HelloServiceImpl implements HelloService {

    @Override
    public String helloRPC() {
        return "helloRPC";
    }
}


package com.rpc.server.impl;

import com.rpc.common.service.HiService;

public class HiServiceImpl implements HiService {

    @Override
    public String HiRPC(String name) {
        return "Hi" + name;
    }
}
然后就是我们的netty啦,真的是方便又安全的框架!!
package com.rpc.server.netty;

import io.netty.bootstrap.ServerBootstrap;
import io.netty.channel.*;
import io.netty.channel.nio.NioEventLoopGroup;
import io.netty.channel.socket.SocketChannel;
import io.netty.channel.socket.nio.NioServerSocketChannel;
import io.netty.handler.codec.serialization.ClassResolvers;
import io.netty.handler.codec.serialization.ObjectDecoder;
import io.netty.handler.codec.serialization.ObjectEncoder;


public class NettyServer {

    private int port;

    EventLoopGroup bossGroup = new NioEventLoopGroup();
    EventLoopGroup workerGroup = new NioEventLoopGroup();

    public NettyServer(int port){
        this.port = port;
    }

    public void start(){
        try {
            ServerBootstrap serverBootstrap = new ServerBootstrap();

            serverBootstrap.group(bossGroup, workerGroup)
                    .channel(NioServerSocketChannel.class)
                    .option(ChannelOption.SO_BACKLOG, 128)
                    .childOption(ChannelOption.SO_KEEPALIVE, true)
                    .localAddress(port)
                    .childHandler(new ChannelInitializer() {

                        @Override
                        protected void initChannel(SocketChannel socketChannel) throws Exception {
                            ChannelPipeline pipeline = socketChannel.pipeline();
                            //编码器
                            pipeline.addLast("encoder",new ObjectEncoder());
                            //解码器
                            pipeline.addLast("decoder",new ObjectDecoder(Integer.MAX_VALUE,
                                    ClassResolvers.cacheDisabled(null)));
                            //服务器端业务处理类
                            pipeline.addLast(new InvokeHandle());
                        }
                    });
            ChannelFuture future = serverBootstrap.bind(port).sync();
            System.out.println("服务启动-------------");
            future.channel().closeFuture().sync();
        } catch (Exception e) {
            bossGroup.shutdownGracefully(); workerGroup.shutdownGracefully();
        }
    }

    public static void main(String[] args) {
        new NettyServer(9999).start();
    }
}
这一大串我就不具体说了,如果接触过netty的小盆友,因该都不会陌生。编码和解码,就是对我们传过来的对象进行解码或者编码,其实就是序列化。netty已经帮我们做好了。
package com.rpc.server.netty;

import com.rpc.common.enity.ClassInfo;
import io.netty.channel.ChannelHandlerContext;
import io.netty.channel.ChannelInboundHandlerAdapter;
import org.reflections.Reflections;

import java.lang.reflect.Method;
import java.util.Set;


public class InvokeHandle extends ChannelInboundHandlerAdapter {

    private static String interfacePath = "com.rpc.common.service";
    private static String implPath="com.rpc.server.impl";

    private String getImplClassName(ClassInfo classInfo)throws Exception{
        int lastDot = classInfo.getClassName().lastIndexOf(".");
        String interfaceName = classInfo.getClassName().substring(lastDot);

        Class superClass = Class.forName(interfacePath + interfaceName);

        Reflections reflections = new Reflections(implPath);
        //得到接口下面的实现类
        Set implClassSet = reflections.getSubTypesOf(superClass);
        if(implClassSet.size() == 0){
            System.out.println("未找到实现类");
            return null;
        }else if(implClassSet.size() > 1){
            System.out.println("找到多个实现类");
            return null;
        }else{
            Class[] classes = implClassSet.toArray(new Class[0]);
            return classes[0].getName();//实现类的名字
        }
    }

    @Override
    public void channelRead(ChannelHandlerContext ctx,Object msg) throws Exception {
        ClassInfo classInfo = (ClassInfo)msg;
        Object clazz = null;
        try {
            clazz = Class.forName(getImplClassName(classInfo)).newInstance();
        } catch (Exception e) {
            e.printStackTrace();
            System.out.println("类名提取异常");
        }
        Method method = clazz.getClass().getMethod(classInfo.getMethodName(),classInfo.getTypes());
        Object result = method.invoke(clazz,classInfo.getObjects());
        ctx.writeAndFlush(result);
        ctx.close();
    }

}
咱们可以用channelRead这个方法直接接收到客户端发过来的请求。也就是msg。实际上已经帮我们解码好了,重写反序列化成对象了,我们直接拿就好了,然后我们通过getImplClassName方法获得这个类的实现类的Class对象,我们姑且不看这个getImplClassName方法,假设我们拿到这个实现类了,就是咱们server下面的impl这些,我们就可以对应调用的方法,然后invoke调用。最后返回处理结果。这个调用任务就完成了。
接下来我们看getImplClassName方法。它通过forName拿到service的class对象,然后用下面代码:
 Reflections reflections = new Reflections(implPath);
 //得到接口下面的实现类
Set implClassSet = reflections.getSubTypesOf(superClass);
获得所有的实现类。最终经过处理能够得到实现类。这也就完成了我们服务端调用的整个过程。我们接下来关注的就是客户端如何把ClassInfo给我们发过来。
Client
我们首先来看一下代理对象:
package com.rpc.client.proxy;


import com.rpc.client.netty.NettyClient;
import com.rpc.common.enity.ClassInfo;

import java.lang.reflect.InvocationHandler;
import java.lang.reflect.Method;
import java.lang.reflect.Proxy;

public class NettyRPCProxy implements InvocationHandler {

    private static Class clazz;

    public static Object create(Class target){
        clazz = target;
        return Proxy.newProxyInstance(target.getClassLoader(),new Class[]{target},new NettyRPCProxy());
    }


    @Override
    public Object invoke(Object proxy, Method method, Object[] args) throws Throwable {
        //封装Classinfo
        ClassInfo classInfo = new ClassInfo();
        classInfo.setClassName(clazz.getName());
        classInfo.setMethodName(method.getName());
        classInfo.setObjects(args);
        classInfo.setTypes(method.getParameterTypes());

        //开始netty发送数据
        return new NettyClient().start(classInfo);
    }

}
create方法创建代理对象就不说了啊,大家想没想我们为啥要用代理呀?代理可以获取我们所有的方法的参数、类型、以及方法名。这就是它存在的意义。这些都是我们传输ClassInfo对象的字段,必须品!!!
package com.rpc.client.netty;

import io.netty.channel.ChannelHandlerContext;
import io.netty.channel.ChannelInboundHandlerAdapter;


public class ResultHandler extends ChannelInboundHandlerAdapter {


    private Object response;
    public Object getResponse() { return response; }

    @Override //读取服务器端返回的数据(远程调用的结果)
    public void channelRead(ChannelHandlerContext ctx, Object msg) throws Exception {
        response = msg;
        ctx.close();
    }


}
这个就不复杂了,直接是获取服务端调用完方法的结果!
package com.rpc.client.netty;

import com.rpc.client.proxy.NettyRPCProxy;
import com.rpc.common.enity.ClassInfo;
import com.rpc.common.service.HelloService;
import com.rpc.common.service.HiService;
import io.netty.bootstrap.Bootstrap;
import io.netty.channel.*;
import io.netty.channel.nio.NioEventLoopGroup;
import io.netty.channel.socket.SocketChannel;
import io.netty.channel.socket.nio.NioServerSocketChannel;
import io.netty.channel.socket.nio.NioSocketChannel;
import io.netty.handler.codec.serialization.ClassResolvers;
import io.netty.handler.codec.serialization.ObjectDecoder;
import io.netty.handler.codec.serialization.ObjectEncoder;


public class NettyClient {

    private  EventLoopGroup group = new NioEventLoopGroup();
    private ResultHandler resultHandler =  new ResultHandler();

    public Object start(ClassInfo classInfo){
        try {
            Bootstrap client = new Bootstrap();

            client.group(group)
                    .channel(NioSocketChannel.class)
                    .handler(new ChannelInitializer() {
                        @Override
                        protected void initChannel(SocketChannel socketChannel) throws Exception {
                            ChannelPipeline pipeline = socketChannel.pipeline();
                            //编码器
                            pipeline.addLast("encoder",new ObjectEncoder());
                            //解码器
                            pipeline.addLast("decoder",new ObjectDecoder(Integer.MAX_VALUE,
                                    ClassResolvers.cacheDisabled(null)));
                            //服务器端业务处理类
                            pipeline.addLast("handle",resultHandler);
                        }
                    });
            ChannelFuture future = client.connect("127.0.0.1",9999).sync();
            future.channel().writeAndFlush(classInfo).sync();
            future.channel().closeFuture().sync();
        } catch (Exception e) {

        }finally {
            group.shutdownGracefully();
        }
        return resultHandler.getResponse();
    }


    public static void main(String[] args) {
        //第一次调用
        HelloService helloService = (HelloService) NettyRPCProxy.create(HelloService.class);
        System.out.println(helloService.helloRPC());
        //第二次调用
        HiService hiService = (HiService) NettyRPCProxy.create(HiService.class);
        System.out.println(hiService.HiRPC("baby"));

    }
}
这就是我们调用的过程了!!!,实际上大家可以想一想,dubbo的zookeeper的注册中心就是注册了一个service的信息,还有域名端口,我们这里是在项目中写固定了这些东西,ClassInfo很重要。由于时间紧,代码规范不是很好,大家见谅。
运行结果:
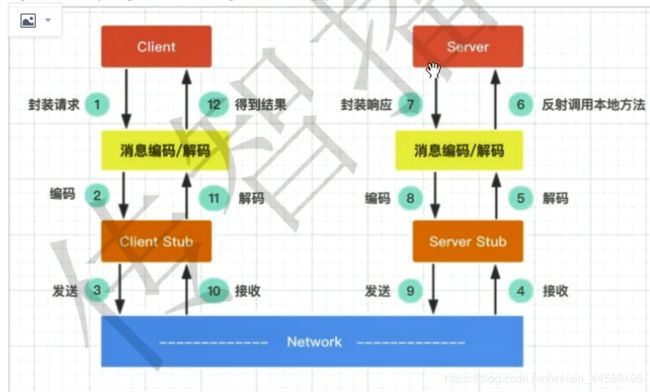
最后配上一个小图,大家在看就理解了!
过程:
client stub可以是bio、nio和netty。
1、服务消费方(client)以本地调用方式调用服务。
2、client stub接收到调用后负责将方法、参数封装成能够进行网络传输的消息体
3、client stub将消息进行编码并发送到服务端
4、server stub接收到消息后进行解码
5、server stub根据解码j结果调用本地的服务
6、本地服务执行并将结果返回给server stub
7、server stub将返回结果进行编码并发送至消费方
8、client stub接收到消息并进行解码
9、服务消费方client得到结果。
而dubbo做的就是封装了2-8。
项目地址:[email protected]:Zesystem/-Handwritten-RPC.git
