Flutter 使用 SignalR Asp.Net Core 搭建即时通讯 DEMO
本人刚开始学习Flutter,对Flutter还不是很了解。这个例子 首先是日后项目有可能会用到,其次是加深学习。
文中的说明中难免有不合理的地方,详细文档请参阅官方文档:
SIgnalR https://docs.microsoft.com/zh-cn/aspnet/core/tutorials/signalr?view=aspnetcore-3.0&tabs=visual-studio。
Flutter https://flutter.dev/docs https://flutterchina.club
Flutter signalr_client https://pub.dev/packages/signalr_client#-readme-tab-
客户端 Android Flutter
服务端 Windows Asp.Net Core 注意本文只针对服务端是 Asp.Net Core 而不是 Farmework
服务端Demo
- 首先创建Asp.Net Core 项目。
- 通过Nuget 安装 Microsoft.AspNetCore.SignalR。
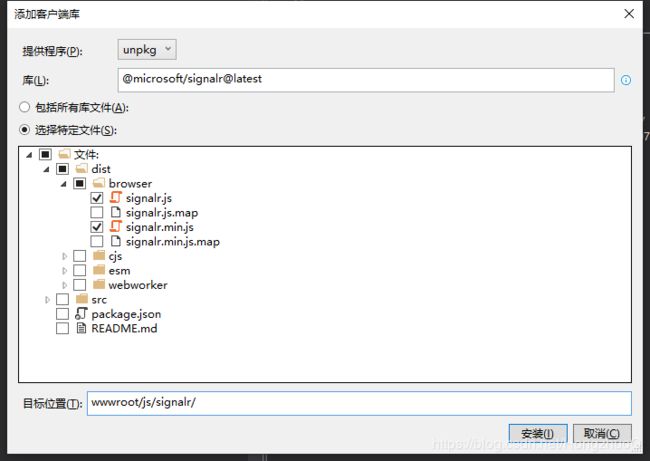
- 在项目上右键-添加-添加客户端
如图所示 提供程序选中 unpkg,文件只选着 signalr.js signalr.js.min ,目标位置 wwwroot/js/signalr/ 然后点击安装。
- 在 SignalRChat 项目文件夹中,创建 Hubs 文件夹 。
- 在 Hubs 文件夹中,使用以下代码创建 ChatHub.cs 文件
    public class ChatHub : Hub
    {

        public override Task OnConnectedAsync()
        {
            return base.OnConnectedAsync();
        }

        public async Task SendMessage(string name,string message)
        {
            await Clients.All.SendAsync("NewMessage", message);
        }
}- 修改Startup.cs 文件
在 ConfigureServices 中 添加 services.AddSignalR();
        public void ConfigureServices(IServiceCollection services)
        {
            services.AddControllersWithViews();
            services.AddSignalR();
        }
在Configure中 添加 endpoints.MapHub
        public void Configure(IApplicationBuilder app, IWebHostEnvironment env)
        {
            if (env.IsDevelopment())
            {
                app.UseDeveloperExceptionPage();
            }
            else
            {
                app.UseExceptionHandler("/Home/Error");
            }
            app.UseStaticFiles();

            app.UseRouting();

            app.UseAuthorization();

            app.UseEndpoints(endpoints =>
            {
                endpoints.MapControllerRoute(
                    name: "default",
                    pattern: "{controller=Home}/{action=Index}/{id?}");
                endpoints.MapHub("/chatHub");
            });
} - 修改Index.cshtml 为如下所示
@page


        User


        Message
- 在 wwwroot -> js 文件夹中新建 chat.js 文件
"use strict";

var connection = new signalR.HubConnectionBuilder().withUrl("/chatHub").build();

//Disable send button until connection is established
document.getElementById("sendButton").disabled = true;

connection.on("ReceiveMessage", function (user, message) {
    var msg = message.replace(/&/g, "&").replace(//g, ">");
    var encodedMsg = user + " says " + msg;
    var li = document.createElement("li");
    li.textContent = encodedMsg;
    document.getElementById("messagesList").appendChild(li);
});

connection.start().then(function () {
    document.getElementById("sendButton").disabled = false;
}).catch(function (err) {
    return console.error(err.toString());
});

document.getElementById("sendButton").addEventListener("click", function (event) {
    var user = document.getElementById("userInput").value;
    var message = document.getElementById("messageInput").value;
    connection.invoke("SendMessage", user, message).catch(function (err) {
        return console.error(err.toString());
    });
    event.preventDefault();
});- F5 运行项目
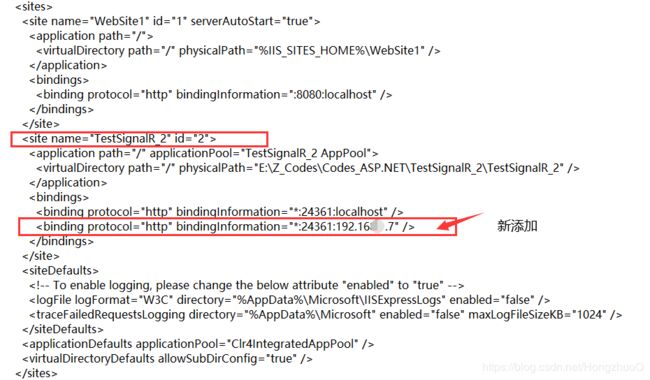
- 在任务栏右下角找到 IIS Express 图表并右键点击,选着显示所有应用程序,选着你的网站名称并点击下面的配置。
- 找到你的网站的配置节 在 bindings 中添加一个指定你电脑ip的配置节。并在你的电脑防火墙中允许你设置的网站端口的入站规则。现在你需要关闭 VisualStudio 后用管理员权限重新打开并允许项目。
客户端 Demo
- 首先使用 AndroidStudio 新建一个 Fultter的项目。
- 编辑 pubspec.yaml 在 dependencies 中 添加
signalr_client: ^0.1.6
- 在Fultter中引入
import 'package:signalr_client/signalr_client.dart';
主要代码如下
// SignalR地址
static final serverUrl = "http://192.168.1.7:24361/chatHub";
// SignalR Connection
final hubConnection = HubConnectionBuilder().withUrl(serverUrl).build();
//初始化连接
void _initSignalR() async {
print("Begin Connection");
print(serverUrl);
try {
hubConnection.onclose((error) => print("Connection Closed"));
await hubConnection.start();
hubConnection.on("ReceiveMessage", (e) => {receiveMessage(e[0], e[1])});
_conState = "连接成功";
} catch (e) {
_conState = "连接失败";
}
}
// 接受消息
void receiveMessage(name, msg) {
setState(() {
ltMsg.add("来自[" + name + "]的即时消息:" + msg);
});
}
// 发送消息
void sendMsg() async {
final result = await hubConnection.invoke("SendMessage",
args: - 完整代码如下
import 'package:flutter/cupertino.dart';
import 'package:flutter/material.dart';
import 'package:signalr_client/signalr_client.dart';
void main() => runApp(MyApp());
class MyApp extends StatelessWidget {
// This widget is the root of your application.
@override
Widget build(BuildContext context) {
return MaterialApp(
title: 'Flutter Demo',
theme: ThemeData(
primarySwatch: Colors.blue,
),
home: MyHomePage(title: 'Flutter SignalR 首页'),
);
}
}
class MyHomePage extends StatefulWidget {
MyHomePage({Key key, this.title}) : super(key: key);
// This widget is the home page of your application. It is stateful, meaning
// that it has a State object (defined below) that contains fields that affect
// how it looks.
// This class is the configuration for the state. It holds the values (in this
// case the title) provided by the parent (in this case the App widget) and
// used by the build method of the State. Fields in a Widget subclass are
// always marked "final".
final String title;
@override
_MyHomePageState createState() => _MyHomePageState();
}
class _MyHomePageState extends State {
int _counter = 0;
var _msg = "等待消息";
var _conState = "等待连接";
_MyHomePageState() {
_initSignalR();
}
// The location of the SignalR Server.
static final serverUrl = "http://192.168.1.7:24361/chatHub";
// SignalR Connection
final hubConnection = HubConnectionBuilder().withUrl(serverUrl).build();
// Msg List
List ltMsg = ["测试1", "测试2"];
// Msg
final TextEditingController _controllerMsg = new TextEditingController();
// Name
final TextEditingController _controllerName = new TextEditingController();
//初始化连接
void _initSignalR() async {
print("Begin Connection");
print(serverUrl);
try {
hubConnection.onclose((error) => print("Connection Closed"));
await hubConnection.start();
hubConnection.on("ReceiveMessage", (e) => {receiveMessage(e[0], e[1])});
_conState = "连接成功";
} catch (e) {
_conState = "连接失败";
}
}
// 接受消息
void receiveMessage(name, msg) {
setState(() {
ltMsg.add("来自[" + name + "]的即时消息:" + msg);
});
}
// 发送消息
void sendMsg() async {
final result = await hubConnection.invoke("SendMessage",
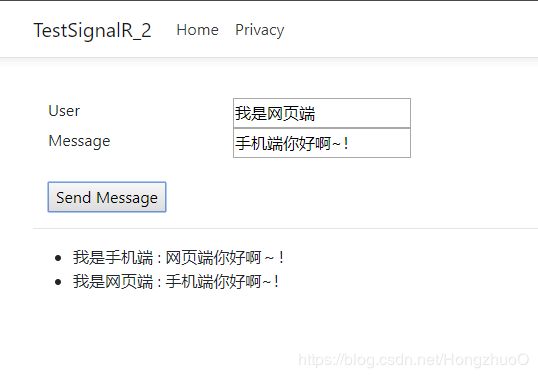
args: - 页面效果
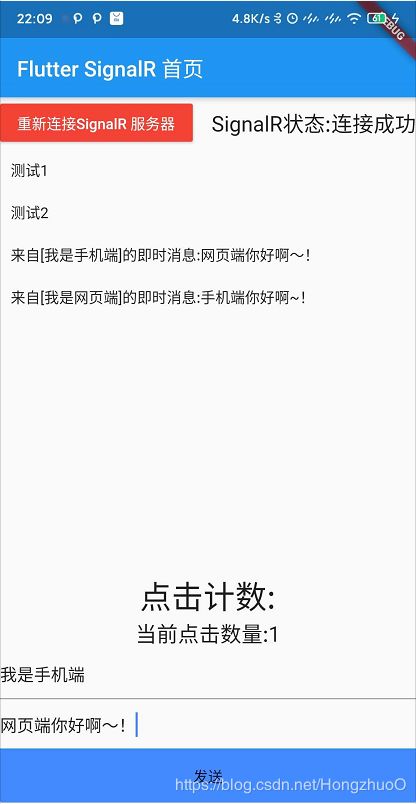
- 移动端效果


