rpm,repo和yum的区别和使用详解(centos7安装和升级mysql举例)
相信和红帽系统或者centos打交道的朋友应该对rpm,repo和yum不会陌生,这三个都是和包管理相关的东西。但是虽然经常使用,有时候还是容易造成混淆。这里借着安装mysql的机会,对这些概念进行一下整理。
我是T型人小付,一位坚持终身学习的互联网从业者。喜欢我的博客欢迎在csdn上关注我,如果有问题欢迎在底下的评论区交流,谢谢。
文章目录
- 概念介绍
- RPM
- Yum
- Repo
- repo文件详解
- 如何添加repo到本地
- rpm方式/yum方式
- yum-config-manager方法
- mysql的yum操作实例
- 安装mysql专属repo
- 查看repo内容
- 修改mysql安装版本
- 选择rpm包下载安装
- 升级mysql
- 常用yum命令
概念介绍
RPM
RPM(Red-hat Package Manager),是一个由红帽最早开发出来的包管理器,目前已经是大多数Linux发行的默认包管理器。RPM管理的包都是以.rpm结尾,其中存储了该软件的安装压缩包,以及一些额外信息,例如所依赖的其余的包还有安装,升级,卸载时候执行的一些脚本。
看起来很美好,想要安装软件的时候下载一个官方的.rpm文件,然后用RPM安装一下即可。但是事实往往没这么顺利。一个包在安装的时候往往依赖于很多的其它的包,如果这些被依赖的包没有被安装会造成很多意想不到的麻烦。RPM的一大缺点,就是它可以检测这些被依赖的包有没有被安装,但是假如有包没有安装它不会自动去进行安装。
于是需要一种新的工具来弥补这个缺点,这个新工具在Centos中就是Yum。
Yum
Yum(Yellowdog Updater Modified),也是包管理工具,只适用于红帽和Centos发行版本。比起RPM来,Yum的优势在于可以自动检测依赖,并且对于不存在的依赖会自动去进行安装。
所以通常是用Yum来进行包的操作,例如查看,安装,更新,删除等等。
但是又有了另一个问题,RPM包里面只是写了依赖包的名字,Yum怎么知道去哪下载这些包呢?如果能有一个仓库,里面放着成千上万的包给Yum去选择,这个问题也就迎刃而解了。
是的,很多的公司和团体都维护着这样的仓库,这些仓库就叫做repository,简称repo。
Repo
Repo就像是一个大仓库,每个repo里面包含着很多的.rpm文件,但是一个repo不可能把这个世界所有的.rpm包都包括进去,往往是某个特定目的的包集合放在一个repo里面,例如centos需要的基础包做一个repo,额外特性的包再放一个repo,mysql维护自己的repo,docker维护自己的repo,等等。所以我们往往一台机器上要配置好几个repo的地址供yum去查询和选择,而且安装新软件的时候可能还需要新安装他们自己维护的repo来使用。
下面我们就来详细看看怎么在本地配置repo。
repo文件详解
centos中存放repo文件的路径在/etc/yum.repos.d/,每个文件都以.repo结尾,每个文件中可能包含一个或多个repo的信息。
下面以/etc/yum.repos.d/CentOS-Base.repo为例来看看里面到底写了些啥,打开文件,内容如下:
[base]
name=CentOS-$releasever - Base
mirrorlist=http://mirrorlist.centos.org/?release=$releasever&arch=$basearch&repo=os&infra=$infra
#baseurl=http://mirror.centos.org/centos/$releasever/os/$basearch/
gpgcheck=1
gpgkey=file:///etc/pki/rpm-gpg/RPM-GPG-KEY-CentOS-7

#released updates
[updates]
name=CentOS-$releasever - Updates
mirrorlist=http://mirrorlist.centos.org/?release=$releasever&arch=$basearch&repo=updates&infra=$infra
#baseurl=http://mirror.centos.org/centos/$releasever/updates/$basearch/
gpgcheck=1
gpgkey=file:///etc/pki/rpm-gpg/RPM-GPG-KEY-CentOS-7

#additional packages that may be useful
[extras]
name=CentOS-$releasever - Extras
mirrorlist=http://mirrorlist.centos.org/?release=$releasever&arch=$basearch&repo=extras&infra=$infra
#baseurl=http://mirror.centos.org/centos/$releasever/extras/$basearch/
gpgcheck=1
gpgkey=file:///etc/pki/rpm-gpg/RPM-GPG-KEY-CentOS-7

#additional packages that extend functionality of existing packages
[centosplus]
name=CentOS-$releasever - Plus
mirrorlist=http://mirrorlist.centos.org/?release=$releasever&arch=$basearch&repo=centosplus&infra=$infra
#baseurl=http://mirror.centos.org/centos/$releasever/centosplus/$basearch/
gpgcheck=1
enabled=0
gpgkey=file:///etc/pki/rpm-gpg/RPM-GPG-KEY-CentOS-7
就拿最上面的一部分来仔细看看
[base]
name=CentOS-$releasever - Base
mirrorlist=http://mirrorlist.centos.org/?release=$releasever&arch=$basearch&repo=os&infra=$infra
#baseurl=http://mirror.centos.org/centos/$releasever/os/$basearch/
gpgcheck=1
gpgkey=file:///etc/pki/rpm-gpg/RPM-GPG-KEY-CentOS-7
- [base] - 这是repo的id,必须要在该文件中独一无二才可以。可以看到打开的
CentOS-Base.repo文件中一共包含4个repo - name=xxx - 这是repo的描述信息,这其中带入了一个变量,在我这里就是7
- mirrorlist=xxx - 这个url打开后是一个地址列表,yum会依次去各个地址尝试下载想安装的包,如果所有地址遍历完依然下载失败,则会向用户抛出错误
- gpgcheck=1 - gpgcheck是官方镜像特有的一种密钥校验方法,1表示要校验
- gpgkey=xxx - 本地存放的用于gpgcheck的公钥,用浏览器访问链接可以查看
下面我们来验证下这四个repo是不是都被系统识别了,跑一下sudo yum repolist | grep CentOS如下:
[fuhx@testmachine Desktop]$ sudo yum repolist | grep CentOS
https://copr-be.cloud.fedoraproject.org/results/mcepl/vim8/epel-7-x86_64/repodata/repomd.xml: [Errno 14] HTTPS Error 404 - Not Found
Trying other mirror.
To address this issue please refer to the below wiki article

https://wiki.centos.org/yum-errors

If above article doesn't help to resolve this issue please use https://bugs.centos.org/.

base/7/x86_64                     CentOS-7 - Base                         10,097
extras/7/x86_64                   CentOS-7 - Extras                          323
updates/7/x86_64                  CentOS-7 - Updates                       1,478
上面有个报错,我们待会再来细说这个报错。我们发现上面的4个repo只有3个在使用,我们再去看看第四个repo的设置有啥不一样的
[centosplus]
name=CentOS-$releasever - Plus
mirrorlist=http://mirrorlist.centos.org/?release=$releasever&arch=$basearch&repo=centosplus&infra=$infra
#baseurl=http://mirror.centos.org/centos/$releasever/centosplus/$basearch/
gpgcheck=1
enabled=0
gpgkey=file:///etc/pki/rpm-gpg/RPM-GPG-KEY-CentOS-7
发现多了一个配置项
- enabled=0 - 0表示不使用,1表示使用
把这个配置改为1再试试,发现四个repo都能被正常使用了
base/7/x86_64                     CentOS-7 - Base                         10,097
centosplus/7/x86_64               CentOS-7 - Plus                             80
extras/7/x86_64                   CentOS-7 - Extras                          323
updates/7/x86_64                  CentOS-7 - Updates                       1,478
顺便说一下,最右边的数字表示该repo中rpm文件的个数。既然有这么多的包肯定不能一个个去比对,所以每个repo都会在/repodata/repomd.xml中去存储所有包的索引,方便去检索。这也是上面报错的原因,索引文件不存在。
如何添加repo到本地
yum在安装包的时候会在本地的所有repo进行查找,所以首先要添加repo到本地。添加本地repo的方法有两种
rpm方式/yum方式
通常在给了一个rpm包去安装repo的情况,例如最出名的epel源,官方给的安装方法如下
yum install https://dl.fedoraproject.org/pub/epel/epel-release-latest-7.noarch.rpm
安装完以后会生成etc/yum.repos.d/epel.repo文件,查看一下发现里面有13192个包
[fuhx@testmachine Desktop]$ sudo yum repolist | grep epel
 * epel: epel.dionipe.id
epel/x86_64                       Extra Packages for Enterprise Linux 7 - 13,192
yum-config-manager方法
适用于官方直接给了一个.repo文件的情况下,例如docker官方给的安装方法如下
sudo yum-config-manager \
    --add-repo \
    https://download.docker.com/linux/centos/docker-ce.repo
这个就比较好理解,相当于直接下载一个文件存放到/etc/yum.repos.d/目录
mysql的yum操作实例
理论知识铺垫的差不多了,下面就从零开始安装个mysql实际感受下用yum从mysql专属的repo安装的过程。
以下操作可能需要科学上网
安装mysql专属repo
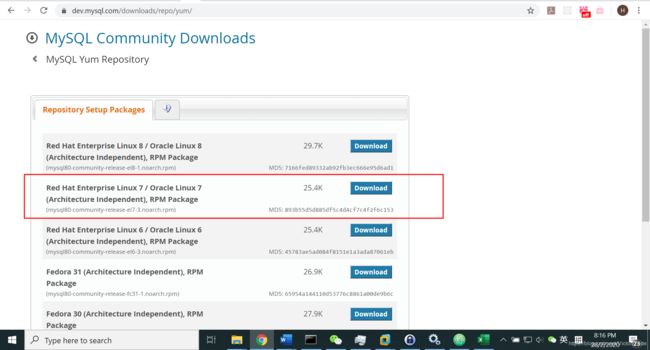
访问mysql官方repo下载页面,下载官方提供的yum版本的repo安装包

选择符合自己系统版本的包去下载,我的系统是centos7

下载下来以后记得验证下md5,确保无误
[fuhx@testmachine Downloads]$ md5sum mysql80-community-release-el7-3.noarch.rpm
893b55d5d885df5c4d4cf7c4f2f6c153  mysql80-community-release-el7-3.noarch.rpm
因为下载的是rpm包,就用上面的第一种方法安装repo
[fuhx@testmachine Downloads]$ sudo yum install mysql80-community-release-el7-3.noarch.rpm
但是因为我的机器上事先安装了旧版本的mysql57的repo,报错了,需要先删除旧版本repo才可以。报错如下
Error: mysql80-community-release conflicts with mysql57-community-release-el7-11.noarch
 You could try using --skip-broken to work around the problem
 You could try running: rpm -Va --nofiles --nodigest
先找到用yum安装的旧版本repo,然后直接删除
[root@testmachine yum.repos.d]# yum list installed | grep mysql
mysql57-community-release.noarch        el7-11                         installed
[root@testmachine yum.repos.d]# yum remove mysql57-community-release.noarch
删除完成后再尝试安装新的repo
[fuhx@testmachine Downloads]$ sudo yum install mysql80-community-release-el7-3.noarch.rpm
查看repo内容
查看下刚才新创建的文件/etc/yum.repos.d/mysql-community.repo
# Enable to use MySQL 5.5
[mysql55-community]
name=MySQL 5.5 Community Server
baseurl=http://repo.mysql.com/yum/mysql-5.5-community/el/7/$basearch/
enabled=0
gpgcheck=1
gpgkey=file:///etc/pki/rpm-gpg/RPM-GPG-KEY-mysql

# Enable to use MySQL 5.6
[mysql56-community]
name=MySQL 5.6 Community Server
baseurl=http://repo.mysql.com/yum/mysql-5.6-community/el/7/$basearch/
enabled=0
gpgcheck=1
gpgkey=file:///etc/pki/rpm-gpg/RPM-GPG-KEY-mysql

# Enable to use MySQL 5.7
[mysql57-community]
name=MySQL 5.7 Community Server
baseurl=http://repo.mysql.com/yum/mysql-5.7-community/el/7/$basearch/
enabled=0
gpgcheck=1
gpgkey=file:///etc/pki/rpm-gpg/RPM-GPG-KEY-mysql

[mysql80-community]
name=MySQL 8.0 Community Server
baseurl=http://repo.mysql.com/yum/mysql-8.0-community/el/7/$basearch/
enabled=1
gpgcheck=1
gpgkey=file:///etc/pki/rpm-gpg/RPM-GPG-KEY-mysql

[mysql-connectors-community]
name=MySQL Connectors Community
baseurl=http://repo.mysql.com/yum/mysql-connectors-community/el/7/$basearch/
enabled=1
gpgcheck=1
gpgkey=file:///etc/pki/rpm-gpg/RPM-GPG-KEY-mysql

[mysql-tools-community]
name=MySQL Tools Community
baseurl=http://repo.mysql.com/yum/mysql-tools-community/el/7/$basearch/
enabled=1
gpgcheck=1
gpgkey=file:///etc/pki/rpm-gpg/RPM-GPG-KEY-mysql

[mysql-tools-preview]
name=MySQL Tools Preview
baseurl=http://repo.mysql.com/yum/mysql-tools-preview/el/7/$basearch/
enabled=0
gpgcheck=1
gpgkey=file:///etc/pki/rpm-gpg/RPM-GPG-KEY-mysql

[mysql-cluster-7.5-community]
name=MySQL Cluster 7.5 Community
baseurl=http://repo.mysql.com/yum/mysql-cluster-7.5-community/el/7/$basearch/
enabled=0
gpgcheck=1
gpgkey=file:///etc/pki/rpm-gpg/RPM-GPG-KEY-mysql

[mysql-cluster-7.6-community]
name=MySQL Cluster 7.6 Community
baseurl=http://repo.mysql.com/yum/mysql-cluster-7.6-community/el/7/$basearch/
enabled=0
gpgcheck=1
gpgkey=file:///etc/pki/rpm-gpg/RPM-GPG-KEY-mysql

[mysql-cluster-8.0-community]
name=MySQL Cluster 8.0 Community
baseurl=http://repo.mysql.com/yum/mysql-cluster-8.0-community/el/7/$basearch/
enabled=0
gpgcheck=1
gpgkey=file:///etc/pki/rpm-gpg/RPM-GPG-KEY-mysql
可以看到这里配置了10个repo,但是配置enabled=1的只有3个,也就是说只有3个repo被使用。我们来验证下
[root@testmachine yum.repos.d]# yum repolist | grep mysql
mysql-connectors-community/x86_64 MySQL Connectors Community                 141
mysql-tools-community/x86_64      MySQL Tools Community                      105
mysql80-community/x86_64          MySQL 8.0 Community Server                 161
和上面使用的三个repo相吻合。
修改mysql安装版本
这里使用的是mysql 8.0版本的repo,但是假如想使用5.7版本的repo,就将上面的配置替换为
# Enable to use MySQL 5.7
[mysql57-community]
name=MySQL 5.7 Community Server
baseurl=http://repo.mysql.com/yum/mysql-5.7-community/el/7/$basearch/
enabled=1
gpgcheck=1
gpgkey=file:///etc/pki/rpm-gpg/RPM-GPG-KEY-mysql

[mysql80-community]
name=MySQL 8.0 Community Server
baseurl=http://repo.mysql.com/yum/mysql-8.0-community/el/7/$basearch/
enabled=0
gpgcheck=1
gpgkey=file:///etc/pki/rpm-gpg/RPM-GPG-KEY-mysql
注意,如果有多个版本enabled,会自动选最高版本来下载
我们这里也选择5.7版本来安装,比较稳定。
选择rpm包下载安装
装好了repo,但是我们还不清楚要安装的软件全称是什么,只知道有个关键字叫mysql,那我们就搜索下和mysql以及和server有关的rpm包
[fuhx@testmachine Downloads]$ yum search mysql | grep mysql | grep server
dpm-copy-server-mysql.x86_64 : DPM copy server with MySQL database back-end
dpm-name-server-mysql.x86_64 : DPM name server with MySQL database back-end
dpm-server-mysql.x86_64 : Disk Pool Manager (DPM) server with MySQL database
dpm-srm-server-mysql.x86_64 : DPM SRM server with MySQL database back-end
lfc-server-mysql.x86_64 : LCG File Catalog (LFC) server with MySQL database
mysql-community-common.i686 : MySQL database common files for server and client
mysql-community-common.x86_64 : MySQL database common files for server and
mysql-community-test.x86_64 : Test suite for the MySQL database server
proftpd-mysql.x86_64 : Module to add MySQL support to the ProFTPD FTP server
voms-mysql-plugin.x86_64 : VOMS server plugin for MySQL
zabbix22-server-mysql.x86_64 : Zabbix server compiled to use MySQL
zabbix30-server-mysql.x86_64 : Zabbix server compiled to use MySQL
zabbix40-server-mysql.x86_64 : Zabbix server compiled to use MySQL
mysql-community-server.x86_64 : A very fast and reliable SQL database server
[fuhx@testmachine Downloads]$
发现有一个叫做mysql-community-server的包,安装一下
[fuhx@testmachine Downloads]$ sudo yum -y install mysql-community-server
安装完启动mysqld服务
[root@testmachine mysql57-community]# systemctl start mysqld
简单验证下是否可用
[fuhx@testmachine Downloads]$ mysql -uroot
如果出现报错,可以查看我的另一篇博客《centos7安装完mysql5.7.29访问报错解决办法》
顺便补充下,yum的配置文件在/etc/yum.conf,里面配置了yum包下载保存路径
cachedir=/var/cache/yum/$basearch/$releasever
升级mysql
正常情况下,每个软件都是在单个repo里面进行版本的叠加,有了新版本上传到跟旧版本一样的路径。这样有了新版本就可以直接用yum check-update xxx检测出来。
但是mysql这个比较特殊,不同版本对应着不同的repo。所以如果要进行升级或者是修改版本,需要将原先的版本的repo禁用,然后启用新版本的repo。
例如想把mysql5.7版本升级到最新的8.0版本,首先在repo文件里面禁用5.7的repo,并且启用8.0的repo,如下
# Enable to use MySQL 5.7
[mysql57-community]
name=MySQL 5.7 Community Server
baseurl=http://repo.mysql.com/yum/mysql-5.7-community/el/7/$basearch/
enabled=0
gpgcheck=1
gpgkey=file:///etc/pki/rpm-gpg/RPM-GPG-KEY-mysql

[mysql80-community]
name=MySQL 8.0 Community Server
baseurl=http://repo.mysql.com/yum/mysql-8.0-community/el/7/$basearch/
enabled=1
gpgcheck=1
gpgkey=file:///etc/pki/rpm-gpg/RPM-GPG-KEY-mysql
检查下成功检测到了新版本
[root@testmachine yum.repos.d]# yum check-update mysql-community-server
Loaded plugins: fastestmirror, langpacks
Loading mirror speeds from cached hostfile
 * base: ap.stykers.moe
 * centosplus: mirrors.ustc.edu.cn
 * epel: hk.mirrors.thegigabit.com
 * extras: ap.stykers.moe
 * updates: mirrors.ustc.edu.cn
mysql-connectors-community                                                                                                                            | 2.5 kB  00:00:00
mysql-tools-community                                                                                                                                 | 2.5 kB  00:00:00
mysql80-community                                                                                                                                     | 2.5 kB  00:00:00

mysql-community-server.x86_64                                                         8.0.19-1.el7                                                          mysql80-community
更新到8.0版本
[root@testmachine yum.repos.d]# yum update mysql-community-server
如果是要安装指定版本的软件,首先用yum list | grep xxx查看下这个软件可供安装的不同版本的rpm包名字,然后用带版本的包的名字来安装即可。
常用yum命令
- yum repolist
显示本机可使用的所有repo - yum list
显示本机所有repo可安装的软件 - yum list installed
显示本机已安装的软件 - yum search
查询某关键字相关的包 - yum info
显示包的详细信息 - yum install
安装包 - yum remove
删除包 - yum check-update
检查更新 - yum update
更新包