4412开发板学习之Linux驱动开发(九):中断控制及按键中断实现

中断控制及按键中断实现

  • 基本概念
  • 相关函数与结构体
    • 中断注册函数
    • 中断释放函数
    • 相关结构体
  • 硬件
  • 软件
    • 准备工作
    • 代码与分析
      • 驱动代码
      • 驱动代码分析
  • 实验
    • 安装模块
    • 查看中断
  • 总结一下

基本概念

在这里就不讲解什么是中断了,在单片机中我们对中断都已经相当了解了
中断的处理流程是:按下(产生中断)-》跳转到异常向量入口,执行中断函数
中断函数要:保护现场、执行中断处理函数、恢复现场
我们需要做什么:学会使用中断注册函数,了解注册中断相关的函数和结构体
中断一般并不会有应用来调用 一般都是在底层处理

相关函数与结构体

中断注册函数

request_irq

request_irq(unsigned int irq, irq_handler_t handler, unsigned long flags,const char *name, void *dev)

参数1:irq中断号(和平台架构相关,结合datasheet以及相关平台文件)
参数2:中断处理函数
参数3:中断标记。上升沿、下降沿、高电平、低电平…
参数4:中断名字
参数5:使用设备的设备结构体或者NULL

中断释放函数

free_irq

void free_irq(unsigned int irq, void *dev_id)

参数1:irq中断号
参数2:设备号

相关结构体

这个没有深入的去看,以后在进行补充
irqaction
irq_desc

硬件

4412上外部中断号如何对应

  • Home->UART_RING->GPX1_1->EXYNOS4_GPX1(1)->KP_COL[1]->XEINT_9
  • back->SIM_DET->GPX1_2->EXYNOS4_GPX1(2)->KP_COL[2]->XEINT_10

IRQ_EINT() 宏定义
用于获取中断号

#define IRQ_EINT(x)    (((x) >= 4) ? (IRQ_EINT4 + (x) - 4) : (IRQ_EINT0 + (x)))

所以两个中断号为

  • IRQ_EINT(9)
  • IRQ_EINT(10)

软件

准备工作

注册设备,编译源码,烧录内核

代码与分析

驱动代码

#include 
#include 

#include 
#include 
#include 
#include 
#include 
#include 
//#include 
#include 
#include 
#include 
//#include "gps.h"
#include 
/*中断头文件*/
#include 
#include 
#define DPRINTK(x...) printk("KEYIRQ_CTL DEBUG:" x)

#define DRIVER_NAME "keyirq_ctl"

/*IRQ_EINT(9)中断服务函数*/
static irqreturn_t eint9_handler(int irq,void *dev_id)
{
	mdelay(5);
	printk("receive a interrupt 9!\n");
	return IRQ_HANDLED;
}
/*IRQ_EINT(10)中断服务函数*/
static irqreturn_t eint10_handler(int irq,void *dev_id)
{
	mdelay(5);
	printk("receive a interrupt 10!\n");
	return IRQ_HANDLED;
}

static int keyirq_probe(struct platform_device *pdev)
{
	//int ret, i;
	char *banner = "keyirq Initialize\n";

	printk(banner);
	/*中断注册函数*/
	request_irq(IRQ_EINT(9),eint9_handler,IRQ_TYPE_EDGE_FALLING,"my_eint9",pdev);
	request_irq(IRQ_EINT(10),eint10_handler,IRQ_TYPE_EDGE_FALLING,"my_eint10",pdev);
	return 0;

}

static int keyirq_remove (struct platform_device *pdev)
{
	/*中断卸载函数*/
	free_irq(IRQ_EINT(9),pdev);
	free_irq(IRQ_EINT(10),pdev);
	return 0;
}

static int keyirq_suspend (struct platform_device *pdev, pm_message_t state)
{
	DPRINTK("keyirq suspend:power off!\n");
	return 0;
}

static int keyirq_resume (struct platform_device *pdev)
{
	DPRINTK("keyirq resume:power on!\n");
	return 0;
}

static struct platform_driver keyirq_driver = {
	.probe = keyirq_probe,
	.remove = keyirq_remove,
	.suspend = keyirq_suspend,
	.resume = keyirq_resume,
	.driver = {
		.name = DRIVER_NAME,
		.owner = THIS_MODULE,
	},
};

static void __exit keyirq_exit(void)
{
	platform_driver_unregister(&keyirq_driver);
}

static int __init keyirq_init(void)
{
	return platform_driver_register(&keyirq_driver);
}

module_init(keyirq_init);
module_exit(keyirq_exit);

MODULE_LICENSE("Dual BSD/GPL");

驱动代码分析

按键的中断实现我们就没有使用应用程序,直接在中断中进行的打印
首先我们在probe函数中注册了中断函数,我们注册为下降沿触发(当按键按下为低电平,按下时会触发中断)接着我们编写了两个中断函数,就是很简单的打印,然后在remove函数中卸载了中断函数,这样在我们卸载模块的时候中断函数也就被卸载了

实验

安装模块

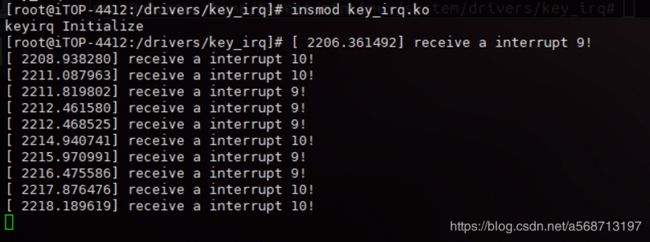
4412开发板学习之Linux驱动开发(九):中断控制及按键中断实现_第1张图片
当我们按下按键的时候中断服务函数中的printk语句被调用

查看中断

使用cat /proc/interrupts
4412开发板学习之Linux驱动开发(九):中断控制及按键中断实现_第2张图片
4412开发板学习之Linux驱动开发(九):中断控制及按键中断实现_第3张图片
可以看到在中断列表中有我们的中断,前面的数字8表示中断触发的次数

总结一下

中断是处理器的重要功能,也是我们驱动编写者要处理的最大难点之一,今天的中断驱动程序看上去很简单,但是在以后的学习工作中我们会遇到更多复杂的中断上下文,更多的复杂中断,中断要学的还有很多,以后会有深入的博客进行研究
你可能感兴趣的:(arm+linux开发)