Hadoop_YARN资源管理系统源码解析
目录
一、YARN产生的背景(MRv1的局限性)
二、YARN源代码结构
三、YARN基本架构
四、YARN各模块详细分析
五、MRAppMaster-MapReduce On YARN实现
六、YarnChild-MR引擎启动入口
七、总结
一、YARN产生的背景(MRv1的局限性)
YARN 是在 MRv1 基础上演化而来的,它克服了 MRv1 中的各种局限性。在正式介绍 YARN 之前,我们先要了解 MRv1 的一些局限性,这可概括为以下几个方面:
❑ 扩展性差。在 MRv1 中,JobTracker 同时兼备了资源管理和作业控制两个功能,这成为系统的一个最大瓶颈,严重制约了Hadoop集群扩展性。
❑ 可靠性差。MRv1 采用了Master/Slave结构,其中,Master(JobTracker)存在单点故障问题,一旦它出现故障将导致整个集群不可用。
❑ 资源利用率低。MRv1 采用了基于槽位的资源分配模型,槽位是一种粗粒度的资源 划分单位,通常一个任务不会用完槽位对应的资源,且其他任务也无法使用这些空 闲资源。此外,Hadoop 将槽位分为 Map Slot 和 Reduce Slot 两种,且不允许它们之 间共享,常常会导致一种槽位资源紧张而另外一种闲置(比如一个作业刚刚提交时, 只会运行Map Task,此时Reduce Slot 会闲置)。
❑ 无法支持多种计算框架。随着互联网高速发展,MapReduce这种基于磁盘的离线计算框架已经不能满足应用要求,从而出现了一些新的计算框架,包括内存计算框架、 流式计算框架和迭代式计算框架等,而这些新的计算框架是无法运行在MRv1上的。
为了克服以上几个缺点,Apache开始尝试对Hadoop进行升级改造,进而诞生了更加先进的下一代MapReduce计算框架 MRv2。正是由于MRv2将资源管理功能抽象成了一个独立的通用系统YARN,直接导致下一代MapReduce的核心从单一的计算框架MapReduce转移为通用的资源管理系统YARN。为了进一步理解以YARN为核心的软件栈, 我们将之与以MapReduce为核心的软件栈进行对比,在以MapReduce为核心的软件栈中,资源管理系统 YARN 是可插拔替换的,比如选择 Mesos替换YARN,一旦MapReduce接口改变,所有的资源管理系统的实现均需要跟着改变 ;但以 YARN 为核心的 软件栈则不同,所有框架都需要实现 YARN 定义的对外接口以运行在YARN之上,这意味着Hadoop 2.0可以打造一个以YARN为核心的生态系统。
图1 MRV1的基本架构 图2 YARN作为通用资源管理系统的的基本架构
MRv1主要由两类服务组成,分别是 JobTracker 和TaskTracker。其中,JobTracker负责集群资源资源和作业管理,TaskTracker负责单个节点的资源管理和任务管理。MRv1将资源管理和作业管理两部分混杂在一 起,使得它在扩展性、容错性和多框架支持等方面存在明显缺陷。而 MRv2 则通过将资源管理和作业管理两部分剥离开,分别由YARN和ApplicationMaster负责,其中,YARN专管资源管理和调度,而ApplicationMaster则负责应用程序的生命周期。总结:MRv2将MRv1中JobTracker的集群资源管理功能抽出来变成YARN中的ResourceManager,将MRv1中的TaskTracker的节点资源管理抽出来变成YARN中的NodeManager,将MRv1中JobTracker的作业管理及TaskTracker的任务管理抽出来变成YARN中的ApplicationMaster,使得YARN在扩展性、容错性和多框架支持等方面相比MRv1都有明显的改进。
二、YARN源代码结构
在 Hadoop 的JAR压缩包解压后的目录 hadoop-{VERSION} 中包含了 Hadoop 全部的 管理脚本和JAR包,下面简单对这些文件或目录进行介绍。
❑ bin:Hadoop 最基本的管理脚本和使用脚本所在目录,这些脚本是 sbin 目录下管理 脚本的基础实现,用户可以直接使用这些脚本管理和使用 Hadoop。
❑ etc:Hadoop 配置文件所在的目录,包括 core-site.xml、hdfs-site.xml、mapred-site. xml 等从 Hadoop 1.0 继承而来的配置文件和 yarn-site.xml 等 Hadoop 2.0 新增的配置 文件。
❑ include:对外提供的编程库头文件(具体动态库和静态库在 lib 目录中),这些头文 件均是用 C++ 定义的,通常用于 C++ 语言访问 HDFS 或者编写 MapReduce 程序。
❑ lib:该目录包含了 Hadoop 对外提供的编程动态库和静态库,与 include 目录中的头 文件结合使用。
❑ libexec:各个服务对应的 Shell 配置文件所在目录,可用于配置日志输出目录、启 动参数(比如 JVM 参数)等基本信息。
❑ sbin:Hadoop 管理脚本所在目录,主要包含 HDFS 和 YARN 中各类服务的启动/关闭脚本。
❑ share:Hadoop 各个模块编译后的 JAR 包所在目录。
在 Hadoop 源代码压缩包解压后的目录 hadoop-{VERSION}-src 中,可看到如图1
示的目录结构,其中,比较重要的目录有 :hadoop-common-project、hadoop-mapreduce- project、hadoop-hdfs-project 和 hadoop-yarn-project 等,下面分别介绍这几个目录的作用。
❑ hadoop-common-project:Hadoop 基础库所在目录,该目录中包含了其他所有模块可 能会用到的基础库,包括 RPC、Metrics、Counter 等。
图3 Hadoop源码目录结构
❑ hadoop-mapreduce-project :MapReduce 框架的实现,在 MRv1 中,MapReduce 由编程模 型(map/reduce)、调度系统(JobTracker 和 TaskTracker)和数据处理引擎(MapTask 和 ReduceTask)等模块组成,而此处的 MapReduce 则不同于 MRv1 中的实现,它的资 源调度功能由新增的 YARN 完成(编程模型和数据处理引擎不变),自身仅包含非 常简单的任务分配功能。
❑ hadoop-hdfs-project :Hadoop 分布式文件系统实现,不同于 Hadoop 1.0 中单 NameNode 实现,Hadoop 2.0 支持多 NameNode,同时解决了 NameNode 单点故障问题。
❑ hadoop-yarn-project :Hadoop 资源管理系统 YARN 实现。这是 Hadoop 2.0 新引入的 分支,该系统能够统一管理系统中的资源,并按照一定的策略分配给各个应用程序。
下面就对Hadoop YARN源代码组织结构进行介绍。
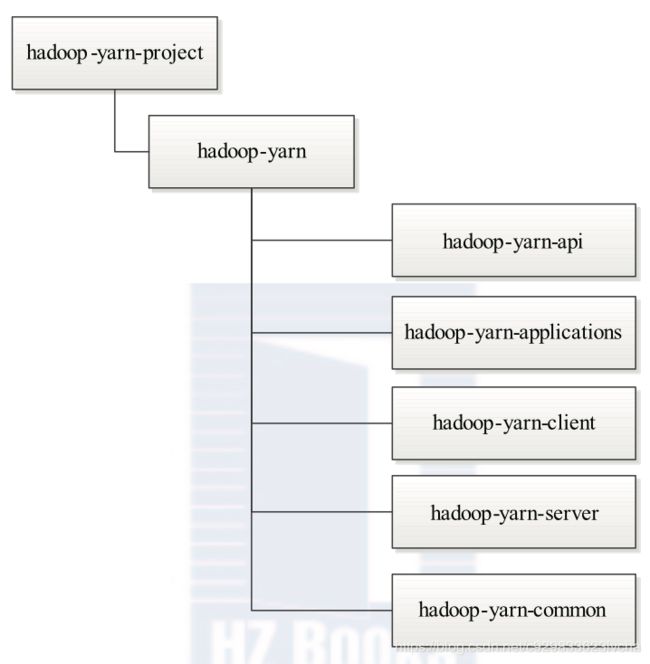
总体上看,Hadoop YARN 分为 5 部分 :API、Common、Applications、Client 和 Server, 它们的内容具体如下:
❑ YARN API(hadoop-yarn-api 目录):给出了 YARN 内部涉及的 4 个主要 RPC 协议的 Java 声明和 Protocol Buffers 定义,这 4 个 RPC 协议分别是 ApplicationClientProtocol、 ApplicationMasterProtocol、ContainerManagementProtocol 和 ResourceManagerAdministrationProtocol。
❑ YARN Common(hadoop-yarn-common 目录):该部分包含了 YARN 底层库实现, 包括事件库、服务库、状态机库、Web 界面库等。
❑ YARN Applications(hadoop-yarn-applications 目录):该部分包含了两个 Application 编程实例,分别是 distributedshell 和 Unmanaged AM。
❑ YARN Client(hadoop-yarn-client 目录):该部分封装了几个与 YARN RPC 协议交互 相关的库,方便用户开发应用程序。
❑ YARN Server(hadoop-yarn-server 目录):该部分给出了 YARN 的核心实现,包括ResourceManager、NodeManager、资源管理器等核心组件的实现。
图4 Hadoop YARN目录组织结构
三、YARN基本架构
YARN是Hadoop 2.0 中的资源管理系统,它的基本设计思想是将MRv1中的JobTracker拆分成了两个独立的服务 :一个全局的资源管理器ResourceManager和每个应用程序特有的 ApplicationMaster。其中ResourceManager负责全局的资源管理及调度,而 ApplicationMaster负责单个应用程序的生命周期管理。
3.1、YARN基本组成结构
YARN 总体上仍然是 Master/Slave 结构,在整个资源管理框架中,ResourceManager 为 Master,NodeManager 为 Slave,ResourceManager 负责对各个 NodeManager 上的资源进行 统一管理和调度。当用户提交一个应用程序时,需要提供一个用以跟踪和管理这个程序的 ApplicationMaster,它负责向 ResourceManager 申请资源,并要求 NodeManger 启动可以占 用一定资源的任务。由于不同的 ApplicationMaster 被分布到不同的节点上,因此它们之间 不会相互影响。在本小节中,我们将对 YARN 的基本组成结构进行介绍。
图 2-9 描述了 YARN 的基本组成结构,YARN 主要由 ResourceManager、NodeManager、 ApplicationMaster(图中给出了 MapReduce 和 MPI 两种计算框架的 ApplicationMaster,分 别为 MR AppMstr 和 MPI AppMstr)和 Container 等几个组件构成。
1. ResourceManager(RM)
RM是一个全局的资源管理器,负责整个集群的资源管理与调度(个人理解类似于MRv1时的JobTracker,只是把JobTracker作业管理相关的这块移到了ApplicationMaster中,只负责纯粹通用的资源管理与调度,做到了计算框架无关)。主要功能是包括资源管理与调度、ApplicationMaster管理(启动应用程序的AM)、NodeManager管理等。
❑ 与客户端进行交互,处理来自于客户端的请求,如提交应用程序、查询应用的运行情况等。
❑ 启动和管理各个应用程序的ApplicationMaster,并且为ApplicationMaster申请第一个Container用于启动和在它运行失败时将它重新启动。
❑ 管理NodeManager,接收来自NodeManager的资源和节点健康情况汇报,并向NodeManager下达资源管理命令,例如kill掉某个container。
❑ 资源管理与调度,接收来自ApplicationMaster的资源申请请求,并为之分配资源。这个是它最重要的职能。YARN提供了多种直接可用的调度器,比如Fair Scheduler和Capacity Scheduler。
2. ApplicationMaster(AM)
AM是一个应用程序管理器,负责一个应用程序的生命周期管理(管理Job中的各个task,申请资源并管理Job内的资源分配)。用户提交的每个应用程序均包含一个 AM,主要功能包括:
❑ 与 RM 调度器协商以获取资源(用 Container 表示);
❑ 将得到的资源进一步分配给内部的任务;
❑ 与 NM 通信以启动 / 停止任务;
❑ 监控所有任务运行状态,并在任务运行失败时重新为任务申请资源以重启任务。
当 前 YARN 自 带 了 两 个 AM 实 现, 一 个 是 用 于 演 示 AM 编 写 方 法 的 实 例 程 序
distributedshell,它可以申请一定数目的 Container 以并行运行一个 Shell 命令或者 Shell 脚本 ; 另一个是运行 MapReduce 应用程序的 AM— MRAppMaster。此外,一些其他的计算框架对应的 AM 正在开发中,比如 Open MPI、Spark 等 。
3. NodeManager(NM)
NM 是单个节点上的资源管理器(个人理解类似于MRv1时的TaskTracker,只是把TaskTracker任务管理这块移到了ApplicationMaster中,只负责纯粹通用的资源管理与调度,做到了计算框架无关),一方面,它会定时地向 RM 汇报本节点上的 资源使用情况和各个 Container 的运行状态;另一方面,它接收并处理来自 AM 的 Container 启动 / 停止等各种请求。
4. Container
Container 是 YARN 中的资源抽象,它封装了某个节点上的多维度资源,如内存、 CPU、磁盘、网络等,当 AM 向 RM 申请资源时,RM 为 AM 返回的资源便是用 Container 表示的。YARN 会为每个任务分配一个 Container,且该任务只能使用该 Container 中描述的 资源。需要注意的是,Container 不同于 MRv1 中的 slot,它是一个动态资源划分单位,是 根据应用程序的需求动态生成的。YARN 目前仅支持 CPU 和内存两种资源, 且使用了轻量级资源隔离机制 Cgroups 进行资源隔离 。
3.2、YARN通信协议
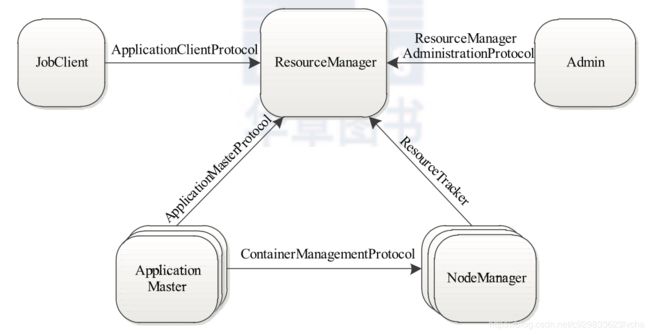
RPC 协议是连接各个组件的“大动脉”,了解不同组件之间的 RPC 协议有助于我们更 深入地学习 YARN 框架。在 YARN 中,任何两个需相互通信的组件之间仅有一个 RPC 协 议,而对于任何 一个 RPC 协议,通信双方有一端是 Client,另一端为 Server,且 Client 总 是主动连接 Server 的,因此,YARN 实际上采用的是拉式(pull-based)通信模型。如图 2-10 所示,箭头指向的组件是 RPC Server,而箭头尾部的组件是 RPC Client,YARN 主要由以 下几个 RPC 协议组成 :
❑ JobClient(作业提交客户端)与 RM 之间的协议 — ApplicationClientProtocol : JobClient 通过该 RPC 协议向RM提交应用程序、查询应用程序状态等。
❑ Admin(管理员)与 RM 之间的通信协议— ResourceManagerAdministrationProtocol : Admin 通过该 RPC 协议更新系统配置文件,比如节点黑白名单、用户队列权限等。
❑ AM 与 RM 之间的协议— ApplicationMasterProtocol :AM 通过该 RPC 协议向 RM 注册和撤销自己,并为各个任务申请资源。
❑ AM 与 NM 之间的协议 — ContainerManagementProtocol :AM 通过该 RPC 要求 NM 启动或者停止Container,获取各个Container的使用状态等信息。
❑ NM 与 RM 之间的协议— ResourceTracker :NM 通过该 RPC 协议向 RM 注册,并 定时发送心跳信息汇报当前节点的资源使用情况和Container运行情况。
图5 Hadoop YARN的RPC协议
为了提高 Hadoop 的向后兼容性和不同版本之间的兼容性,YARN 中的序列化框架采用 了 Google 开源的 Protocol Buffers。
3.3、YARN工作流程
运行在 YARN 上的应用程序主要分为两类 :短应用程序和长应用程序,其中,短应用程序是指一定时间内(可能是秒级、分钟级或小时级,尽管天级别或者更长时间的也存在,但非常少)可运行完成并正常退出的应用程序,比如 MapReduce 作业、Tez DAG 作业等,长应用程序是指不出意外,永不终止运行的应用程序,通常是一些服务,比如 Storm Service(主要包括 Nimbus 和 Supervisor 两类服务),HBase Service(包括 Hmaster 和 RegionServer 两类服务) 等,而它们本身作为一个框架提供了编程接口供用户使用。尽管这两类应用程序作用不同,一类直接运行数据处理程序,一类用于部署服务(服务之上再运行数据处理程序),但运行在 YARN 上的流程是相 同的。当用户向 YARN 中提交一个应用程序后,YARN 将分两个阶段运行该应用程序 :第一 个阶段是启动 ApplicationMaster ;第二个阶段是由 ApplicationMaster 创建应用程序,为它 申请资源,并监控它的整个运行过程,直到运行完成。如图 2-11 所示,YARN 的工作流程 分为以下几个步骤:
图6 Hadoop YARN的工作流程
步骤 1 用户向 YARN 中提交应用程序,其中包括 ApplicationMaster 程序、启动 ApplicationMaster 的命令、用户程序等。
步骤 2 ResourceManager 为该应用程序分配第一个 Container,并与对应的 Node- Manager 通信,要求它在这个 Container 中启动应用程序的 ApplicationMaster。
步骤 3 ApplicationMaster 首先向 ResourceManager 注册,这样用户可以直接通过 ResourceManage 查看应用程序的运行状态,然后它将为各个任务申请资源,并监控它的运 行状态,直到运行结束,即重复步骤 4~7。
步骤 4 ApplicationMaster 采用轮询的方式通过 RPC 协议向 ResourceManager 申请和 领取资源。
步骤 5 一旦 ApplicationMaster 申请到资源后,便与对应的 NodeManager 通信,要求 它启动任务。
步骤 6 NodeManager 为任务设置好运行环境(包括环境变量、JAR 包、二进制程序 等)后,将任务启动命令写到一个脚本中,并通过运行该脚本启动任务。
步骤 7 各个任务通过某个 RPC 协议向 ApplicationMaster 汇报自己的状态和进度,以 让 ApplicationMaster 随时掌握各个任务的运行状态,从而可以在任务失败时重新启动任务。
在应用程序运行过程中,用户可随时通过 RPC 向 ApplicationMaster 查询应用程序的当 前运行状态。
步骤 8 应用程序运行完成后,ApplicationMaster 向 ResourceManager 注销并关闭自己。
四、YARN各模块详细分析
接下来将分析各个重要模块,ResourceManager、NodeManager、MRAppMaster、YarnChild。如下如所示:
图7 Hadoop YARN详细模块
4.1、ResourceManager
同MRv1一样,YARN也采用了Master/Slave结构,其中,Master实现为ResourceManager,负责整个集群的资源管理与调度;Slave实现为NodeManager,负责单个节点的资源管理与调度及任务启动。ResourceManager是整个YARN集群中最重要的组件之一,主要功能是包括资源管理与调度、ApplicationMaster管理(启动应用程序的AM)、Application管理等、NodeManager管理等。在YARN中,ResourceManager负责集群中所有资源的统一管理和分配(个人理解类似于MRv1时的JobTracker,只是把JobTracker作业管理这块移到了ApplicationMaster中,只负责纯粹通用的资源管理与调度,做到了计算框架无关),它接收来自各个节点(NodeManager)的资源汇报信息,并把这些信息按照一定的策略分配给各个应用程序(ApplicationMaster)。接下来就来分析下RM内部组成的各个功能组件和他们相互的交互方式。
一、ResourceManager的交互协议与基本职能
1、ResourceManager交互协议
在整个Yarn框架中主要涉及到7个协议,分别是ApplicationClientProtocol、MRClientProtocol、ContainerManagementProtocol、ApplicationMasterProtocol、ResourceTracker、LocalizationProtocol、TaskUmbilicalProtocol,这些协议封装了各个组件交互的信息。ResourceManager现实功能需要和NodeManager以及ApplicationMaster进行信息交互,其中涉及到的RPC协议有ResourceTrackerProtocol、ApplicationMasterProtocol和ResourceTrackerProtocol。
-
ResourceTracker
NodeManager通过该协议向ResourceManager中注册、汇报节点健康情况以及Container的运行状态,并且领取ResourceManager下达的重新初始化、清理Container等命令。NodeManager和ResourceManager这种RPC通信采用了和MRv1类似的“pull模型”(ResourceManager充当RPC server角色,NodeManager充当RPC client角色),NodeManager周期性主动地向ResourceManager发起请求,并且领取下达给自己的命令。
-
ApplicationMasterProtocol
应用程序的ApplicationMaster同过该协议向ResourceManager注册、申请和释放资源。该协议和上面协议同样也是采用了“pull模型”,其中在RPC机制中,ApplicationMaster充当RPC client角色,ResourceManager充当RPC server角色。
-
ApplicationClientProtocol
客户端通过该协议向ResourceManager提交应用程序、控制应用程序(如杀死job)以及查询应用程序的运行状态等。在该RPC 协议中应用程序客户端充当RPC client角色, ResourceManager充当RPC server角色。
整理一下ResourceManager与NodeManager、ApplicationMaster和客户端RPC协议交互的信息:
图8 ResourceManager相关的RPC协议
上图中的ResourceTrackeService、ApplicationMasterService 、ClientRMService是ResourceManager中处理上述功能的组件,充当RPC_Servser。
2、ResourceManager基本职能
ResourceManager基本职能概括起来就以下几方面:
-
与客户端进行交互,处理来自于客户端的请求,如提交应用程序、查询应用的运行情况等。
-
启动和管理各个应用程序的ApplicationMaster,并且为ApplicationMaster申请第一个Container用于启动和在它运行失败时将它重新启动。
-
管理NodeManager,接收来自NodeManager的资源和节点健康情况汇报,并向NodeManager下达资源管理命令,例如kill掉某个container。
-
资源管理与调度,接收来自ApplicationMaster的资源申请请求,并为之分配资源。这个是它最重要的职能。
二、ResourceManager内部组成架构分析
ResourceManager在底层代码实现上将各个功能模块分的比较细,各个模块功能具有很强的独立性。下图所示的是ResourceManager中的大概的功能模块组成:
图9 ResourceManager内部架构图
ResourceManager内部架构代码概况如下:
public class ResourceManager extends CompositeService implements Recoverable {
  /**
   * Priority of the ResourceManager shutdown hook.
   */
  public static final int SHUTDOWN_HOOK_PRIORITY = 30;
  private static final Log LOG = LogFactory.getLog(ResourceManager.class);
  public static final long clusterTimeStamp = System.currentTimeMillis();

  // ApplicationClientProtocol协议的RPC_Server
  private ClientRMService clientRM;

  // ContainerManagementProtocol协议的RPC_Client,以启动应用程序的ApplicationMaster
  private ApplicationMasterLauncher applicationMasterLauncher;

  // ResourceTracker协议的RPC_Server
  protected ResourceTrackerService resourceTracker;

  // ApplicationMasterProtocol协议的RPC_Server
  protected ApplicationMasterService masterService;

  // 资源管理器
  protected ResourceScheduler scheduler;

  private Dispatcher rmDispatcher;
  ...
}
1、用户交互模块
用户交互模块即上图显示的User Service管理模块。在这里边还可以看到根据不同的用户类型启用了不同的服务进行处理,AdminService处理管理员相关请求,ClientRMService处理普通客户相关请求,这样使得管理员不会因为普通客户请求太多而造成堵塞。下面看看这2个服务的具体实现代码:
-
ClientRMService
public class ClientRMService extends AbstractService implements
    ApplicationClientProtocol {
  private static final ArrayList EMPTY_APPS_REPORT = new ArrayList();
  private static final Log LOG = LogFactory.getLog(ClientRMService.class);
  final private AtomicInteger applicationCounter = new AtomicInteger(0);
  final private YarnScheduler scheduler; // 资源调度器
  final private RMContext rmContext; // RM上下文对象,其包含了RM大部分运行时信息,如节点列表、队列列表、应用程序列表等
  private final RMAppManager rmAppManager; //应用程序管理器
  private Server server; // ApplicationClientProtocol协议的RPC_Server
  // 访问控制对象,例如,一些应用程序在提交时设置了查看权限的话,其他普通用户就无法查看。
  private final ApplicationACLsManager applicationsACLsManager;
  private final QueueACLsManager queueACLsManager;
  @Override
  protected void serviceStart() throws Exception {
    Configuration conf = getConfig();
    YarnRPC rpc = YarnRPC.create(conf);
    this.server =  // 构建ApplicationClientProtocol协议的RPC_Server
      rpc.getServer(ApplicationClientProtocol.class, this,
            clientBindAddress,
            conf, this.rmDTSecretManager,
            conf.getInt(YarnConfiguration.RM_CLIENT_THREAD_COUNT,
                YarnConfiguration.DEFAULT_RM_CLIENT_THREAD_COUNT));
    // 启动ApplicationClientProtocol协议的RPC_Server
    this.server.start();
  }
  @Override
  public SubmitApplicationResponse submitApplication(
      SubmitApplicationRequest request) throws YarnException {
    ApplicationSubmissionContext submissionContext = request
        .getApplicationSubmissionContext();
    ApplicationId applicationId = submissionContext.getApplicationId();
    String user = null;
    try {
      // call RMAppManager to submit application directly
      rmAppManager.submitApplication(submissionContext,
          System.currentTimeMillis(), false, user);
    } catch (YarnException e) {
      LOG.info("Exception in submitting application with id " +
          applicationId.getId(), e);
    }
    SubmitApplicationResponse response = recordFactory
        .newRecordInstance(SubmitApplicationResponse.class);
    return response;
  }
  ...
}
从上面ClientRMService的基本代码架构我们可以看出:
(1)ClientRMService是一个RPC Server,主要为来自于普通客户端的各种RPC请求。从代码实现的角度看,ClientRMService实现了RPC协议ApplicationClientProtocol。
(2)之前我们已经说了,普通用户可以通过该服务来获得正在运行应用程序的相关信息,如进度情况、应用程序列表等。上面代码中都将ResourceManager运行信息封装在RMContxt接口中了,下面来看看这个接口的一个实现对象RMContextImpl:
public class RMContextImpl implements RMContext {

  // 中央异步调度器。RM中的各个服务和组件以及它们处理和输出的事件类型都是通过中央异步调度器组织在一起的,这样可以有效提高系统的吞吐量。

  private final Dispatcher rmDispatcher;

  private final ConcurrentMap applications // 应用程序列表

    = new ConcurrentHashMap();

  private final ConcurrentMap nodes // 节点列表

    = new ConcurrentHashMap();

  private final ConcurrentMap inactiveNodes // 非活跃节点列表

    = new ConcurrentHashMap();

  private AMLivelinessMonitor amLivelinessMonitor; // 正在运行中的AP心跳监控对象

  private AMLivelinessMonitor amFinishingMonitor; // 运行完毕后的AM心跳监控对象

  private RMStateStore stateStore = null; // 用于存储ResourceManager运行状态

  // 用于Container的超时监控,应用程序必须在一定时间内(默认10Min)使用分配到的Container去运行task,否则会被回收

  private ContainerAllocationExpirer containerAllocationExpirer;

  // 下面变量都是与安全管理相关的对象

  private final DelegationTokenRenewer delegationTokenRenewer;

  private final AMRMTokenSecretManager amRMTokenSecretManager;

  private final RMContainerTokenSecretManager containerTokenSecretManager;

  private final NMTokenSecretManagerInRM nmTokenSecretManager;

  private final ClientToAMTokenSecretManagerInRM clientToAMTokenSecretManager;

  private ClientRMService clientRMService;

  private RMDelegationTokenSecretManager rmDelegationTokenSecretManager;

...

} -
AdminService
AdminService和ClientRMService一样都是作为RPC的服务端,它针对的处理管理员RPC请求,负责访问权限的控制,中Yarn中管理员权限的设定可以在yarn-site.xml中yarn.admi.acl项进行设置,该项的默认值是*,也就是说如果不进行设置的话就当所有的用户都是管理员。从代码上看,它是ResourceManagerAdministrationProtocol协议的一个实现:
public class AdminService extends AbstractService implements ResourceManagerAdministrationProtocol {

  private static final Log LOG = LogFactory.getLog(AdminService.class);

  private final Configuration conf;

  private final ResourceScheduler scheduler;

  private final RMContext rmContext;

  private final NodesListManager nodesListManager;


  private final ClientRMService clientRMService;

  private final ApplicationMasterService applicationMasterService;

  private final ResourceTrackerService resourceTrackerService;


  private Server server; // ResourceManagerAdministrationProtocol协议的RPC_Server

  private InetSocketAddress masterServiceAddress;


  @Override

  protected void serviceStart() throws Exception {

    Configuration conf = getConfig();

    YarnRPC rpc = YarnRPC.create(conf);

    this.server = // 构建ResourceManagerAdministrationProtocol协议的RPC_Server

      rpc.getServer(ResourceManagerAdministrationProtocol.class, this, masterServiceAddress,

          conf, null,

          conf.getInt(YarnConfiguration.RM_ADMIN_CLIENT_THREAD_COUNT,

              YarnConfiguration.DEFAULT_RM_ADMIN_CLIENT_THREAD_COUNT));

    this.server.start();

    super.serviceStart();

  }

}
AdminService代码和ClientRMService比较相似,它各类功能对象也差不多。
2、NodeManager管理模块
NodeManager管理部分主要是通过ResourceTrackerService、NMLivelinessMonitor和NodeListManager这三个服务组件来共同管理NodeManager的生命周期。
1)ResourceTrackerService
ResourceTrackerService是RPC协议ResourceTracker的一个实现,它作为一个RPC Server端接收NodeManager的RPC请求,请求主要包含2种信息,注册NodeManager和处理心跳信息。ResourceTrackerService具体的核心代码如下:
public class ResourceTrackerService extends AbstractService implements ResourceTracker {

  private final RMContext rmContext;

  private final NodesListManager nodesListManager; // NodesListManager

  private final NMLivelinessMonitor nmLivelinessMonitor; // NMLivelinessMonitor

  private final RMContainerTokenSecretManager containerTokenSecretManager;

  private final NMTokenSecretManagerInRM nmTokenSecretManager;


  private long nextHeartBeatInterval;

  private Server server; // ResourceTracker协议的RPC_Server

  private InetSocketAddress resourceTrackerAddress;


  @Override

  protected void serviceStart() throws Exception {

    super.serviceStart();

    Configuration conf = getConfig();

    YarnRPC rpc = YarnRPC.create(conf);

    this.server = // 构建ResourceTracker协议的RPC_Server

      rpc.getServer(ResourceTracker.class, this, resourceTrackerAddress,

          conf, null,

          conf.getInt(YarnConfiguration.RM_RESOURCE_TRACKER_CLIENT_THREAD_COUNT,

              YarnConfiguration.DEFAULT_RM_RESOURCE_TRACKER_CLIENT_THREAD_COUNT));

    this.server.start();

  }

  ...

}
NodeManger启动时第一件事就是像ResourceManager注册,注册时NodeManager发给ResourceTrackerService的RPC包主要包含NodeManager所在节点的可用资源总量、对外开放的htpp端口、节点的host和port等信息,具体代码看ResourceTrackerService#registerNodeManager方法:
@Override

  public RegisterNodeManagerResponse registerNodeManager(

      RegisterNodeManagerRequest request) throws YarnException,

      IOException {

    NodeId nodeId = request.getNodeId(); // NodeManager的NodeID

    String host = nodeId.getHost(); // NodeManager所在节点的host

    int cmPort = nodeId.getPort(); // NodeManager所在节点的port

    int httpPort = request.getHttpPort(); // 对外开放的http端口

    Resource capability = request.getResource(); // 获得NodeManager所在节点的资源上限

    RegisterNodeManagerResponse response = recordFactory

        .newRecordInstance(RegisterNodeManagerResponse.class);

    response.setContainerTokenMasterKey(containerTokenSecretManager

        .getCurrentKey());

    response.setNMTokenMasterKey(nmTokenSecretManager

        .getCurrentKey());

    RMNode rmNode = new RMNodeImpl(nodeId, rmContext, host, cmPort, httpPort,

        resolve(host), capability);

    RMNode oldNode = this.rmContext.getRMNodes().putIfAbsent(nodeId, rmNode);

    if (oldNode == null) {

      this.rmContext.getDispatcher().getEventHandler().handle(

          new RMNodeEvent(nodeId, RMNodeEventType.STARTED));

    } else {

      LOG.info("Reconnect from the node at: " + host);

      this.nmLivelinessMonitor.unregister(nodeId);

      this.rmContext.getDispatcher().getEventHandler().handle(

          new RMNodeReconnectEvent(nodeId, rmNode));

    }

    this.nmTokenSecretManager.removeNodeKey(nodeId);

    this.nmLivelinessMonitor.register(nodeId);

    response.setNodeAction(NodeAction.NORMAL);

    response.setRMIdentifier(ResourceManager.clusterTimeStamp);

    return response;

}ResourceTrackerService另外一种功能就是处理心跳信息了,当NodeManager启动后,它会周期性地调用RPC函数ResourceTracker#nodeHeartbeat汇报心跳,心跳信息主要包含该节点的各个Container的运行状态、正在运行的Application列表、节点的健康状况等,随后ResourceManager为该NodeManager返回需要释放的Container列表、Application列表等信息。其中心跳信息处理的流程:首先,从NodeManager发来的心跳包中获得节点的状态状态信息,然后检测该节点是否已经注册过,然后检测该节点的host名称是否合法,例如是否在excluded列表中,然后再检测该次心跳是不是第一次心跳信息,这点非常重要,因为关系到心跳的重复发送与应答的相关问题。其实ResourceTrackerService和NodeManager的心跳处理机制和之前Hadoop1.x中的JobTracker与TaskTacker之间的心跳处理很相像,再然后,为NodeManager返回心跳应答信息,最后,向RMNode发送该NodeManager的状态信息并且保存最近一次心跳应答信息。再具体看看ResourceTrackerService#nodeHeart方法:
@Override

  public NodeHeartbeatResponse nodeHeartbeat(NodeHeartbeatRequest request)

      throws YarnException, IOException {

    //从RPC Clinet中获得nodeManager所在节点的健康状况

    NodeStatus remoteNodeStatus = request.getNodeStatus();

    NodeId nodeId = remoteNodeStatus.getNodeId();

    // 1. Check if it's a registered node

    RMNode rmNode = this.rmContext.getRMNodes().get(nodeId);

    if (rmNode == null) {

      /* node does not exist */

      String message = "Node not found resyncing " + remoteNodeStatus.getNodeId();

      LOG.info(message);

      resync.setDiagnosticsMessage(message);

      return resync;

    }

    // Send ping

    this.nmLivelinessMonitor.receivedPing(nodeId);

    // 2. Check if it's a valid (i.e. not excluded) node

    if (!this.nodesListManager.isValidNode(rmNode.getHostName())) {

      String message =

          "Disallowed NodeManager nodeId: " + nodeId + " hostname: "

              + rmNode.getNodeAddress();

      LOG.info(message);

      shutDown.setDiagnosticsMessage(message);

      this.rmContext.getDispatcher().getEventHandler().handle(

          new RMNodeEvent(nodeId, RMNodeEventType.DECOMMISSION));

      return shutDown;

    }

    NodeHeartbeatResponse lastNodeHeartbeatResponse = rmNode.getLastNodeHeartBeatResponse();

    if (remoteNodeStatus.getResponseId() + 1 == lastNodeHeartbeatResponse

        .getResponseId()) {

      LOG.info("Received duplicate heartbeat from node "

          + rmNode.getNodeAddress());

      return lastNodeHeartbeatResponse;

    } else if (remoteNodeStatus.getResponseId() + 1 < lastNodeHeartbeatResponse

        .getResponseId()) {

      String message =

          "Too far behind rm response id:"

              + lastNodeHeartbeatResponse.getResponseId() + " nm response id:"

              + remoteNodeStatus.getResponseId();

      LOG.info(message);

      resync.setDiagnosticsMessage(message);

      this.rmContext.getDispatcher().getEventHandler().handle(

          new RMNodeEvent(nodeId, RMNodeEventType.REBOOTING));

      return resync;

    }

    // Heartbeat response

    NodeHeartbeatResponse nodeHeartBeatResponse = YarnServerBuilderUtils

        .newNodeHeartbeatResponse(lastNodeHeartbeatResponse.

            getResponseId() + 1, NodeAction.NORMAL, null, null, null, null,

            nextHeartBeatInterval);

    rmNode.updateNodeHeartbeatResponseForCleanup(nodeHeartBeatResponse);

    populateKeys(request, nodeHeartBeatResponse);

    // 4. Send status to RMNode, saving the latest response.

    this.rmContext.getDispatcher().getEventHandler().handle(

        new RMNodeStatusEvent(nodeId, remoteNodeStatus.getNodeHealthStatus(),

            remoteNodeStatus.getContainersStatuses(),

            remoteNodeStatus.getKeepAliveApplications(), nodeHeartBeatResponse));

    return nodeHeartBeatResponse;

  }
(2)NodeListManager
NodeListManager主要分管黑名单(include列表)和白名单(exlude列表)管理功能,分别有yarnresouecemanager.nodes.include-path和yarnresourcemanager.nodes.exclude-path指定。黑名单列表中的nodes不能够和RM直接通信(直接抛出RPC异常),管理员可以对这两个列表进行编辑,然后使用$HADOOP_HOME/bin/yarn rmadmin -refreshNodes动态加载修改后的列表,使之生效。
(3)NMLivelinessMonitor
NMLivelinessMonitor主要是分管心跳异常请求。该服务会周期性地遍历集群中的所有NodeManager,如果某个NodeManager在一定时间内(默认10min,可以有参数yarn.nm.liveness-monitor.expiry-interval-ms配置)没有进行心跳汇报,那么则认为它已经死掉,同时在该节点上运行的Container也会被置为运行失败释放资源。那么这些被置为失败的Container是不会直接被RM分配执行的,RM只是负责将这些被置为失败的Container信息告诉它们所对应的ApplicationMaster,需不需要重新运行它说的算,如果需要重新运行的话,该ApplicationMaster要重新向RM申请资源,然后由ApplicationMaster与对应的NodeManager通信以重新运行之前失败的Container。
3、ApplicationMaster管理模块
ApplicationMaster的管理主要是用ResouceManager内部的3个服务组件来完成:ApplicationMasterLauncher、AMLivelinessMonitor、ApplicationMasterService,他们共同管理ApplicationMaster的生命周期。
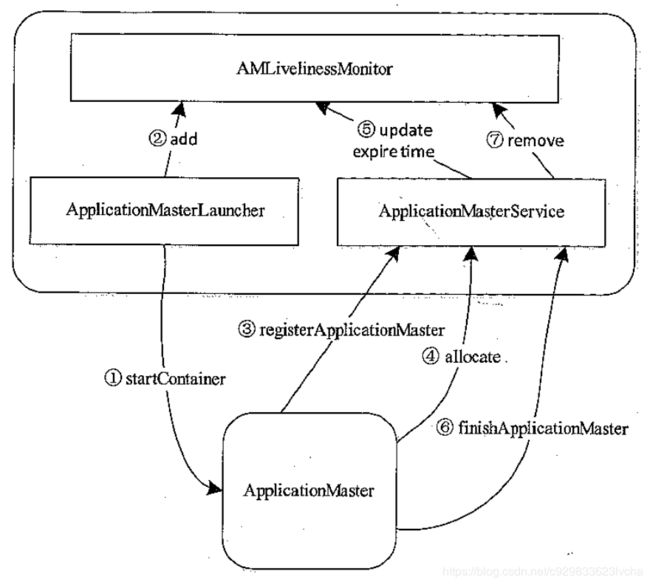
(1)在介绍这三个服务组件之前,先说说ApplicationMaster和ResourceManager整个交互流程:
图10 ApplicationMaster与ResourceManager交互流程
步骤一:
当ResourceManager接收到客户端提交应用程序请求时就会立马向资源管理器申请一个资源用于启动该应用程序所对应的ApplicationMaster,申请到资源后由ApplicationMasterLaucher与对应的NodeManager进行通信,要求该NodemManager在其所在节点启动该ApplicationMaster。
步骤二:
ApplicationMaster启动完毕后,ApplicationMasterLuacher通过事件的形式将刚刚启动的ApplicationMaster注册到AMLivelinessMonitor,以启动心跳监控。
步骤三:
ApplicationMaster启动后主动向ApplicationMasterService注册,并将自己所在host、端口等信息向其汇报。
步骤四:
ApplicationMaster在运行的过程中不断向ApplicationMasterService发送心跳。
步骤五:
ApplicationMasterService每次收到ApplicationMaster的心跳信息后,会同时AMLivelinessMonitor更新其最近一次发送心跳的时间。
步骤六:
当应用程序运行完毕后,ApplicationMaster向ApplicationMasterService请求注销自己。
步骤七:
ApplicationMasterService收到注销请求后,会将该应用程序的运行状态标注为完成,并且同时AMLivelinessMonitor移除对该ApplicationMaster的心跳监控。
(2)接下来详细介绍下这三个服务组件的一些运行机制
-
ApplicationMasterLauncher
ApplicationMasterLaucher是以线程池方式实现的一个事件处理器,其主要处理AMLaucherEvent类型的事件,包括启动(LAUNCH)和清除(CLEANUP)一个ApplicationMaster的事件。
当接收到LAUNCH类型的事件,ApplicationMasterLaucher立马会和对应的NodeManager进行通信,并且带上启动该ApplicationMaster所需要的各种信息,包括:启动命令、JAR包、环境变量等信息。NodeManager接收到来自ApplicationMasterLaucher的启动命令就会启动ApplicationMaster。
当接收到CLEANUP类型事件,ApplicationMasterLaucher立马会和对应的NodeManager进行通信,要求NodeManager杀死该ApplicationMaster,并释放掉资源。
ApplicationMasterLauncher相关的核心源码如下:
public class ApplicationMasterLauncher extends AbstractService implements

    EventHandler {

  private static final Log LOG = LogFactory.getLog(

      ApplicationMasterLauncher.class);

  private final ThreadPoolExecutor launcherPool;

  private LauncherThread launcherHandlingThread;

  private final BlockingQueue masterEvents

    = new LinkedBlockingQueue();

  protected final RMContext context;

  public ApplicationMasterLauncher(RMContext context) {

    super(ApplicationMasterLauncher.class.getName());

    this.context = context;

    this.launcherPool = new ThreadPoolExecutor(10, 10, 1,

        TimeUnit.HOURS, new LinkedBlockingQueue());

    this.launcherHandlingThread = new LauncherThread();

  }

  private void launch(RMAppAttempt application) {

    Runnable launcher = createRunnableLauncher(application,

        AMLauncherEventType.LAUNCH);

    masterEvents.add(launcher);

  }

  protected Runnable createRunnableLauncher(RMAppAttempt application,

      AMLauncherEventType event) {

    Runnable launcher =

        new AMLauncher(context, application, event, getConfig());

    return launcher;

  }

  private void cleanup(RMAppAttempt application) {

    Runnable launcher = createRunnableLauncher(application, AMLauncherEventType.CLEANUP);

    masterEvents.add(launcher);

  }

  private class LauncherThread extends Thread {

    public LauncherThread() {

      super("ApplicationMaster Launcher");

    }

    @Override

    public void run() {

      while (!this.isInterrupted()) {

        Runnable toLaunch;

        try {

          toLaunch = masterEvents.take();

          launcherPool.execute(toLaunch);

        } catch (InterruptedException e) {

          LOG.warn(this.getClass().getName() + " interrupted. Returning.");

          return;

        }

      }

    }

} 接下来再来看看AMLauncher,本质其实就是一个ContainerManagementProtocol协议的RPC_Client,让NodeManager去启动ApplicationMaster,相关的核心代码如下:
public class AMLauncher implements Runnable {

  private static final Log LOG = LogFactory.getLog(AMLauncher.class);

  private ContainerManagementProtocol containerMgrProxy;  // ContainerManagementProtocol协议的RPC_Client

  private final RMAppAttempt application;

  private final Configuration conf;

  private final AMLauncherEventType eventType;

  private final RMContext rmContext;

  private final Container masterContainer;

  @SuppressWarnings("rawtypes")

  private final EventHandler handler;

  public AMLauncher(RMContext rmContext, RMAppAttempt application,

      AMLauncherEventType eventType, Configuration conf) {

    this.application = application;

    this.conf = conf;

    this.eventType = eventType;

    this.rmContext = rmContext;

    this.handler = rmContext.getDispatcher().getEventHandler();

    this.masterContainer = application.getMasterContainer();

  }

  private void connect() throws IOException {

    ContainerId masterContainerID = masterContainer.getId();

    containerMgrProxy = getContainerMgrProxy(masterContainerID);

  }

  protected ContainerManagementProtocol getContainerMgrProxy(

      final ContainerId containerId) {

    final YarnRPC rpc = YarnRPC.create(conf);

    return currentUser

        .doAs(new PrivilegedAction() {

          @Override

          public ContainerManagementProtocol run() {

            return (ContainerManagementProtocol) rpc.getProxy( // 构建ContainerManagementProtocol协议的RPC_Client

                ContainerManagementProtocol.class,

                containerManagerBindAddress, conf);

          }

        });

} -
AMLivelinessMonitor
AMLivelinessMonitor的功能和NMLivelinessMonitor的功能几乎一样,只不过AMLivelinessMonitor监控的是ApplicationMaster,而NMLivelinessMonitor监控的是NodeManager。
AMLivelinessMonitor会周期性地遍历集群中的所有ApplicationMaster,如果某个ApplicationMaster在一定时间内(默认10min,可以有参数yarn.am.liveness-monitor.expiry-interval-ms配置)没有进行心跳汇报,那么则认为它已经死掉,同时该ApplicationMaster关联运行的Container也会被置为运行失败释放资源。如果Application运行失败,则有ResourceManager重新为它申请资源,并且在另外的节点上启动它(AM启动尝试次数由参数yarn.resourcemanager.am.max-attempts控制,默认2)。那么这些被置为失败的Container是不会直接被RM分配执行的,RM只是负责将这些被置为失败的Container信息告诉它们所对应的ApplicationMaster,需不需要重新运行它说的算,如果需要从新运行的话,该ApplicationMaster要从新向RM申请资源,然后由ApplicationMaster与对应的NodeManager通信以从新运行之前失败的Container。
-
ApplicationMasterService
ApplicationMasterService实现了RPC协议ApplicationMasterProtocol,负责处理来自ApplicationMaster的请求,请求主要包括注册、心跳、清理三种,其中注册是ApplicationMaster启动时发生的行为,请求包中包含:AM所在的节点、RPC端口、tracking url等信息;心跳是周期性行为,请求包中包含:请求资源的类型描述、待释放的Container列表等;清理是应用程序运行结束时发生的行为,ApplicationMaster向RM发送清理应用程序的请求,以回收资源和清理各种内存空间。
ApplicationMasterLauncher启动AM后,AM做的第一件事是向RM注册,这是通过RPC函数ApplicationMasterProtocol#registerApplicationMaster实现的。
AM运行过程中,需要周期性地通过RPC函数ApplicationMasterProtocol#allocate与RM通信,进行资源请求及告诉RM自己还活着。
AM运行结束后,需要通过RPC函数ApplicationMasterProtocol#finshApplicationMaster告诉RM自己运行结束,可以回收资源和清理各种数据结果。
ApplicationMasterService的核心代码如下:
public class ApplicationMasterService extends AbstractService implements

    ApplicationMasterProtocol {

  private static final Log LOG = LogFactory.getLog(ApplicationMasterService.class);

  private final AMLivelinessMonitor amLivelinessMonitor;

  private YarnScheduler rScheduler;

  private InetSocketAddress bindAddress;

  private Server server; // ApplicationMasterProtocol协议的RPC_Server

  private final RecordFactory recordFactory =

      RecordFactoryProvider.getRecordFactory(null);

  private final ConcurrentMap responseMap =

      new ConcurrentHashMap();

  private final AllocateResponse resync =

      recordFactory.newRecordInstance(AllocateResponse.class);

  private final RMContext rmContext;


  public ApplicationMasterService(RMContext rmContext, YarnScheduler scheduler) {

    super(ApplicationMasterService.class.getName());

    this.amLivelinessMonitor = rmContext.getAMLivelinessMonitor();

    this.rScheduler = scheduler;

    this.resync.setAMCommand(AMCommand.AM_RESYNC);

    this.rmContext = rmContext;

  }

  @Override

  protected void serviceStart() throws Exception {

    Configuration conf = getConfig();

    YarnRPC rpc = YarnRPC.create(conf);

    InetSocketAddress masterServiceAddress = conf.getSocketAddr(

        YarnConfiguration.RM_SCHEDULER_ADDRESS,

        YarnConfiguration.DEFAULT_RM_SCHEDULER_ADDRESS,

        YarnConfiguration.DEFAULT_RM_SCHEDULER_PORT);

    Configuration serverConf = conf;

    serverConf = new Configuration(conf);

    serverConf.set(

        CommonConfigurationKeysPublic.HADOOP_SECURITY_AUTHENTICATION,

        SaslRpcServer.AuthMethod.TOKEN.toString());

    this.server =

      rpc.getServer(ApplicationMasterProtocol.class, this, masterServiceAddress, // 构建ApplicationMasterProtocol协议的RPC_Server

          serverConf, this.rmContext.getAMRMTokenSecretManager(),

          serverConf.getInt(YarnConfiguration.RM_SCHEDULER_CLIENT_THREAD_COUNT,

              YarnConfiguration.DEFAULT_RM_SCHEDULER_CLIENT_THREAD_COUNT));

    this.server.start();

    super.serviceStart();

  }

  @Override

  public RegisterApplicationMasterResponse registerApplicationMaster(

      RegisterApplicationMasterRequest request) throws YarnException,

      IOException {

    ApplicationAttemptId applicationAttemptId = authorizeRequest();

    ApplicationId appID = applicationAttemptId.getApplicationId();

    AllocateResponse lastResponse = responseMap.get(applicationAttemptId);

    // Allow only one thread in AM to do registerApp at a time.

    synchronized (lastResponse) {

      this.amLivelinessMonitor.receivedPing(applicationAttemptId);

      RMApp app = this.rmContext.getRMApps().get(appID);

      lastResponse.setResponseId(0);

      responseMap.put(applicationAttemptId, lastResponse);

      this.rmContext

        .getDispatcher()

        .getEventHandler()

        .handle(

          new RMAppAttemptRegistrationEvent(applicationAttemptId, request

            .getHost(), request.getRpcPort(), request.getTrackingUrl()));

      // Pick up min/max resource from scheduler...

      RegisterApplicationMasterResponse response = recordFactory

          .newRecordInstance(RegisterApplicationMasterResponse.class);

      response.setMaximumResourceCapability(rScheduler

          .getMaximumResourceCapability());

      response.setApplicationACLs(app.getRMAppAttempt(applicationAttemptId)

          .getSubmissionContext().getAMContainerSpec().getApplicationACLs());

      return response;

    }

  }

  @Override

  public AllocateResponse allocate(AllocateRequest request)

      throws YarnException, IOException {

    ApplicationAttemptId appAttemptId = authorizeRequest();

    this.amLivelinessMonitor.receivedPing(appAttemptId);

    /* check if its in cache */

    AllocateResponse lastResponse = responseMap.get(appAttemptId);

    // Allow only one thread in AM to do heartbeat at a time.

    synchronized (lastResponse) {

      // Send the status update to the appAttempt.

      this.rmContext.getDispatcher().getEventHandler().handle(

          new RMAppAttemptStatusupdateEvent(appAttemptId, request

              .getProgress()));

      List ask = request.getAskList();

      List release = request.getReleaseList();

      // Send new requests to appAttempt.

      Allocation allocation =

          this.rScheduler.allocate(appAttemptId, ask, release,

              blacklistAdditions, blacklistRemovals);

      RMApp app = this.rmContext.getRMApps().get(

          appAttemptId.getApplicationId());

      RMAppAttempt appAttempt = app.getRMAppAttempt(appAttemptId);

      AllocateResponse allocateResponse =

          recordFactory.newRecordInstance(AllocateResponse.class);

      allocateResponse.setAllocatedContainers(allocation.getContainers());

      allocateResponse.setCompletedContainersStatuses(appAttempt

          .pullJustFinishedContainers());

      allocateResponse.setResponseId(lastResponse.getResponseId() + 1);

      allocateResponse.setAvailableResources(allocation.getResourceLimit());

      allocateResponse.setNumClusterNodes(this.rScheduler.getNumClusterNodes());

      return allocateResponse;

    }

  }

  @Override

  public FinishApplicationMasterResponse finishApplicationMaster(

      FinishApplicationMasterRequest request) throws YarnException,

      IOException {

    ApplicationAttemptId applicationAttemptId = authorizeRequest();

    AllocateResponse lastResponse = responseMap.get(applicationAttemptId);

    // Allow only one thread in AM to do finishApp at a time.

    synchronized (lastResponse) {

      this.amLivelinessMonitor.receivedPing(applicationAttemptId);

      rmContext.getDispatcher().getEventHandler().handle(

          new RMAppAttemptUnregistrationEvent(applicationAttemptId, request

              .getTrackingUrl(), request.getFinalApplicationStatus(), request

              .getDiagnostics()));

      if (rmContext.getRMApps().get(applicationAttemptId.getApplicationId())

          .isAppSafeToUnregister()) {

        return FinishApplicationMasterResponse.newInstance(true);

      } else {

        return FinishApplicationMasterResponse.newInstance(false);

      }

    }

  }
4、资源调度器(ResourceScheduler)
资源调度器是在ResourceManager组件中进行调度的,YARN中主要有FIFO调度器、Capacity调度器、Fair调度器三种调度器,分别由FifoScheduler,CapacityScheduler,FairScheduler实现。如果业务逻辑比较简单或者刚接触Hadoop的时候建议使用FIFO调度器;如果需要控制部分应用的优先级同时又想要充分利用集群资源的情况下,建议使用Capacity调度器;如果想要多用户或者多队列公平的共享集群资源,那么就选用Fair调度器。
一、FIFO调度器
上图为FIFO调度器的执行过程示意图。FIFO调度器也就是平时所说的先进先出(First In First Out)调度器。FIFO调度器是Hadoop最早应用的一种调度策略,可以简单的将其理解为一个Java队列,它的含义在于集群中同时只能有一个作业在运行。将所有的Application按照提交时候的顺序来执行,只有当上一个Job执行完成之后后面的Job才会按照队列的顺序依次被执行。FIFO调度器以集群资源独占的方式来运行作业,这样的好处是一个作业可以充分利用所有的集群资源,但是对于运行时间短,重要性高或者交互式查询类的MR作业就要等待排在序列前的作业完成才能被执行,这也就导致了如果有一个非常大的Job在运行,那么后面的作业将会被阻塞。因此,虽然单一的FIFO调度实现简单,但是对于很多实际的场景并不能满足要求。这也就催发了Capacity调度器和Fair调度器的出现。
三、Capacity调度器
上图是Capacity调度器的执行过程示意图。Capacity调度器也就是日常说的容器调度器。可以将它理解成一个个的资源队列。这个资源队列是用户自己去分配的。例如因为工作所需要把整个集群分成了AB两个队列,A队列下面还可以继续分,比如将A队列再分为1和2两个子队列。那么队列的分配就可以参考下面的树形结构:
—A[60%]
|—A.1[40%]
|—A.2[60%]
—B[40%]
上述的树形结构可以理解为A队列占用整个资源的60%,B队列占用整个资源的40%。A队列里面又分了两个子队列,A.1占据40%,A.2占据60%,也就是说此时A.1和A.2分别占用A队列的40%和60%的资源。虽然此时已经具体分配了集群的资源,但是并不是说A提交了任务1之后任务1只能使用A队列的60%的资源,此时如果B队列的40%的资源处于空闲,任务1也可以使用B队列的资源。只要是其它队列中的资源处于空闲状态,那么有任务提交的队列可以使用空闲队列所分配到的资源,使用的多少是依据配来决定。
三、Fair调度器
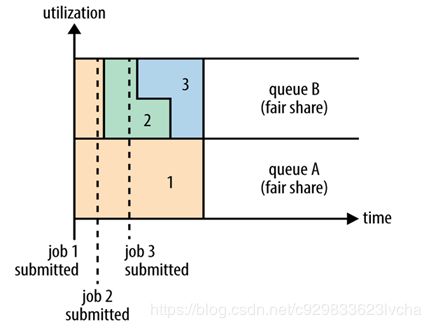
上图是Fair调度器在一个队列中的执行过程示意图。Fair调度器也就是日常说的公平调度器。Fair调度器是一个队列资源分配方式,在整个时间线上,所有的Job平均的获取资源。默认情况下,Fair调度器只是对内存资源做公平的调度和分配。当集群中只有一个任务在运行时,那么此任务会占用整个集群的资源。当其他的任务提交后,那些释放的资源将会被分配给新的Job,所以每个任务最终都能获取几乎一样多的资源。
公平调度器也可以在多个队列间工作,如上图所示,例如有两个用户A和B,他们分别拥有一个队列。当A启动一个Job而B没有任务提交时,A会获得全部集群资源;当B启动一个Job后,A的任务会继续运行,不过队列A会慢慢释放它的一些资源,一会儿之后两个任务会各自获得一半的集群资源。如果此时B再启动第二个Job并且其它任务也还在运行时,那么它将会和B队列中的的第一个Job共享队列B的资源,也就是队列B的两个Job会分别使用集群四分之一的资源,而队列A的Job仍然会使用集群一半的资源,结果就是集群的资源最终在两个用户之间平等的共享。
4.2、NodeManager
NodeManger是运行在单个节点上的代理(个人理解类似于MRv1时的TaskTracker,只是把TaskTracker任务管理这块移到了ApplicationMaster中,只负责纯粹通用的资源管理与调度,做到了计算框架无关),它需要与应用程序的ApplicationMaster和集群管理者ResourceManager交互:从ApplicationMaster上接收有关任务的启动、停止命令;向ResourceManager汇报各个Container运行状态和节点监控状况;
一、NodeManager的交互协议与基本职能
1、NodeManager交互协议
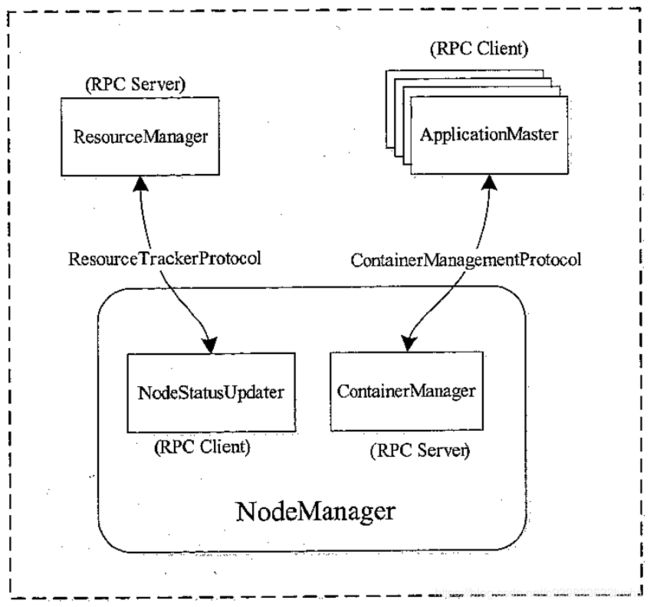
整体上讲,NodeManager涉及到两个RPC协议,分别是ResourceTracker和ContainerManagemenetProtocol,分别用来与ResourceManager和ApplicationMaster进行交互。
-
ResourceTracker
NodeManager通过该协议向ResourceManager中注册、汇报节点健康情况以及Container的运行状态,并且领取ResourceManager下达的重新初始化、清理Container等命令。NodeManager和ResourceManager这种RPC通信采用了和MRv1类似的“pull模型”,ResourceManager充当RPC Server角色,NodeManager充当RPC Client角色(由内部组件NodeStatusUpdater实现),NodeManager周期性主动地向ResourceManager发起请求,并且领取下达给自己的命令。
-
ContainerManagemenetProtocol
应用程序的ApplicationMaster通过该RPC协议向NodeManager发起正对Container的相关操作,包括启动Container、杀死Container、获取Container执行状态等。在该协议中,ApplicationMaster扮演RPC Client角色,而NodeManager扮演RPC Server角色(由内部组件ConatinerManager实现),换句话说,NodeManager与ApplicationMaster之间采用了“pull模型”,可大大降低时间延迟。
整理一下NodeManager与ResourceManager、ApplicationMaster的RPC协议交互的信息:
图11 NodeManager相关的RPC协议
上图中的NodeStatusUpdater、ContainerManager是NodeManager中处理上述功能的组件,NodeStatusUpdater充当RPC Client,ContainerManager充当RPC Server。
2、NodeManager基本职能
NodeManager基本职能概括起来就以下几方面:
-
周期性地向RM汇报本节点的资源使用情况和各个Container的运行状态。
-
接收并处理来自AM的Conatiner启动/停止命令。
二、NodeManager内部组成架构分析
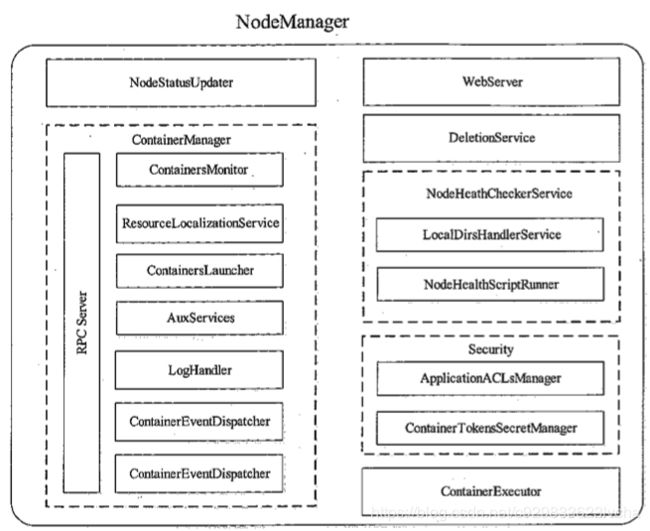
NodeManager在底层代码实现上将各个功能模块分的比较细,各个模块功能具有很强的独立性。下图所示的是NodeManager中的大概的功能模块组成:
图12 NodeManager的内部架构图
NodeManager内部架构代码概况如下:
public class NodeManager extends CompositeService

    implements EventHandler {

  /**

   * Priority of the NodeManager shutdown hook.

   */

  public static final int SHUTDOWN_HOOK_PRIORITY = 30;

  private static final Log LOG = LogFactory.getLog(NodeManager.class);

  private NodeHealthCheckerService nodeHealthChecker;

  private Context context;

  private AsyncDispatcher dispatcher;

  // ResourceTracker协议的RPC_Client

  private NodeStatusUpdater nodeStatusUpdater;

  // ContainerManagementProtocol协议的RPC_Server

  private ContainerManagerImpl containerManager;

  ...

}
1、与RM的交互模块-NodeStatusUpdater
NodeStatusUpdater是NodeMnagaer与ResourceManager通信的唯一通道,本质其实就是一个ResourceTracker协议的RPC_Client。当NodeManager启动时,该组件负责向ResourceManager注册,并汇报节点上总的可用资源;之后,改组件周期性与ResourceManager通信,汇报各个Container的状态更新,包括节点上正运行的Container、已完成的Container等信息等。NodeStatusUpdater的核心代码如下:
public class NodeStatusUpdaterImpl extends AbstractService implements

    NodeStatusUpdater {

  public static final String YARN_NODEMANAGER_DURATION_TO_TRACK_STOPPED_CONTAINERS =

      YarnConfiguration.NM_PREFIX + "duration-to-track-stopped-containers";

  private static final Log LOG = LogFactory.getLog(NodeStatusUpdaterImpl.class);

  private final Object heartbeatMonitor = new Object();

  private final Context context;

  private final Dispatcher dispatcher;

  private NodeId nodeId;

  private long nextHeartBeatInterval;

  // NodeManager与ResourceManager进行交互的RPC_Client

  private ResourceTracker resourceTracker;

  private Resource totalResource;

  private int httpPort;

  private final NodeHealthCheckerService healthChecker;

  // 周期性心跳线程

  private Runnable statusUpdaterRunnable;

  private Thread  statusUpdater;

  @Override

  protected void serviceStart() throws Exception {

    // NodeManager is the last service to start, so NodeId is available.

    this.nodeId = this.context.getNodeId();

    this.httpPort = this.context.getHttpPort();

    try {

      // Registration has to be in start so that ContainerManager can get the

      // perNM tokens needed to authenticate ContainerTokens.

      // 构建ResourceTracker协议的RPC_Client

      this.resourceTracker = getRMClient();

      registerWithRM();

      super.serviceStart();

      startStatusUpdater();

    } catch (Exception e) {

      String errorMessage = "Unexpected error starting NodeStatusUpdater";

      LOG.error(errorMessage, e);

      throw new YarnRuntimeException(e);

    }

  }

  protected ResourceTracker getRMClient() throws IOException {

    Configuration conf = getConfig();

    // 通过YARN的RPC-API构建ResourceTracker协议的RPC_Client

    return ServerRMProxy.createRMProxy(conf, ResourceTracker.class);

  }

  // 周期性向ResourceManager发送心跳的状态更新线程逻辑

  protected void startStatusUpdater() {

    statusUpdaterRunnable = new Runnable() {

      @Override

      @SuppressWarnings("unchecked")

      public void run() {

        int lastHeartBeatID = 0;

        while (!isStopped) {

          // Send heartbeat

          try {

            NodeHeartbeatResponse response = null;

            NodeStatus nodeStatus = getNodeStatusAndUpdateContainersInContext();

            nodeStatus.setResponseId(lastHeartBeatID);


            NodeHeartbeatRequest request = recordFactory

                .newRecordInstance(NodeHeartbeatRequest.class);

            request.setNodeStatus(nodeStatus);

            request.setLastKnownContainerTokenMasterKey(NodeStatusUpdaterImpl.this.context

                .getContainerTokenSecretManager().getCurrentKey());

            request.setLastKnownNMTokenMasterKey(NodeStatusUpdaterImpl.this.context

                .getNMTokenSecretManager().getCurrentKey());

            // 周期性地向ResourceManager发送心跳信息

            response = resourceTracker.nodeHeartbeat(request);

            //get next heartbeat interval from response

            nextHeartBeatInterval = response.getNextHeartBeatInterval();

            lastHeartBeatID = response.getResponseId();

            List containersToCleanup = response.getContainersToCleanup();

            ...

          }

        }

      }

    };

    statusUpdater = new Thread(statusUpdaterRunnable, "Node Status Updater");

    statusUpdater.start(); // 启动周期性心跳线程

  }
2、与AM的交互模块-ContainerManager
ConatinerManager是NodeManager中最核心的组件之一,实现了RPC协议ContainerManagementProtocol,它由多个子组件构成,每个子组件负责一部分功能,协作共同管理运行在该节点上的所有Container。ConatinerManager组件中主要有两个比较重要的子组件,分别是ContainerLauncher和ContainerExecutor,ContainerLauncher维护了一个线程池以并行完成Container相关操作,比如启动或杀死Container,其中启动请求是由ApplicationMaster发起的,而杀死Container请求则可能来自ApplicationMaster或者ResourceManager。ContainerExecutor是用来跟底层的操作系统交互的,用来启动和清除Container对应的进程。目前,YARN提供了DefaultContainerExecutor和LinuxContainerExecutor两种实现。相关的核心代码如下:
public class ContainerManagerImpl extends CompositeService implements

    ServiceStateChangeListener, ContainerManagementProtocol,

    EventHandler {

  /**

   * Extra duration to wait for applications to be killed on shutdown.

   */

  private static final int SHUTDOWN_CLEANUP_SLOP_MS = 1000;

  private static final Log LOG = LogFactory.getLog(ContainerManagerImpl.class);

  final Context context;

  private final ContainersMonitor containersMonitor;

  private Server server; // ContainerManagementProtocol协议的RPC_Server

  private final ContainersLauncher containersLauncher; // ContainersLauncher维护了一个线程池用来启动或杀死Container

  protected final AsyncDispatcher dispatcher; // 异步的事件转发器,会把相应的事件转发到比如ContainersLauncher事件处理器

  public ContainerManagerImpl(Context context, ContainerExecutor exec,

      DeletionService deletionContext, NodeStatusUpdater nodeStatusUpdater,

      NodeManagerMetrics metrics, ApplicationACLsManager aclsManager,

      LocalDirsHandlerService dirsHandler) {

    super(ContainerManagerImpl.class.getName());

    // ContainerManager level dispatcher.

    dispatcher = new AsyncDispatcher(); // 异步的事件转发器,观察者模式-发布订阅模式-监听器模式

    containersLauncher = createContainersLauncher(context, exec); // 创建ContainersLauncher

    addService(containersLauncher);

    dispatcher.register(ContainerEventType.class,new ContainerEventDispatcher());

    dispatcher.register(ApplicationEventType.class,new ApplicationEventDispatcher());

    dispatcher.register(ContainersLauncherEventType.class, containersLauncher); // 添加Container启动或关闭事件处理器ContainersLauncher

    addService(dispatcher);

  }

  /**

   * Start a list of containers on this NodeManager.

   */

  @Override

  public StartContainersResponse

      startContainers(StartContainersRequest requests) throws YarnException,

          IOException {

    if (blockNewContainerRequests.get()) {

      throw new NMNotYetReadyException(

        "Rejecting new containers as NodeManager has not"

            + " yet connected with ResourceManager");

    }

    UserGroupInformation remoteUgi = getRemoteUgi();

    NMTokenIdentifier nmTokenIdentifier = selectNMTokenIdentifier(remoteUgi);

    authorizeUser(remoteUgi,nmTokenIdentifier);

    List succeededContainers = new ArrayList();

    Map failedContainers =

        new HashMap();

    for (StartContainerRequest request : requests.getStartContainerRequests()) {

      ContainerId containerId = null;

      try {

        ContainerTokenIdentifier containerTokenIdentifier =

            BuilderUtils.newContainerTokenIdentifier(request.getContainerToken());

        verifyAndGetContainerTokenIdentifier(request.getContainerToken(),

          containerTokenIdentifier);

        containerId = containerTokenIdentifier.getContainerID();

        startContainerInternal(nmTokenIdentifier, containerTokenIdentifier,

          request);

        succeededContainers.add(containerId);

      } catch (YarnException e) {

        failedContainers.put(containerId, SerializedException.newInstance(e));

      } catch (InvalidToken ie) {

        failedContainers.put(containerId, SerializedException.newInstance(ie));

        throw ie;

      } catch (IOException e) {

        throw RPCUtil.getRemoteException(e);

      }

    }

    return StartContainersResponse.newInstance(getAuxServiceMetaData(),

        succeededContainers, failedContainers);

  }

  /**

   * Stop a list of containers running on this NodeManager.

   */

  @Override

  public StopContainersResponse stopContainers(StopContainersRequest requests)

      throws YarnException, IOException {

    List succeededRequests = new ArrayList();

    Map failedRequests =

        new HashMap();

    UserGroupInformation remoteUgi = getRemoteUgi();

    NMTokenIdentifier identifier = selectNMTokenIdentifier(remoteUgi);

    for (ContainerId id : requests.getContainerIds()) {

      try {

        stopContainerInternal(identifier, id);

        succeededRequests.add(id);

      } catch (YarnException e) {

        failedRequests.put(id, SerializedException.newInstance(e));

      }

    }

    return StopContainersResponse.newInstance(succeededRequests, failedRequests);

  }

} ContainerLauncher作为为一个EventHandler,其中维护了一个线程池可以并行启动或关闭Container,相关线程逻辑在ContainerLaunch中,最后在ContainerLaunch中会去调用ConatinerExecutor用来跟底层的操作系统进行交互,用来启动和清除Container对应的进程。相关的核心代码如下:
public class ContainersLauncher extends AbstractService

    implements EventHandler {

  private static final Log LOG = LogFactory.getLog(ContainersLauncher.class);

  private final Context context;

  private final ContainerExecutor exec;

  private final Dispatcher dispatcher;

  private final ContainerManagerImpl containerManager;

  public ExecutorService containerLauncher =

    Executors.newCachedThreadPool(

        new ThreadFactoryBuilder()

          .setNameFormat("ContainersLauncher #%d")

          .build());

  public final Map running =

    Collections.synchronizedMap(new HashMap());

  public void handle(ContainersLauncherEvent event) {

    Container container = event.getContainer();

    ContainerId containerId = container.getContainerId();

    switch (event.getType()) {

      case LAUNCH_CONTAINER:

        Application app =

          context.getApplications().get(

              containerId.getApplicationAttemptId().getApplicationId());

        ContainerLaunch launch =

            new ContainerLaunch(context, getConfig(), dispatcher, exec, app,

              event.getContainer(), dirsHandler, containerManager);

        containerLauncher.submit(launch);

        running.put(containerId, launch);

        break;

      case CLEANUP_CONTAINER:

        ContainerLaunch launcher = running.remove(containerId);

        if (launcher == null) {

          return;

        }

        try {

          launcher.cleanupContainer();

        } catch (IOException e) {

          LOG.warn("Got exception while cleaning container " + containerId

              + ". Ignoring.");

        }

        break;

    }

  }
五、MRAppMaster-MapReduce On YARN实现
MRAppMaster是MapReduce的ApplicationMaster实现,它使得MapReduce计算框架可以运行于YARN之上。在YARN中,MRAppMaster负责管理MapReduce作业的生命周期,包括创建MapReduce作业,向ResourceManager申请资源,与NodeManage通信要求其启动Container,监控作业的运行状态,当任务失败时重新启动任务等。
YARN使用了基于事件驱动的异步编程模型,它通过事件将各个组件联系起来,并由一个中央事件调度器统一将各种事件分配给对应的事件处理器。在YARN中,每种组件是一种事件处理器,当MRAppMaster启动时,它们会以服务的形式注册到MRAppMaster的中央事件调度器上,并告诉调度器它们处理的事件类型,这样,当出现某一种事件时,MRAppMaster会查询<事件,事件处理器>表,并将该事件分配给对应的事件处理器。
接下来,我们分别介绍MRAppMaster内部各种组件/服务的功能。
图12 MRAppMaster内部架构图
ContainerAllocator
ContainerAllocator负责与ResourceManager通信,本质其实就是一个ApplicationMasterProtocol协议的RPC_Client,为作业申请资源。作业的每个任务资源需求可描述为四元组
如下:
public abstract class RMCommunicator extends AbstractService

    implements RMHeartbeatHandler {

   // 资源申请心跳线程

  protected Thread allocatorThread;

  // ApplicationMasterProtocol协议的RPC_Client

  protected ApplicationMasterProtocol scheduler;

  @Override

  protected void serviceStart() throws Exception {

    scheduler= createSchedulerProxy(); // 构建ApplicationMasterProtocol协议的RPC_Client

    startAllocatorThread(); // 启动心跳线程

    super.serviceStart();

  }

  protected ApplicationMasterProtocol createSchedulerProxy() {

    final Configuration conf = getConfig();

    try {

      return ClientRMProxy.createRMProxy(conf, ApplicationMasterProtocol.class);

    } catch (IOException e) {

      throw new YarnRuntimeException(e);

    }

  }

  // 启动心跳线程

  protected void startAllocatorThread() {

    allocatorThread = new Thread(new Runnable() {

      @Override

      public void run() {

        while (!stopped.get() && !Thread.currentThread().isInterrupted()) {

          try {

            Thread.sleep(rmPollInterval);

            try {

              // 周期性的心跳,作用:(1)周期性发送心跳,告诉RM自己还活着(2)周期性询问RM,以获取新分配的资源和各个container运行状况。

              heartbeat();

            } catch (YarnRuntimeException e) {

              LOG.error("Error communicating with RM: " + e.getMessage() , e);

            }

          }

        }

      }

    });

    allocatorThread.setName("RMCommunicator Allocator");

    allocatorThread.start();

  }

  @Override

  protected synchronized void heartbeat() throws Exception {

    scheduleStats.updateAndLogIfChanged("Before Scheduling: “);

    // 向RM申请资源

    List allocatedContainers = getResources();

    if (allocatedContainers.size() > 0) {

      // 把申请到的资源进行Job内分配,分配给任务

      scheduledRequests.assign(allocatedContainers);

    }

    ...

  }
ContainerLauncher
ContainerLauncher与NodeManager通信,要求其启动一个Container,本质其实就是一个ContainerManagemenetProtocol协议的RPC_Client。当ResourceManager为作业分配资源后,ContainerLauncher会将资源信息封装成container,包括任务运行所需资源、任务运行命令、任务运行环境、任务依赖的外部文件等,然后与对应的节点通信,要求其启动container。采用了阻塞队列+线程池的方式异步并行处理CONTAINER_REMOTE_LAUNCH和CONTAINER_REMOTE_CLEANUP这两种事件,核心代码如下:
public class ContainerLauncherImpl extends AbstractService implements

    ContainerLauncher {

  static final Log LOG = LogFactory.getLog(ContainerLauncherImpl.class);

  private ConcurrentHashMap containers =

    new ConcurrentHashMap();

  protected BlockingQueue eventQueue = // Container事件队列

      new LinkedBlockingQueue();

  private Thread eventHandlingThread; // 事件轮训线程

  protected ThreadPoolExecutor launcherPool; // 事件处理线程池

   // ContainerManagementProtocolProxy协议的RPC_Client

  private ContainerManagementProtocolProxy cmProxy;

  protected void serviceStart() throws Exception {

    launcherPool = new ThreadPoolExecutor(INITIAL_POOL_SIZE,

        Integer.MAX_VALUE, 1, TimeUnit.HOURS,

        new LinkedBlockingQueue(),

        tf);

    eventHandlingThread = new Thread() {

      @Override

      public void run() {

        ContainerLauncherEvent event = null;

        Set allNodes = new HashSet();

        while (!stopped.get() && !Thread.currentThread().isInterrupted()) {

          try {

            event = eventQueue.take(); // 从事件阻塞队列中获取Container事件

          } catch (InterruptedException e) {

            if (!stopped.get()) {

              LOG.error("Returning, interrupted : " + e);

            }

            return;

          }

          launcherPool.execute(createEventProcessor(event)); // 封装成事件处理器EventProcessor,异步交给线程池

        }

      }

    };

    eventHandlingThread.setName("ContainerLauncher Event Handler”);

    // 启动事件处理线程,轮训获取Container事件,封装成EventProcessor事件处理器,再异步交给线程池launcherPool进行任务的启动或关闭

    eventHandlingThread.start();

    super.serviceStart();

  }

  // 事件处理器

  class EventProcessor implements Runnable {

    private ContainerLauncherEvent event;

    EventProcessor(ContainerLauncherEvent event) {

      this.event = event;

    }

    @Override

    public void run() {

      LOG.info("Processing the event " + event.toString());

      ContainerId containerID = event.getContainerID();

      Container c = getContainer(event);

      switch(event.getType()) {

      case CONTAINER_REMOTE_LAUNCH: // Container启动事件

        ContainerRemoteLaunchEvent launchEvent

            = (ContainerRemoteLaunchEvent) event;

        c.launch(launchEvent); // 跟对应的NodeManager通信,启动Container

        break;

      case CONTAINER_REMOTE_CLEANUP: // Container杀死事件

        c.kill(); // 跟对应的NodeManager通信,关闭Container

        break;

      }

      removeContainerIfDone(containerID);

    }

  }
  // Container相关的启动或关闭

  private class Container {

    private ContainerState state;

    private TaskAttemptId taskAttemptID; // 关联的任务ID

    private ContainerId containerID; // 此任务分配的资源ContainerID

    final private String containerMgrAddress;

    // 启动Container

    public synchronized void launch(ContainerRemoteLaunchEvent event) {

      LOG.info("Launching " + taskAttemptID);

      ContainerManagementProtocolProxyData proxy = null;

      try {

        // 动态构建ContainerManagementProtocolProxyData协议的RPC_Client

        proxy = getCMProxy(containerMgrAddress, containerID);

        // Construct the actual Container

        ContainerLaunchContext containerLaunchContext =

          event.getContainerLaunchContext();

        // Now launch the actual container

        StartContainerRequest startRequest =

            StartContainerRequest.newInstance(containerLaunchContext,

              event.getContainerToken());

        List list = new ArrayList();

        list.add(startRequest);

        StartContainersRequest requestList = StartContainersRequest.newInstance(list);

        // 跟NodeManager通信,启动Container

        StartContainersResponse response =

            proxy.getContainerManagementProtocol().startContainers(requestList);

      }

    }
    // 关闭Container

    public synchronized void kill() {

      if(this.state == ContainerState.PREP) {

        this.state = ContainerState.KILLED_BEFORE_LAUNCH;

      } else if (!isCompletelyDone()) {

        LOG.info("KILLING " + taskAttemptID);

        ContainerManagementProtocolProxyData proxy = null;

        try {

          // 动态构建ContainerManagementProtocolProxyData协议的RPC_Client

          proxy = getCMProxy(this.containerMgrAddress, this.containerID);

          // kill the remote container if already launched

          List ids = new ArrayList();

          ids.add(this.containerID);

          StopContainersRequest request = StopContainersRequest.newInstance(ids);

          // 跟NodeManager通信,关闭Container

          StopContainersResponse response =

              proxy.getContainerManagementProtocol().stopContainers(request);

        }

      }

    }

  }

}
TaskAttemptListener
管理各个任务的心跳信息,如果一个任务一段时间内未汇报心跳,则认为它死掉了,会将其从系统中移除。同MRv1中的TaskTracker类似,它实现了TaskUmbilicalProtocol协议,任务会通过该协议汇报心跳,并询问是否能够提交最终结果。相关代码如下:
public class TaskAttemptListenerImpl extends CompositeService

    implements TaskUmbilicalProtocol, TaskAttemptListener {

  private static final JvmTask TASK_FOR_INVALID_JVM = new JvmTask(null, true);

  private static final Log LOG = LogFactory.getLog(TaskAttemptListenerImpl.class);

  private AppContext context;

  //在MRAppMaster中构建TaskUmbilicalProtocol协议的RPC_Server

  private Server server;

  protected void startRpcServer() {

    Configuration conf = getConfig();

    try {

      // 在MRAppMaster中构建TaskUmbilicalProtocol协议的RPC_Server

      server =

          new RPC.Builder(conf).setProtocol(TaskUmbilicalProtocol.class)

            .setInstance(this).setBindAddress("0.0.0.0")

            .setPort(0).setNumHandlers(

                conf.getInt(MRJobConfig.MR_AM_TASK_LISTENER_THREAD_COUNT,

                    MRJobConfig.DEFAULT_MR_AM_TASK_LISTENER_THREAD_COUNT))

                    .setVerbose(false).setSecretManager(jobTokenSecretManager)

                    .build();

      server.start();

      this.address = NetUtils.getConnectAddress(server);

    } catch (IOException e) {

      throw new YarnRuntimeException(e);

    }

  }
ClientService
ClientService是一个接口,由MRClientService实现。MRClientService实现了MRClientProtocol协议,客户端可通过该协议获取作业的执行状态(而不必通过ResourceManager)和制作业(比如杀死作业等)。
核心代码如下:
public class MRClientService extends AbstractService implements ClientService {

  static final Log LOG = LogFactory.getLog(MRClientService.class);

  private MRClientProtocol protocolHandler;

  private Server server; // MRClientProtocol协议的RPC_Server

  private WebApp webApp;

  private InetSocketAddress bindAddress;

  private AppContext appContext;

  public MRClientService(AppContext appContext) {

    super(MRClientService.class.getName());

    this.appContext = appContext;

    this.protocolHandler = new MRClientProtocolHandler();

  }

  protected void serviceStart() throws Exception {

    Configuration conf = getConfig();

    YarnRPC rpc = YarnRPC.create(conf);

    InetSocketAddress address = new InetSocketAddress(0);

    server =    // 构建MRClientProtocol协议的RPC_Server

        rpc.getServer(MRClientProtocol.class, protocolHandler, address,

            conf, appContext.getClientToAMTokenSecretManager(),

            conf.getInt(MRJobConfig.MR_AM_JOB_CLIENT_THREAD_COUNT,

                MRJobConfig.DEFAULT_MR_AM_JOB_CLIENT_THREAD_COUNT),

                MRJobConfig.MR_AM_JOB_CLIENT_PORT_RANGE);

    server.start();

    super.serviceStart();

  }
六、YarnChild-MR引擎启动入口
YarnChild是MapReduce在Yarn的Container任务子进程入口类,执行到这里,就基本已经完成了执行任务所需要的资源调度相关的工作,可以开始执行MapReduce引擎来调用MapReduc应用程序,真正开始执行某种类型的任务,进行计算。MapReduce框架的核心就在此,包括MapReduce编程模型API,MapReduce引擎等,MapReduce引擎会去回调用户的MapReduce应用程序,基本跟MRv1基本没有太大变化,这里不做展开,参考我的另一篇关于<
图13 MR引擎及MR编程模型
七、总结
本文开始从YARN产生的背景分析MRv1的一些局限性,接着从YARN的整体架构以及内部相关组件来详细分析了YARN的整个工作了流程,包括ResourceManager、NodeManagaer、MR计算框架相关的MRAppMaster和YarnChild等各个组件核心代码详细解析,作为一个大数据生态领域事实上通用的资源管理系统,值得深入学习研究。


