android自定义伸缩框(展开效果)
在android中往往在很多时候用到伸缩框也就是展开效果,或者说是折叠效果,当然在Android中系统也有个类似QQ好友的方式的View “ExpandableListView”它的用法也很简单先看看效果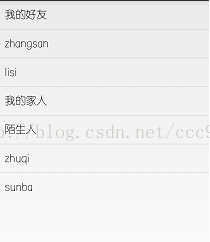
ExpandableListView 的用法我们也先来简单的介绍一下 ExpandableListView的用法和ListView相识,都是需要适配器,在这里就不直接自定义适配器了,我们直接采用系统的适配器,把代码给大家呈上:这里主要是主界面代码
private ExpandableListView mExpandListView;

	@Override
	protected void onCreate(Bundle savedInstanceState) {
		super.onCreate(savedInstanceState);
		setContentView(R.layout.activity_main);

		mExpandListView = (ExpandableListView) findViewById(R.id.expandlistview);

		List> groupData = new ArrayList>();
		HashMap map = new HashMap();
		map.put("GROUP", "我的好友");
		groupData.add(map);
		map = new HashMap();
		map.put("GROUP", "我的家人");
		groupData.add(map);
		map = new HashMap();
		map.put("GROUP", "陌生人");
		groupData.add(map);

		//childData.size()-->一共有多少个分组
		//childData.get(i).size()-->每个分组有多少个人
		List>> childData = new ArrayList>>();
		//添加第一组数据
		List> childList = new ArrayList>();
		HashMap childMap = new HashMap();
		childMap.put("NAME", "zhangsan");
		childList.add(childMap);
		childMap = new HashMap();
		childMap.put("NAME", "lisi");
		childList.add(childMap);
		childData.add(childList);
		//添加第二组数据
		childList = new ArrayList>();
		childMap = new HashMap();
		childMap.put("NAME", "wangwu");
		childList.add(childMap);
		childMap = new HashMap();
		childMap.put("NAME", "zhaoliu");
		childList.add(childMap);
		childData.add(childList);
		//添加第三组数据
		childList = new ArrayList>();
		childMap = new HashMap();
		childMap.put("NAME", "zhuqi");
		childList.add(childMap);
		childMap = new HashMap();
		childMap.put("NAME", "sunba");
		childList.add(childMap);
		childData.add(childList);

		//1.Context 上下文
		//2.groupData 组的数据 List>
		//3.groupLayout 组显示的布局的id
		//4.groupFrom groupData --> map --> key
		//5.groupTo 需要匹配内容的控件的id集合
		//6.childData 二级目录的数据 List>>
		//7.childLayout 二级目录的布局
		//8.childFrom
		//9.childTo
		SimpleExpandableListAdapter adapter = new SimpleExpandableListAdapter(
				this, groupData, android.R.layout.simple_list_item_1,
				new String[]{"GROUP"}, new int[]{android.R.id.text1},
				childData,
				android.R.layout.simple_list_item_1, new String[]{"NAME"}, new int[]{android.R.id.text1});
		//设置适配器
		mExpandListView.setAdapter(adapter);
	}
大家看到代码是否是比较简单?这个是不是今天主要讲的我们今天主要讲的先看看效果


在这里我们就直接贴出实现的代码:工具类InfoItemBar:
/**
 *
 * @Description 展开与收缩框工具定义类
 * @Create Time 2015-6-30
 */
public class InfoItemBar extends LinearLayout {

	private LinearLayout mLinearLayout,mitembar;
	private ImageView Image;

	InfoItemBar(Context mContext,String title)
	{
		super(mContext);
		View view=LayoutInflater.from(mContext).inflate(R.layout.item_bar, this);
		this.mLinearLayout = (LinearLayout)view.findViewById(R.id.itemBar_content);
		this.mitembar=(LinearLayout) view.findViewById(R.id.itembar);
		this.Image = (ImageView) view.findViewById(R.id.item_img_title);
		TextView titleTextView = (TextView) view.findViewById(R.id.itemBar_title);
		titleTextView.setText(title + " :");

		mitembar.setOnClickListener(new OnClickListener() {
			@Override
			public void onClick(View v) {
				if (mLinearLayout.getVisibility() == View.GONE) {
					mLinearLayout.setVisibility(View.VISIBLE);
					Image.setImageResource(R.drawable.item_pressed);
				} else {
					mLinearLayout.setVisibility(View.GONE);
					Image.setImageResource(R.drawable.item_unpressed);
				}
			}

		});
	}
	/**
	 * 设置 羡项目集 是否展开
	 *
	 * @param isShow
	 */
	public void setShow(boolean isShow) {
		if (isShow) {
			mLinearLayout.setVisibility(View.VISIBLE);
			Image.setImageResource(R.drawable.item_pressed);
		} else {
			mLinearLayout.setVisibility(View.GONE);
			Image.setImageResource(R.drawable.item_unpressed);
		}
	}
	/**
	 * 添加 infoItem项目
	 *
	 * @param item
	 */
	public void addView(View item) {

		mLinearLayout.addView(item);

	}


}
我们从代码中可以看出其时我们就是运用了显示于不显示来控制着伸缩
InfoItemBar 这是我们定义的类,既然定义的类都写好了,那么只需要在页面显示了,MainActvity中protected void onCreate(Bundle savedInstanceState) {
super.onCreate(savedInstanceState);
setContentView(R.layout.activity_main);
mLinearLayout=(LinearLayout) findViewById(R.id.mianliner);
View view=LayoutInflater.from(MainActivity.this).inflate(R.layout.main_bar, null);
InfoItemBar mbar=new InfoItemBar(MainActivity.this, "点击展开");
mbar.addView(view);
mbar.setShow(true);
mLinearLayout.addView(mbar);
布局文件.xml
main_activity.xml
item_bar.xml 点击展开的父文件
main_bar.xml 主要展开里面显示的布局文件
好了这样一个完整的控件就完成了另附代码与控件设计到的图片。ItemBar附件
想要更多的编程学习资料,请关注微信公众号:IT010101