ffmpeg入门教程之Android使用FFmpeg so(API文件格式转换)
文章目录
- Java代码从编译到执行
- C代码编译
- 交叉编译
- Cmake
- NDK
- JNI
- JNI应用场景
- Android Studio 3.4创建工程
- CPU架构适配
- 配置build.gradle
- 配置CMakeLists.txt
- 链接FFmpeg的so库
- 包含FFmpeg头文件
- Android使用FFmpeg so(封装格式转换)
- 加载so库
- 定义native方法
- Android调用native方法
- JNI实现native方法
- 测试
- GitHub:[https://github.com/AnJiaoDe/FFmpegAndroidDemo](https://github.com/AnJiaoDe/FFmpegAndroidDemo)
- 欢迎分享、转载、联系、指正、批评、撕逼
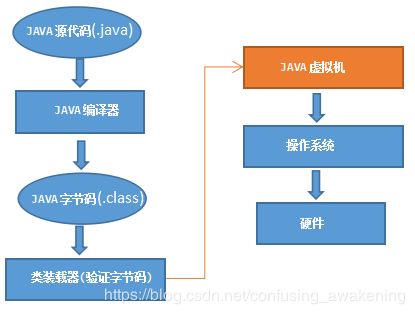
Java代码从编译到执行
C代码编译

此处转载于:https://blog.csdn.net/u012184539/article/details/81348529
交叉编译
交叉编译是在一个平台上生成另一个平台上的可执行代码。同一个体系结构可以运行不同的操作系统;同样,同一个操作系统也可以在不同的体系结构上运行。
举例来说,我们常说的x86 Linux平台实际上是Intel x86体系结构和Linux for x86操作系统的统称;而x86 WinNT平台实际上是Intel x86体系结构和Windows NT for x86操作系统的简称。
将中间代码连接成当前计算机可执行的二进制程序时,链接程序会根据当前计算机的CPU、操作系统的类型来转换。
根据运行的设备的不同,可以将cpu分为:
arm结构 :主要在移动手持、嵌入式设备上。
x86结构 : 主要在台式机、笔记本上使用。如Intel和AMD的CPU 。
若想在使用了基于x86结构CPU的操作系统中编译出可以在基于arm结构CPU的操作系统上运行的代码,就必须使用交叉编译。
交叉编译:在一个平台下编译出在另一个平台中可以执行的二进制代码。Google提出的NDK就可以完成交叉编译的工作。
此处转载于百度百科:https://baike.baidu.com/item/%E4%BA%A4%E5%8F%89%E7%BC%96%E8%AF%91/10916911?fr=aladdin
Cmake
CMake是一个跨平台的安装(编译)工具,可以用简单的语句来描述所有平台的安装(编译过程)。他能够输出各种各样的makefile或者project文件,能测试编译器所支持的C++特性,类似UNIX下的automake。只是 CMake 的组态档取名为 CMakeLists.txt。Cmake 并不直接建构出最终的软件,而是产生标准的建构档(如 Unix 的 Makefile 或 Windows Visual C++ 的 projects/workspaces),然后再依一般的建构方式使用。这使得熟悉某个集成开发环境(IDE)的开发者可以用标准的方式建构他的软件,这种可以使用各平台的原生建构系统的能力是 CMake 和 SCons 等其他类似系统的区别之处。
此处转载于百度百科:https://baike.baidu.com/item/cmake/7138032?fr=aladdin
NDK
NDK全称:Native Development Kit 。
NDK是一个包含了API,交叉编译器、连接器、调试器、构建工具等的综合工具集
首先,NDK可以帮助开发者快速开发C(或C++)的动态库。
其次,NDK集成了交叉编译器。使用NDK,我们可以将要求高性能的应用逻辑使用C开发,从而提高应用程序的执行效率。
JNI
JNI是Java Native Interface的缩写,通过使用 Java本地接口书写程序,可以确保代码在不同的平台上方便移植。 [1] 从Java1.1开始,JNI标准成为java平台的一部分,它允许Java代码和其他语言写的代码进行交互。JNI一开始是为了本地已编译语言,尤其是C和C++而设计的,但是它并不妨碍你使用其他编程语言,只要调用约定受支持就可以了。使用java与本地已编译的代码交互,通常会丧失平台可移植性。但是,有些情况下这样做是可以接受的,甚至是必须的。例如,使用一些旧的库,与硬件、操作系统进行交互,或者为了提高程序的性能。JNI标准至少要保证本地代码能工作在任何Java 虚拟机环境。
就把JNI看作是一种编程语言或者编程规范吧,让java语言和底层的c/c++语言可以互相访问,互相调用,让java的数据类型和c/c++语言的数据类型可以互相对应。
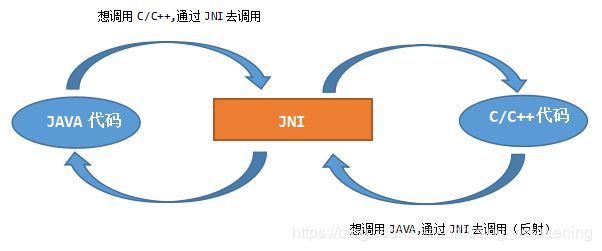
使用JNI技术,其实就是在Java程序中,调用C语言的函数库中提供的函数,来完成一些Java语言无法完成的任务。由于Java语言和C语言结构完全不相同,因此若想让它们二者交互,则需要制定一系列的规范。JNI就是这组规范,此时 Java只和JNI交互,而由JNI去和C语言交互。
首先,Java程序员在Java端定义一些native方法,并将这些方法以C语言头文件的方式提供给C程序员。
然后,C程序员使用C语言,来实现Java程序员提供的头文件中定义的函数。
接着,C程序员将函数打包成一个库文件,并将库文件交给Java程序员。
最后,Java程序员在Java程序中导入库文件,然后调用native方法。
在Java程序执行的时候,若在某个类中调用了native方法,则虚拟机会通过JNI来转调用库文件中的C语言代码。提示:C代码最终是在Linux进程中执行的,而不是在虚拟机中。

JNI应用场景
- 操作硬件(编写驱动,用java代码调用底层的c代码)
- 效率要求非常高的场景,比如:
opencv 图像的识别和处理
ffmpeg 音视频处理
opengl 图像绘制
webkit 浏览器
7zip 开源的压缩算法 - 出于安全性考虑
java代码反编译容易,不安全
c/c++代码,反编译后读起来很困难,安全
手机网银支付模块
c、c++语言效率高,java语言效率低一些,因为C,C++编译出来的机器码可以直接运行在操作系统上,而JAVA编译后的文件需要运行在虚拟机上,虚拟机需要和操作系统交互。
这也是为何Android系统(4.4以前,使用Dalvik虚拟机)没有IOS系统使用流畅的原因,android 4.4出现了ART虚拟机,ART模式与Dalvik模式最大的不同在于,在启用ART模式后,系统在安装应用的时候会进行一次预编译,在安装应用程序时会先将代码转换为机器语言存储在本地,这样在运行程序时就不会每次都进行一次编译了,执行效率也大大提升。但是因为还是有虚拟机的存在,Android系统流畅度依然不如IOS(当然也许是小编猜错,小编也不太了解)。
可参考->Java 虚拟机、Art、Dalvik 他们的区别:https://www.jianshu.com/p/713d24fa9982
下面开始动手:
Android Studio 3.4创建工程
不同版本使用不一样,无须纠结
CPU架构适配
Android中设备加载so策略
不同CPU架构的android手机加载时会在libs下找自己对应的目录,从对应的目录下寻找需要的.so文件;
如果没有对应的目录,就会去armeabi下去寻找,如果已经有对应的目录,却没有找到对应的.so文件,也不会去armeabi下去寻找了;
以x86设备为例,x86设备会在项目中的 libs文件夹寻找是否含有x86文件夹,如果含有x86文件夹,则默认为该项目有x86对应的so可运行文件,只有x86文件夹而文件夹下没有so,程序运行也是会出现 find library returned null 的错误的;如果工程本身不含有x86文件夹,则会寻找armeabi或者armeabi-v7a文件夹,兼容运行。
以armeabi-v7a设备为例,该Android设备当然优先寻找libs目录下的armeabi-v7a文件夹,同样,如果只有armeabi-v7a文件夹而没有 so也是会报错的;如果找不到armeabi-v7a文件夹,则寻找armeabi文件夹,兼容运行该文件夹下的so,但是不能兼容运行x86的so。所以项目中如果只含有x86的so,在armeabi和armeabi-v7a也是无法运行的。以上就是不同CPU架构运行时加载so的策略。
针对不同平台,如何去适配
目前主流的Android设备主要是 armeabi-v7a 架构的,然后是 x86 和 armeabi 了。如果同时包含了 armeabi, armeabi-v7a和x86,所有设备都可以运行,程序在运行的时候去加载不同平台对应的so,这是较为完美的一种解决方案,但是有时候为了减少apk的大小,不会同时设置 armeabi, armeabi-v7a 和 x86。根据不同的情况,可以进行不同的适配,
1.只适配 armeabi-v7a,因为目前主流机型是 ARMv7,并且 ARMv8 设备也向下兼容了armeabi-v7a,
Facebook、WhatsApp、王者荣耀等就是只适配了armeabi-v7a。(Google play store下载 Native libs Monitor 进行查看)。
2.只适配 armeabi,因为 ARMv7 、ARMv8 还是 x86 都兼容 armeabi,但是性能都会有些损耗,例如ARMv7 支持硬件浮点运算等没法体现,x86 支持 armeabi 同样具有相应的损耗。微信使用了此策略。
3.同时适配 armeabi-v7a 和 armeabi,既能够支持所有 ARM 架构,同时又能具有 ARMv7 支持硬件浮点运算等特性,例如Line等应用。
4.同时适配 x86 和 armeabi,既能支持所有 ARM 架构,又能支持x86架构,唯一的缺点就是没有了ARMv7 支持硬件浮点运算等一系列特性,例如QQ.
5.同时适配 armeabi, armeabi-v7a 和 x86,在性能方面来说是较为完美的方案,只是APK的大小也会随之的变大。
此处转载于Android CPU架构及so库兼容问题总结:https://www.jianshu.com/p/2d23764746e4
配置build.gradle
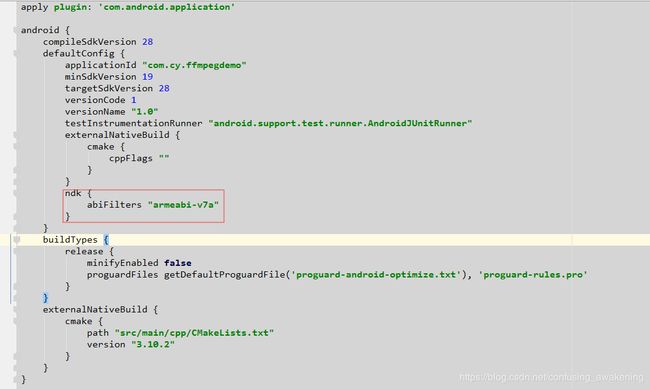
咱们只适配 armeabi-v7a,因为目前主流机型是 ARMv7,
  ndk {
            abiFilters "armeabi-v7a"
  }
配置CMakeLists.txt
不同版本的死丢丢CMakeLists.txt目录不一致,无须纠结
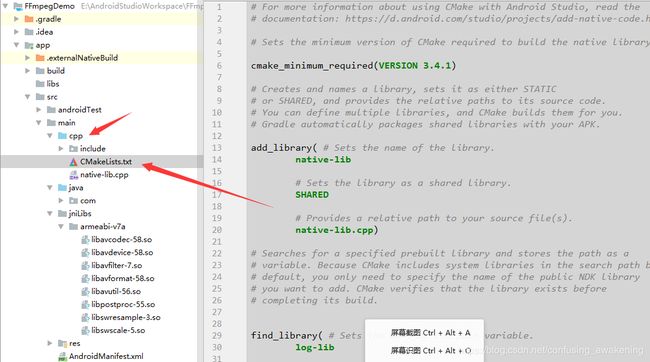
在main目录下创建jniLibs/armeabi-v7a文件夹,将ffmpeg相关的so库放进去,
如何获取so库?
ffmpeg入门教程之linux编译.so从下载坚持到成功(血泪史)https://www.jianshu.com/p/2ba0360ebd5f
直接下载:https://github.com/AnJiaoDe/ffmpeg4.2.1_so_generated
链接FFmpeg的so库
首先配置armeabi-v7a路径
set(path_so E:/AndroidStudioWorkspace/FFmpegDemo/app/src/main/jniLibs/armeabi-v7a)
我这死丢丢有点奇怪,必须写完整路径,如果这样写:
set(path_so ../jniLibs/armeabi-v7a)
报错如下:
Build command failed.
Error while executing process D:\AndroidSDK\cmake\3.10.2.4988404\bin\cmake.exe with arguments
{--build E:\AndroidStudioWorkspace\FFmpegDemo\app\.externalNativeBuild\cmake\debug\armeabi-v7a --target native-lib}

ninja: error: '../jniLibs/armeabi-v7a/libavcodec-58.so', needed by
'E:/AndroidStudioWorkspace/FFmpegDemo/app/build/intermediates/cmake/debug/obj/armeabi-v7a/libnative-lib.so',
missing and no known rule to make it
添加ffmpeg相关的库
add_library(avcodec-58
        SHARED
        IMPORTED)
set_target_properties(avcodec-58
        PROPERTIES
        IMPORTED_LOCATION
        ${path_so}/libavcodec-58.so)
链接so库
target_link_libraries( # Specifies the target library.
        native-lib
        avcodec-58
        ${log-lib})
包含FFmpeg头文件
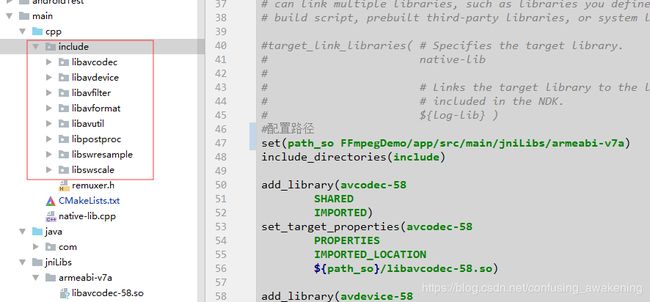
因为include文件夹和CMakeLists.txt文件处于同一目录,所以配置如下:
include_directories(include)
完整配置如下:
# For more information about using CMake with Android Studio, read the
# documentation: https://d.android.com/studio/projects/add-native-code.html

# Sets the minimum version of CMake required to build the native library.

cmake_minimum_required(VERSION 3.4.1)

# Creates and names a library, sets it as either STATIC
# or SHARED, and provides the relative paths to its source code.
# You can define multiple libraries, and CMake builds them for you.
# Gradle automatically packages shared libraries with your APK.

add_library( # Sets the name of the library.
        native-lib

        # Sets the library as a shared library.
        SHARED

        # Provides a relative path to your source file(s).
        native-lib.cpp)

# Searches for a specified prebuilt library and stores the path as a
# variable. Because CMake includes system libraries in the search path by
# default, you only need to specify the name of the public NDK library
# you want to add. CMake verifies that the library exists before
# completing its build.


find_library( # Sets the name of the path variable.
        log-lib

        # Specifies the name of the NDK library that
        # you want CMake to locate.
        log)

# Specifies libraries CMake should link to your target library. You
# can link multiple libraries, such as libraries you define in this
# build script, prebuilt third-party libraries, or system libraries.

#target_link_libraries( # Specifies the target library.
#                       native-lib
#
#                       # Links the target library to the log library
#                       # included in the NDK.
#                       ${log-lib} )
#配置路径
set(path_so FFmpegDemo/app/src/main/jniLibs/armeabi-v7a)
include_directories(include)

add_library(avcodec-58
        SHARED
        IMPORTED)
set_target_properties(avcodec-58
        PROPERTIES
        IMPORTED_LOCATION
        ${path_so}/libavcodec-58.so)

add_library(avdevice-58
        SHARED
        IMPORTED)
set_target_properties(avdevice-58
        PROPERTIES
        IMPORTED_LOCATION
        ${path_so}/libavdevice-58.so)

add_library(avfilter-7
        SHARED
        IMPORTED)
set_target_properties(avfilter-7
        PROPERTIES
        IMPORTED_LOCATION
        ${path_so}/libavfilter-7.so)

add_library(avformat-58
        SHARED
        IMPORTED)
set_target_properties(avformat-58
        PROPERTIES
        IMPORTED_LOCATION
        ${path_so}/libavformat-58.so)

add_library(avutil-56
        SHARED
        IMPORTED)
set_target_properties(avutil-56
        PROPERTIES
        IMPORTED_LOCATION
        ${path_so}/libavutil-56.so)

add_library(postproc-55
        SHARED
        IMPORTED)
set_target_properties(postproc-55
        PROPERTIES
        IMPORTED_LOCATION
        ${path_so}/libpostproc-55.so)

add_library(swresample-3
        SHARED
        IMPORTED)
set_target_properties(swresample-3
        PROPERTIES
        IMPORTED_LOCATION
        ${path_so}/libswresample-3.so)

add_library(swscale-5
        SHARED
        IMPORTED)
set_target_properties(swscale-5
        PROPERTIES
        IMPORTED_LOCATION
        ${path_so}/libswscale-5.so)


target_link_libraries( # Specifies the target library.
        native-lib

        avcodec-58
        avdevice-58
        avfilter-7
        avformat-58
        avutil-56
        postproc-55
        swresample-3
        swscale-5
        # Links the target library to the log library
        # included in the NDK.
        ${log-lib})
至此,需要用到的FFmpeg相关文件都以配置好,下面开始编程
Android使用FFmpeg so(封装格式转换)
首先创建一个类JniUtils,用于定义本地方法
加载so库
JAVA代码调用so库的方法前,需要加载so库
package com.cy.ffmpegdemo;
public class JniUtils {
    static {
        System.loadLibrary("native-lib");
    }
}
定义native方法
package com.cy.ffmpegdemo;
public class JniUtils {
    static {
        System.loadLibrary("native-lib");
    }
    public static native boolean remuxe(String inPath, String outPath);
}
定义一个封装格式转换的native方法remuxe(),
传入输入文件的路径,和输出文件的路径
返回true表示封装格式转换成功,
返回false表示封装格式转换失败
Android调用native方法
package com.cy.ffmpegdemo;
import android.os.Environment;
import android.support.v7.app.AppCompatActivity;
import android.os.Bundle;
import android.util.Log;
import android.view.View;
import android.widget.TextView;
public class MainActivity extends BaseActivity {
    // Used to load the 'native-lib' library on application startup.
    @Override
    protected void onCreate(Bundle savedInstanceState) {
        super.onCreate(savedInstanceState);
        setContentView(R.layout.activity_main);

        new Thread(new Runnable() {
            @Override
            public void run() {
                checkPermissionWRITE_EXTERNAL_STORAGE(new OnPermissionRequestListener() {
                    @Override
                    public void onPermissionHave() {
                        //先取得读写权限
                        Log.e("issuccess?", "" + JniUtils.remuxe(Environment.getExternalStorageDirectory() + "/FFmpegDemo/video.mp4",
                                Environment.getExternalStorageDirectory() + "/FFmpegDemo/video.mkv"));
                    }

                    @Override
                    public void onPermissionRefuse() {

                    }

                    @Override
                    public void onPermissionRefuseNoAsk() {

                    }
                });

            }
        }).start();
    }
    @Override
    public void onClick(View v) {

    }
}
JNI实现native方法
在没有实现JniUtils的native方法前,方法名字呈红色,使用快捷键,可以快速在native-lib.cpp中生成,
代码如下:
extern "C" JNIEXPORT jboolean JNICALL
Java_com_cy_ffmpegdemo_JniUtils_remuxe(JNIEnv *env, jclass type, jstring inPath_,
                                       jstring outPath_) {
    const char *inPath = env->GetStringUTFChars(inPath_, 0);
    const char *outPath = env->GetStringUTFChars(outPath_, 0);
}
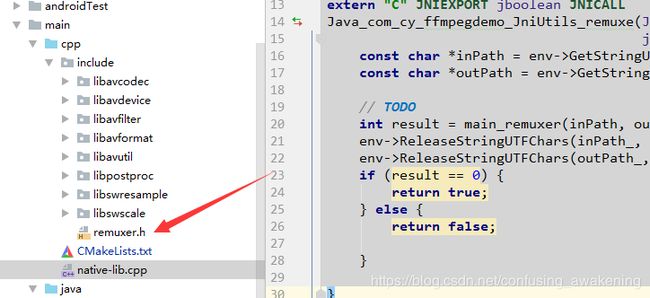
接下来在include目录下创建一个头文件remuxer.h,如图所示:
int main_remuxer(const char *inPath,const char *outPath)
完整代码如下:
/*
* Copyright (c) 2013 Stefano Sabatini
*
* Permission is hereby granted, free of charge, to any person obtaining a copy
* of this software and associated documentation files (the "Software"), to deal
* in the Software without restriction, including without limitation the rights
* to use, copy, modify, merge, publish, distribute, sublicense, and/or sell
* copies of the Software, and to permit persons to whom the Software is
* furnished to do so, subject to the following conditions:
*
* The above copyright notice and this permission notice shall be included in
* all copies or substantial portions of the Software.
*
* THE SOFTWARE IS PROVIDED "AS IS", WITHOUT WARRANTY OF ANY KIND, EXPRESS OR
* IMPLIED, INCLUDING BUT NOT LIMITED TO THE WARRANTIES OF MERCHANTABILITY,
* FITNESS FOR A PARTICULAR PURPOSE AND NONINFRINGEMENT. IN NO EVENT SHALL
* THE AUTHORS OR COPYRIGHT HOLDERS BE LIABLE FOR ANY CLAIM, DAMAGES OR OTHER
* LIABILITY, WHETHER IN AN ACTION OF CONTRACT, TORT OR OTHERWISE, ARISING FROM,
* OUT OF OR IN CONNECTION WITH THE SOFTWARE OR THE USE OR OTHER DEALINGS IN
* THE SOFTWARE.
*/
/**
* @file
* libavformat/libavcodec demuxing and muxing API example.
*
* Remux streams from one container format to another.
* @example remuxing.c
*/
extern "C" {
#include (av_mallocz_array(stream_mapping_size, sizeof(*stream_mapping)));
// if (!stream_mapping) {
// ret = AVERROR(ENOMEM);
// goto end;
// }
/**输出文件的格式,只有在封装时使用,必须在调用avformat_write_header()前初始化
*/
ofmt = ofmt_ctx->oformat;
/*AVFormatContext 结构体中定义了AVStream **streams 数组;
* nb_streams即为数组元素的个数
*/
for (i = 0; i < ifmt_ctx->nb_streams; i++) {
AVStream *out_stream;
AVStream *in_stream = ifmt_ctx->streams[i];
/**当前流的编解码参数,
avformat_new_stream()调用后会初始化,
avformat_free_context()调用后会被释放。
解封装:在创建流的时候或者avformat_find_stream_info()调用后,被初始化;
封装:avformat_write_header()调用前,手动初始化
*/
AVCodecParameters *in_codecpar = in_stream->codecpar;
/**如果输入多媒体文件的当前遍历到的流的 媒体类型不是音频、视频、字幕,那么stream_mapping[i]赋值为-1
*/
if (in_codecpar->codec_type != AVMEDIA_TYPE_AUDIO &&
in_codecpar->codec_type != AVMEDIA_TYPE_VIDEO &&
in_codecpar->codec_type != AVMEDIA_TYPE_SUBTITLE) {
// stream_mapping[i] = -1;
continue;
}
//记录流索引
// stream_mapping[i] = stream_index++;
/**创建一个用于输出的AVStream指针对象
*/
out_stream = avformat_new_stream(ofmt_ctx, NULL);
if (!out_stream) {
fprintf(stderr, "Failed allocating output stream\n");
ret = AVERROR_UNKNOWN;
goto end;
}
/**输出的AVCodecParameters指针所占内存被释放,然后将输入的AVCodecParameters指针内存拷贝到输出的AVCodecParameters中
*/
ret = avcodec_parameters_copy(out_stream->codecpar, in_codecpar);
if (ret < 0) {
fprintf(stderr, "Failed to copy codec parameters\n");
goto end;
}
/**
* Additional information about the codec (corresponds to the AVI FOURCC).
uint32_t codec_tag;
为编解码器添加额外信息,这里懵逼了,这行不写,输出视频文件会有毛病
*/
out_stream->codecpar->codec_tag = 0;
}
/**打印输入或输出格式的详细信息,
is_output:0表示input,1表示output
*/
av_dump_format(ofmt_ctx, 0, pathOut, 1);
/**解封装时,AVFormatContext中的AVIOContext *pb, 可以在调用avformat_open_input()之前初始化,
或者通过调用avformat_open_input()初始化
封装时,AVFormatContext中的AVIOContext *pb,可以在调用avformat_write_header()之前初始化,
完事后必须释放AVFormatContext中的AVIOContext *pb占用的内存
如果ofmt->flags值为AVFMT_NOFILE,就不要初始化AVFormatContext中的AVIOContext *pb,在这种情况下,
解封装器/封装器将会通过其它方式处理I/O,而且AVFormatContext中的AVIOContext *pb为NULL
*/
if (!(ofmt->flags & AVFMT_NOFILE)) {
/**为对应url的文件初始化一个AVIOContext 二级指针对象
*/
ret = avio_open(&ofmt_ctx->pb, pathOut, AVIO_FLAG_WRITE);
if (ret < 0) {
fprintf(stderr, "Could not open output file '%s'", pathOut);
goto end;
}
}
//初始化流的私有数据并将流头写入输出媒体文件
ret = avformat_write_header(ofmt_ctx, NULL);
if (ret < 0) {
fprintf(stderr, "Error occurred when opening output file\n");
goto end;
}
while (1) {
AVStream *in_stream, *out_stream;
/**返回流的下一帧。
此函数读取存储在文件中的内容到AVPacket *pkt,而不验证是否存在解码器的有效帧。
它将*存储在文件中的内容分割成帧,并为每个调用返回一个AVPacket *pkt。
它不会*省略有效帧之间的无效数据,以便给解码器最大的解码信息。
返回0表示读取一帧成功,返回负数,表示出错了或者已经读到文件末尾了。
*/
ret = av_read_frame(ifmt_ctx, &pkt);
if (ret < 0)
break;
//初始化输入的AVStream,AVpacket 中的stream_index定义了流的索引
in_stream = ifmt_ctx->streams[pkt.stream_index];
// if (pkt.stream_index >= stream_mapping_size ||stream_mapping[pkt.stream_index] < 0) {
// //清除packet占用的内存
// av_packet_unref(&pkt);
// continue;
// }
// pkt.stream_index = stream_mapping[pkt.stream_index];
//初始化输出的AVStream
out_stream = ofmt_ctx->streams[pkt.stream_index];
log_packet(ifmt_ctx, &pkt, "in");
/*pkt.pts **乘** in_stream->time_base **除** out_stream->time_base
得到out_stream下pkt的pts,输出文件的一帧数据包的pts
即同步了输入输出的显示时间戳
pkt为从输入文件读取的一帧的数据包,
* */
pkt.pts = av_rescale_q_rnd(pkt.pts, in_stream->time_base, out_stream->time_base,
static_cast<AVRounding>(AV_ROUND_NEAR_INF | AV_ROUND_PASS_MINMAX));
/**pkt.dts **乘** in_stream->time_base **除** out_stream->time_base
得到out_stream下pkt的dts ,输出文件的一帧数据包的dts
即同步了输入输出的解压时间戳
pkt为从输入文件读取的一帧的数据包,
*/
pkt.dts = av_rescale_q_rnd(pkt.dts, in_stream->time_base, out_stream->time_base,
static_cast<AVRounding>(AV_ROUND_NEAR_INF | AV_ROUND_PASS_MINMAX));
/**pkt.duration**乘** in_stream->time_base **除** out_stream->time_base
得到out_stream下pkt的duration ,输出文件的一帧数据包的持续时间
即同步了输入输出的持续时间戳
pkt为从输入文件读取的一帧的数据包,
*/
pkt.duration = av_rescale_q(pkt.duration, in_stream->time_base, out_stream->time_base);
// pkt.pos = -1;
log_packet(ofmt_ctx, &pkt, "out");
/**将一帧数据包写入输出媒体文件。
此函数将根据需要在内部缓冲数据包,以确保输出文件中的数据包按照dts的顺序正确交叉存储。
调用者进行自己的交叉存储时,应该调用av_write_frame(),而不是这个函数。
使用此函数而不是av_write_frame()可以使muxers提前了解未来的数据包,例如改善MP4对VFR内容在碎片模式下的行为。
*/
ret = av_interleaved_write_frame(ofmt_ctx, &pkt);
if (ret < 0) {
fprintf(stderr, "Error muxing packet\n");
break;
}
//清除packet占用的内存
av_packet_unref(&pkt);
}
// *将流的尾部写入输出媒体文件,并且释放其私有数据占用的内存
av_write_trailer(ofmt_ctx);
end:
//关闭打开的input AVFormatContext。释放其所有内容占用的内存,赋值为NULL。
avformat_close_input(&ifmt_ctx);
/* close output */
if (ofmt_ctx && !(ofmt->flags & AVFMT_NOFILE))
// 关闭被AVIOContext使用的资源,释放AVIOContext占用的内存并且置为NULL
avio_closep(&ofmt_ctx->pb);
//释输出的放AVFormatContext所有占用的内存
avformat_free_context(ofmt_ctx);
//释放内存
// av_freep(&stream_mapping);
if (ret < 0 && ret != AVERROR_EOF) {
// fprintf(stderr, "Error occurred: %s\n", av_err2str(ret));
return 1;
}
return 0;
}
详解参考:ffmpeg入门教程之多媒体文件格式转换器(无编解码)详解(官网翻译):https://www.jianshu.com/p/db0516080b86
然后在native-lib.cpp中引入头文件remuxer.h:
#include 在JNI方法处调用int main_remuxer(const char *inPath,const char *outPath)
Java_com_cy_ffmpegdemo_JniUtils_remuxe(JNIEnv *env, jclass type, jstring inPath_,
                                       jstring outPath_) {
    const char *inPath = env->GetStringUTFChars(inPath_, 0);
    const char *outPath = env->GetStringUTFChars(outPath_, 0);
    // TODO
    int result = main_remuxer(inPath, outPath);
    env->ReleaseStringUTFChars(inPath_, inPath);
    env->ReleaseStringUTFChars(outPath_, outPath);
    if (result == 0) {
        return true;
    } else {
        return false;
    }
}
返回true表示封装格式转换成功,
返回false表示封装格式转换失败
测试
在手机存储根目录下创建文件夹比如FFmpegDemo,
找一个视频文件比如6S时长的mp4,命名video.mp4,放置到FFmpegDemo下面,记住视频不要太长,不然运行比较久。
 Log.e("issuccess?", "" + JniUtils.remuxe(Environment.getExternalStorageDirectory() + "/FFmpegDemo/video.mp4",
                                Environment.getExternalStorageDirectory() + "/FFmpegDemo/video.mkv"));
运行到Android手机上,不一会儿就会发现FFmpegDemo生成了一个视频文件,比如video.mkv
GitHub:https://github.com/AnJiaoDe/FFmpegAndroidDemo
欢迎分享、转载、联系、指正、批评、撕逼
Github:https://github.com/AnJiaoDe
简书:https://www.jianshu.com/u/b8159d455c69
CSDN:https://blog.csdn.net/confusing_awakening
ffmpeg入门教程:https://www.jianshu.com/p/042c7847bd8a
QQ群
