Linux中的Apache web服务
本篇博客的内容依次为:apache安装,配置目录讲解,使用端口修改,默认发布文件修改,默认发布目录修改,apache虚拟主机建立,基于IP和基于服务的两种访问控制,apache支持的几种语言实验测试,加密访问https和https网页重写【不用手动输入https】
Apache是世界使用排名第一的Web服务器软件。它可以运行在几乎所有广泛使用的计算机平台上,由于其跨平台和安全性被广泛使用,是最流行的Web服务器端软件之一。它快速、可靠并且可通过简单的API扩充,将Perl/Python等解释器编译到服务器中。同时Apache音译为阿帕奇,是北美印第安人的一个部落,叫阿帕奇族,在美国的西南部。也是一个基金会的名称、一种武装直升机等等。
环境搭建:本次实验我们采用新建立的虚拟机server,对其进行网络配置,yum源搭建,更改主机名称,调整selinux【enforcing状态】这几项准备工作。
http超文本传输协议准备:
yum search apache
yum install -y httpd
systemctl start httpd
systemctl enable httpd
firewall-cmd --permanent --add-service=http
firewall-cmd --reload
yum install httpd-manual   ###下载http手册,可以直接在浏览器搜索apache手册,可以调整为中文
systemctl restart httpd
cd /var/www/html  ###默认发布目录
vim index.html   ###默认发布文件   【可以先随便输入内容】
在浏览器直接输入主机IP,可以看到默认发布文件中的内容
配置目录说明:
/etc/httpd/conf 主配置目录
/etc/httpd/conf/httpd.conf主配置文件
/etc/httpd/conf.d 子配置目录
/etc/httpd/conf.d/.conf 子配置文件
httpd_sys_content_t 默认安全上下文
/etc/httpd/logs/ 日志
修改默认端口:
当修改为默认允许的端口时:
netstat -antlupe | grep httpd  ###默认使用80端口
semanage port -l | grep http  ###查看http允许的端口
vim /etc/httpd/conf/httpd.conf
	listen 8080                                   ###更改侦听端口
firewall-cmd --permanent --add-port=8080/tcp  ###在火墙中允许8080端口访问
firewall-cmd --reload   ###重新加载火墙
systemctl restart httpd ###重启服务
netstat -antlupe | grep httpd  ###默认使用的端口被改为8080
当设置为http默认没有允许的端口时【例如端口6666】:
vim /etc/httpd/conf/httpd.conf
	listen 6666
systemctl restart httpd  ##会重启失败,需要将selinux调整为premissive
setenforce 0     ###调整SELINUX为警告模式
systemctl restart httpd  ###重启服务
我们要解决的是在enforcing状态下依旧可以使用没有被允许的端口开启服务。
那么就需要让这个端口,被允许。
   semanage port -a -t http_port_t -p tcp 6666
  ###允许selinux在enforcing状态让http访问6666端口
修改默认发布文件:
vim /etc/httpd/conf/httpd.conf    ###修改配置文件来指定默认发布文件
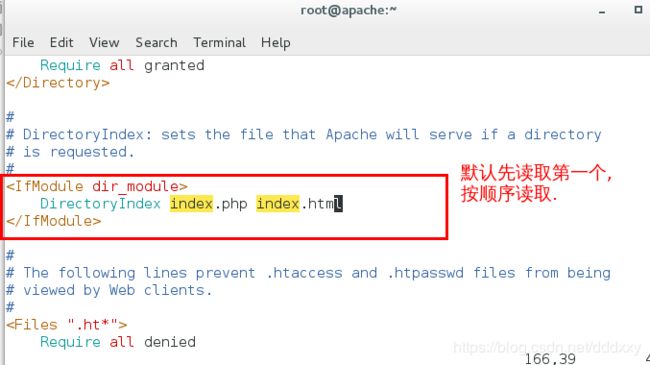
	DirectoryIndex test.html    可以写多个,按顺序读取
systemctl restart httpd    ###改完要重启服务
修改默认发布目录:
vim /etc/httpd/conf/httpd.conf    ###修改默认发布目录【SELINUX开启时会影响】
	DocumentRoot "/westos/html"

		Require all granted    ###授权
当SELINUX开启的时候: 服务无法重启
ls -Zd /var/www/html/
ls -zd /westos/html/
semanage fcontext -a -t httpd_sys_content_t '/westos/html(/.*)?'修改安全上下文
restorecon -RvvF /westos/html
systemctl restart httpd  ###改完要重启服务
apache虚拟主机:
使一台主机可以发布多个默认发布文件
【一个网站中有多个子域,就是多个默认发布文件】
上面我们说的写多个默认发布文件是依次读取的,这里是分开读取
在子配置目录中
cd /etc/httpd/conf.d
vim vhost.conf   ###虚拟主机配置文件

        DocumentRoot /var/www/html
        CustomLog logs/default.log combined


        ServerName news.westos.com
        DocumentRoot /var/www/vhost/news
        CustomLog logs/news.log combined


        Require all granted


        ServerName music.westos.com
        DocumentRoot /var/www/vhost/music
        CustomLog logs/music.log combined


        Require all granted

mkdir -p /var/www/vhost/news     ###创建子域的默认发布目录
mkdir -p /var/www/vhost/music    ###创建子域的默认发布目录
vim /var/www/vhost/news/index.html   ###写入内容,测试的时候可以看到
vim /var/www/vhost/music.index.html  ###写入内容
systemctl restart httpd
在哪台主机浏览器访问,就要在那台主机的/etc/hosts中写入解析
vim /etc/hosts   ###写入解析
	172.25.254.112 www.westos.com new.westos.com music.westos.com
测试:在写入解析的主机上的浏览器中:
www.westos.com
new.westos.com
music.westos.com
访问控制:
基于IP
vim vhost.conf

		Order Allow,Deny
		Allow from All
		Deny from 172.25.254.250
	      ###允许除了250以外所有人访问


	Order Deny,Allow
	Deny from all
	Allow from 172.25.254.250
      ###只允许250访问
systemctl restart httpd

使用200这台主机可以访问到,但是使用12这台主机访问时出错.

基于服务
环境准备:我们先把基于IP的代码注释掉.
cd /etc/httpd   ###需要在该目录去生成认证
htpasswd -cm .apache_auth admin   ###建立认证文件
要为admin建立密码

cat .apache_auth  ###查看认证
当认证文件存在时,再建立要将c去掉.否则会覆盖认证文件.再建立为添加用户
htpasswd -m .apache_auth admin
cd /etc/httpd/conf.d/
vim vhost.conf

	AuthUserFile /etc/httpd/.apache_auth
	AuthType basic     ###认证类型
	AuthName "Please input username and password"
	Require user admin   ###只允许admin用户访问


##Require valid-user   ###允许所有有效用户登陆
apache支持的语言:
默认是直接使用HTML语言
【PHP语言】
注释掉之前的访问权限控制
vim /etc/httpd/conf/httpd.conf    默认发布文件将index.php放在最前面
	DirectoryIndex index.php
vim /var/www/html/index.php

yum install php -y
systemctl restart httpd


浏览器测试:172.25.254.112/index.php
【cgi语言】
perl语言
cd /var/www/html/
ls
mkdir cgi
ls
cd cgi/
vim index.cgi
  1 #!/usr/bin/perl
  2 print "Content-type: text/html\n\n";
  3 print `date`;

chmod +x index.cgi
本地直接测试:
./index.cgi
要在浏览器测试的话:
vim /etc/httpd/conf.d/vhost.conf

		options +ExecCGI
		AddHandler cgi-script .cgi

systemctl restart httpd
setenforcing 0
当SELINUX在enforcing状态时,需要更改安全上下文
semanage fcontext -a -t httpd_sys_script_exec_t '/var/www/html/cgi(/.*)?'
restorecon -RvvF /var/www/html/cgi
浏览器测试:172.25.254.112/cgi/index.cgi

【python语言】
WSGI提供python语言支持: PythonWeb服务器网关接口(Python Web Server Gateway
Interface,缩写为WSGI)是Python应用程序或框架和Web服务器之间的一种接口,已经被广泛接受,
它已基本达成它的可移植性方面的目标。 WSGI 没有官方的实现,
因为WSGI更像一个协议.只要遵照这些协议,WSGI应用(Application)都可以在任何服务器(Server)上运行, 反之亦然。
cd /var/www/cgi-bin
在该目录下存放 webapp.wsgi脚本文件 ###脚本从他处考的,也可以自行下载python语言脚本
yum search wsgi
yum install mod_wsgi.x86_64 -y   ###可以运行脚本的软件
vim /etc/httpd/conf.d/vhost.conf

		ServerName wsgi.westos.com
		WSGIScriptAlias / /var/www/cgi-bin/webapp.wsgi

vim /etc/hosts
	172.25.254.112 wsgi.westos.com
systemctl restart httpd
测试:浏览器:wsgi.westos.com
开启加密访问https:
https使用443端口
yum install mod_ssl
systemctl restart httpd
firewall-cmd --permanent --add-service=https
friewall-cmd --reload

yum install crypto-utils

genkey server.westos.com  ###--help可查看用法
####生成随机数较慢,可以在无图形界面移动鼠标,或者在shell里敲击字符来帮助生成
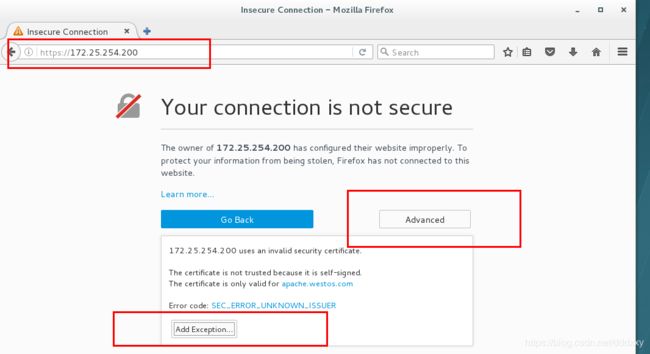
测试:在浏览器访问时,使用https
设定https虚拟主机并网页重写:
解决了我们手动输入https这个问题:会自动跳转。
访问80端口时跳转到443端口
cd /etc/httpd/conf.d/
vim vhost_https.conf

       		 ServerName login.westos.com
        	 DocumentRoot /var/www/html/xyy/login
         	 CustomLog "logs/login.logs" combined
         	 SSLEngine on
         	 SSLCertificateFile /etc/pki/tls/certs/www.westos.com.crt
          	 SSLCertificateKeyFile /etc/pki/tls/private/www.westos.com.key


		Require all granted


          	 ServerName login.westos.com
         	 RewriteEngine On
         	 RewriteRule ^(/.*)$ https://%{HTTP_HOST}$1 [redirect=301]
^(/.)$ ##客户在浏览器地址栏中输入的所有字符
https:// ##强制客户加密访问
%{HTTP_HOST} ##客户请求主机
‘‘$ 1‘‘ "表示 ^(/.)$的值
[redirect=301] ##永久重写 301
mkdir -p /var/www/html/xyy/login
vim /var/www/html/xyy/login/index.html  ###写入测试可以看到的内容
systemctl restart httpd
vim /etc/hosts
172.25.254.112 login.westos.com
测试: 浏览器输入: login.westos.com
大大的小小阳


