Opencv4 vs2017 实现kcf ( opencv_contrib )
先放上Learn Opencv上关于追踪算法的介绍以及C++和python的代码实现
https://www.learnopencv.com/object-tracking-using-opencv-cpp-python/
#include
#include
#include

using namespace cv;
using namespace std;

// Convert to string
#define SSTR( x ) static_cast< std::ostringstream & >( \
( std::ostringstream() << std::dec << x ) ).str()

int main(int argc, char **argv)
{
    // List of tracker types in OpenCV 3.4.1
    string trackerTypes[8] = {"BOOSTING", "MIL", "KCF", "TLD","MEDIANFLOW", "GOTURN", "MOSSE", "CSRT"};
    // vector  trackerTypes(types, std::end(types));

    // Create a tracker
    string trackerType = trackerTypes[2];

    Ptr tracker;

    #if (CV_MINOR_VERSION < 3)
    {
        tracker = Tracker::create(trackerType);
    }
    #else
    {
        if (trackerType == "BOOSTING")
            tracker = TrackerBoosting::create();
        if (trackerType == "MIL")
            tracker = TrackerMIL::create();
        if (trackerType == "KCF")
            tracker = TrackerKCF::create();
        if (trackerType == "TLD")
            tracker = TrackerTLD::create();
        if (trackerType == "MEDIANFLOW")
            tracker = TrackerMedianFlow::create();
        if (trackerType == "GOTURN")
            tracker = TrackerGOTURN::create();
        if (trackerType == "MOSSE")
            tracker = TrackerMOSSE::create();
        if (trackerType == "CSRT")
            tracker = TrackerCSRT::create();
    }
    #endif
    // Read video
    VideoCapture video("videos/chaplin.mp4");

    // Exit if video is not opened
    if(!video.isOpened())
    {
        cout << "Could not read video file" << endl;
        return 1;
    }

    // Read first frame
    Mat frame;
    bool ok = video.read(frame);

    // Define initial bounding box
    Rect2d bbox(287, 23, 86, 320);

    // Uncomment the line below to select a different bounding box
    // bbox = selectROI(frame, false);
    // Display bounding box.
    rectangle(frame, bbox, Scalar( 255, 0, 0 ), 2, 1 );

    imshow("Tracking", frame);
    tracker->init(frame, bbox);

    while(video.read(frame))
    {
        // Start timer
        double timer = (double)getTickCount();

        // Update the tracking result
        bool ok = tracker->update(frame, bbox);

        // Calculate Frames per second (FPS)
        float fps = getTickFrequency() / ((double)getTickCount() - timer);

        if (ok)
        {
            // Tracking success : Draw the tracked object
            rectangle(frame, bbox, Scalar( 255, 0, 0 ), 2, 1 );
        }
        else
        {
            // Tracking failure detected.
            putText(frame, "Tracking failure detected", Point(100,80), FONT_HERSHEY_SIMPLEX, 0.75, Scalar(0,0,255),2);
        }

        // Display tracker type on frame
        putText(frame, trackerType + " Tracker", Point(100,20), FONT_HERSHEY_SIMPLEX, 0.75, Scalar(50,170,50),2);

        // Display FPS on frame
        putText(frame, "FPS : " + SSTR(int(fps)), Point(100,50), FONT_HERSHEY_SIMPLEX, 0.75, Scalar(50,170,50), 2);

        // Display frame.
        imshow("Tracking", frame);

        // Exit if ESC pressed.
        int k = waitKey(1);
        if(k == 27)
        {
            break;
        }

    }
}
这里我因为需要,使用的是C++,, kcf。
问题:
在配置完成opencv环境之后,我直接将代码粘了过来,然而总是找不到
tracking.hpp 我尝试使用了video目录下面的tracking.hpp头文件,并不能使用。
看了许多博客之后,最后找到了解决方法:需要给opencv配置contrib 扩展。下面是具体的步骤:
cmake的下载以及安装
下载链接: https://cmake.org/download/
根据需要下载,我下载的是:
![]()
next,,。
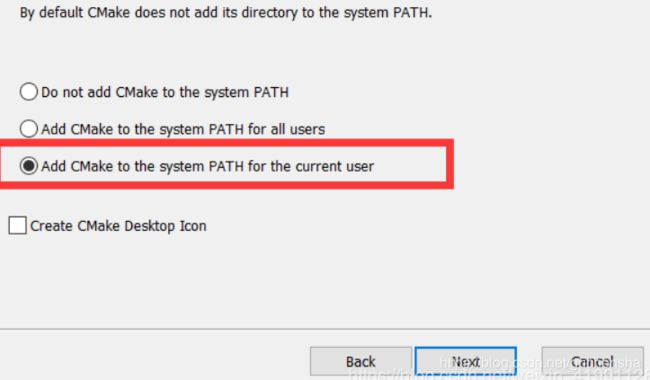
create icon选上也可
contrib 的下载
下载链接: https://github.com/opencv/opencv_contrib/releases.
我的opencv 版本4.00
于是我下载了

下载完成之后解压到任意路径即可。
利用Cmake进行编译
打开安装好的cmake
如下图,这里需要选择两个路径。第一个source路径是安装好了的opencv中的source文件夹的路径。第二个路径是我们自己设置的一个文件夹的路径(这个路径之后需要用来配置环境)
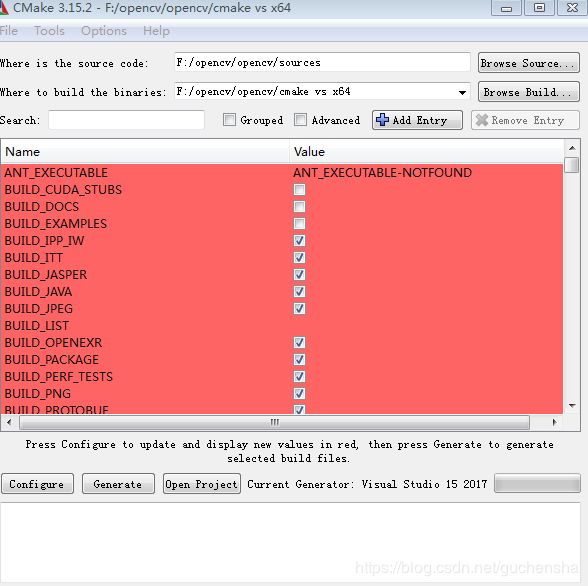
点击configure 并选择相应的VS版本,上图中我已经选择好了 :VS 15 2017 注意选择64位还是32位。
configure一段时间之后,会显示“Configure Done” 。接下来
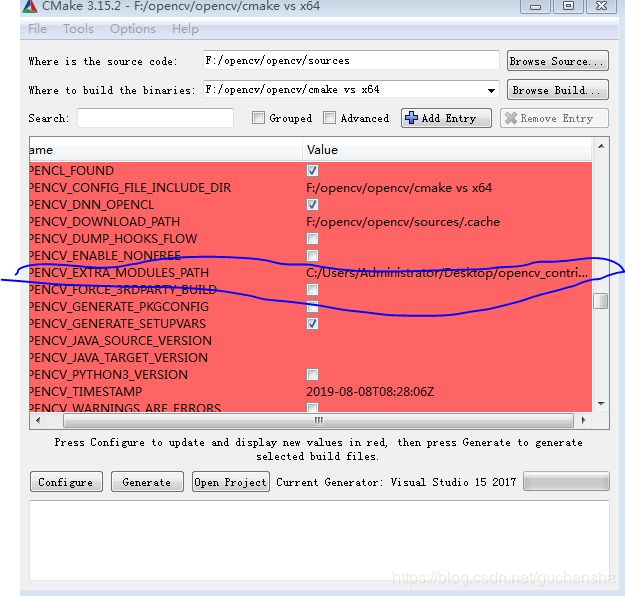
找到上图中蓝色圈起来的那一项,,路径选择自己解压好了的opencv_contrib下的modules目录,点击generate
genenrate一段时间之后会显示“Generating Done”。
VS编译
第一步
利用VS打开自定义的文件夹,之后打开“Opencv.sln”
![]()
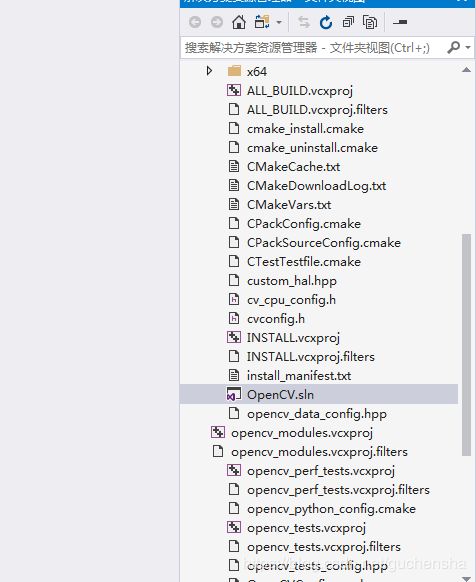
第二步
点击生成 —重新生成解决方案(该过程需要耗费一定的时间)
我再完成这一步的时候报错了

并没有解决错误,不过即便没有处理对最后的结果也没有产生影响。
第三步
解决方案资源管理器—>CMakeTargets—>INSTALL—>仅用于项目—>仅生成INSTALL
第四步
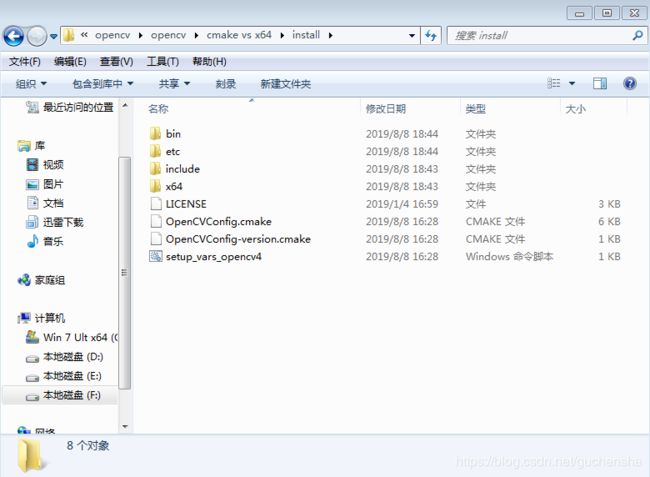
找到自定义文件夹中的install文件夹 进行验证。(会有一点出入)
Opencv_contrib 环境配置
该配置与opencv环境配置完全相同。
分别是:系统变量,VC++目录中的包含目录和库目录,,下面是我添加的目录,使用上一步的install,具体路径具体分析
F:\opencv\opencv\cmake vs x64\install\include\opencv2
F:\opencv\opencv\cmake vs x64\install\include
附加依赖项(注意自己的版本):
opencv_aruco400d.lib
opencv_bgsegm400d.lib
opencv_bioinspired400d.lib
opencv_calib3d400d.lib
opencv_ccalib400d.lib
opencv_core400d.lib
opencv_datasets400d.lib
opencv_dnn400d.lib
opencv_dnn_objdetect400d.lib
opencv_dpm400d.lib
opencv_face400d.lib
opencv_features2d400d.lib
opencv_flann400d.lib
opencv_fuzzy400d.lib
opencv_gapi400d.lib
opencv_hfs400d.lib
opencv_highgui400d.lib
opencv_imgcodecs400d.lib
opencv_imgproc400d.lib
opencv_img_hash400d.lib
opencv_line_descriptor400d.lib
opencv_ml400d.lib
opencv_objdetect400d.lib
opencv_optflow400d.lib
opencv_phase_unwrapping400d.lib
opencv_photo400d.lib
opencv_plot400d.lib
opencv_reg400d.lib
opencv_rgbd400d.lib
opencv_saliency400d.lib
opencv_shape400d.lib
opencv_stereo400d.lib
opencv_stitching400d.lib
opencv_structured_light400d.lib
opencv_superres400d.lib
opencv_surface_matching400d.lib
opencv_text400d.lib
opencv_tracking400d.lib
opencv_video400d.lib
opencv_videoio400d.lib
opencv_videostab400d.lib
opencv_xfeatures2d400d.lib
opencv_ximgproc400d.lib
opencv_xobjdetect400d.lib
opencv_xphoto400d.lib
此时进行kcf编译
这时tracking.hpp可以被找到,但是会出现新的问题。
tracker 未标明的标识符 这是由于opencv版本更新带来的问题,这时我们在调用opencv自带的 kcf算法的时候需要如下声明:
Ptr tracker = TrackerKCF::create();
KCF代码如下:
#include
#include
#include
#include
#include
#include

using namespace std;
using namespace cv;

int main()
{
	Rect2d roi;
	Mat frame;
	Ptr tracker = TrackerKCF::create();//高版本一般是这样创建KCF的
	//string video = "F://crop.avi"; //视频流
	VideoCapture cap(0);//启用摄像头
//VideoCapture cap(video);
	if (!cap.isOpened())
	{
		return 0;
	}
	cout << "press c to leap current Image" << endl;
	cout << "press q to slect current Image" << endl;
	cout << "press empty key to start track RIO Object" << endl;

	cap >> frame;
	while (1)
	{
		char key = waitKey(1);
		if (key == 'c')  // 按c键跳帧
		{
			cap >> frame;
		}
		if (key == 'q')  // 按q键退出跳帧
		{
			break;
		}
		imshow("first", frame);
	}

	cv::destroyWindow("first");

	roi = selectROI("tracker", frame);

	if (roi.width == 0 || roi.height == 0)
		return 0;

	tracker->init(frame, roi);

	// perform the tracking process
	printf("Start the tracking process\n");
	for (;; )
	{
		// get frame from the video
		cap >> frame;

		// stop the program if no more images
		if (frame.rows == 0 || frame.cols == 0) {
			cv::destroyWindow("tracker");
			break;
		}

		// update the tracking result

		tracker->update(frame, roi);

		// draw the tracked object
		rectangle(frame, roi, Scalar(255, 0, 0), 2, 1);

		// show image with the tracked object
		imshow("tracker", frame);

		if (char(waitKey(1)) == 'q') {
			cv::destroyWindow("tracker");
			break;
		}
	}
	return 0;
}