学习 spring-cloud-aibaba第六篇,API网关Gateway
文章目录
- 1.什么是网关?
- 2.为什么我们需要网关?
- 3.Spring Cloud Gateway
- 4.创建Spring Cloud Gateway项目
- 4.1 IDEAJ 创建gateway项目
- 4.2 添加依赖
- 4.3 写配置
- 4.4 启动gateway项目,测试通过网关访问content和user
- 5.spring cloud gateway的两大核心
- 5.1 gateway的架构图
- 5.2 核心之一 routes 路由
- 5.2.1 路由nacos其它微服务
- 5.2.2 自定义路由
- 5.2.2.1 示例 (可以配置多个):
- 5.2.2.2 内置的Predicate谓词工厂
- 5.2.2.3 自定义Predicate谓词工厂
- 5.2.2.4 内置的filters过滤器
- 5.2.2.5 自定义filters过滤器
- 5.3 核心之二 filters 全局过滤器
- 5.3.1 内置全局过滤器
- 5.3.2 自定义全局过滤器并使用
- 5.3.2 过滤器的执行顺序
- 6.springboot actuator对gateway的监控
特别声明:整理自慕课网大目师兄的微服务视频,链接: https://coding.imooc.com/learn/list/358.html
前情提要:在 nacos上注册了 content-center和 user-center两个服务, content-center使用 Feign调用 user-center服务,使用 Ribbon做负载均衡, sentinel实现服务容错来保护服务自己,微服务架构的像模像样了,但是我们还需要网关 Gateway
1.什么是网关?
一句话,客户端访问后台的统一入口

2.为什么我们需要网关?
如果没有网关,客户端与每个微服务直接通讯,会造成以下的不便
- 登录认证不便
如果微服务很多,每个微服务里都要有登录认证这一套逻辑,这就很烦了;如果有网关,把登录认证放到网关里实现,只需要做一次,很方便 - 客户端迭代不便
如果微服务的地址,域名改变了,客户端要做大量的改动;
用网关就不一样了,客户端只需要知道网关的地址就行了,请求都是经过网关转发,客户端不用关心微服务地址的改变 - 无法访问特殊协议的微服务
如果有些微服务使用了客户端不友好的协议,没有网关去转换协议,就无法访问这些微服务了
3.Spring Cloud Gateway
- 是spring cloud的第二代网关,未来会取代第一代网关zuul
- 基于Netty、Reactor以及WebFlux构建
- 性能强劲,是第一代网关zuul的1.6倍
- 功能强大,内置很多实用功能,例如转发,监控,限流
- 不支持springboot 1.x
- 还在改进当中,下面写的这版本没错,下版本就不一定对了
4.创建Spring Cloud Gateway项目
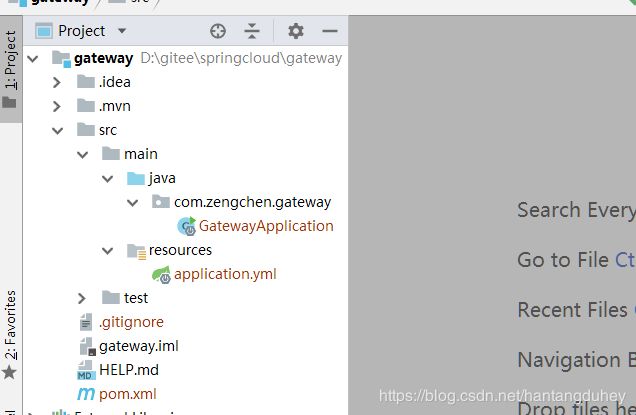
4.1 IDEAJ 创建gateway项目

找不到的可以直接搜索一下

4.2 添加依赖
- 修改springboot版本为2.1.6.RELEASE,和其它微服务保持一直
        org.springframework.boot
        spring-boot-starter-parent
        2.1.6.RELEASE
- 添加spring-cloud-alibaba
                org.springframework.cloud
                spring-cloud-alibaba-dependencies
                ${com.alibaba.cloud.version}
                pom
                import
0.9.0.RELEASE
- 添加springboot 监控 actuator
            org.springframework.boot
            spring-boot-starter-actuator
- 添加nacos客户端
            org.springframework.cloud
            spring-cloud-starter-alibaba-nacos-discovery
4.3 写配置
- 端口号
server:
  port: 8040
- 应用名称
spring:
  application:
    name: gateway
- nacos 注册地址
spring:
  application:
    name: gateway
  cloud:
    nacos:
      discovery:
        server-addr: 118.31.11.178:8848
- 开启gateway通过服务发现组件找到其它服务
spring:
  application:
    name: gateway
  cloud:
    nacos:
      discovery:
        server-addr: 118.31.11.178:8848
    gateway:
      discovery:
        locator:
          # 让gateway通过服务发现组件找到其它的微服务
          enabled: true
- 开启actuator的配置
management:
  endpoints:
    web:
      exposure:
        # 暴露出所有actuator监控的端点
        include: '*'
  endpoint:
    health:
      show-details: always
4.4 启动gateway项目,测试通过网关访问content和user
- 访问user-center的接口:http://localhost:8040/user-center//reciteHis/testAno

- 访问content-center接口:http://localhost:8040/content-center/poem/list?ids=1,2
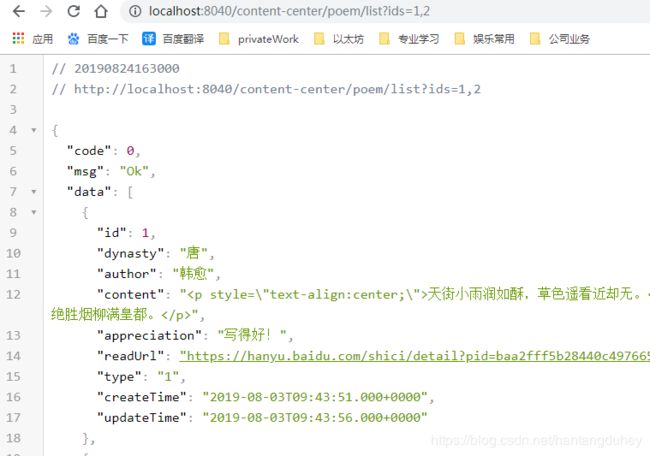
转发规律:访问 ${gateway_url}/{微服务X}/** 实际转发到 微服务X的/** 路径
5.spring cloud gateway的两大核心
5.1 gateway的架构图
由图可见,网关的两大核心,1.转发请求(路由,routes),2.过滤器

5.2 核心之一 routes 路由
5.2.1 路由nacos其它微服务
- 开启 gateway 发现服务注册组件上其它微服务的自动路由
效果:访问 ${gateway_url}/{微服务X}/** -------> 微服务X的/** 路径
spring:
	cloud:
		gateway:
	      discovery:
	        locator:
	          # 开启 gateway 发现服务注册组件上其它微服务的自动路由
	          enabled: true
5.2.2 自定义路由
5.2.2.1 示例 (可以配置多个):
如果有多个路由,请求会被第一个符合条件的路由转发走
将 http://localhost:8040/baidu/search/error.html?chid=wx 路由转发到 https://www.baidu.com/search/error.html,不带chid=wx参数的不转发
spring:
	cloud:
		gateway:
	      routes:
	        - id: test_baidu_route
	          uri: https://www.baidu.com
	          predicates:
	            - Query=chid,wx
	            - Path=/baidu/**
	          filters:
	            - name: RewritePath
	              args:
	                regexp: /baidu/(?.*)
	                replacement: /${remaining}
这个配置表示的含义:
-
id
这个路由的唯一标识,随便定义 -
uri
转发的去处,就是要转发到哪里去 -
predicates,
这是断言,也叫谓词工厂,这里使用了两个谓词,被转发的url必须满足这两个条件
第一个是Query,Query=chid,wx表示,请求gateway的链接必须要有参数 chid=wx才会被转发
第一个是Path,Path=/baidu/**表示,请求gateway的链接必须是 http://localhost:8040/baidu/****************,gateway_url后面必须是/baidu/的才会被转发
内置的谓词工厂有11个,起到不同的作用,如果这11个内置的谓词不能满足你的需求,你也可以写一个谓词工厂。这里是官方文档:https://cloud.spring.io/spring-cloud-gateway/reference/html/#gateway-request-predicates-factories -
filters
过滤器,这里只配置了一个过滤器RewritePath,如果不配置这个路径替换过滤器
http://localhost:8040/baidu/search/error.html?chid=wx被转发到 https://www.baidu.com/baidu/search/error.html,你会发现中间多了一个 /baidu/,这就不对了,所以这个过滤器就是把 /baidu/替换掉的逻辑,使最终的url是 https://www.baidu.com/search/error.html,一个可以正常访问的url
内置的过滤器工厂有二三十个,各种功能都有,同样你也可以自定义符合自己需求的过滤器。这里是官方文档:https://cloud.spring.io/spring-cloud-gateway/reference/html/#_rewritepath_gatewayfilter_factory -
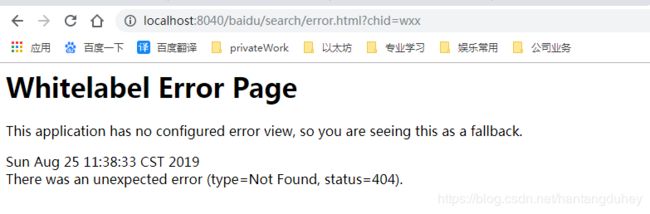
测试正常的转发
http://localhost:8040/baidu/search/error.html?chid=wx,没错,是baidu的返回

-
测试参数 chid=wx 不正确
http://localhost:8040/baidu/search/error.html?chid=wxx,说明predicate Query起作用了
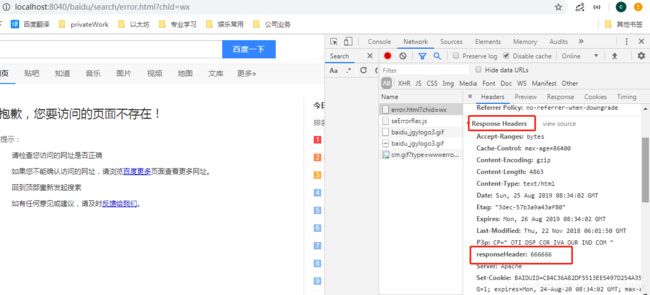
-
测试不以 /baidu/ 开头
http://localhost:8040/search/error.html?chid=wx,说明 predicate Path 起作用了

5.2.2.2 内置的Predicate谓词工厂
官方文档链接:https://cloud.spring.io/spring-cloud-gateway/reference/html/#gateway-request-predicates-factories
- After
技巧:时间可使用 System.out.println(ZonedDateTime.now()); 打印
spring:
  cloud:
    gateway:
      routes:
        - id: after_route
          uri: lb://user-center
          predicates:
            # 当且仅当请求时的时间After配置的时间时,才会转发到用户微服务
            # 目前配置不会进该路由配置,所以返回404
            # 将时间改成 < now的时间,则访问localhost:8040/** -> user-center/**
            # eg. 访问http://localhost:8040/users/1 -> user-center/users/1
            - After=2030-01-20T17:42:47.789-07:00[America/Denver]
- Before
spring:
  cloud:
    gateway:
      routes:
        - id: before_route
          uri: lb://user-center
          predicates:
            # 当且仅当请求时的时间Before配置的时间时,才会转发到用户微服务
            # 目前配置不会进该路由配置,所以返回404
            # 将时间改成 > now的时间,则访问localhost:8040/** -> user-center/**
            # eg. 访问http://localhost:8040/users/1 -> user-center/users/1
            - Before=2018-01-20T17:42:47.789-07:00[America/Denver]
- Between
spring:
  cloud:
    gateway:
      routes:
        - id: between_route
          uri: lb://user-center
          predicates:
            # 当且仅当请求时的时间Between配置的时间时,才会转发到用户微服务
            # 因此,访问localhost:8040/** -> user-center/**
            # eg. 访问http://localhost:8040/users/1 -> user-center/users/1
            - Between=2017-01-20T17:42:47.789-07:00[America/Denver], 2027-01-21T17:42:47.789-07:00[America/Denver]
- Cookie
spring:
  cloud:
    gateway:
      routes:
        - id: cookie_route
          uri: lb://user-center
          predicates:
            # 当且仅当带有名为somecookie,并且值符合正则ch.p的Cookie时,才会转发到用户微服务
            # 如Cookie满足条件,则访问http://localhost:8040/** -> user-center/**
            # eg. 访问http://localhost:8040/users/1 -> user-center/users/1
            - Cookie=somecookie, ch.p
- Header
spring:
  cloud:
    gateway:
      routes:
        - id: header_route
          uri: lb://user-center
          predicates:
            # 当且仅当带有名为X-Request-Id,并且值符合正则\d+的Header时,才会转发到用户微服务
            # 如Header满足条件,则访问http://localhost:8040/** -> user-center/**
            # eg. 访问http://localhost:8040/users/1 -> user-center/users/1
            - Header=X-Request-Id, \d+
- Host
spring:
  cloud:
    gateway:
      routes:
        - id: host_route
          uri: lb://user-center
          predicates:
            # 当且仅当名为Host的Header符合**.somehost.org或**.anotherhost.org时,才会转发用户微服务
            # 如Host满足条件,则访问http://localhost:8040/** -> user-center/**
            # eg. 访问http://localhost:8040/users/1 -> user-center/users/1
            - Host=**.somehost.org,**.anotherhost.org
- Method
spring:
  cloud:
    gateway:
      routes:
        - id: method_route
          uri: lb://user-center
          predicates:
            # 当且仅当HTTP请求方法是GET时,才会转发用户微服务
            # 如请求方法满足条件,访问http://localhost:8040/** -> user-center/**
            # eg. 访问http://localhost:8040/users/1 -> user-center/users/1
            - Method=GET
- Path
spring:
  cloud:
    gateway:
      routes:
        - id: path_route
          uri: lb://user-center
          predicates:
            # 当且仅当访问路径是/users/*或者/some-path/**,才会转发用户微服务
            # segment是一个特殊的占位符,单层路径匹配
            # eg. 访问http://localhost:8040/users/1 -> user-center/users/1
            - Path=/users/{segment},/some-path/**
- Query
示例1
spring:
  cloud:
    gateway:
      routes:
        - id: query_route
          uri: lb://user-center
          predicates:
            # 当且仅当请求带有baz的参数,才会转发到用户微服务
            # eg. 访问http://localhost:8040/users/1?baz=xx -> user-center的/users/1
            - Query=baz
示例2
spring:
  cloud:
    gateway:
      routes:
        - id: query_route
          uri: lb://user-center
          predicates:
            # 当且仅当请求带有名为foo的参数,且参数值符合正则ba.,才会转发到用户微服务
            # eg. 访问http://localhost:8040/users/1?baz=baz -> user-center的/users/1?baz=baz
            - Query=foo, ba.
- RemoteAddr
spring:
  cloud:
    gateway:
      routes:
        - id: remoteaddr_route
          uri: lb://user-center
          predicates:
            # 当且仅当请求IP是192.168.1.1/24网段,例如192.168.1.10,才会转发到用户微服务
            # eg. 访问http://localhost:8040/users/1 -> user-center的/users/1
            - RemoteAddr=192.168.1.1/24
组合使用
spring:
  cloud:
    gateway:
      routes:
       - id: host_foo_path_headers_to_httpbin
        uri: http://ityouknow.com
        predicates:
        - Host=**.foo.org
        - Path=/headers
        - Method=GET
        - Header=X-Request-Id, \d+
        - Query=foo, ba.
        - Query=baz
        - Cookie=chocolate, ch.p
        - After=2018-01-20T06:06:06+08:00[Asia/Shanghai]
相关代码

如果想知道具体配置的细则,看源码是最直接有效的方法
5.2.2.3 自定义Predicate谓词工厂
参照这些内置predicate的源码实现,照葫芦画瓢,代码并不多,写一个类就行
5.2.2.4 内置的filters过滤器
官方文档:https://cloud.spring.io/spring-cloud-gateway/reference/html/#_gatewayfilter_factories,参照文档配置使用就行
也可以看大目师兄的手记:https://www.imooc.com/article/290816
5.2.2.5 自定义filters过滤器
也是参照内置的filters去实现
5.3 核心之二 filters 全局过滤器
上面提到的过滤器都是对单个路由起作用的gatewayFilter,全局过滤器是对所有路由都有用的过滤器globalFilter
经过我的测试,全局过滤器默认都是生效的,包括内置的全局过滤器和自定义的全局过滤器
5.3.1 内置全局过滤器
官方文档:https://cloud.spring.io/spring-cloud-gateway/reference/html/#_global_filters
大目师兄手记:https://www.imooc.com/article/290821
5.3.2 自定义全局过滤器并使用
我自定一个类 GlobalFilterConfiguration
package com.zengchen.gateway.configuration;

import lombok.extern.slf4j.Slf4j;
import org.springframework.cloud.gateway.filter.GlobalFilter;
import org.springframework.context.annotation.Bean;
import org.springframework.context.annotation.Configuration;
import org.springframework.core.annotation.Order;
import org.springframework.http.server.reactive.ServerHttpRequest;
import org.springframework.web.server.ServerWebExchange;
import reactor.core.publisher.Mono;

@Configuration
@Slf4j
public class GlobalFilterConfiguration {

    /**
     * 给每个请求增加个header requestHeader=111111
     * @return
     */
    @Bean
    @Order(1)
    public GlobalFilter addHeaderArPre() {
        return (exchange, chain) -> {
            log.info("do **pre** GlobalFilter addHeaderArPre");
            ServerHttpRequest.Builder requestBuilder = exchange.getRequest().mutate();
            requestBuilder.header("requestHeader","111111");
            ServerWebExchange newExchange = exchange.mutate().request(requestBuilder.build()).build();
            return chain.filter(newExchange).then(Mono.fromRunnable(() -> {
                log.info("do **post** GlobalFilter addHeaderArPre");
            }));
        };
    }

    /**
     * 给每个请求返回的时候,增加header
     * @return
     */
    @Bean
    @Order(2)
    public GlobalFilter addHeaderAtPost() {
        return (exchange, chain) -> {
            log.info("do **pre** GlobalFilter addHeaderAtPost");
            return chain.filter(exchange).then(Mono.fromRunnable(() -> {
                log.info("do **post** GlobalFilter addHeaderAtPost");
                exchange.getResponse().getHeaders().add("responseHeader","666666");
            }));
        };
    }
}
这样就ok了,不用写任何配置,重启项目,直接就对所有的请求有效了
返回的responseHeader已经有了666666,至于请求的header有没有添加进去,可以在其它执行顺序排在它后面的过滤器里面打断点查看,我偷偷看过,有的
5.3.2 过滤器的执行顺序
上面请求打的日志,addHeaderArPre排在addHeaderAtPost之前执行,因为addHeaderArPre的order是1,addHeaderAtPost的order是2,数值小的先执行。对于post,方法返回时候执行顺序又倒过来了,有点绕,执行顺序得看清楚了

对于gatewayFilter,写配置的时候,谁写在第一个,它的order就是1,后面的顺着排,2,3,4、、、、
6.springboot actuator对gateway的监控
创建项目的时候,我们已经添加了actuator监控组件
访问:http://localhost:8040/actuator/,最后一个就是gateway部分的入口,但是不能直接访问,我试一下404,下面介绍可以访问的端点

- 可以访问的端点
| 路径 | 描述 |
|---|---|
| globalfilters | GET 展示所有的全局过滤器 |
| routefilters | GET 展示所有的 gatewayFilter |
| routes | GET 展示路由列表 |
| routes/{id} | GET 展示指定 id 的路由的信息 |
| refresh | POST 清空路由缓存 |
| routes/{id} | POST 新增一个路由,消息体如下 |
| routes/{id} | DELETE 删除一个路由 |
新增路由消息体:
{
  "predicates": [
    {
      "name": "Path",
      "args": {
        "_genkey_0": "/test"
      }
    }
  ],
  "filters": [
    {
      "name": "AddRequestHeader",
      "args": {
        "_genkey_0": "X-Request-Foo",
        "_genkey_1": "Bar"
      }
    },
    {
      "name": "PreLog",
      "args": {
        "_genkey_0": "a",
        "_genkey_1": "b"
      }
    }
  ],
  "uri": "https://www.itmuch.com",
  "order": 0
}
- 查看全局过滤器
http://localhost:8040/actuator/gateway/globalfilters,还可以看到内置globalFilters的order,画红框的就是我自定义的两个全局过滤器,没有显示order,我也不知道为什么,看一下内置全局过滤器源码,可能会有答案

- 查看所有的路由
http://localhost:8040/actuator/gateway/routes,有四个,正好,两个微服务+gateway自己+自定义的一个路由
