SSH 环境搭建及注解实现登录功能 DEMO
SSH 环境搭建及注解实现登录功能 DEMO
前言
最近通过网上的视频学习了一下 SSH 三大框架的整合应用,熟悉一下流程,视频其实三四天就可以看完了。比较基础的内容,更多的是需要自己去尝试,离开视频后一步步去操作,去实践。
环境
Eclipse 4.7.1
Windows 7
Spring 4.3.9 版本
Struts 2.5 版本
Hibernate 5.2.12 版本
C3P0 0.9.5.2 版本
MySQL 驱动 5.1.41
struts2-spring-plugin-2.5.13.jar
说明版本只是因为,不同版本配置可能有所不同,自己配置的时候,因为 jar 包都是从官网下载,所以版本都比较新。配置起来有所不同,同时有些使用的方法也可能被废弃了。
配置
新建 web 项目
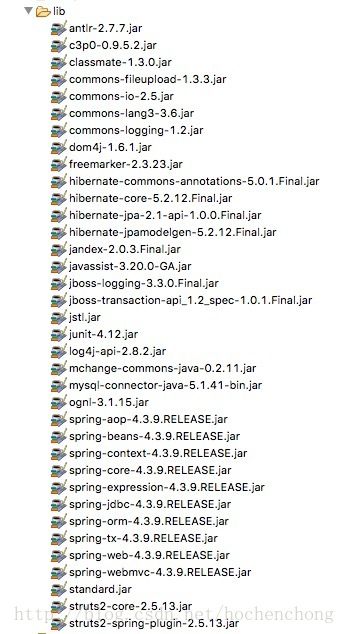
导入相关的 jar 包
配置文件的配置
编写后台代码
前台页面
测试
新建 web 项目
打开 Eclipse,File —— New —— Dynamic Web project,输入项目名称,然后 Finally
导入相关的 jar 包
导入最基础的 jar 包即可,缺包的再导入相关的 jar 包
Struts2 的官网有提供必须的最小 jar 包
Hibernate 则导入 required 文件夹下的 jar 包和 jpa 文件夹下的 jar 包
Spring 的 jar 包(需要导入 spring-orm-4.3.9.RELEASE.jar 与 Hibernate 整合)
mysql 驱动的 jar 包
导入 Struts2 与 Spring 整合的插件包 struts2-spring-plugin-2.5.13.jar
导入 c3p0-0.9.5.2.jar
配置文件的配置
web.xml 配置
在 /ssh_anno(项目名)/WebContent/WEB-INF 下创建一个 web.xml 文件。配置如下:
<web-app xmlns:xsi="http://www.w3.org/2001/XMLSchema-instance"
    xmlns="http://xmlns.jcp.org/xml/ns/javaee"
    xsi:schemaLocation="http://xmlns.jcp.org/xml/ns/javaee http://xmlns.jcp.org/xml/ns/javaee/web-app_3_1.xsd"
    id="WebApp_ID" version="3.1">
    <display-name>ssh_annodisplay-name>
    <welcome-file-list>
        <welcome-file>/WEB-INF/login.jspwelcome-file>
    welcome-file-list>


    <listener>
        <listener-class>org.springframework.web.context.ContextLoaderListenerlistener-class>
    listener>
    <context-param>
        <param-name>contextConfigLocationparam-name>
        <param-value>classpath:applicationContext.xmlparam-value>
    context-param>


    <filter>
        <filter-name>struts2filter-name>
        <filter-class>org.apache.struts2.dispatcher.filter.StrutsPrepareAndExecuteFilterfilter-class>
    filter>
    <filter-mapping>
        <filter-name>struts2filter-name>
        <url-pattern>/*url-pattern>
    filter-mapping>
web-app>
applicationContext.xml 配置
在 src 下创建 applicationContext.xml 文件,配置如下:
<beans xmlns="http://www.springframework.org/schema/beans"
    xmlns:xsi="http://www.w3.org/2001/XMLSchema-instance"
    xmlns:p="http://www.springframework.org/schema/p"
    xmlns:context="http://www.springframework.org/schema/context"
    xmlns:tx="http://www.springframework.org/schema/tx"
    xsi:schemaLocation="http://www.springframework.org/schema/beans
                        http://www.springframework.org/schema/beans/spring-beans.xsd
                        http://www.springframework.org/schema/context
                        http://www.springframework.org/schema/context/spring-context-4.3.xsd
                        http://www.springframework.org/schema/tx
                        http://www.springframework.org/schema/tx/spring-tx-4.3.xsd">


     <bean id="dataSource" class="com.mchange.v2.c3p0.ComboPooledDataSource">
        <property name="driverClass" value="com.mysql.jdbc.Driver" />
        <property name="jdbcUrl" value="jdbc:mysql://localhost:3306/learnSSH?characterEncoding=UTF-8" />
        <property name="user" value="root" />
        <property name="password" value="123456" />
    bean>


    <context:component-scan base-package="test" />


    <bean id="sessionFactory" class="org.springframework.orm.hibernate5.LocalSessionFactoryBean">
        <property name="dataSource" ref="dataSource">property>
        <property name="configLocations" value="classpath:hibernate.cfg.xml">property>

        <property name="packagesToScan" value="test.entity">property>
    bean>


    <bean id="transactionManager" class="org.springframework.orm.hibernate5.HibernateTransactionManager">
        <property name="sessionFactory" ref="sessionFactory">property>
    bean>

    <tx:annotation-driven transaction-manager="transactionManager" />

    <bean id="hibernateTemplate" class="org.springframework.orm.hibernate5.HibernateTemplate">
        <property name="sessionFactory" ref="sessionFactory">property>
    bean>
beans>
修改 applicationContext.xml 配置中的数据库名称,账号以及密码,数据库必须存在。Hibernate 可以配置自动创建对应的表,但是无法自动创建数据库。
hibernate.cfg.xml 文件配置
<hibernate-configuration>
    <session-factory>

        <property name="hibernate.show_sql">trueproperty>

        <property name="hibernate.format_sql">trueproperty>

        <property name="hibernate.hbm2ddl.auto">updateproperty>

        <property name="hibernate.dialect">org.hibernate.dialect.MySQL5Dialectproperty>
    session-factory>
hibernate-configuration>
struts.xml 配置
<struts>
    <package name="front" namespace="/" extends="struts-default">

        <global-allowed-methods>regex:.*global-allowed-methods>

        <action name="user_*" class="userAction" method="{1}">
            <result name="loginSuccess">/WEB-INF/hello.jspresult>
            <result name="login">/WEB-INF/login.jspresult>
        action>
    package>
struts>
编写后台代码
编写实体类 User.java
在 src 下创建包 test.entity,然后创建 User.java 文件,代码如下:
package test.entity;

import javax.persistence.Column;
import javax.persistence.Entity;
import javax.persistence.GeneratedValue;
import javax.persistence.GenerationType;
import javax.persistence.Id;
import javax.persistence.Table;

@Entity
@Table(name="t_user")
public class User {
    @Id
    @GeneratedValue(strategy=GenerationType.IDENTITY)
    private int uid;

    @Column
    private String username;

    @Column
    private String password;

    @Column
    private String address;

    public int getUid() {
        return uid;
    }
    public void setUid(int uid) {
        this.uid = uid;
    }
    public String getUsername() {
        return username;
    }
    public void setUsername(String username) {
        this.username = username;
    }
    public String getPassword() {
        return password;
    }
    public void setPassword(String password) {
        this.password = password;
    }
    public String getAddress() {
        return address;
    }
    public void setAddress(String address) {
        this.address = address;
    }
}
UserAction.java 代码编写
在 src 下创建包 test.action,然后创建 UserAction.java 文件,代码如下:
package test.action;

import javax.annotation.Resource;
import javax.servlet.http.HttpServletRequest;
import org.apache.struts2.ServletActionContext;
import org.springframework.context.annotation.Scope;
import org.springframework.stereotype.Controller;
import com.opensymphony.xwork2.ActionSupport;

import test.entity.User;
import test.service.UserService;

@Controller("userAction")
@Scope(value="prototype")
public class UserAction extends ActionSupport {
    @Resource(name="userService")
    private UserService userService;

    private String username;
    private String password;
    public String getUsername() {
        return username;
    }
    public void setUsername(String username) {
        this.username = username;
    }
    public String getPassword() {
        return password;
    }
    public void setPassword(String password) {
        this.password = password;
    }

    // 登录
    public String login() {
        User user = new User();
        user.setUsername(username);
        user.setPassword(password);

        User userExist = userService.login(user);
        if (null != userExist) {
            HttpServletRequest request = ServletActionContext.getRequest();
            request.getSession().setAttribute("user", userExist);
            return "loginSuccess";
        } else {
            return "login";
        }
    }
}
UserService.java 代码编写
在 src 下创建包 test.service,然后创建 UserService.java 文件,代码如下:
package test.service;

import javax.annotation.Resource;
import org.springframework.stereotype.Service;
import org.springframework.transaction.annotation.Transactional;
import test.dao.UserDao;
import test.entity.User;

@Service(value="userService")
@Transactional
public class UserService {
    @Resource(name="userDao")
    private UserDao userDao;

    // 登录验证
    public User login(User user) {
        return userDao.login(user);
    }
}
UserDao.java 和 UserDaoImpl.java 代码编写
在 src 下创建包 test.dao,然后创建 UserDao.java 和 UserDaoImpl.java 文件,代码如下:
UserDao.java
package test.dao;

import test.entity.User;

public interface UserDao {
    // 登录验证
    User login(User user);
}
UserDaoImpl.java
package test.dao;

import java.util.List;
import javax.annotation.Resource;
import org.springframework.orm.hibernate5.HibernateTemplate;
import org.springframework.stereotype.Component;

import test.entity.User;

@Component("userDao")
public class UserDaoImpl implements UserDao {
    @Resource(name="hibernateTemplate")
    private HibernateTemplate hibernateTemplate;

    // 登录
    @SuppressWarnings("unchecked")
    @Override
    public User login(User user) {
        List list = (List) hibernateTemplate.
            find("from User where username=? and password=?", user.getUsername(),user.getPassword());
        if (null != list && list.size() > 0) {
            return list.get(0);
        }
        return null;
    }
}
前台页面
在 /ssh_anno/WebContent/WEB-INF/ 下创建 login.jsp 和 hello.jsp 页面
login.jsp
<%@ page language="java" contentType="text/html; charset=utf-8"
    pageEncoding="utf-8"%>

<html>
<head>
    <meta http-equiv="Content-Type" content="text/html; charset=UTF-8">
    <title>登录页面title>
head>
<body>
    <form action="${pageContext.request.contextPath}/user_login.action" method="post">
        <br />
        <br />
        用户名:<input type="text" id="username" name="username" /> <br />
        密码:<input type="password" id="password" name="password" /> <br />
        <button type="submit">提交button>
    form>
body>
html>
hello.jsp
<%@ page language="java" contentType="text/html; charset=UTF-8"
    pageEncoding="utf-8"%>

<html>
<head>
    <meta http-equiv="Content-Type" content="text/html; charset=UTF-8">
    <title>Hello,SSHtitle>
head>
<body>
    <h1>Hello,${user.username}h1>
body>
html>
测试
在 MySQL 中创建数据库,这里数据库名为 learnSSH。与 applicationContext.xml 中的配置保持一致即可。
运行项目,则会自动在 learnSSH 数据库中创建表 t_user
手动往里面输入一条记录,例如用户名为 test,密码为 123
在 http://localhost:8080/ssh_anno/ 页面,输入刚才的账号密码,点击登录,成功跳转到 hello.jsp 页面的内容。
OK,测试成功!
后记
到此,基本整合就结束了,剩下的就是往上面新增一些功能了。加入注解之后,整个开发变得更为整洁了,也方便了许多。
关于 SSH 的了解,估计也就到此告一段落了,之后则去折腾其他的,如今更多的是使用 SSM 或者其他的。了解多一套框架,以此来扩展自己的知识面。在遇到新老项目对接的时候,不至于什么都不懂,自己实践后,留个小 DEMO 并做下笔记。需要用到时,翻看一下自己的笔记和 DEMO,也就很快就上手了。
在实践中成长!
HochenChong
时间:2017-12-21
