gitHub传送门,点我哦!
在iOS中常用的绘图框架就是Quartz 2D,Quartz 2D是Core Graphics框架的一部分,是一个强大的二维图像绘制引擎。Quartz 2D在UIKit中也有很好的封装和集成,我们日常开发时所用到的UIKit中的组件都是由Core Graphics进行绘制的。不仅如此,当我们引入UIKit框架时系统会自动引入Core Graphics框架,并且为了方便开发者使用在UIKit内部还对一些常用的绘图API进行了封装。
在iOS中绘图一般分为以下几个步骤:
1.获取绘图上下文
2.创建并设置路径
3.将路径添加到上下文
4.设置上下文状态
5.绘制路径
6.释放路径
图形上下文CGContextRef代表图形输出设备(也就是绘制的位置),包含了绘制图形的一些设备信息,Quartz 2D中的所有对象最终都必须绘制到图形上下文。这样一来,我们在绘制图形时就不必关心具体的设备信息,统一了代码编写方式(在Quartz 2D中的绘图上下文可以是位图Bitmap、PDF、窗口Window、层Layer、打印对象Printer).
基本绘图:
在UIKit中默认已经为我们准备好了一个图形上下文对象,在UI控件的drawRect:方法(这个方法在loadView、viewDidLoad方法后执行)中我们可以通过UIKit封装函数UIGraphicsGetCurrentContext()方法获得这个图形上下文(注意在其他UI控件方法中无法取得这个对象),然后我们只要按照绘图步骤一步步执行即可。下面自定义一个KCView继承自UIView,重写drawRect:方法绘制两条直线说明上面绘图的步骤:
CustomView.m
#import "CustomView.h"

@implementation CustomView

/*
 基本绘图
 在iOS中绘图一般分为以下几个步骤:

 1.获取绘图上下文
 2.创建并设置路径
 3.将路径添加到上下文
 4.设置上下文状态
 5.绘制路径
 6.释放路径
 */
- (instancetype)initWithFrame:(CGRect)frame {
    if (self = [super initWithFrame:frame]) {
        self.backgroundColor = [UIColor orangeColor];
    }
    return self;
}

//绘图只能在此方法中调用,否则无法得到当前图形的上下文
- (void)drawRect:(CGRect)rect {
    //1.获取到图像上下文对象
    CGContextRef context = UIGraphicsGetCurrentContext();

    //2.创建路径对象
    CGMutablePathRef path = CGPathCreateMutable();

    CGAffineTransform transform = CGAffineTransformScale(self.transform, 1, 1);

    CGPathMoveToPoint(path, &transform, rect.origin.x, rect.origin.y + 50);//移动到指定位置(设置路径起点)
    CGPathAddLineToPoint(path, &transform, rect.origin.x + 50, rect.origin.y + 100);//绘制直线(从起始位置开始)
    CGPathAddLineToPoint(path, &transform, [UIScreen mainScreen].bounds.size.width - 50, rect.origin.y + 100);//绘制另外一条直线(从上一直线终点开始绘制)
    CGPathAddLineToPoint(path, &transform, [UIScreen mainScreen].bounds.size.width, rect.origin.y + 50);

    //3.将路径添加到上下文
    CGContextAddPath(context, path);

    CGContextSetRGBStrokeColor(context, 1.0, 0, 0, 1.0);//设置笔触颜色
    CGContextSetRGBFillColor(context, 0, 1.0, 0, 1.0);//设置填充颜色
    CGContextSetLineWidth(context, 2);//设置线条宽度
    CGContextSetLineCap(context, kCGLineCapRound);//设置顶点样式
    CGContextSetLineJoin(context, kCGLineJoinRound);//设置连接点样式

    /*4.设置线段样式
     phase:虚线开始的位置
     lengths:虚线长度间隔 lengths值为{10, 20, 10},则表示先绘制10个点,跳过20个点,绘制10个点,跳过10个点,再绘制20个点,如此反复
     lengths的值{10,10}表示先绘制10个点,再跳过10个点,如此反复
     count:虚线数组元素个数(count的值等于lengths数组的长度)
     */
    CGFloat lengths[3] = {10, 20, 10};
    CGContextSetLineDash(context, 50, lengths, 3);

    /*设置阴影
     context:图形上下文
     offset:偏移量
     blur:模糊度
     color:阴影颜色
     */
    CGColorRef color = [UIColor grayColor].CGColor;//颜色转化,由于Quartz 2D跨平台,所以其中不能使用UIKit中的对象,但是UIkit提供了转化方法
    CGContextSetShadowWithColor(context, CGSizeMake(2, 2), 0.8, color);

    //5.绘制图像到指定图形上下文
    /*CGPathDrawingMode是填充方式,枚举类型
     kCGPathFill:只有填充(非零缠绕数填充),不绘制边框
     kCGPathEOFill:奇偶规则填充(多条路径交叉时,奇数交叉填充,偶交叉不填充)
     kCGPathStroke:只有边框
     kCGPathFillStroke:既有边框又有填充
     kCGPathEOFillStroke:奇偶填充并绘制边框
     */
    CGContextDrawPath(context, kCGPathFillStroke);//最后一个参数是填充类型

    //6.释放对象
    CGPathRelease(path);


    //----------------------------简化绘图方式-----------------------

    //上面的绘图方式未免显得有些麻烦,其实Core Graphics 内部对创建对象添加到上下文这两步操作进行了封装,可以一步完成。另外前面也说过UIKit内部其实封装了一些以“UI”开头的方法帮助大家进行图形绘制。就拿前面的例子来说我们改进一些绘制方法

    //绘制路径(相当于前面创建路径并添加路径到图形上下文两步操作)
    CGContextMoveToPoint(context, 0, rect.origin.y + 200);
    CGContextAddLineToPoint(context, 50, rect.origin.y + 300);
    CGContextAddLineToPoint(context, [UIScreen mainScreen].bounds.size.width, rect.origin.y + 300);
    CGContextAddLineToPoint(context, [UIScreen mainScreen].bounds.size.width - 50, rect.origin.y + 200);

    //封闭路径:直接调用路径封闭方法
    CGContextClosePath(context);

    //设置图形上下文属性
    [[UIColor yellowColor] setFill];
    [[UIColor blueColor] setStroke];
    CGContextSetLineWidth(context, 0);
    CGContextSetShadow(context, CGSizeMake(0, 0), 0);

    //开始绘制
    CGContextDrawPath(context, kCGPathFillStroke);


    //画椭圆(加阴影)
    CGContextAddEllipseInRect(context, CGRectMake(0, 350, 300, 200));

    [[UIColor redColor] setFill];

    CGContextSetShadowWithColor(context, CGSizeMake(20, 30), 30, [UIColor yellowColor].CGColor);

    CGContextClosePath(context);

    CGContextDrawPath(context, kCGPathFillStroke);

    //绘制弧形
    /*添加弧形对象
     x:中心点x坐标
     y:中心点y坐标
     radius:半径
     startAngle:起始弧度
     endAngle:终止弧度
     closewise:是否逆时针绘制,0则顺时针绘制
     */
    CGContextAddArc(context, [UIScreen mainScreen].bounds.size.width / 2, 550, 100, 0.0, -M_PI_2, 0);

    CGContextSetShadow(context, CGSizeMake(0, 0), 0);

    [[UIColor blueColor] set];

    CGContextDrawPath(context, kCGPathFillStroke);

    //注:矩形就不列出来了   方法都是一样的大家可以尝试一下
}
@end
调用
#import "ViewController.h"
#import "CustomView.h"

@interface ViewController ()

@property (nonatomic, strong) CustomView *customView;

@end

@implementation ViewController

- (void)viewDidLoad {
    [super viewDidLoad];

    self.view.backgroundColor = [UIColor whiteColor];

    _customView = [[CustomView alloc] initWithFrame:CGRectMake(0, 0, [UIScreen mainScreen].bounds.size.width, [UIScreen mainScreen].bounds.size.height)];

    [self.view addSubview:_customView];
}
@end
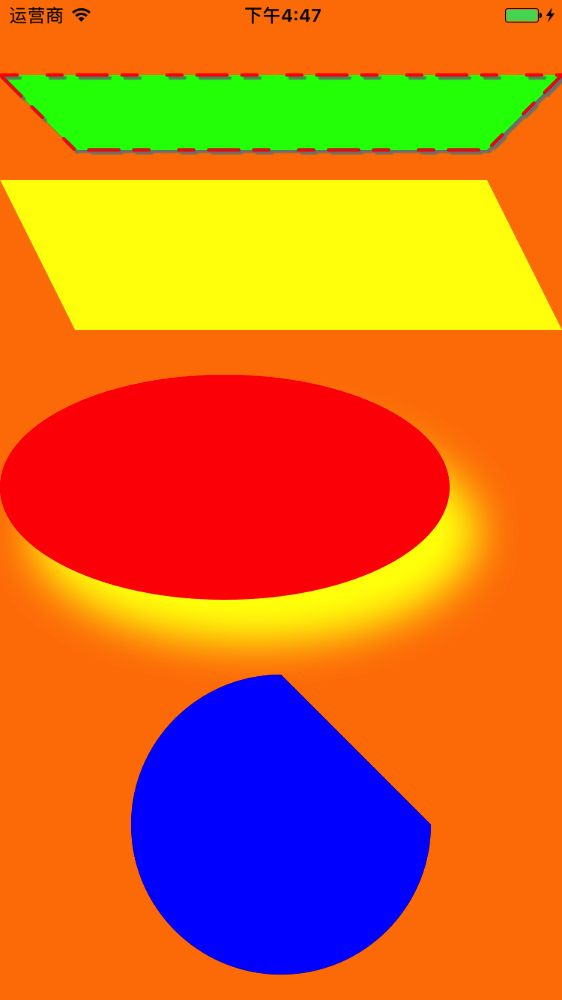
效果图
尊重原创:参考http://www.cnblogs.com/kenshincui/p/3959951.html
