iOS推送总结之远程推送(基础)
参考:iOS推送之远程推送(iOS Notification Of Remote Notification)
1.远程推送原理
iOS APP大多数是基于client/server模式下开发的,client就是安装在我们设备上的APP,server就是远程服务器,主要给我们APP提供数据,因此也被称为Provide。当APP处于Terminate状态的时候,当client与server断开的时候,client如何与server进行通信呢?这时候远程推送就很好的解决了这个困境。苹果所提供的一套服务称之为Apple Push Notification service,就是我们经常说的APNs
推送消息传输路径:Provider-APNs-Client APP
我们设备联网时都会与苹果的APNs服务器建立一个长连接(persistent IP connection),当Provider推送一条通知的时候,这条通知并不是直接推送给了我们的设备,而是先推送到苹果的APNs服务器上面,而苹果的APNs服务器再通过与设备建立的长连接进而把通知推送到我们的设备上。而当设备处于非联网状态的时候,APNs服务器会保留Provider所推送的最后一条通知,当设备转换为联网状态的时候,APNs则把其保留的最后一台哦通知推送给我们的设备;如果设备长时间处于非联网状态下,那么APNs的服务器为期保存的最后一条通知也会丢失。Remote Notification必须要求设备联网状态下才能收到,并且太频繁的接收远程推送通知对设备的电池寿命室友一定的影响的。
deviceToken
当一个APP注册接收远程通知时,系统会发送请求到APNs服务器收到此请求会根据请求所带的key值生成一个独一2无二的value值也就是deviceToken,而后APNs服务器会把此deviceToken包装成一个NSData对象发送到对应请求的APP上。然后此APP把此deviceToken发送给我们自己的服务器,就是Provider。Provider收到deviceToken以后进行储存等相关处理,以后Provider给我们设备推送通知的时候,必须包含此deviceToen
deviceToken:deviceToken其实就是根据注册远程通知的时候想APNs服务器发送的Token key,Token key中包含了设备的UDID和APP的Bundle Identifier,然后苹果APNs服务器根据此Token key编码生成一个deviceToken。deviceToken可以简单理解为就是包含了设备信息和应用信息的一串编码
deviceToken有什么用:上面提到的Provider推送消息的时候必须带有此deviceToken,然后此消息就是根据deviceToken(UDID+App’s Bundle Identifier)找到对应的设备以及该设备上对应的应用,从而把此推送消息推送给此应用
deviceToken唯一性:苹果APNs的编码技术和deviceToken的独特作用保证了它的唯一性。唯一性并不是说一台设备上的应用程序永远只有一个deviceToken,当用户升级系统的时候deviceToen是会变化的。
2.注册远程通知
申请推送证书和开启远程推送服务不在此进行叙述
注册远程通知的方法
一般都是在APP启动完成的时候去注册远程通知注册方法:
- (BOOL)application:(UIApplication *)application didFinishLaunchingWithOptions:(NSDictionary *)launchOptions {
    if (@available(iOS 10.0, *)) {
        // iOS10及以上注册远程通知的方法
        UNUserNotificationCenter *center = [UNUserNotificationCenter currentNotificationCenter];
        // 必须写代理,不然无法监听通知的接收与点击
        center.delegate = self;
        [center requestAuthorizationWithOptions:UNAuthorizationOptionAlert | UNAuthorizationOptionBadge | UNAuthorizationOptionSound completionHandler:^(BOOL granted, NSError * _Nullable error) {
            if (granted) {
                // 点击允许
                NSLog(@"注册成功");
                [center getNotificationSettingsWithCompletionHandler:^(UNNotificationSettings * _Nonnull settings) {
                    NSLog(@"%@", settings);
                }];
            } else {
                // 点击不允许
                NSLog(@"注册失败");
            }
        }];
        [[UIApplication sharedApplication] registerForRemoteNotifications];
    } else if (@available(iOS 8.0, *)) {
        // iOS8-iOS10注册远程通知的方法
        UIUserNotificationType types = UIUserNotificationTypeAlert | UIUserNotificationTypeBadge | UIUserNotificationTypeSound;
        UIUserNotificationSettings *mySettings = [UIUserNotificationSettings settingsForTypes:types categories:nil];
        [[UIApplication sharedApplication] registerUserNotificationSettings:mySettings];
        [[UIApplication sharedApplication] registerForRemoteNotifications];
    } else {
        // 在iOS8之前注册远程通知的方法,如果项目中要支持iOS8之前的版本,必须要写此方法
        UIRemoteNotificationType types = UIRemoteNotificationTypeAlert | UIRemoteNotificationTypeBadge | UIRemoteNotificationTypeSound;
        [[UIApplication sharedApplication] registerForRemoteNotificationTypes:types];
    }
    return YES;
}
处理中注册远程通知的回调方法
// 注册成功回调方法,其中deviceToken即为APNs返回的token
- (void)application:(UIApplication *)application didRegisterForRemoteNotificationsWithDeviceToken:(NSData *)deviceToken {
    // 将此deviceToken发送给Provider
}
// 注册失败回调方法,处理失败情况
- (void)application:(UIApplication *)application didFailToRegisterForRemoteNotificationsWithError:(NSError *)error {

}
3.处理接收到远程通知消息
1.APP在Terminate状态,点击通知条
2.App在Background状态,点击通知条,在Foreground状态通知条的点击事件
3.App在Background状态,接收到远程通知,需要立即处理远程推送的消息
4.APP在Foreground状态(需要验证)
在情况1下会调用:
- (BOOL)application:(UIApplication *)application didFinishLaunchingWithOptions:(NSDictionary *)launchOptions {
    NSDictionary *userInfo = launchOptions[UIApplicationLaunchOptionsRemoteNotificationKey];
    if (userInfo) {
        // 有推送的消息,处理推送的消息
    }
    return YES;
}
情况2和情况4时会调用以下两个方法
在情况3时会调用以下方法中(2)
// (1)在iOS10之前会调用该方法
- (void)application:(UIApplication *)application didReceiveRemoteNotification:(nonnull NSDictionary *)userInfo {
}
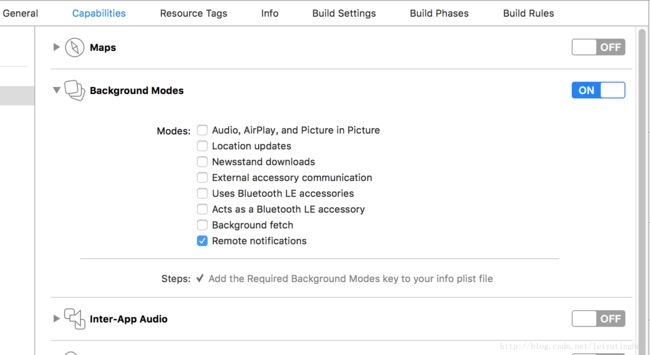
// (2)该方法会使APP在后台运行做一些更新UI、下载数据的操作等。若要接收到远程推送的时候要在后台做一些事情则需要把后台远程推送模式打开。同时content-available值需要设为1 - 在后面会进行说明
// 在iOS8-iOS9会调用方法,如果同时实现上个和这个方法,则系统会忽略上个方法而自动调用该方法
- (void)application:(UIApplication *)application didReceiveRemoteNotification:(nonnull NSDictionary *)userInfo fetchCompletionHandler:(nonnull void (^)(UIBackgroundFetchResult))completionHandler {
switch (application.applicationState) {
case UIApplicationStateBackground:
// 在后台收到通知,立即运行此处代码
break;
case UIApplicationStateInactive:
// 点击通知条时会运行此处代码
break;
case UIApplicationStateActive:
// 在Foreground时运行此处代码
break;
default:
break;
}
/*
UIBackgroundFetchResultNewData, 成功接收到数据
UIBackgroundFetchResultNoData, // 没有接收到数据
UIBackgroundFetchResultFailed // 接受失败
*/
// 在此方法中一定要调用completionHandler这个回调,告诉系统是否处理成功
if (userInfo) {
completionHandler(UIBackgroundFetchResultNewData);
} else {
completionHandler(UIBackgroundFetchResultNoData);
}
}
// (3)iOS10及以上在Foreground收到通知
- (void)userNotificationCenter:(UNUserNotificationCenter *)center willPresentNotification:(UNNotification *)notification withCompletionHandler:(void (^)(UNNotificationPresentationOptions))completionHandler {
NSDictionary * userInfo = notification.request.content.userInfo;
UNNotificationRequest *request = notification.request; // 收到推送的请求
UNNotificationContent *content = request.content; // 收到推送的消息内容
NSNumber *badge = content.badge; // 推送消息的角标
NSString *body = content.body; // 推送消息体
UNNotificationSound *sound = content.sound; // 推送消息的声音
NSString *subtitle = content.subtitle; // 推送消息的副标题
NSString *title = content.title; // 推送消息的标题
if([notification.request.trigger isKindOfClass:[UNPushNotificationTrigger class]]) {
NSLog(@"iOS10 前台收到远程通知");
}
else {
// 判断为本地通知
NSLog(@"iOS10 前台收到本地通知:{\\\\nbody:%@,\\\\ntitle:%@,\\\\nsubtitle:%@,\\\\nbadge:%@,\\\\nsound:%@,\\\\nuserInfo:%@\\\\n}",body,title,subtitle,badge,sound,userInfo);
}
completionHandler(UNNotificationPresentationOptionBadge|UNNotificationPresentationOptionSound|UNNotificationPresentationOptionAlert); // 需要执行这个方法,选择是否提醒用户,有Badge、Sound、Alert三种类型可以设置
}
// (4)iOS10及以上通知的点击事件
- (void)userNotificationCenter:(UNUserNotificationCenter *)center didReceiveNotificationResponse:(UNNotificationResponse *)response withCompletionHandler:(void (^)(void))completionHandler {
NSDictionary * userInfo = response.notification.request.content.userInfo;
UNNotificationRequest *request = response.notification.request; // 收到推送的请求
UNNotificationContent *content = request.content; // 收到推送的消息内容
NSNumber *badge = content.badge; // 推送消息的角标
NSString *body = content.body; // 推送消息体
UNNotificationSound *sound = content.sound; // 推送消息的声音
NSString *subtitle = content.subtitle; // 推送消息的副标题
NSString *title = content.title; // 推送消息的标题
if([response.notification.request.trigger isKindOfClass:[UNPushNotificationTrigger class]]) {
NSLog(@"iOS10 收到远程通知");
} else {
// 判断为本地通知
NSLog(@"iOS10 收到本地通知:{\\\\nbody:%@,\\\\ntitle:%@,\\\\nsubtitle:%@,\\\\nbadge:%@,\\\\nsound:%@,\\\\nuserInfo:%@\\\\n}",body,title,subtitle,badge,sound,userInfo);
}
// Warning: UNUserNotificationCenter delegate received call to -userNotificationCenter:didReceiveNotificationResponse:withCompletionHandler: but the completion handler was never called.
completionHandler(); // 系统要求执行这个方法
}后台模式设置:
客户端与服务端的交互
远程推送负载:
远程通知负载的大小根据Provider使用的API不同而不同。当使用HTTP/2 provider API时,负载最大为4096bytes,即4kB;当使用legacy binary interface时,负载最大为2048bytes,即2kB。当负载大小超过规定的负载大小时,APNs会拒绝发送此消息。
每一条通知的消息都会组成一个JSON字典对象,其格式如下所示,示例中的key值为苹果官方所用key。自定义字段的时候要避开这些key值。
{
     "aps" : {
        "alert"              :              {   // string or dictionary
          "title"          :   "string"
            "body"           :   "string",
            "title-loc-key"  :   "string or null"
            "title-loc-args" :   "array of strings or null"
            "action-loc-key" :   "string or null"
            "loc-key"        :   "string"
            "loc-args"       :   "array of strings"
            "launch-image"   :   "string"
        },
        "badge"             :    number,
        "sound"             :    "string"
        "content-available" :    number;
        "category"          :    "string"
     },
}

aps:推送消息必须有的key

alert:推送消息包含此key值,系统就会根据用户的设置展示标准的推送信息
badge:在app图标上显示消息数量,缺少此key值,消息数量就不会改变,消除标记时把此key对应的value设置为0
sound:设置推送声音的key值,系统默认提示声音对应的value值为default
content-available:此key值设置为1,系统接收到推送消息时就会调用不同的回调方法,iOS7之后配置后台模式

category:UIMutableUserNotificationCategory's identifier 可操作通知类型的key值
title:简短描述此调推送消息的目的,适用系统iOS8.2之后版本
body:推送的内容
title-loc-key:功能类似title,附加功能是国际化,适用系统iOS8.2之后版本
title-loc-args:配合title-loc-key字段使用,适用系统iOS8.2之后版本
action-loc-key:可操作通知类型key值,不详细叙述
loc-key:参考title-loc-key
loc-args:参考title-loc-args
launch-image:点击推送消息或者移动事件滑块时,显示的图片。如果缺少此key值,会加载app默认的启动图片。
自定义key值
{
    "aps" : {
        "alert" : "Provider push messag.",
        "badge" : 9,
        "sound" : "toAlice.aiff"
    },
    "Id"   : 1314,               //  自定义key值
    "type" : "customType"        //  自定义key值
}
指定用户推送:
对于要求用户登录的App,推送是可以指定用户的,同一条推送有些用户可以收到,但是有些用户又不能收到。说起来这个就要提到另外的一个token了,一般称之为userToken,userToken一般都是根据自己公司自定义的规则去生成的。userToken是以用户的账号加对应的密码生成的。这样结合上面提到的deviceToken,就可以做到根据不同的用户推送不同的消息。deviceToken找到对应某台设备和该设备上的应用,而userToken对应找到该用户。客户端在上报deviceToken的时候,要把userToken对应一起上报给服务端也就是Provider。