(1)如果cell 重用了 http://www.2cto.com/kf/201304/204114.html
方法1 将获得cell的方法从
- (UITableViewCell*)dequeueReusableCellWithIdentifier: (NSString*)identifier
换为
-(UITableViewCell *)cellForRowAtIndexPath:(NSIndexPath *)indexPath
重用机制调用的就是dequeueReusableCellWithIdentifier这个方法,
方法的意思就是“出列可重用的cell”,因而 只要将它换为cellForRowAtIndexPath
(只从要更新的cell的那一行取出cell),就可以不使用重用机制,
因而问题就可以得到解 决,虽然可能会浪费一些空间。
示例代码:

[plain]

- (UITableViewCell *)tableView:(UITableView *)tableView cellForRowAtIndexPath:(NSIndexPath *)indexPath
{

static NSString *CellIdentifier = @"Cell";

 // UITableViewCell *cell = [tableView dequeueReusableCellWithIdentifier:CellIdentifier];
//改为以下的方法

  UITableViewCell *cell = [tableView cellForRowAtIndexPath:indexPath];
//根据indexPath准确地取出一行,而不是从cell重用队列中取出

   if (cell == nil)
   {

       cell = [[UITableViewCell alloc] initWithStyle:UITableViewCellStyleDefault  reuseIdentifier:CellIdentifier];

    }

   //...其他代码


}
(2)表的Cell有按钮区域不可滑动的两种处理方式(我之前不能滑动时因为项目中添加的一个控件DZNempty这个第三方影响,不过后来跟新之后就没有出现按钮不能滑动的情况了)
   <1>将按钮地方换成手势 uitapgesturerecognizer(当然按钮可以换成View或者是label等控件)
   <2>转载的一个地方  但是500错了 只好贴出代码了
[原]iOS 在tableView上添加button导致按钮没有点击效果和不能滑动的问题
今天在调试代码的时候,在tableviewcell上添加button,发现button快速点击的话,是看不出点击效果的,查找资料发现,

 ios7上UITableViewCell子层容器是UITableViewCellScrollView,

ios6的则是UITableViewCellContentView.点击效果应该是被ScrollView的触摸延迟给阻拦了。

经过一番摸索,终于找到解决方法。

第一步:将 tableView  的 delaysContentTouches �设置为NO,

第二步:在自定义cell的初始化方法里添加如下代码


for (id obj in self.subviews)
        {
            if ([NSStringFromClass([obj class]) isEqualToString:@"UITableViewCellScrollView"])

            {
                UIScrollView *scroll = (UIScrollView *) obj;

                scroll.delaysContentTouches =NO;
                break;

            }
        }
以上2步可以解决按钮没有点击效果的问题,但之后发现,如果滑动tableView的时候,触碰区域正好在按钮上的话,是滑动不了的。

这个时候就得

第三步:自定义一个tableview继承UITableView,重写这个方法
- (BOOL)touchesShouldCancelInContentView:(UIView *)view
{
    return YES;
}
本来以上方法在ios7以下可以解决,因为公司要适配ios8,当切换ios8的时候,发现又没有点击效果了,于是又查找一番.

第四步:在自定义的tableView初始化方法里添加如下代码
for (id view in self.subviews)
        {
            // looking for a UITableViewWrapperView
            if ([NSStringFromClass([view class]) isEqualToString:@"UITableViewWrapperView"])
            {
                if([view isKindOfClass:[UIScrollView class]])
                {
                    // turn OFF delaysContentTouches in the hidden subview
                    UIScrollView *scroll = (UIScrollView *) view;
                    scroll.delaysContentTouches = NO;
                }
                break;
            }
        }
或者第四步改成 在你的viewController添加tableview的时候,加上以下代码
if ([UIDevice currentDevice].systemVersion.intValue >= 8) {
        for (UIView *currentView in table.subviews) {
            if ([currentView isKindOfClass:[UIScrollView class]]) {
                ((UIScrollView *)currentView).delaysContentTouches = NO;
                break;
            }
        }
    }
(3)去掉表多余分割线 以及右边上下滑块
   self.tableView.tableFooterView = [[UIView alloc] init];//去掉多余线
   self.tableView.separatorStyle = NO;//这是所有线全部去掉
   self.tableView.showsVerticalScrollIndicator = NO;//去掉垂直滑块
(4)滑动表使键盘下去
//移动表的时候调用的方法

-(void)scrollViewDidScroll:(UIScrollView *)scrollView
{
    if (![_nameField isExclusiveTouch])
    {
        [_nameField resignFirstResponder];
    }
}
(5)默认表左侧去掉15个像素
if ([_tableView respondsToSelector:@selector(setSeparatorInset:)])
    {
        [_tableView setSeparatorInset:UIEdgeInsetsZero];
    }

    if ([_tableView respondsToSelector:@selector(setLayoutMargins:)])
    {
        [_tableView setLayoutMargins:UIEdgeInsetsZero];
    }
(6)移动Cell的代码
//打开编辑模式后,默认情况下每行左边会出现红的删除按钮,这个方法就是关闭这些按钮的
- (UITableViewCellEditingStyle)tableView:(UITableView *)tableView
           editingStyleForRowAtIndexPath:(NSIndexPath *)indexPath {
    return UITableViewCellEditingStyleNone;
}
//返回当前哪些去中的哪些行是可以移动的,如果返回YES  则代表所有的行都可以移动
- (BOOL)tableView:(UITableView *)tableView canMoveRowAtIndexPath:(NSIndexPath *)indexPath{
//    if(indexPath.row == 0)   return  NO;  //第一行不能移动,但是可以将其他行移动到第一行,成为第一行;成为第一行后就不能移动
    return  YES;
}
//这个方法就是执行移动操作的
- (void)tableView:(UITableView *)tableView moveRowAtIndexPath:(NSIndexPath *)
sourceIndexPath toIndexPath:(NSIndexPath *)destinationIndexPath {
    NSUInteger fromRow = [sourceIndexPath row];
    NSUInteger toRow = [destinationIndexPath row];

    id object = [self.fakeData objectAtIndex:fromRow];
    [self.fakeData removeObjectAtIndex:fromRow];
    [self.fakeData insertObject:object atIndex:toRow];
}
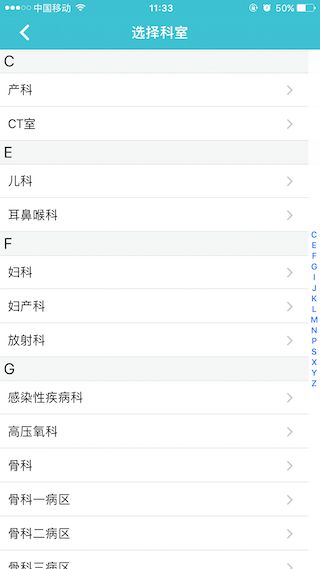
(7)三重数据如何操作(我自己的笨办法 但是容易理解
![Uploading IMG_3091_276821.PNG . . .]
)
-(void)initData{
    MBProgressHUD *HUD = [Utils createHUD];
    HUD.labelText = @"数据加载中...";
    AFHTTPRequestOperationManager * mager=[AFHTTPRequestOperationManager manager];
    //设置相应内容类型
    mager.responseSerializer.acceptableContentTypes = [NSSet setWithObject:@"text/html"];
       [mager GET:[NSString stringWithFormat:@“———”] parameters:nil success:^(AFHTTPRequestOperation *operation, id responseObject) {
//               NSLog(@"返回的数据是:%@",responseObject);
        _keys =[responseObject valueForKey:@"datas"];
        for (NSDictionary *dic in _keys)
        {
            NSString *ZiMu = dic[@"key"];
            [zimuArr addObject:ZiMu];
        }
           [self.tableView reloadData];
    } failure:^(AFHTTPRequestOperation *operation, NSError *error) {
    }];

}
- (NSInteger)numberOfSectionsInTableView:(UITableView *)tableView
{
    return _keys.count;
}

- (NSInteger)tableView:(UITableView *)tableView numberOfRowsInSection:(NSInteger)section {
    NSDictionary *dic = _keys[section];
    NSMutableArray *data=[dic valueForKey:@"content"];
    return data.count;
}


- (UITableViewCell *)tableView:(UITableView *)tableView cellForRowAtIndexPath:(NSIndexPath *)indexPath {
    static NSString *CellIdentifier = @"CommonCell";
    NSInteger row = indexPath.row;
    NSDictionary *dic = _keys[indexPath.section];
    NSMutableArray *content=[dic valueForKey:@"content"];
    NSDictionary *dicc = content[row];
    CommonModel * model=[CommonModel new];
    model.itemid=[dicc valueForKey:@"id"];
    model.title=[dicc valueForKey:@"name"];

    CommonCell *cell = [self.tableView dequeueReusableCellWithIdentifier:CellIdentifier forIndexPath:indexPath];
    cell.accessoryType = UITableViewCellAccessoryDisclosureIndicator;
    cell.title.text=model.title;
    cell.selectionStyle = UITableViewCellSelectionStyleNone;
    return cell;
}

- (CGFloat)tableView:(UITableView *)tableView heightForRowAtIndexPath:(NSIndexPath *)indexPath
{
    return 44;
}

- (void)tableView:(UITableView *)tableView didSelectRowAtIndexPath:(NSIndexPath *)indexPath
{
     NSInteger row = indexPath.row;
    NSDictionary *dic = _keys[indexPath.section];
    NSMutableArray *content=[dic valueForKey:@"content"];
    NSDictionary *dicc = content[row];
    CommonModel * model=[CommonModel new];
    model.itemid=[dicc valueForKey:@"id"];
    model.title=[dicc valueForKey:@"name"];
}
//区头名字
-(UIView *)tableView:(UITableView *)tableView viewForHeaderInSection:(NSInteger)section
{
    UIView *view = [[UIView   alloc]initWithFrame:CGRectMake(0, 0, SCREEN_WIDTH, 30)];
    view.backgroundColor = [UIColor bgColor];


    UILabel * Sectiontitle=[[UILabel alloc]init];
    Sectiontitle.frame=CGRectMake(5, 5, 50, 20);
    Sectiontitle.font=[UIFont systemFontOfSize:20];
    NSString *zimu = [self.keys[section] objectForKey:@"key"];
    Sectiontitle.text=[NSString stringWithFormat:@"%@",zimu];
    [view addSubview:Sectiontitle];

    UILabel *line = [[UILabel alloc]initWithFrame:CGRectMake(0, 30, SCREEN_WIDTH, 1)];
    line.backgroundColor = [UIColor lineColor];
    [view addSubview:line];

    return view;

}
-(CGFloat)tableView:(UITableView *)tableView heightForHeaderInSection:(NSInteger)section
{
    return 30;
}
//字母索引
- (nullable NSArray *)sectionIndexTitlesForTableView:(UITableView *)tableView;
{
    NSLog(@"字母数组是:%@",zimuArr);
    return zimuArr;
}
效果如下
(8)表边框加阴影
    _tableView.layer.shadowColor =[UIColor colorWithHex:0x000000 alpha:0.3].CGColor;
//左边加是-5   右边加是+5  如果全加(    self.tableView.layer.shadowRadius = 2.0;)
    _tableView.layer.shadowOffset = CGSizeMake(-5, 5);
    _tableView.layer.shadowOpacity = 1;
    _tableView.clipsToBounds = false;
(9)自定义cell中的分割线 在重用的时候 总是消失 得在自定义中重新绘制分割线
#pragma mark - 绘制Cell分割线
- (void)drawRect:(CGRect)rect {

    CGContextRef context = UIGraphicsGetCurrentContext();
    CGContextSetFillColorWithColor(context, [UIColor clearColor].CGColor);
    CGContextFillRect(context, rect);

//    //上分割线,
//    CGContextSetStrokeColorWithColor(context, [UIColor colorWithRed:198/255.0 green:198/255.0 blue:198/255.0 alpha:1].CGColor);
//    CGContextStrokeRect(context, CGRectMake(63, 0, rect.size.width-63-17, 1));

    //下分割线
    CGContextSetStrokeColorWithColor(context, [UIColor colorWithRed:198/255.0 green:198/255.0 blue:198/255.0 alpha:1].CGColor);
    CGContextStrokeRect(context, CGRectMake(68, rect.size.height, rect.size.width-80, 1));
}

- (void)awakeFromNib {
    // Initialization code
}

- (void)setSelected:(BOOL)selected animated:(BOOL)animated {
    [super setSelected:selected animated:animated];

    // Configure the view for the selected state
}
