Jenkins之自动生成Sophix热修复补丁
本篇博客是《Jenkins之自动进行360加固》的后续。在分享完如何使用Jenkins实现自动加固后,本篇博客将继续分享使用Jenkins自动生成热修复补丁的实现过程。
背景及思路
项目使用git-flow分支模式,而热修复采用的是阿里的移动热修复Sophix方案,并且项目启用了混淆。因此,我的思路很简单:
- 在构建正式环境的Apk之前,修改混淆规则
-applymapping...,使其与对应版本的混淆符号映射一致。 - 在构建正式环境的Apk之后,增加热修复阶段,进行热修复补丁生成。
- 热修复补丁生成之后,将补丁文件与一些git提交信息通过邮件发送出来。
- 以上步骤仅对
hotfix/开头的分支有效。
应用混淆规则
约定
在之前的博客中,我们会把加固包对应的原apk及mapping文件发送出来。**我们约定,在加固包上架之后,把apk及mapping文件提交到项目的release文件夹中,再打上tag。**这样,当我们需要生成热修复补丁时,则可以方便地找到对应版本的原apk及mapping文件。
我们再约定,在app模块的混淆规则文件proguard-rules.pro中,添加一条规则,但是默认情况下注释掉,只在需要生成补丁时才启用它:
#-applymapping ...
Jenkins的配置
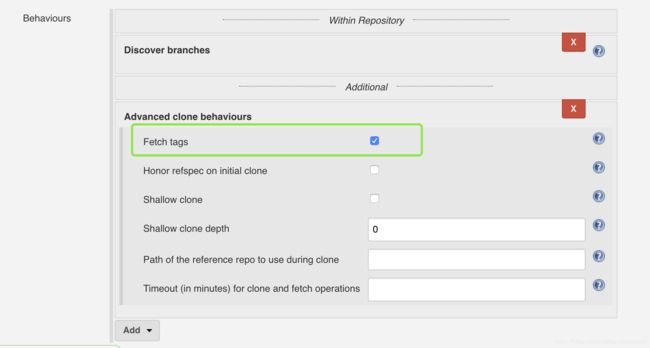
接下来,修改Jenkins中的job配置,添加或勾选Fetch tags一项,确保在拉取代码时把tag也给拉取下来。如下:
编写替换脚本
然后,编写脚本文件进行混淆规则的替换。考虑到热修复的相关文件可能会比较多,我在buildsystem下新建了一个文件夹hotfix,然后再在这个文件夹下添加修改混淆规则的脚本apply-rules.sh,内容如下:
#!/usr/bin/env bash

cd `dirname $0`/../../
projectDir=`pwd`

gitTag=`git describe --tags --abbrev=0 | sed "s/[^0-9\.].*//"`
ruleFile="$projectDir/`find release -name "mapping*$gitTag*.txt"`"

unix=false
case "`uname`" in
  Darwin* )
    unix=true
    ;;
esac

# sed 替换标识符说明: `#`会出现在规则文件中;`/`会出现在路径中;`@`会出现在Jenkins工作空间中。
if [ "$unix" = "true" ]; then
  sed -i "" "s!.*applymapping.*!-applymapping $ruleFile!g" $projectDir/app/proguard-rules.pro
else
  sed -i "s!.*applymapping.*!-applymapping $ruleFile!g" $projectDir/app/proguard-rules.pro
fi
这里说明一下:
获取对应mapping文件的tag,原本用git describe --tags --abbrev=0就可以了。但是考虑到一个版本可能会有多次的补丁,因此在发布补丁时,我也会把对应的代码打上tag,名称为原来版本名-hotfix-编号,这样的话就会有这样的情况:原来的版本2.12,生成过一次补丁包有2.12-hotfix-1的tag,当需要再次生成补丁包时,对应的mapping文件的tag应该还是2.12,而前面的命令找到的tag会是2.12-hotfix-1,因此需要把其后缀给过滤掉。
Jenkinsfile增加应用规则阶段
找到tag之后,根据之前约定的名称,找到对应的mapping文件,然后修改混淆规则文件,这个步骤就完成了。这个阶段,应该在构建之前完成,对应的Jenkinsfile相关代码如下:
stages {
    stage('ProguardRule') {
        when {
            expression { BRANCH_NAME ==~ /hotfix\/.*/ }
        }
        steps {
            sh "./buildsystem/hotfix/apply-rules.sh"
        }
    }

    stage('Build') {
        // ...略
    }
    // ... 略
}
生成热修复补丁
Jenkinsfile增加生成补丁阶段
我们在Jenkinsfile的build阶段增加构建正式环境的apk。然后在build之后,新增一个hotfix阶段,在这里生成补丁并发送邮件,相关代码如下:
stage('Build') {
    // ... 略
}
stage ('Hotfix') {
    when {
        expression { BRANCH_NAME ==~ /hotfix\/.*/ }
    }
    steps {
        sh "buildsystem/hotfix/hotfix.sh"
        emailext(
                subject: "IOP-Android补丁生成成功",
                mimeType: "text/html",
                attachmentsPattern: "build/patch/*",
                body: "详见附件",
                recipientProviders: [[$class: 'CulpritsRecipientProvider'],
                                 [$class: 'DevelopersRecipientProvider'],
                                 [$class: 'RequesterRecipientProvider']]
        )
    }
}
编写生成补丁的脚本
由于mac上的热修复补丁生成工具需要放在应用程序中才能正常使用,所以我没有把它集成进来,改为在具体的机器上预装好再调用。而对于linux及windows上的补丁生成工具,我把它们集成在一个项目中,放在github上:https://github.com/msdx/sophix-patch-tool 。
接下来我们编写生成补丁的脚本。在这个脚本中,首先获取补丁工具上,我改为使用git clone及git pull来获取或更新,而不是像之前的360加固那样通过wget或curl来下载,以避开两个构建正好同时下载同一个文件到同一个地方可能出错的情况。
在命令行下调用补丁生成工具,需要指定一个配置文件,我把其命名为profiles.json,内容如下:
{
  "AesKey": "",
  "ClassFilterFilePath": "白名单地址",
  "KeyAlias": "配置为你的key alias",
  "KeyPassword": "配置为你的key password",
  "KeyStorePassword": "配置为你的store password",
  "KeyStorePath": "配置为你的密钥路径",
  "NewApkPath": "NEW_APK",
  "OldApkPath": "OLD_APK",
  "OutputDirPath": "OUTPUT",
  "isForceColdFix": true,
  "isIgnoreRes": false,
  "isIgnoreSo": false
}
这里需要自行修改ClassFilterFilePath、KeyAlias、KeyAlias和KeyStorePath为具体的值。而NewApkPath、OldApkPath和OutputDirPath需要在外部指定,我则先填为固定的字符串,在生成补丁之前再替换为具体的值。
在生成补丁之后,需要发邮件出来,为使开发者清楚这个补丁的修改内容,还应输出从我们要打补丁的tag到当前的提交的所有修改信息。获取这些修改信息的命令如下:
git log --graph --pretty=format:'%h -%d (%ci) %s <%aN>' --abbrev-commit $gitTag..HEAD
完整的脚本如下:
#!/usr/bin/env bash

function fetch() {
  cd ~/.android
  local gitUrl="https://github.com/msdx/sophix-patch-tool.git"
  local dir="sophix-patch-tool"
  if [ ! -d "$dir" ]; then
    git clone $gitUrl && cd $dir || exit 1
  else
    cd $dir && git pull $gitUrl || exit 1
  fi
}

function replaceConfig() {
  local origin=$1
  local target=$2
  local file=$3

  if [ "mac" = "$platform" ]; then
    sed -i "" "s#$origin#$target#" $file
  else
    sed -i "s#$origin#$target#" $file
  fi
}

cd `dirname $0`/../../
scriptDir="`pwd`/`dirname $0`"
projectDir=`pwd`

# download the program
platform=""
tool=""
case "`uname`" in
  CYGWIN* )
    platform="windows"
    tool="SophixPatchTool.exe"
    ;;
  MINGW* )
    platform="windows"
    tool="SophixPatchTool.exe"
    ;;
  Darwin* )
    platform="mac"
    tool="/Applications/SophixPatchTool.app/Contents/MacOS/SophixPatchTool"
    ;;
  Linux* )
    platform="linux"
    tool="SophixPatchTool"
    ;;
esac

if [ ! -n "$platform" ]; then
  echo "The platform `uname` is not supported"
  exit 1
fi

if [ "mac" != "$platform" ]; then
  fetch
fi

cd $projectDir

gitTag=`git describe --tags --abbrev=0 | sed "s/[^0-9\.].*//"`
oldapk=$projectDir/`find release -name "*$gitTag*.apk"`
newapk=$projectDir/`find app/build/outputs/apk/Official/release -name "*$gitTag*.apk"`
output="$projectDir/build/patch/"
jsonFile="$scriptDir/profiles.json"

echo $oldapk
echo $newapk
echo $output
git checkout $jsonFile
replaceConfig "NEW_APK" $newapk $jsonFile
replaceConfig "OLD_APK" $oldapk $jsonFile
replaceConfig "OUTPUT" $output $jsonFile
if [ "mac" != "$platform" ]; then
  cd ~/.android/sophix-patch-tool/$platform
fi
$tool --profiles "$scriptDir/profiles.json" \
  && cd $projectDir \
  && git log --graph --pretty=format:'%h -%d (%ci) %s <%aN>' --abbrev-commit $gitTag..HEAD > $output/git-info.txt
到这里整个过程就完成了。如配置无误,则当基于某个版本开hotfix/分支并提交时,Jenkins构建将会生成对应的补丁包并发送出来。