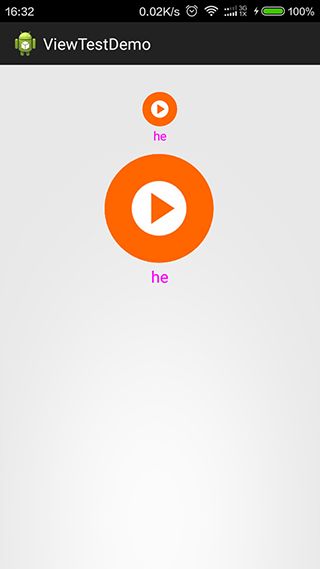
设置drawableTop、drawableLeft、drawableRight、drawableBottom图片大小
在很多的项目中,我们都会用到RadioButton、TextView、Button这个三个控件,RadioButton我们常用的地方像QQ一样,在下面进行切换,但是有时候是要求文字和图片是同时出现的,这时候,我们就会在xml中使用到drawableTop、drawableLeft、drawableRight、drawableBottom三个属性值,来设定文字对应方向的图片,但是如果我们直接食用这三个属性,是没办法改变图片的大小的,所以这时候就得自定义RadioButton了。
步骤:
1. 自定义自己需要的属性:现在value的目录下,创建一个名为attrs的xml文件,设定相关的属性。
<resources>

    <declare-styleable name="PengRadioButton">

        <attr name="peng_drawableTopWith" format="dimension" />

        <attr name="peng_drawableTopHeight" format="dimension" />
        <attr name="peng_drawableBottomWith" format="dimension" />
        <attr name="peng_drawableBottomHeight" format="dimension" />
        <attr name="peng_drawableRightWith" format="dimension" />
        <attr name="peng_drawableRightHeight" format="dimension" />
        <attr name="peng_drawableLeftWith" format="dimension" />
        <attr name="peng_drawableLeftHeight" format="dimension" />

        <attr name="peng_drawableTop" format="reference" />
        <attr name="peng_drawableBottom" format="reference" />
        <attr name="peng_drawableRight" format="reference" />
        <attr name="peng_drawableLeft" format="reference" />
    declare-styleable>

resources>
2.创建一个类继承RadioButton,并且在构造方法中对它进行初始化
        if (attrs != null) {
            float scale = context.getResources().getDisplayMetrics().density;
            TypedArray a = context.obtainStyledAttributes(attrs, R.styleable.PengRadioButton);
            int n = a.getIndexCount();
            for (int i = 0; i < n; i++) {
                int attr = a.getIndex(i);
                switch (attr) {
                case R.styleable.PengRadioButton_peng_drawableBottom:
                    drawableBottom = a.getDrawable(attr);
                    break;
                case R.styleable.PengRadioButton_peng_drawableTop:
                    drawableTop = a.getDrawable(attr);
                    break;
                case R.styleable.PengRadioButton_peng_drawableLeft:
                    drawableLeft = a.getDrawable(attr);
                    break;
                case R.styleable.PengRadioButton_peng_drawableRight:
                    drawableRight = a.getDrawable(attr);
                    break;
                case R.styleable.PengRadioButton_peng_drawableTopWith:
                    mTopWith = (int) (a.getDimension(attr, 20) * scale + 0.5f);
                    break;
                case R.styleable.PengRadioButton_peng_drawableTopHeight:
                    mTopHeight = (int) (a.getDimension(attr, 20) * scale + 0.5f);
                    break;
                case R.styleable.PengRadioButton_peng_drawableBottomWith:
                    mBottomWith = (int) (a.getDimension(attr, 20) * scale + 0.5f);
                    break;
                case R.styleable.PengRadioButton_peng_drawableBottomHeight:
                    mBottomHeight = (int) (a.getDimension(attr, 20) * scale + 0.5f);
                    break;
                case R.styleable.PengRadioButton_peng_drawableRightWith:
                    mRightWith = (int) (a.getDimension(attr, 20) * scale + 0.5f);
                    break;
                case R.styleable.PengRadioButton_peng_drawableRightHeight:
                    mRightHeight = (int) (a.getDimension(attr, 20) * scale + 0.5f);
                    break;
                case R.styleable.PengRadioButton_peng_drawableLeftWith:
                    mLeftWith = (int) (a.getDimension(attr, 20) * scale + 0.5f);
                    break;
                case R.styleable.PengRadioButton_peng_drawableLeftHeight:
                    mLeftHeight = (int) (a.getDimension(attr, 20) * scale + 0.5f);
                    break;

                default:
                    break;
                }
            }
            a.recycle();
            setCompoundDrawablesWithIntrinsicBounds(drawableLeft, drawableTop, drawableRight, drawableBottom);
        }
3.重写setCompoundDrawablesWithIntrinsicBounds方法,来设定图片的大小
@Override
    public void setCompoundDrawablesWithIntrinsicBounds(Drawable left, Drawable top, Drawable right, Drawable bottom) {

        if (left != null) {
            left.setBounds(0, 0, mLeftWith <= 0 ? left.getIntrinsicWidth() : mLeftWith, mLeftHeight <= 0 ? left.getMinimumHeight() : mLeftHeight);
        }
        if (right != null) {
            right.setBounds(0, 0, mRightWith <= 0 ? right.getIntrinsicWidth() : mRightWith, mRightHeight <= 0 ? right.getMinimumHeight() : mRightHeight);
        }
        if (top != null) {
            top.setBounds(0, 0, mTopWith <= 0 ? top.getIntrinsicWidth() : mTopWith, mTopHeight <= 0 ? top.getMinimumHeight() : mTopHeight);
        }
        if (bottom != null) {
            bottom.setBounds(0, 0, mBottomWith <= 0 ? bottom.getIntrinsicWidth() : mBottomWith, mBottomHeight <= 0 ? bottom.getMinimumHeight()
                    : mBottomHeight);
        }
        setCompoundDrawables(left, top, right, bottom);
    }
看看效果

ok,大功告成,下面你就可以放心的使用,Button类似的效果和自定义方法和这个是一样的,不过别忘了,命名空间的改变
xmlns:peng=”http://schemas.android.com/apk/res/你的包名”
下载类库和示例