Android动画之Interpolator(插值器)
介绍
什么是Interpolator?
通俗易懂的说,Interpolator负责控制动画变化的速率,使得基本的动画效果能够以匀速、加速、减速、抛物线速率等各种速率变化。
动画是开发者给定开始和结束的“关键帧”,其变化的“中间帧”是有系统计算决定然后播放出来。因此,动画的每一帧都将在开始和结束之间的特定时间显示。此时动画时间被转换为时间索引,则动画时间轴上的每个点都可以转换成0.0到1.0之间的一个浮点数。然后再将该值用于计算该对象的属性变换。在变换的情况下,y轴上,0.0对应于起始位置,1.0对应于结束位置,0.5对应于起始和结束之间的中间,对于一些插值器其值还可以是0~1之外的数值。
比如:对于LinearInterpolator(线性插值器)的平移动画来讲,在0.3这个时间点视图则刚好移动了整个动画的30%。
Interpolator 本质上是一个数学函数,其取数字在0.0和1.0之间,并将其转换为另一个数字。
原理
以上的介绍,也是参考网上一些资料,理解起来,我个人觉得确实有点费劲。这里,就拿AccelerateInterpolator加速器举个栗子,详细介绍其中的原理。
每个Interpolator多需要 继承TimeInterpolator,并实现里面唯一的方法:
public interface TimeInterpolator {
    /**
     * Maps a value representing the elapsed fraction of an animation to a value that represents
     * the interpolated fraction. This interpolated value is then multiplied by the change in
     * value of an animation to derive the animated value at the current elapsed animation time.
     *
     * @param input A value between 0 and 1.0 indicating our current point
     *        in the animation where 0 represents the start and 1.0 represents
     *        the end
     * @return The interpolation value. This value can be more than 1.0 for
     *         interpolators which overshoot their targets, or less than 0 for
     *         interpolators that undershoot their targets.
     */
    float getInterpolation(float input);
}那么AccelerateInterpolator类中,其实现如下:
@HasNativeInterpolator
public class AccelerateInterpolator extends BaseInterpolator implements NativeInterpolatorFactory {
    private final float mFactor;
    private final double mDoubleFactor;

    public AccelerateInterpolator() {
        mFactor = 1.0f;
        mDoubleFactor = 2.0;
    }

    /**
     * Constructor
     */
    public AccelerateInterpolator(float factor) {
        mFactor = factor;
        mDoubleFactor = 2 * mFactor;
    }

    public AccelerateInterpolator(Context context, AttributeSet attrs) {
        this(context.getResources(), context.getTheme(), attrs);
    }

    public float getInterpolation(float t) {
        if (mFactor == 1.0f) {
            return t * t;
        } else {
            return (float)Math.pow(t, mDoubleFactor);
        }
    }
}
可以看到,getInterpolation(float input)返回的是抛物线函数的值,即
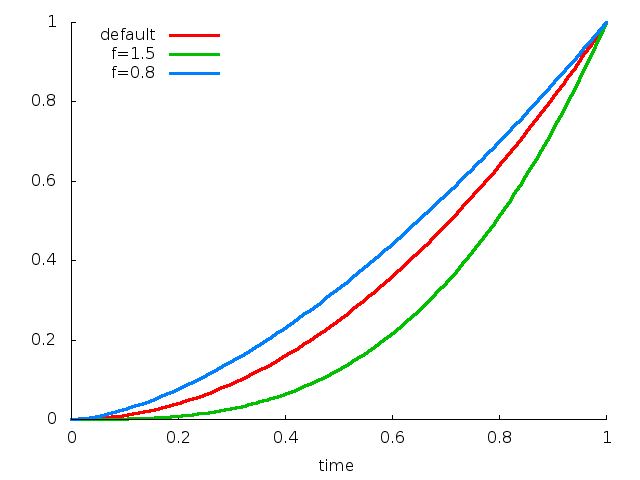
y=t2f
解释:
t:就是时间索引,通过比例的转换为0-1之间的值,即3000m或者5000ms,在运动随着时间的流逝,通过比例都转换为0-1的取值;
y:就是Interpolator的输出,根据时间的流逝的百分比,计算出动画属性改变的百分比,或者是说动画总路程的百分比。
f :相当于代码中的mFactor,指定加速度应该如何强调的因素 ,可以通过构造函数自定义该值,这里默认是1。这里的 f 越大,起始速度越慢,但是后期加速度会更大;如果 f=0.5,则和LinearInterpolator的行为一模一样了。
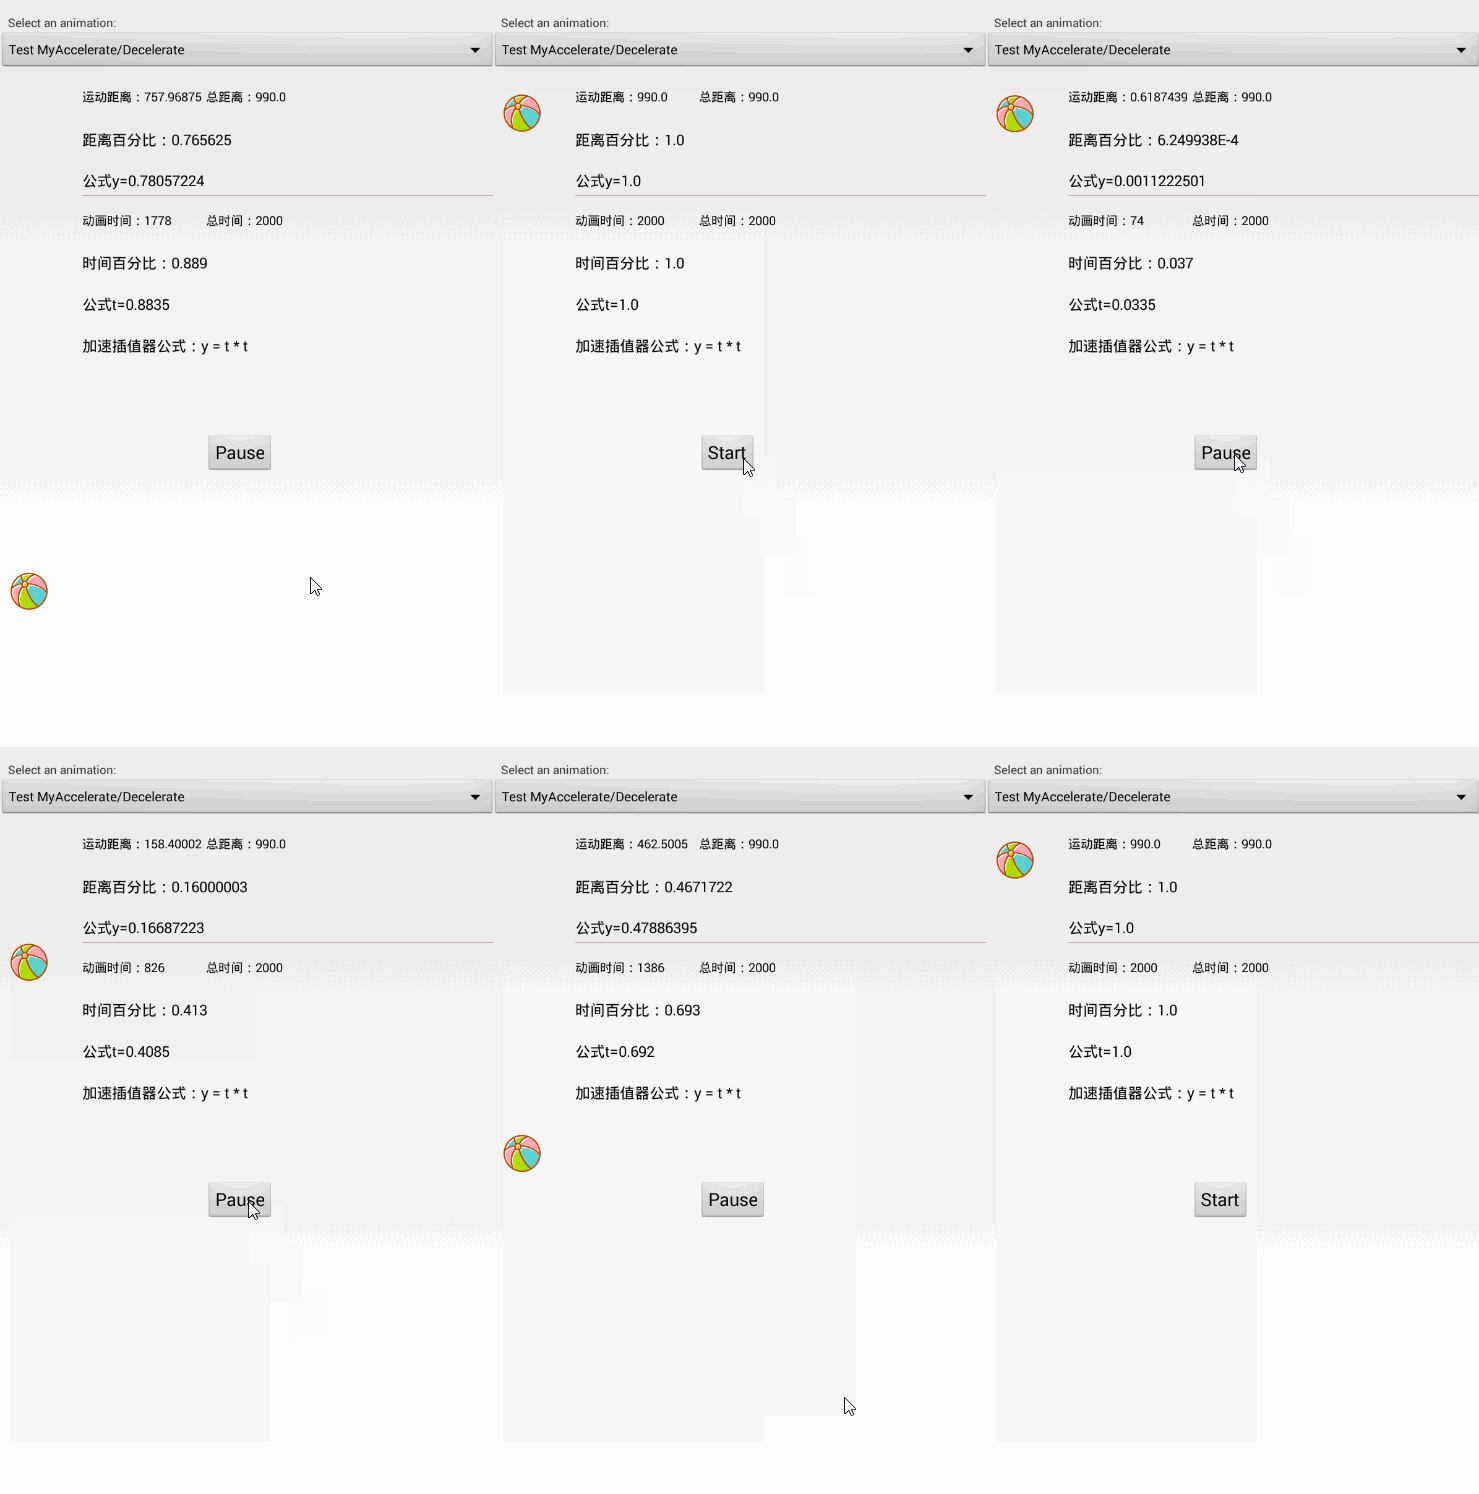
如果,你还是对上面的公式有点疑惑,那么,无聊的我给你实践上面的公式,与动画一起关联起来看:
从上面的可以看出,动画路程完成的比例,和公式中的y是一致的;动画时间的完成的比例,和公式中t(时间上有微小的误差)也是一致的。
现在是否比较清晰明白呢,也可自己动手证明下。
分类
| java类 | xml资源id | 说明 |
|---|---|---|
| AccelerateDecelerateInterpolator | @android:anim/accelerate_decelerate_interpolator | 其变化开始和结束速率较慢,中间加速 |
| AccelerateInterpolator | @android:anim/accelerate_interpolator | 其变化开始速率较慢,后面加速 |
| DecelerateInterpolator | @android:anim/decelerate_interpolator | 其变化开始速率较快,后面减速 |
| LinearInterpolator | @android:anim/linear_interpolator | 其变化速率恒定 |
| AnticipateInterpolator | @android:anim/anticipate_interpolator | 其变化开始向后甩,然后向前 |
| AnticipateOvershootInterpolator | @android:anim/anticipate_overshoot_interpolator | 其变化开始向后甩,然后向前甩,过冲到目标值,最后又回到了终值 |
| OvershootInterpolator | @android:anim/overshoot_interpolator | 其变化开始向前甩,过冲到目标值,最后又回到了终值 |
| BounceInterpolator | @android:anim/bounce_interpolator | 其变化在结束时反弹 |
| CycleInterpolator | @android:anim/cycle_interpolator | 循环播放,其速率为正弦曲线 |
| TimeInterpolator | 一个接口,可以自定义插值器 |
1.Linear Interpolator 线性插值
公式: y=t
构造函数: public LinearInterpolator()
参数: 无
2. Accelerate Interpolator / 加速度插值器
公式: y=t^(2f)
构造函数: public AccelerateInterpolator(float factor)
参数:
名称: f
XML属性: android:factor
描述: 加速度参数. f越大,起始速度越慢,但是速度越来越快
3. Decelerate Interpolator / 减速插值器
公式: y=1-(1-t)^(2f)
构造函数: public DecelerateInterpolator(float factor)
参数:
名称: f
XML属性: android:factor
描述: 加速度参数. f越大,起始速度越快,但是速度越来越慢
4. Accelerate Decelerate Interpolator / 先加速后减速插值器
公式: y=cos((t+1)π)/2+0.5
构造函数: public AccelerateDecelerateInterpolator()
参数: 无
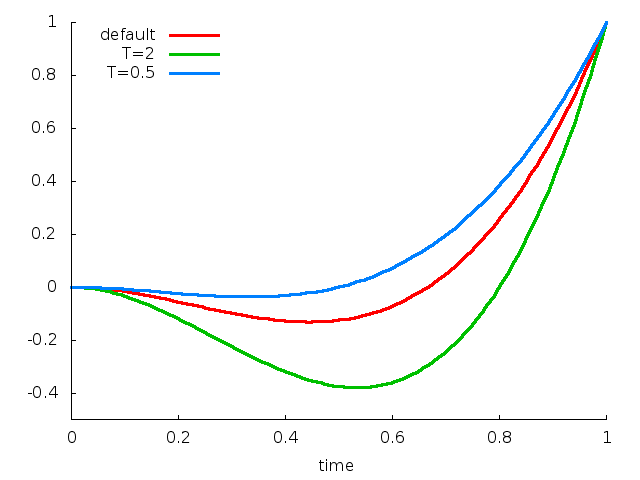
5. Anticipate Interpolator
公式: y=(T+1)×t^3–T×t^2
构造函数: public AnticipateInterpolator(float tension)
参数:
名称: T
XML属性: android:tension
描述: 张力值, 默认为2,T越大,初始的偏移越大,而且速度越快
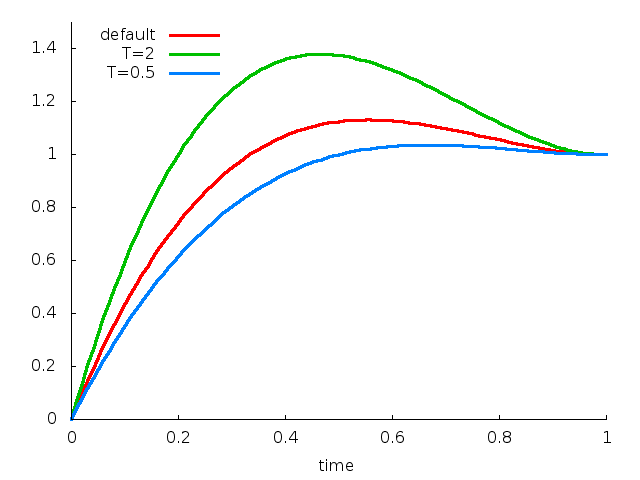
6. Overshoot Interpolator
公式: y=(T+1)x(t1)^3+T×(t1)^2 +1
构造函数: public OvershootInterpolator (float tension)
参数:
名称: T
XML属性: android:tension
描述: 张力值,默认为2,T越大,结束时的偏移越大,而且速度越快
该插值器的y值就是先会超过1,然后又回到1。
7.Anticipate Overshoot Interpolator
公式: y={0.5((T+1)×(2t)3–T×(2t)2)0.5((T+1)×(2t−2)3+T×(2t−2)2)+1for t<0.5for t≥0.5
构造函数:
public AnticipateOvershootInterpolator(float tension)
public AnticipateOvershootInterpolator(float tension, float extraTension)
参数:
XML属性: android:tension
描述: 张力值,默认为2,张力越大,起始和结束时的偏移越大,而且速度越快
XML属性: android:extraTension
描述: 额外张力值,默认为1.5。
公式中T的值为tension*extraTension
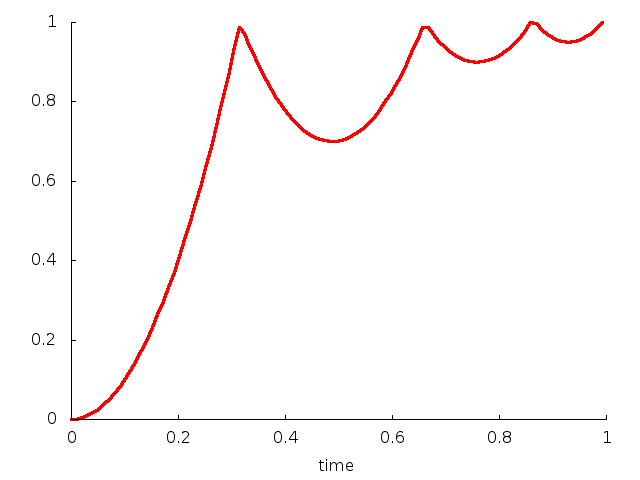
8. Bounce Interpolator / 弹跳插值器
公式:
构造函数: public BounceInterpolator ()
参数: 无
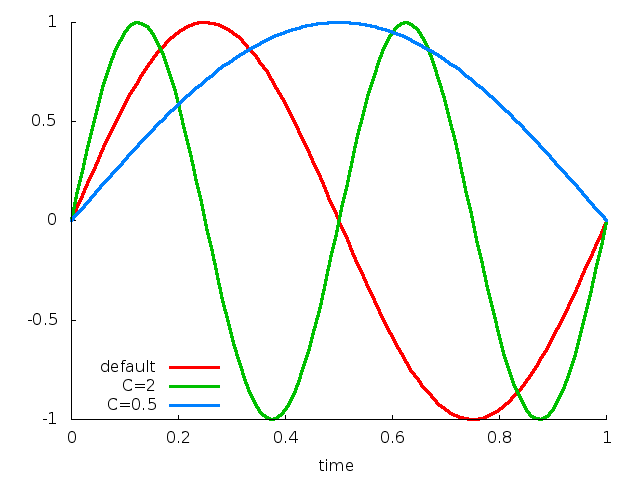
9.Cycle Interpolator / 周期插值器
公式: y=sin(2π×C×t)
构造函数: public CycleInterpolator(float cycles)
参数:
名称: C
XML属性: android:cycles
描述: 周期值,默认为1;2表示动画会执行两次
这里的动画是放大效果,那么就会先放大->缩小 -> 放大 ->恢复原来
使用
在xml使用
通过android:interpolator属性指定你想要的插值器,如:
如果加速因素不理想,还可以自己配置参数,在res/anim文件夹里面创建一个XML文件,你想将AccelerateInterpolator的f参数设置为2,你可以创建这样一个文件res/anim/my_accelerate_interpolator.xml,其代码如下:
注意,accelerateInterpolator表示这是一个AccelerateInterpolator,第一个字符小写。
在java是使用
在代码中使用也超级简单,可以通过setInterpolator()方法,如:
animation.setInterpolator(new AccelerateInterpolator());
那么,在代码中怎么配置加速因素呢?前面我们也看到,有参数的,多会有对应的构造函数。是的,定义一个带参数构造即可。如:
animation.setInterpolator(new AccelerateInterpolator(2));
也可以通过上面,在xml上配置,然后通过代码来使用,如:
animation.setInterpolator(AnimationUtils.loadInterpolator(this,R.anim.my_accelerate_interpolator));
自定义Interpolators
通过上面的原理,自定义插值器,只要继承Interpolator实现getInterpolation()就可以了。如:
public class HesitateInterpolator implements Interpolator {

    public HesitateInterpolator() {}

    @Override
    public float getInterpolation(float input) {
        float x = 2.0f * input - 1.0f;
        return 0.5f * (x * x * x + 1.0f);
    }
}
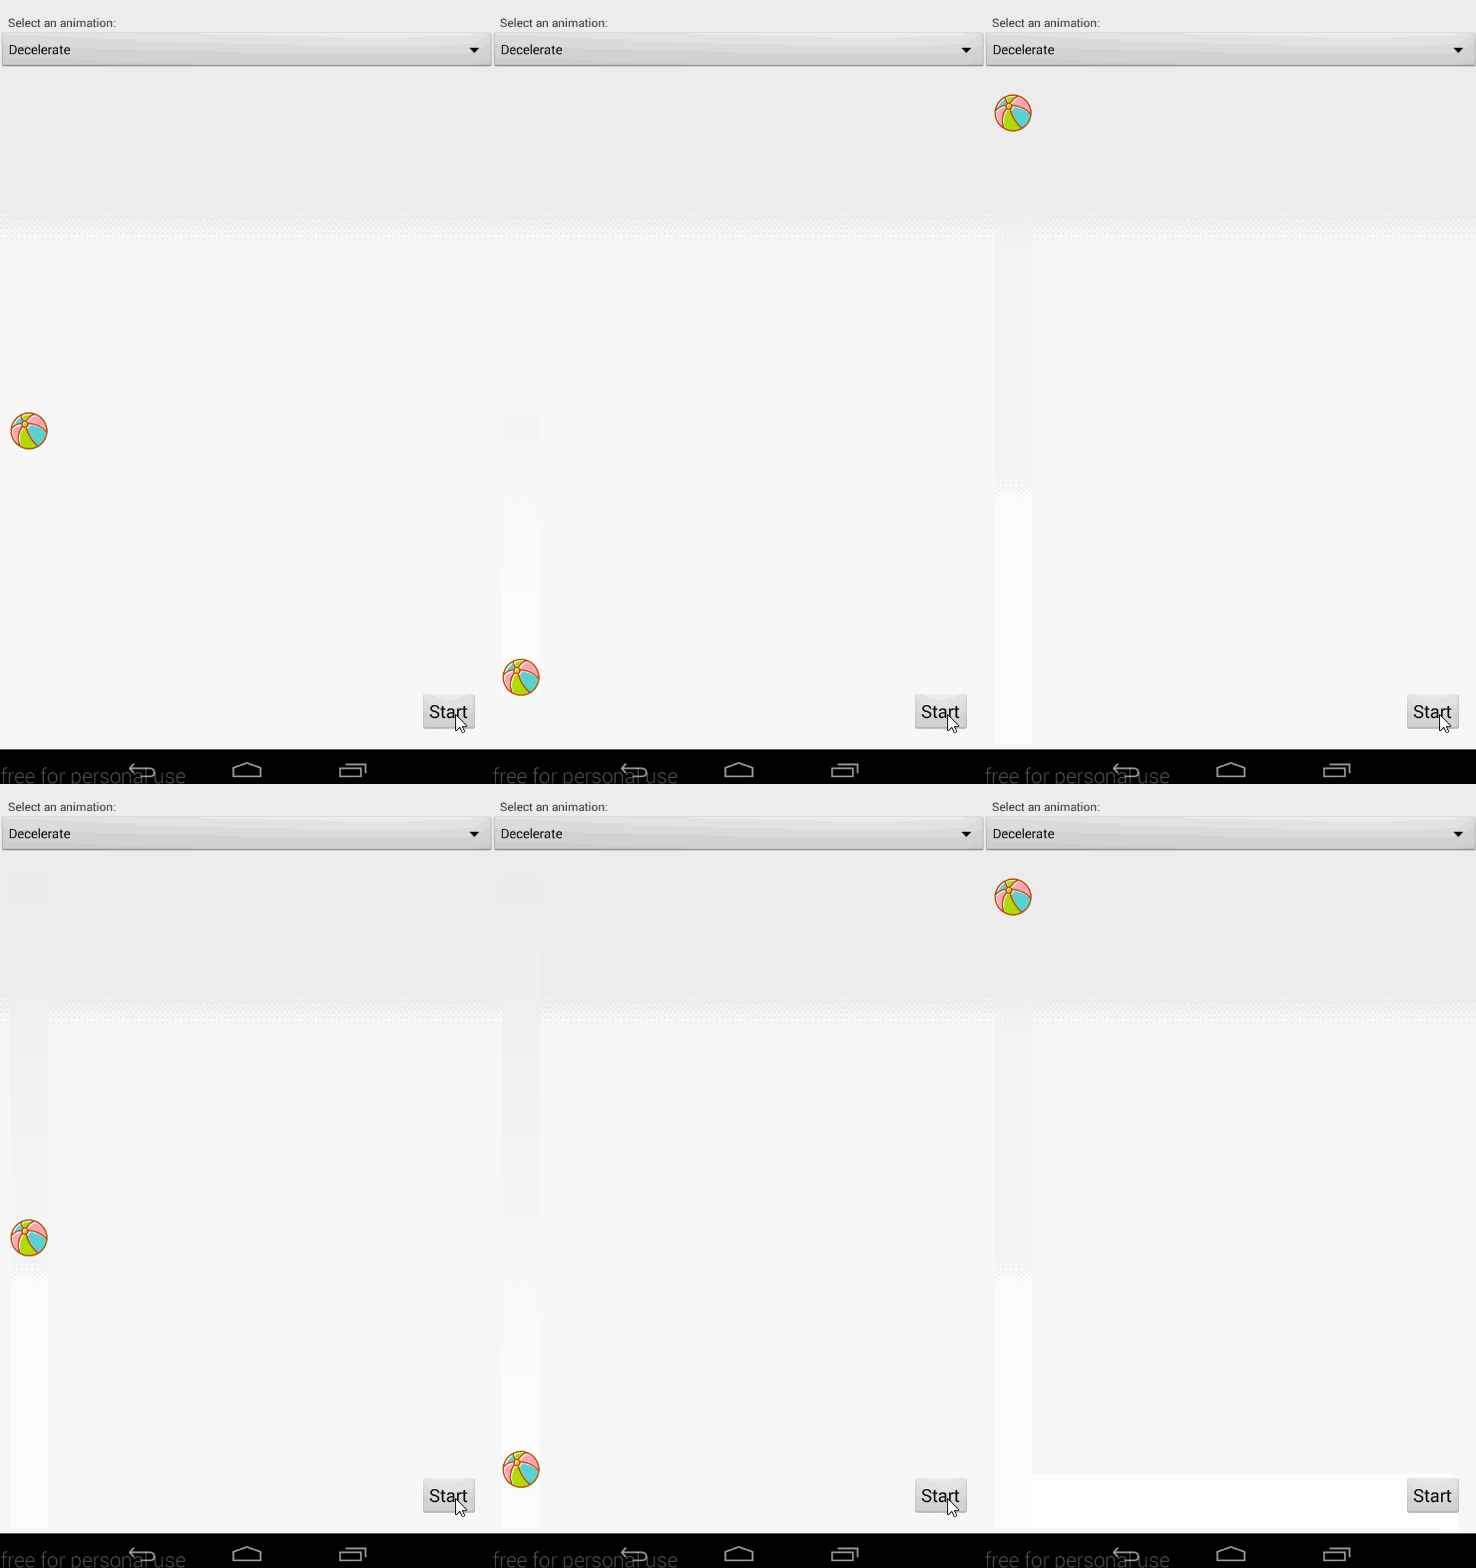
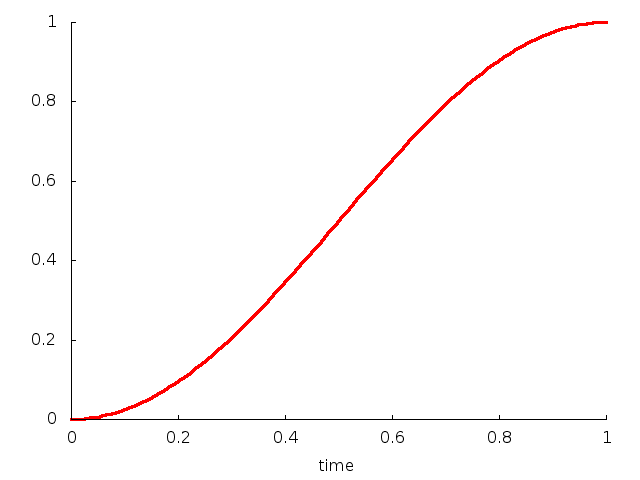
和前面的一样使用就行了。其曲线图和效果图如下:
好了,插值器的介绍差不多就到这里。这里稍微引申一下:
在Android5.0开始,在 android.support.v4.view.animation包下又重新添加这三种插值器,如图。
| java类 | 说明 |
|---|---|
| FastOutLinearInInterpolator | 其变化先加速然后匀速,本质还是加速运动,和Accelerate Interpolator类似 |
| LinearOutSlowInInterpolator | 其变化先匀速再减速,和Decelerate Interpolator类似 |
| FastOutSlowInInterpolator | 其变化是先加速,然后减速,和Accelerate Decelerate Interpolator类似 |
以上这3这种,主要在于计算方式不一样,多是基于贝塞尔曲线来计算。他们是在Material Design中使用较多,这里就不做详细介绍了(其实我也没有研究)。当然我们在平时一样可以使用他们。
好了,放了很久的插值器,终于搞完了,刚开始一直纠结于原理,怎么证明,现在看来,有点想笑。收获还是很大,希望读者也能收获,如有议论,欢迎指出。
如需源码,点 这里
主要参考:
https://developer.android.google.cn/guide/topics/graphics/prop-animation.html
http://cogitolearning.co.uk/?p=1078
