MobileNet详细总结以及代码讲解
MobileNet详细介绍
- 模型介绍
- 代码复现
- 图片预测
模型介绍
模型特点:1.轻量级网络。2.可分离卷积。
简介:如果你知道VGG的话,你会发现,其实MobileNet就是将VGG中的标准卷积层替换成深度可分离卷积。
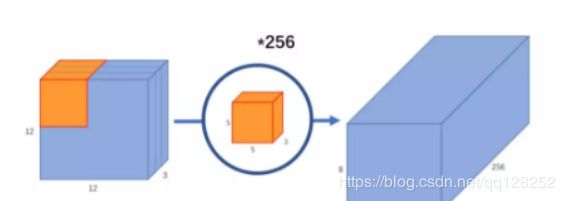
卷积: 一个12x12x3的特征图,采用5x5x3的卷积核进行卷积,得到8x8x1的特征图,如果有256个特征图,则得到8x8x256的特征图

可分离卷积:可分离卷积包括深度可分离卷积 和空间可分离卷积
空间可分离卷积:就是把3x3的卷积核分成3x1和1x3的卷积核。
深度可分离卷积:深度卷积+逐点卷积。
代码:在建立模型的时候,可以使用Keras中的DepthwiseConv2D层实现深度可分离卷积,然后再利用1x1卷积调整channels数。
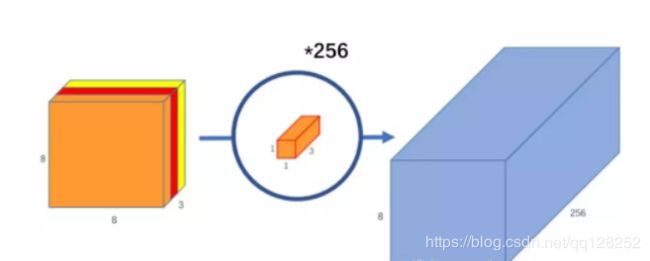
深度卷积:采用单通道进行卷积。如图,我们可以看到输出通道数为3,特征图的维度太少。

逐点卷积:就是1*1卷积,主要作用是变换维度。(升或降)经过深度卷积后我们得到8x8x3的特征图,我们采用256个1x1x3的卷积核进行卷积,得到8x8x256的特征图。

参数量和计算量的比较:
A.普通卷积
卷积核的尺寸是Dk×Dk×M,一共有N个,所以标准卷积的参数量是:

卷积核的尺寸是Dk×Dk×M,一共有N个,每一个都要进行Dw×Dh次运算,所以标准卷积的计算量是:

B.深度可分离卷积
深度卷积的卷积核尺寸Dk×Dk×M;逐点卷积的卷积核尺寸为1×1×M,一共有N个,所以深度可分离卷积的参数量是:

深度卷积的卷积核尺寸Dk×Dk×M,一共要做Dw×Dh次乘加运算;逐点卷积的卷积核尺寸为1×1×M,有N个,一共要做Dw×Dh次乘加运算,所以深度可分离卷积的计算量是:

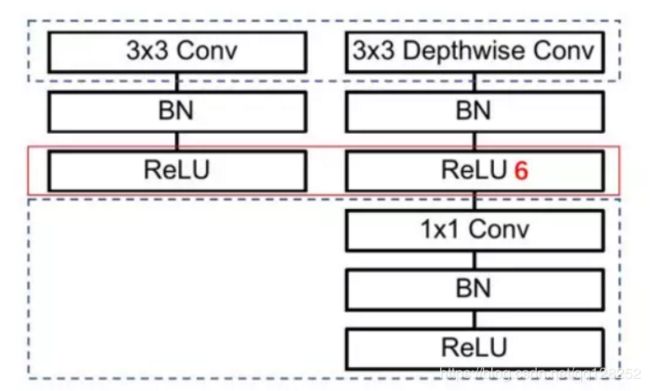
下图是正常卷积和可分离卷积的网络结构:

ReLU6:如图所示。

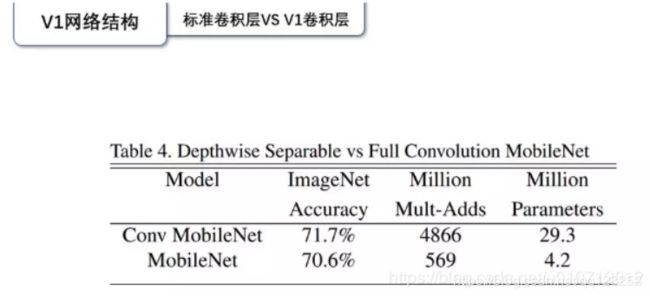
性能比较:准确率下降了1%左右,但是计算量从4866下降到569。

MobileNet网络结构:
如图所示,首先采用3x3的卷积,然后就是深度可分离卷积,其中s2是下采样,即stride。最后采用平均池化将feature变成1x1,根据预测类别的大小加上全连接层,这里是1000,最后用一个softmax层。整个网络有24层,其中13层为深度可分离卷积。
softmax 可以理解为归一化,如目前图片分类有一百种,那经过 softmax 层的输出就是一个一百维的向量。向量中的第一个值就是当前图片属于第一类的概率值,向量中的第二个值就是当前图片属于第二类的概率值…这一百维的向量之和为1.
全连接:卷积取的是局部特征,全连接就是把以前的局部特征重新通过权值矩阵组装成完整的图。因为用到了所有的局部特征,所以叫全连接。
这篇文章是我看过关于全连接最好的解释了(戳我)
代码复现
这是一个3x3的卷积操作
def _conv_block(inputs, filters, kernel=(3, 3), strides=(1, 1)):
    x = Conv2D(filters, kernel,
               padding='same',
               use_bias=False,
               strides=strides,
               name='conv1')(inputs)
    x = BatchNormalization(name='conv1_bn')(x)
    return Activation(relu6, name='conv1_relu')(x)
深度可分离卷积:3X3X1深度卷积后,用1x1逐点卷积,每次卷积后都进行标准化和激活函数。
def _depthwise_conv_block(inputs, pointwise_conv_filters,
                          depth_multiplier=1, strides=(1, 1), block_id=1):

    x = DepthwiseConv2D((3, 3),
                        padding='same',
                        depth_multiplier=depth_multiplier,
                        strides=strides,
                        use_bias=False,
                        name='conv_dw_%d' % block_id)(inputs)

    x = BatchNormalization(name='conv_dw_%d_bn' % block_id)(x)
    x = Activation(relu6, name='conv_dw_%d_relu' % block_id)(x)

    x = Conv2D(pointwise_conv_filters, (1, 1),
               padding='same',
               use_bias=False,
               strides=(1, 1),
               name='conv_pw_%d' % block_id)(x)
    x = BatchNormalization(name='conv_pw_%d_bn' % block_id)(x)
    return Activation(relu6, name='conv_pw_%d_relu' % block_id)(x)
MobileNet网络结构的代码实现:
depth_multiplier=1是指卷积后的维度是1
dropout:暂时去除一些神经元,防止过拟合,使模型更有鲁棒性。
Dropout可以作为训练深度神经网络的一种trick供选择。在每个训练批次中,
通过忽略一半的特征检测器(让一半的隐层节点值为0),
可以明显地减少过拟合现象。这种方式可以减少特征检测器(隐层节点)间的相互作
用,检测器相互作用是指某些检测器依赖其他检测器才能发挥作用。
Dropout说的简单一点就是:我们在前向传播的时候,让某个神经元的激活值以
一定的概率p停止工作,这样可以使模型泛化性更强,因为它不会太依赖某些局部
的特征
def MobileNet(input_shape=[224,224,3],
              depth_multiplier=1,
              dropout=1e-3,
              classes=1000):


    img_input = Input(shape=input_shape)

    # 224,224,3 -> 112,112,32
    x = _conv_block(img_input, 32, strides=(2, 2))

    # 112,112,32 -> 112,112,64
    x = _depthwise_conv_block(x, 64, depth_multiplier, block_id=1)

    # 112,112,64 -> 56,56,128
    x = _depthwise_conv_block(x, 128, depth_multiplier,
                              strides=(2, 2), block_id=2)
    # 56,56,128 -> 56,56,128
    x = _depthwise_conv_block(x, 128, depth_multiplier, block_id=3)

    # 56,56,128 -> 28,28,256
    x = _depthwise_conv_block(x, 256, depth_multiplier,
                              strides=(2, 2), block_id=4)

    # 28,28,256 -> 28,28,256
    x = _depthwise_conv_block(x, 256, depth_multiplier, block_id=5)

    # 28,28,256 -> 14,14,512
    x = _depthwise_conv_block(x, 512, depth_multiplier,
                              strides=(2, 2), block_id=6)

    # 14,14,512 -> 14,14,512
    x = _depthwise_conv_block(x, 512, depth_multiplier, block_id=7)
    x = _depthwise_conv_block(x, 512, depth_multiplier, block_id=8)
    x = _depthwise_conv_block(x, 512, depth_multiplier, block_id=9)
    x = _depthwise_conv_block(x, 512, depth_multiplier, block_id=10)
    x = _depthwise_conv_block(x, 512, depth_multiplier, block_id=11)

    # 14,14,512 -> 7,7,1024
    x = _depthwise_conv_block(x, 1024, depth_multiplier,
                              strides=(2, 2), block_id=12)
    x = _depthwise_conv_block(x, 1024, depth_multiplier, block_id=13)

    # 7,7,1024 -> 1,1,1024
    x = GlobalAveragePooling2D()(x)
    x = Reshape((1, 1, 1024), name='reshape_1')(x)
    x = Dropout(dropout, name='dropout')(x)
    x = Conv2D(classes, (1, 1),padding='same', name='conv_preds')(x)
    x = Activation('softmax', name='act_softmax')(x)
    x = Reshape((classes,), name='reshape_2')(x)

    inputs = img_input

    model = Model(inputs, x, name='mobilenet_1_0_224_tf')
    model_name = 'mobilenet_1_0_224_tf.h5'
    model.load_weights(model_name)

    return model
图片预测
通过下面代码就可以预测啦。
def preprocess_input(x):
    x /= 255.
    x -= 0.5
    x *= 2.
    return x


if __name__ == '__main__':
    model = MobileNet(input_shape=(224, 224, 3))

    img_path = 'elephant.jpg'
    img = image.load_img(img_path, target_size=(224, 224))
    x = image.img_to_array(img)
    x = np.expand_dims(x, axis=0)
    x = preprocess_input(x)
    print('Input image shape:', x.shape)

    preds = model.predict(x)
    print(np.argmax(preds))
    print('Predicted:', decode_predictions(preds, 1))
最后放上所有代码:
import warnings
import numpy as np

from keras.preprocessing import image
from keras.models import Model
from keras.layers import DepthwiseConv2D,Input,Activation,Dropout,Reshape,BatchNormalization,GlobalAveragePooling2D,GlobalMaxPooling2D,Conv2D
from keras.applications.imagenet_utils import decode_predictions
from keras import backend as K


def MobileNet(input_shape=[224,224,3],
              depth_multiplier=1,
              dropout=1e-3,
              classes=1000):


    img_input = Input(shape=input_shape)

    # 224,224,3 -> 112,112,32
    x = _conv_block(img_input, 32, strides=(2, 2))
    # 112,112,32 -> 112,112,64
    x = _depthwise_conv_block(x, 64, depth_multiplier, block_id=1)


    # 112,112,64 -> 56,56,128
    x = _depthwise_conv_block(x, 128, depth_multiplier,
                              strides=(2, 2), block_id=2)
    # 56,56,128 -> 56,56,128
    x = _depthwise_conv_block(x, 128, depth_multiplier, block_id=3)


    # 56,56,128 -> 28,28,256
    x = _depthwise_conv_block(x, 256, depth_multiplier,
                              strides=(2, 2), block_id=4)
    # 28,28,256 -> 28,28,256
    x = _depthwise_conv_block(x, 256, depth_multiplier, block_id=5)


    # 28,28,256 -> 14,14,512
    x = _depthwise_conv_block(x, 512, depth_multiplier,
                              strides=(2, 2), block_id=6)
    # 14,14,512 -> 14,14,512
    x = _depthwise_conv_block(x, 512, depth_multiplier, block_id=7)
    x = _depthwise_conv_block(x, 512, depth_multiplier, block_id=8)
    x = _depthwise_conv_block(x, 512, depth_multiplier, block_id=9)
    x = _depthwise_conv_block(x, 512, depth_multiplier, block_id=10)
    x = _depthwise_conv_block(x, 512, depth_multiplier, block_id=11)

    # 14,14,512 -> 7,7,1024
    x = _depthwise_conv_block(x, 1024, depth_multiplier,
                              strides=(2, 2), block_id=12)
    x = _depthwise_conv_block(x, 1024, depth_multiplier, block_id=13)

    # 7,7,1024 -> 1,1,1024
    # 7x7x1024
    # 1024
    x = GlobalAveragePooling2D()(x)
    x = Reshape((1, 1, 1024), name='reshape_1')(x)
    x = Dropout(dropout, name='dropout')(x)
    # 1024*2
    x = Conv2D(classes, (1, 1),padding='same', name='conv_preds')(x)
    x = Activation('softmax', name='act_softmax')(x)
    x = Reshape((classes,), name='reshape_2')(x)

    inputs = img_input

    model = Model(inputs, x, name='mobilenet_1_0_224_tf')

    return model

def _conv_block(inputs, filters, kernel=(3, 3), strides=(1, 1)):
    x = Conv2D(filters, kernel,
               padding='same',
               use_bias=False,
               strides=strides,
               name='conv1')(inputs)
    x = BatchNormalization(name='conv1_bn')(x)
    return Activation(relu6, name='conv1_relu')(x)


def _depthwise_conv_block(inputs, pointwise_conv_filters,
                          depth_multiplier=1, strides=(1, 1), block_id=1):

    x = DepthwiseConv2D((3, 3),
                        padding='same',
                        depth_multiplier=depth_multiplier,
                        strides=strides,
                        use_bias=False,
                        name='conv_dw_%d' % block_id)(inputs)

    x = BatchNormalization(name='conv_dw_%d_bn' % block_id)(x)
    x = Activation(relu6, name='conv_dw_%d_relu' % block_id)(x)

    x = Conv2D(pointwise_conv_filters, (1, 1),
               padding='same',
               use_bias=False,
               strides=(1, 1),
               name='conv_pw_%d' % block_id)(x)
    x = BatchNormalization(name='conv_pw_%d_bn' % block_id)(x)
    return Activation(relu6, name='conv_pw_%d_relu' % block_id)(x)

def relu6(x):
    return K.relu(x, max_value=6)


def preprocess_input(x):
    x /= 255.
    x -= 0.5
    x *= 2.
    return x

if __name__ == '__main__':
    model = MobileNet(input_shape=(224, 224, 3))

    model.summary()

    # img_path = 'elephant.jpg'
    # img = image.load_img(img_path, target_size=(224, 224))
    # x = image.img_to_array(img)
    # x = np.expand_dims(x, axis=0)
    # x = preprocess_input(x)
    # print('Input image shape:', x.shape)
    #
    # preds = model.predict(x)
    # print(np.argmax(preds))
    # print('Predicted:', decode_predictions(preds, 1))
