springboot+shiro+cas5.2通过RESTful协议进行sso单点登录
单点登录基本配置可以参考上一篇springboot+shiro+cas5.2实现SSO单点登录(超详细)
使用RESTful协议可以用之前项目的登录页,在不改动原本的cas服务端,不使用cas服务端原本的登录页面的情况下,进行sso单点登录
一、在cas服务端pom.xml里添加rest的jar包(我是在压缩文件的pom.xml里添加的,然后重新mvn clean package打包)
    org.apereo.cas
    cas-server-support-rest
    ${cas.version}
二、找到WEB-INF\classes\application.properties位置添加如下内容。
# 开启rest验证并配置url
cas.authn.rest.uri=http://192.168.10.77:8080/v1
# 设置ticket过期时间,默认是10秒
cas.ticket.st.numberOfUses=1
cas.ticket.st.timeToKillInSeconds=60
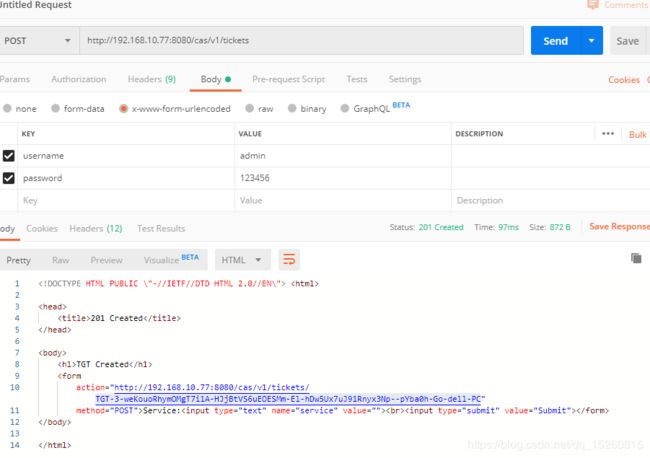
三、获取TGT,post请求,参数为用户名、密码
http://localhost:8080/cas/v1/tickets使用postman发请求测试
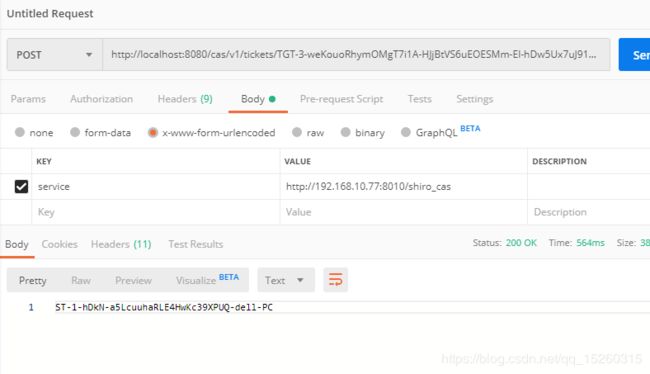
四、根据TGT获取ST,post请求,参数为客户端的服务名(需要访问客户端的地址,错误的话给的ticket不能免登录)
http://localhost:8080/cas/v1/tickets/TGT-XXXXXXXXXX使用postman发请求测试
五、输入网址http:192.168.10.77:8010/shiro_cas?ticket=ST-1-hDkN-a5LcuuhaRLE4HwKc39XPUQ-dell-PC,访问成功跳转首页。
这里需要注意的是,我的shiro里面配置的访问“/shiro_cas”会进到cas过滤器里,拿着ticket票证到cas过滤器后,会向cas服务端发请求验证ticket票证的有效性,验证通过会返回登录用户名,跳转到首页。所以上一步获取ST传的参数service需要能进到cas过滤器。
public static final String casFilterUrlPattern = "/shiro_cas";
//CAS过滤器
@Bean(name = "casFilter")
public CasFilter getCasFilter() {
    MyCasFilter casFilter = new MyCasFilter();
    casFilter.setName("casFilter");
    casFilter.setEnabled(true);
    casFilter.setFailureUrl(loginUrl);
    casFilter.setSuccessUrl("/index");
    return casFilter;
}

private void loadShiroFilterChain(ShiroFilterFactoryBean shiroFilterFactoryBean) {
    Map filterChainDefinitionMap = new LinkedHashMap();
    filterChainDefinitionMap.put(casFilterUrlPattern, "casFilter");
    //不拦截的请求
    filterChainDefinitionMap.put("/css/**", "anon");
    filterChainDefinitionMap.put("/js/**", "anon");
    //此处将logout页面设置为anon,而不是logout,因为logout被单点处理,而不需要再被shiro的 logoutFilter进行拦截
    filterChainDefinitionMap.put("/error", "anon");
    //拦截的请求(从本地数据库获取或者从casserver获取(webservice,http等远程方式),看你的角色权限配置在哪里)
    filterChainDefinitionMap.put("/user", "authc"); //需要登录
    //登录过的不拦截
    filterChainDefinitionMap.put("/**", "authc");
    shiroFilterFactoryBean.setFilterChainDefinitionMap(filterChainDefinitionMap);
}
六、配置文件及封装的RESTful工具类代码
serverA=http://192.168.10.77:8010/shiro_cas
serverB=http://192.168.10.73:8020/shiro_cas
serverUrl=http://192.168.10.77:8080/cas/
package com.enter.net.util;
import org.apache.commons.httpclient.HttpClient;
import org.apache.commons.httpclient.HttpStatus;
import org.apache.commons.httpclient.NameValuePair;
import org.apache.commons.httpclient.methods.DeleteMethod;
import org.apache.commons.httpclient.methods.PostMethod;
import org.apache.commons.lang.StringUtils;
import java.io.IOException;
import java.util.regex.Matcher;
import java.util.regex.Pattern;
public class CasServerUtil {
//登录地址的token
private String get_token_url = "http://192.168.10.77:8080/cas/v1/tickets/";
//目标返回的服务器的url, 同访问的地址必须完全一致,不然就会报错。
private String taget_url = "http://192.168.10.77:8010/shiro_cas";
private String ticket = "";
public String getTicket() {
return ticket;
}
public void setTicket(String ticket) {
this.ticket = ticket;
}
public CasServerUtil(){
String serverUrl = CommonConfigUtils.serverUrl;
if (StringUtils.isNotBlank(serverUrl)) {
get_token_url = serverUrl + "v1/tickets/";
}
}
public CasServerUtil(String tgt,String taget_url) {
this.taget_url = taget_url;
this.ticket = getST(tgt);
}
public static void main(String [] args) throws Exception {
String username ="admin";
String password ="123456";
CasServerUtil casServerUtil = new CasServerUtil();
String st = casServerUtil.getSt(username, password);
System.out.println(st);
}
/**
* 通过tgt,登出
* @param tgt
* @return String
*/
public void logout(String tgt){
HttpClient client = new HttpClient();
DeleteMethod method = new DeleteMethod(get_token_url + tgt + "/");
try{
client.executeMethod(method);
String response = method.getResponseBodyAsString();
int status = method.getStatusCode();
}catch (IOException e){
e.printStackTrace();
}finally{
method.releaseConnection();
}
}
/**
* 通过用户名密码获取tgt,并根据tgt获取ticket
* @param username
* @param password
* @return String
*/
public String getSt(String username,String password){
String tgt = getTGT(username, password);
if(StringUtils.isEmpty(tgt)){
return "";
}
return getST(tgt);
}
/**
* 根据用户名、密码获取tgt
* @return String
*/
public String getTGT(String username,String password){
String tgt = "";
HttpClient client = new HttpClient();
PostMethod method = new PostMethod(get_token_url);
method.setRequestBody(new NameValuePair[]{new NameValuePair("username", username), new NameValuePair("password", password)});
try{
client.executeMethod(method);
String response = method.getResponseBodyAsString();
int status = method.getStatusCode();
switch (status){
case HttpStatus.SC_CREATED: // Created
Matcher matcher = Pattern.compile(".*action=\".*/(.*?)\".*").matcher(response);
if (matcher.matches()){
tgt = matcher.group(1);
}
break;
default:
break;
}
}catch (IOException e){
e.printStackTrace();
}finally{
method.releaseConnection();
}
return tgt;
}
/**
* 通过tgt获取st
* @param tgt
* @return String
*/
private String getST(String tgt){
String serviceTicket = "";
HttpClient client = new HttpClient();
PostMethod method = new PostMethod(get_token_url + tgt + "/");
method.setRequestBody(new NameValuePair[]{new NameValuePair("service", taget_url)});
try {
client.executeMethod(method);
String response = method.getResponseBodyAsString();
int status = method.getStatusCode();
switch (status){
case HttpStatus.SC_OK: // ok
serviceTicket = response.toString();
break;
default:
break;
}
} catch (Exception e) {
e.printStackTrace();
}finally{
method.releaseConnection();
}
return serviceTicket;
}
}
用到maven的jar包
    commons-httpclient
    commons-httpclient
    3.1
七、跳转系统免登录的思路如下
(1)分a系统(192.168.10.77:8010)和b(192.168.10.77:8020)系统,登录一个后,相互免登录跳转
(2)登录a系统,用a系统的登录页面成功登录后,拿到用户名、密码
(3)a系统后台调用获取TGT的方法,获取TGT后写入cookie,传入a系统的service(http://192.168.10.77:8010/shiro_cas)获取a系统的ticket并返回给js
(4)js通过window.location.href跳转(http://192.168.10.77:8010/shiro_cas?ticket=****),进到a系统的shiro的cas过滤器中,登录a系统成功
(5)a系统带有跳转b系统页面被打开时,a系统根据cookie中的TGT,及b系统的service(http://192.168.10.77:8020/shiro_cas),获取b系统的ticket
(6)a系统的js把跳转b系统按钮的url属性值添加ticket参数
(7)免登录跳转到b系统后,b系统带有跳转a系统页面被打开时,b系统根据cookie中的TGT,及a系统的service,获取a系统的ticket
(8)b系统的js把跳转a系统按钮的url属性值添加ticket参数
(9)实现相互跳转
八、代码如下
a系统登录的js,拿到返回的ticket后,跳转页面完成shiro、cas的认证
function login() {
	var msg = "";
	// 封装表单为json参数
	var params = getParamsJson("login_form");
	var loginname= $('input[name="loginname"]').val();
	var password = $('input[name="password"]').val();

	var str = '';
	if (loginname.length == 0) {
		str = "请输入用户账号";
		$('input[name="loginname"]').focus();
		appebdStr(str);
		return;
	} else if (password.length == 0) {
		str = "请输入登录密码";
		$('input[name="password"]').focus();
		appebdStr(str);
		return;
	} else {
		$(".error-msg").css('opacity', 0);
	}

	$login.attr("value", loginingContent);
	$login.attr("disabled", true);
	$.ajax({
		url : "vworkerC/login",
		type : "POST",
		dataType : "text",
		data : params,
		async : false,
		success : function(data) {
			window.location.href("http://192.168.10.77:8010/shiro_cas?ticket=" + data);
		},
		error : function(XMLHttpRequest, textStatus, errorThrown) {
			$mess.show();
			$mess_txt.html("登录失败,系统错误,请刷新页面再试!");
		}
	});
}a系统controller中页面登录后,返回ticket。注意这里获取到ticket时不能带ticket参数重定向,子系统地址不同会出现跨域
String cas_loginname = u.getLoginname();
String cas_password = u.getPassword();
CasServerUtil cas = new CasServerUtil();
String tgt = cas.getTGT(cas_loginname, cas_password);
if (StringUtils.isNotBlank(tgt)) {
    Cookie cookie = new Cookie("tgt", tgt);
    response.addCookie(cookie);
    String ticket = new CasServerUtil(tgt,CommonConfigUtils.serverA).getTicket();
    return ticket;
}
登录成功后,带有跳转b系统按钮的a系统jsp
<%@ page import="com.enter.net.util.CommonConfigUtils" %>
<%@ page language="java" contentType="text/html; charset=UTF-8" pageEncoding="UTF-8"%>
<%
String serviceA = CommonConfigUtils.serverA;
%>
Hello World!
跳转b系统
退出登录
a系统的js
$(function () {
    var url = serviceA;
    var tgt = $.cookie('tgt'); // 读取 cookie;

    loadHref();

    function loadHref() {
        $.ajax({
            type : "POST",
            url : "getSt",
            dataType : "json",
            data : {'tgt': tgt,'taget_url':url},
            async : false,
            success : function(data) {
                $("#href").attr("href", url + "?ticket=" + data.data);
                $("#logout").attr("href", "logoutRest?tgt=" + tgt);
            },
            error : function(XMLHttpRequest, textStatus, errorThrown) {
                console.log("error");
            }
        });
    }

});
a系统的controller(获取b系统service的ticket)
@ResponseBody
@RequestMapping(value = "/getSt", method = RequestMethod.POST)
public Map  getSt(String tgt,String taget_url) {
    Map map = new HashMap<>();
    String ticket = new CasServerUtil(tgt, taget_url).getTicket();
    map.put("data", ticket);
    return map;
}
a系统的controller(登出),注意之前没用SecurityUtils.getSubject().logout()方法,会抛session无效异常
@RequestMapping(value="logoutRest",method =RequestMethod.GET)
public String logoutRest(String tgt){
    new CasServerUtil().logout(tgt);
    SecurityUtils.getSubject().logout();
    return "redirect:http://192.168.10.77:8010/";
}
b系统可以参考a系统,除了地址换下,其他一样


